Author Archives: Jethro Carr

My IAM policy is correct, but awscli isn’t working?

I ran into a weird issue recently where a single AWS EC2 instance was failing to work properly with it’s IAM role for EC2. Whilst the role allowed access to DescribeInstances action, awscli would repeatedly claim it didn’t have permission to perform that action.

For a moment I was thinking there was some bug/issue with my box and was readying the terminate instance button, but decided to check out the –debug output to see if it was actually loading the IAM role for EC2 or not.

$ aws ec2 describe-instances --instance-ids i-hiandre--region 'ap-southeast-2' --debug
2015-11-16 11:53:20,576 - MainThread - botocore.credentials - DEBUG - Looking for credentials via: env
2015-11-16 11:53:20,576 - MainThread - botocore.credentials - DEBUG - Looking for credentials via: assume-role
2015-11-16 11:53:20,576 - MainThread - botocore.credentials - DEBUG - Looking for credentials via: shared-credentials-file
2015-11-16 11:53:20,576 - MainThread - botocore.credentials - DEBUG - Looking for credentials via: config-file
2015-11-16 11:53:20,576 - MainThread - botocore.credentials - DEBUG - Looking for credentials via: ec2-credentials-file
2015-11-16 11:53:20,576 - MainThread - botocore.credentials - DEBUG - Looking for credentials via: boto-config
2015-11-16 11:53:20,576 - MainThread - botocore.credentials - INFO - Found credentials in boto config file: /etc/boto.cfg

Turns out in my case, there was a /etc/boto.cfg file with a different set of credentials – and since Boto takes preference of on disk configuration over IAM Roles for EC2, it resulted in the wrong access credentials being used.

The –debug param is a handy one to remember if you’re having weird permissions issue and want to check exactly what credentials from where are being used.

Your cloud pricing isn’t webscale

Thankfully in 2015 most (but not all) proprietary software providers have moved away from the archaic ideology of software being licensed by the CPU core – a concept that reflected the value and importance of systems back when you were buying physical hardware, but rendered completely meaningless by cloud and virtualisation providers.

Taking it’s place came the subscription model, popularised by Software-as-a-Service (or “cloud”) products. The benefits are attractive – regular income via customer renewal payments, flexibility for customers wanting to change the level of product or number of systems covered and no CAPEX headaches in acquiring new products to use.

Clients win, vendors win, everyone is happy!

Or maybe not.


Whilst the horrible price-by-CPU model has died off, a new model has emerged – price by server. This model assumes that the more servers a customer has, the bigger they are and the more we should charge them.

The model makes some sense in a traditional virtualised environment (think VMWare) where boxes are sliced up and a client runs only as many as they need. You might only have a total of two servers for your enterprise application – primary and DR – each spec’ed appropriately to handle the max volume of user requests.

But the model fails horribly when clients start proper cloud adoption. Suddenly that one big server gets sliced up into 10 small servers which come and go by the hour as they’re needed to supply demand.

DevOps techniques such as configuration management suddenly turns the effort of running dozens of servers into the same as running a single machine, there’s no longer any reason to want to constrain yourself to a single machine.

It gets worse if the client decides to adopt microservices, where each application gets split off into it’s own server (or container aka Docker/CoreOS). And it’s going to get very weird when we start using compute-less computing more with services like Lambda and Hoist because who knows how many server licenses you need to run an application that doesn’t even run on a server that you control?


Really the per-server model for pricing is as bad as the per-core model, because it no longer has any reflection on the size of an organisation, the amount they’re using a product and most important, the value they’ve obtaining from the product.

So what’s the alternative? SaaS products tend to charge per-user, but the model doesn’t always work well for infrastructure tools. You could be running monitoring for a large company with 1,000 servers but only have 3 user accounts for a small sysadmin team, which doesn’t really work for the vendor.

Some products can charge based on volume or API calls, but even this is risky. A heavy micro-service architecture would result in large number of HTTP calls between applications, so you can hardly say an app with 10,000 req/min is getting 4x the value compared to a client with a 2,500 req/min application – it could be all internal API calls.


To give an example of how painful the current world of subscription licensing is with modern computing, let’s conduct a thought exercise and have a look at the current pricing model of some popular platforms.

Let’s go with creating a startup. I’m going to run a small SaaS app in my spare time, so I need a bit of compute, but also need business-level tools for monitoring and debugging so I can ensure quality as my startup grows and get notified if something breaks.

First up I need compute. Modern cloud compute providers *understand* subscription pricing. Their models are brilliantly engineered to offer a price point for everyone. Whether you want a random jump box for $2/month or a $2000/month massive high compute monster to crunch your big-data-peak-hipster-NoSQL dataset, they can deliver the product at the price point you want.

Let’s grab a basic Digital Ocean box. Well actually let’s grab 2, since we’re trying to make a redundant SaaS product. But we’re a cheap-as-chips startup, so let’s grab 2x $5/mo box.

Screen Shot 2015-11-03 at 21.46.40

Ok, so far we’ve spent $10/month for our two servers. And whilst Digital Ocean is pretty awesome our code is going to be pretty crap since we used a bunch of high/drunk (maybe both?) interns to write our PHP code. So we should get a real time application monitoring product, like Newrelic APM.

Screen Shot 2015-11-03 at 21.37.46

Woot! Newrelic have a free tier, that’s great news for our SaaS application – but actually it’s not really that useful, it can’t do much tracing and only keeps 24 hours history. Certainly not enough to debug anything more serious than my WordPress blog.

I’ll need the pro account to get anything useful, so let’s add a whopping $149/mo – but actually make that $298/mo since we have two servers. Great value really. :-/


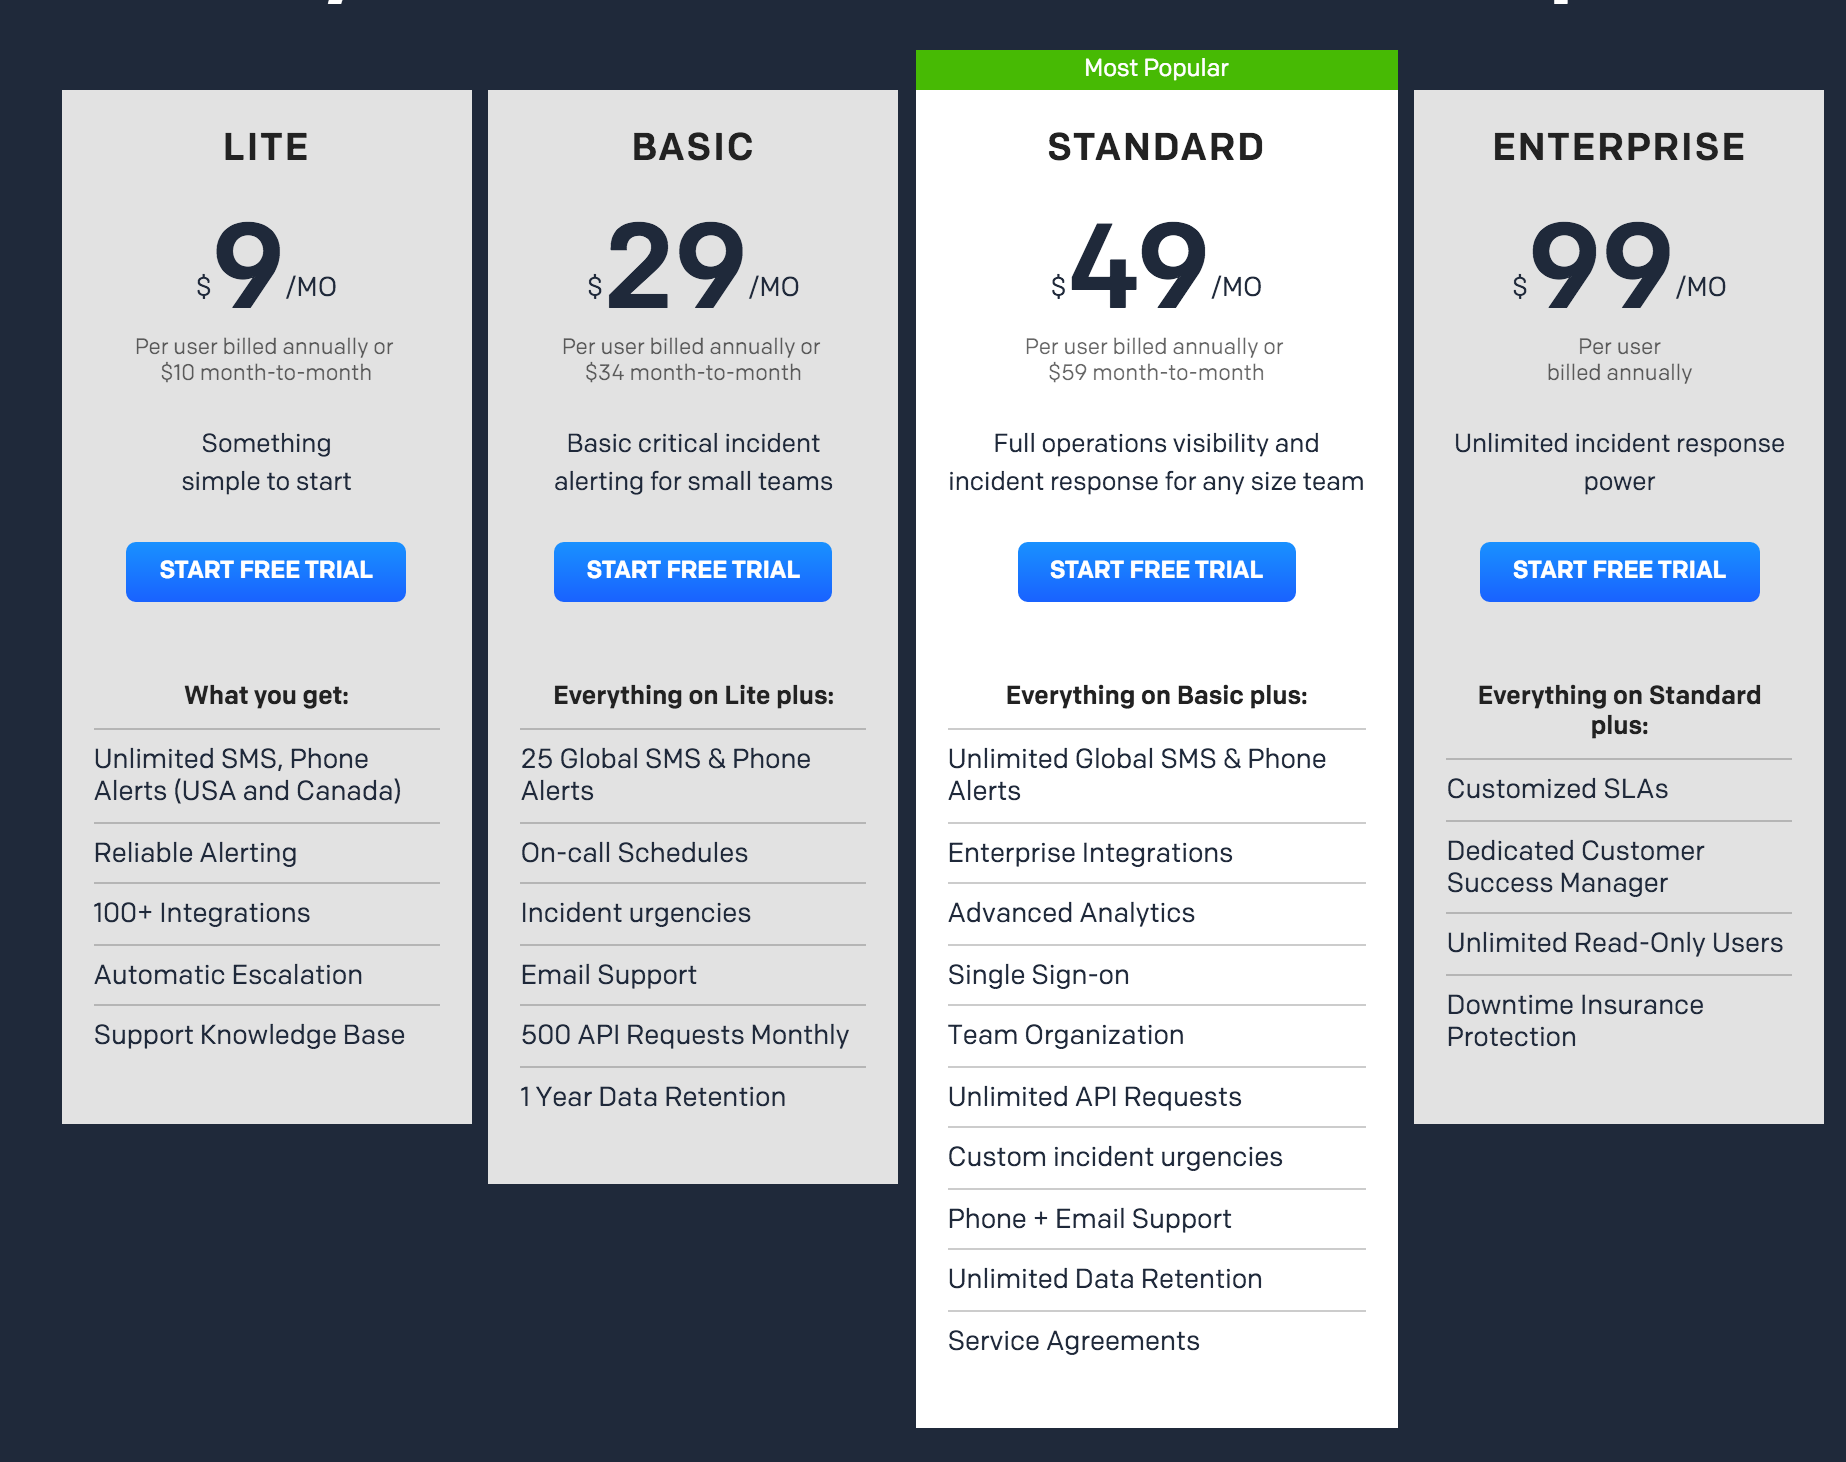
Next we probably need some kind of paging for oncall when our app blows up horribly at 4am like it will undoubtably do. PagerDuty is one of the popular market leaders currently with a good reputation, let’s roll with them.

Screen Shot 2015-11-03 at 21.52.57

Hmm I guess that $9/mo isn’t too bad, although it’s essentially what I’m paying ($10/mo) for the compute itself. Except that it’s kinda useless since it’s USA and their friendly neighbour only and excludes us down under. So let’s go with the $29/mo plan to get something that actually works. $29/mo is a bit much for a $10/mo compute box really, but hey, it looks great next to NewRelic’s pricing…


Remembering that my SaaS app is going to be buggier than Windows Vista, I should probably get some error handling setup. That $298/mo Newrelic APM doesn’t include any kind of good error handler, so we should also go get another market leader, Raygun, for our error reporting and tracking.

Screen Shot 2015-11-03 at 22.00.54

For a small company this isn’t bad value really given you get 5 different apps and any number of muppets working with you can get onboard. But it’s still looking ridiculous compared to my $10/mo compute cost.

So what’s the total damage:

Compute: $10/month
Monitoring: $371/month

Ouch! Now maybe as a startup, I’ll churn up that extra money as an investment into getting a good quality product, but it’s a far cry from the day when someone could launch a new product on a shoestring budget in their spare time from their uni laptop.


Let’s look at the same thing from the perspective of a large enterprise. I’ve got a mission critical business application and it requires a 20 core machine with 64GB of RAM. And of course I need two of them for when Java inevitably runs out of heap because the business let muppets feed garbage from their IDE directly into the JVM and expected some kind of software to actually appear as a result.

That compute is going to cost me $640/mo per machine – so $1280/mo total. And all the other bits, Newrelic, Raygun, PagerDuty? Still that same $371/mo!

Compute: $1280/month
Monitoring: $371/month

It’s not hard to imagine that the large enterprise is getting much more value out of those services than the small startup and can clearly afford to pay for that in relation to the compute they’re consuming. But the pricing model doesn’t make that distinction.


So given that we know know that per-core pricing is terrible and per-server pricing is terrible and (at least for infrastructure tools) per-user pricing is terrible what’s the solution?

“Cloud Spend Licensing” [1]

[1] A term I’ve just made up, but sounds like something Gartner spits out.

With Cloud Spend Licensing, the amount charged reflects the amount you spend on compute – this is a much more accurate indicator of the size of an organisation and value being derived from a product than cores or servers or users.

But how does a vendor know what this spend is? This problem will be solving itself thanks to compute consumers starting to cluster around a few major public cloud players, the top three being Amazon (AWS), Microsoft (Azure) and Google (Compute Engine).

It would not be technically complicated to implement support for these major providers (and maybe a smattering of smaller ones like Heroku, Digital Ocean and Linode) to use their APIs to suck down service consumption/usage data and figure out a client’s compute spend in the past month.

For customers whom can’t (still on VMWare?) or don’t want to provide this data, there can always be the fallback to a more traditional pricing model, whether it be cores, servers or some other negotiation (“enterprise deal”).


How would this look?

In our above example, for our enterprise compute bill ($1280/mo) the equivalent amount spent on the monitoring products was 23% for Newrelic, 3% for Raygun and 2.2% for PagerDuty (total of 28.2%). Let’s make the assumption this pricing is reasonable for the value of the products gained for the sake of demonstration (glares at Newrelic).

When applied to our $10/month SaaS startup, the bill for this products would be an additional $2.82/month. This may seem so cheap there will be incentive to set a minimum price, but it’s vital to avoid doing so:

  • $2.82/mo means anyone starting up a new service uses your product. Because why not, it’s pocket change. That uni student working on the next big thing will use you. The receptionist writing her next mobile app success in her spare time will use you. An engineer in a massive enterprise will use you to quickly POC a future product on their personal credit card.
  • $2.82/mo might only just cover the cost of the service, but you’re not making any profit if they couldn’t afford to use it in the first place. The next best thing to profit is market share – provided that market share has a conversion path to profit in future (something some startups seem to forget, eh Twitter?).
  • $2.82/mo means IT pros use your product on their home servers for fun and then take their learning back to the enterprise. Every one of the providers above should have a ~ $10/year offering for IT pros to use and get hooked on their product, but they don’t. Newrelic is the closest with their free tier. No prizes if you guess which product I use on my personal servers. Definitely no prizes if you guess which product I can sell the benefits of the most to management at work.


But what about real earnings?

As our startup grows and gets bigger, it doesn’t matter if we add more servers, or upsize the existing ones to add bigger servers – the amount we pay for the related support applications is always proportionate.

It also caters for the emerging trend of running systems for limited hours or using spot prices – clients and vendor don’t have to worry about figuring out how it fits into the pricing model, instead the scale of your compute consumption sets the price of the servers.

Suddenly that $2.82/mo becomes $56.40/mo when the startup starts getting successful and starts running a few computers with actual specs. One day it becomes $371 when they’re running $1280/mo of compute tier like the big enterprise. And it goes up from there.


I’m not a business analyst and “Cloud Spend Licensing” may not be the best solution, but goddamn there has to be a more sensible approach than believing someone will spend $371/mo for their $10/mo compute setup. And I’d like to get to that future sooner rather than later please, because there’s a lot of cool stuff out there that I’d like to experiment with more in my own time – and that’s good for both myself and vendors.


Other thoughts:

  • I don’t want vendors to see all my compute spend details” – This would be easily solved by cloud provider exposing the right kind of APIs for this purpose eg, “grant vendor XYZ ability to see sum compute cost per month, but no details on what it is“.
  • I’ll split my compute into lots of accounts and only pay for services where I need it to keep my costs low” – Nothing different to the current situation where users selectively install agents on specific systems.
  • This one client with an ultra efficient, high profit, low compute app will take advantage of us.” – Nothing different to the per-server/per-core model then other than the min spend. Your client probably deserves the cheaper price as a reward for not writing the usual terrible inefficient code people churn out.
  • “This doesn’t work for my app” – This model is very specific to applications that support infrastructure, I don’t expect to see it suddenly being used for end user products/services.

Not all routing is equal

Ran into an interesting issue with my Routerboard CRS226-24G-2S+ “Cloud Router Switch” which is basically a smart layer 3 capable switch running Mikrotik’s RouterOS.

Whilst it’s specs mean it’s intended for switching rather than routing, given it has the full Mikrotik RouterOS on it it’s entirely possible to drop out a port from the switching hardware and use it to route traffic, in my case, between the LAN and WAN connections.

Routerboard’s website rate it’s routing capabilities as between 95.9 and 279 Mbits, in my own iperf tests before putting it into action I was able to do around 200Mbits routing. With only 40/10 Mbits WAN performance, this would work fine for my needs until we finally get UFB (fibre-to-the-home) in 2017.

However between this test and putting it into production, it’s ended up with a lot more firewall rules including NAT and when doing some work on the switch, I noticed that the CPU was often hitting the 100% threshold – which is never good for your networking hardware.

I wondered how much impact that maxed out CPU could be having on my WAN connection, so I used the very non-scientific Ookla Speedtest with the CRS doing my routing:

4735498067

After stripping all the routing work from the CRS and moving it to a small Routerboard 750 ethernet router, I’ve gained a few additional Mbits of performance:

4735587010

The CRS and the Routerboard 750 both feature a MIPS 24Kc 400Mhz CPU, so there’s no effective difference between the devices, in fact the switch is arguably faster as it’s a newer generation chip and has twice the memory, yet it performs worse.

The CPU usage that was formerly pegging at 100% on the CRS dropped to around 30% on the 750 when running these tests, so there clearly something going on in the CRS which is giving it a handicap.

The overhead of switching should be minimal in theory since it’s handled by dedicated hardware, however I wonder if there’s something weird like the main CPU having to give up time to handle events/operations for the switching hardware.

So yeah, a bit annoying – it’s still an awesome managed switch, but it would be nice if they dropped the (terrible) “Cloud Router Switch” name and just sell it for what it is – a damn nice layer 3 capable managed switch, but not as a router (unless they give it some more CPU so it can get the job done as well!).

For now the dedicated 750 as the router will keep me covered, although it will cap out at 100Mbits, both in terms of wire speed and routing capabilities so I may need to get a higher specced router come UFB time.

More Puppet Stuff

I’ve been continuing to migrate to my new server setup and Puppetising along the way, the outcome is yet more Puppet modules:

  1. The puppetlabs-firewall module performs very poorly with large rulesets, to work around this with my geoip/rirs module, I’ve gone and written puppet-speedychains, which generates iptables chains outside of the one-rule, one-resource Puppet logic. This allows me to do thousands of results in a matter of seconds vs hours using the standard module.
  2. If you’re doing Puppet for any more than a couple of users and systems, at some point you’ll want to write a user module that takes advantage of virtual users to make it easy to select which systems should have a specific user account on it. I’ve open sourced my (very basic) virtual user module as a handy reference point, including examples on how to use Hiera to store the user information.

Additionally, I’ve been working on Pupistry lightly, including building a version that runs on the ancient Ruby 1.8.7 versions found on RHEL/CentOS 5 & 6. You can check out this version in the legacy branch currently.

I’m undecided about whether or not I merge this into the main branch, since although it works fine on newer Ruby versions, I’m not sure if it could limit me significantly in future or not, so it might be best to keep the legacy branch as special thing for ancient versions only.

Finding & purging Puppet exported resources

Puppet exported resources is a pretty awesome feature – essentially it allows information from one node to be used on another to affect the resulting configuration. We use this for clever things like having nodes tell an Icinga/Nagios server what monitoring configuration should be added for them.

Of course like everything in the Puppet universe, it’s not without some catch – the biggest issue I’ve run into is that if you have a mistake and generate bad exported resources it can be extremely hard to find which node is responsible and take action.

For example, recently my Puppet runs started failing on the monitoring server with the following error:

Error: Could not retrieve catalog from remote server: Error 400 on SERVER: A duplicate resource was found while collecting exported resources, with the type and title Icinga2::Object::Service[Durp Service Health Check] on node failpet1.nagios.example.com

The error is my fault, I forgot that exported resources must have globally unique names across the entire fleet, so I ended up with 2x “Durp Service Health Check” resources.

The problem is that it’s a big fleet and I’m not sure which of the many durp hosts is responsible. To make it more difficult, I suspect they’ve been deleted which is why the duplication clash isn’t clearing by itself after I fixed it.

Thankfully we can use the Puppet DB command line tools on the Puppet master to search the DB for the specific resource and find which hosts it is:

# puppet query nodes \
--puppetdb_host puppetdb.infrastructure.example.com \
"(@@Icinga2::Object::Service['Durp Service Health Check'])"

durphost1312.example.com
durphost3436.example.com

I can then purge all their data with:

# puppet node deactivate durphost1312.example.com
Submitted 'deactivate node' for durphost1312.example.com with UUID xxx-xxx-xxx-xx

In theory deleted hosts shouldn’t have old data in PuppetDB, but hey, sometimes our decommissioning tool has bugs… :-/

MacOS won’t build anything? Check xcode license

One of the annoyances of the MacOS platform is that whilst there’s a nice powerful UNIX underneath, there’s a rather dumb layer of top that does silly things like preventing the app store password being saved, or as I found the other day, disabling parts of the build system if the license hasn’t been accepted.

When you first setup MacOS to be useful, you need to install xcode’s build tools and libraries either via the app store, or with:

sudo xcode-select --install

However it seems if xcode gets updated via one of the routine updates, it can require that the license is re-accepted, and until that happens, it disable various builds of the build system.

I found the issue when I suddenly lost the ability to install native ruby gems, eg:

Gem::Installer::ExtensionBuildError: ERROR: Failed to build gem native extension.

 /System/Library/Frameworks/Ruby.framework/Versions/2.0/usr/bin/ruby extconf.rb
checking for BIO_read() in -lcrypto... *** extconf.rb failed ***
Could not create Makefile due to some reason, probably lack of necessary
libraries and/or headers. Check the mkmf.log file for more details. You may
need configuration options.

Provided configuration options:
 --with-opt-dir
 --without-opt-dir
 --with-opt-include
 --without-opt-include=${opt-dir}/include
 --with-opt-lib
 --without-opt-lib=${opt-dir}/lib
 --with-make-prog
 --without-make-prog
 --srcdir=.
 --curdir
 --ruby=/System/Library/Frameworks/Ruby.framework/Versions/2.0/usr/bin/ruby
 --with-puma_http11-dir
 --without-puma_http11-dir
 --with-puma_http11-include
 --without-puma_http11-include=${puma_http11-dir}/include
 --with-puma_http11-lib
 --without-puma_http11-lib=${puma_http11-dir}/
 --with-cryptolib
 --without-cryptolib
/System/Library/Frameworks/Ruby.framework/Versions/2.0/usr/lib/ruby/2.0.0/mkmf.rb:434:in `try_do': The compiler failed to generate an executable file. (RuntimeError)
You have to install development tools first.
 from /System/Library/Frameworks/Ruby.framework/Versions/2.0/usr/lib/ruby/2.0.0/mkmf.rb:513:in `block in try_link0'
 from /System/Library/Frameworks/Ruby.framework/Versions/2.0/usr/lib/ruby/2.0.0/tmpdir.rb:88:in `mktmpdir'
 from /System/Library/Frameworks/Ruby.framework/Versions/2.0/usr/lib/ruby/2.0.0/mkmf.rb:510:in `try_link0'
 from /System/Library/Frameworks/Ruby.framework/Versions/2.0/usr/lib/ruby/2.0.0/mkmf.rb:534:in `try_link'
 from /System/Library/Frameworks/Ruby.framework/Versions/2.0/usr/lib/ruby/2.0.0/mkmf.rb:720:in `try_func'
 from /System/Library/Frameworks/Ruby.framework/Versions/2.0/usr/lib/ruby/2.0.0/mkmf.rb:950:in `block in have_library'
 from /System/Library/Frameworks/Ruby.framework/Versions/2.0/usr/lib/ruby/2.0.0/mkmf.rb:895:in `block in checking_for'
 from /System/Library/Frameworks/Ruby.framework/Versions/2.0/usr/lib/ruby/2.0.0/mkmf.rb:340:in `block (2 levels) in postpone'
 from /System/Library/Frameworks/Ruby.framework/Versions/2.0/usr/lib/ruby/2.0.0/mkmf.rb:310:in `open'
 from /System/Library/Frameworks/Ruby.framework/Versions/2.0/usr/lib/ruby/2.0.0/mkmf.rb:340:in `block in postpone'
 from /System/Library/Frameworks/Ruby.framework/Versions/2.0/usr/lib/ruby/2.0.0/mkmf.rb:310:in `open'
 from /System/Library/Frameworks/Ruby.framework/Versions/2.0/usr/lib/ruby/2.0.0/mkmf.rb:336:in `postpone'
 from /System/Library/Frameworks/Ruby.framework/Versions/2.0/usr/lib/ruby/2.0.0/mkmf.rb:894:in `checking_for'
 from /System/Library/Frameworks/Ruby.framework/Versions/2.0/usr/lib/ruby/2.0.0/mkmf.rb:945:in `have_library'
 from extconf.rb:6:in `block in <main>'
 from extconf.rb:6:in `each'
 from extconf.rb:6:in `find'
 from extconf.rb:6:in `<main>'


Gem files will remain installed in /var/folders/py/r973xbbn2g57sr4l_fmb9gtr0000gn/T/bundler20151009-29854-mszy85puma-2.14.0/gems/puma-2.14.0 for inspection.
Results logged to /var/folders/py/r973xbbn2g57sr4l_fmb9gtr0000gn/T/bundler20151009-29854-mszy85puma-2.14.0/gems/puma-2.14.0/ext/puma_http11/gem_make.out
An error occurred while installing puma (2.14.0), and Bundler cannot continue.
Make sure that `gem install puma -v '2.14.0'` succeeds before bundling.

The solution is quite simple:

sudo xcodebuild -license

Why Apple thinks their build tools are so important that they require their own license to be accepted every so often is beyond me.

Puppet modules

I’m in the middle of doing a migration of my personal server infrastructure from a 2006-era colocation server onto modern cloud hosting providers.

As part of this migration, I’m rebuilding everything properly using Puppet (use it heavily at work so it’s a good fit here) with the intention of being able to complete server builds without requiring any manual effort.

Along the way I’m finding gaps where the available modules don’t quite cut it or nobody seems to have done it before, so I’ve been writing a few modules and putting them up on GitHub for others to benefit/suffer from.


puppet-hostname

https://github.com/jethrocarr/puppet-hostname

Trying to do anything consistently with host naming is always fun, since every organisation or individual has their own special naming scheme and approach to dealing with the issue of naming things.

I decided to take a different approach. Essentially every cloud provider will give you a source of information that could be used to name your instance whether it’s the AWS Instance ID, or a VPS provider passing through the name you gave the machine at creation. Given I want to treat my instances like cattle, an automatic soulless generated name is perfect!

Where they fall down, is that they don’t tend to setup the FQDN properly. I’ve seen a number of solution to this including user data setup scripts, but I’m trying to avoid putting anything in user data that isn’t 100% critical and sticking to my Pupistry bootstrap so I wanted to set my FQDN via Puppet itself.

(It’s even possible to set the hostname itself if desired, you can use logic such as tags or other values passed in as facts to define what role a machine has and then generate/set a hostname entirely within Puppet).

Hence puppet-hostname provides a handy way to easily set FQDN (optionally including the hostname itself) and then trigger reloads on name-dependent services such as syslog.

None of this is revolutionary, but it’s nice getting it into a proper structure instead of relying on yet-another-bunch-of-userdata that’s specific to my systems. The next step is to look into having it execute functions to do DNS changes on providers like Route53 so there’s no longer any need for user data scripts being run to set DNS records at startup.


puppet-rirs

https://github.com/jethrocarr/puppet-rirs

There are various parts of my website that I want to be publicly reachable, such as the WordPress login/admin sections, but at the same time I also don’t want them accessible by any muppet with a bot to try and break their way in.

I could put up a portal of some kind, but this then breaks stuff like apps that want to talk with those endpoints since they can’t handle the authentication steps. What I can do, is setup a GeoIP rule that restricts access to the sections to the countries I’m actually in, which is generally just NZ or AU, to dramatically reduce the amount of noise and attempts people send my way, especially given most of the attacks come from more questionable countries or service providers.

I started doing this with mod_geoip2, but it’s honestly a buggy POS and it really doesn’t work properly if you have both IPv4 and IPv6 connections (one or another is OK). Plus it doesn’t help me for applications that support IP ACLs, but don’t offer a specific GeoIP plugin.

So instead of using GeoIP, I’ve written a custom Puppet function that pulls down the IP assignment lists from the various Regional Internet Registries and generate IP/CIDR lists for both IPv4 and IPv6 on a per-country basis.

I then use those lists to populate configurations like Apache, but it’s also quite possible to use it for other purposes such as iptables firewalling since the generated lists can be turned into Puppet resources. To keep performance sane, I cache the processed output for 24 hours and merge any continuous assignment blocks.

Basically, it’s GeoIP for Puppet with support for anything Puppet can configure. :-)


puppet-digitalocean

https://github.com/jethrocarr/puppet-digitalocean

Provides a fact which exposes details from the Digital Ocean instance API about the instance – similar to how you get values automatically about Amazon EC2 systems.


puppet-initfact

https://github.com/jethrocarr/puppet-initfact

The great thing about the open source world is how we can never agree so we end up with a proliferation of tools doing the same job. Even init systems are not immune, with anything tha intends to run on the major Linux distributions needing to support systemd, Upstart and SysVinit at least for the next few years.

Unfortunately the way that I see most Puppet module authors “deal” with this is that they simply write an init config/file that suits their distribution of choice and conveniently forget the other distributions. The number of times I’ve come across Puppet modules that claim support for Red Hat and Amazon Linux but only ship an Upstart file…. >:-(

Part of the issue is that it’s a pain to even figure out what distribution should be using what type of init configuration. So to solve this, I’ve written a custom Fact called “initsystem” which exposes the primary/best init system on the specific system it’s running on.

It operates in two modes – there is a curated list for specific known systems and then fallback to automatic detection where we don’t have a specific curated result handy.

It supports (or should) all major Linux distributions & derivatives plus FreeBSD and MacOS. Pull requests for others welcome, could do with more BSD support plus maybe even support for Windows if you’re feeling brave.


puppet-yas3fs

https://github.com/pcfens/puppet-yas3fs/commit/27af462f1ce2fe0610012a508236062e65017b5f

Not my module, but I recently submitted a PR to it (subsequently merged) which introduces support for a number of different distributions via use of my initfact module so it should now run on most distributions rather than just Ubuntu.

If you’re not familiar with yas3fs, it’s a FUSE driver that turns S3+SNS+SQS into a shared filesystem between multiple servers. Ideal for dealing with legacy applications that demand state on disk, but don’t require high I/O performance, I’m in the process of doing a proof-of-concept with it and it looks like it should work OK for low activity sites such as WordPress, although with no locking I’d advise against putting MySQL on it anytime soon :-)


These modules can all be found on GitHub, as well as the Puppet Forge. Hopefully someone other than myself finds them useful. :-)

10 months in

It’s been almost 10 months since Lisa and I brought our current house and moved in. Things are going well, having our own place and not paying a landlord is a fantastic and freeing feeling, but home ownership certainly isn’t a free ride and the amount of work it generates is quite incredible.

So what’s been happening around Carr Manor since we moved in?

Home sweet home

Can’t beat Wellington on a good day!

Generally the house is in good shape, most of my time has been spent in the grounds of the estate clearing paths, overgrown vegetation and various other missions. However we have had a couple smaller issues with the house itself.


The most serious one is that part of the iron roof in the house was leaking due to what looks like a number of different patch jobs combined with a nice unhealthy dose of rust.

Hmm cracks in the roof that let water in == bad right?

Hmm cracks in the roof that let water in == bad right?

The outside doesn't look a whole lot better.

The outside doesn’t look a whole lot better.

The “proper” fix is that this section of roof needs replacing at some point as it’s technically well-past EOL, but roof replacement is expensive and a PITA, so I’ve fixed the issue by stripped off as much rust as I could and then re-sealing the roof using Mineral Brush-On Underbody Seal.

Incase you’re wondering, yes, the same stuff that you can use on cars. It’s basically liquid tar, completely waterproof and ever so wonderful at sealing leaky roofs. I liberally applied a few cans over flashings, patches and the iron itself getting a nice thick seal.

Repair!

Repair!

The same stuff did wonders on the rusted shed roof flashing as well.

The same stuff did wonders on the rusted shed roof flashing as well.

Up next I need to complete a repaint of both sheds and the house roof. I’m probably going to do a small job in whatever colour I have lying around for the worst part of the roof and then go over the whole roof again at a later stage when we decide on a colour for the full repaint.


The other issue we had was that one of the window hinges had rusted out leaving us with a window that wouldn’t open/close properly.

So rusty :-/

I’m not expert, but I don’t think hinges are supposed to look like this….

This was a tricky one to fix – the hinge and the screws were so rusted out I couldn’t even remove them, in the end I removed the window simply by tearing the hinge apart when I pulled on it leaving a shower of rust and more disturbingly, cockroaches that had been living amongst the bubbled rust.

This left me with two parts of metal hinge stuck in the wall and on the window frame held in by screws that would no longer turn – or in some cases, even lacked heads entirely.

To get them out, I put a very small drill bit into the electric drill and drilled out the screw right down the middle of it. It’s pretty straightforwards once you get it going, but it was a bit tricky to get started – I ended up using the smallest bit I had to make a pilot hole/groove in the screw head, and then upsized the bit to drill in through the screw. Once done, the metal remains tend to just fall out and come out with a little prodding.

I’ve since replaced it with a shiny new hinge and stainless steel screws which should last a lot longer than their predecessors.

Shiny new

Shiny new hardware


Painting has been an “interesting” learning experience, I’ve found it the hardest skill to pickup since it’s just so time consuming and you have to take such extreme care to avoid dripping any paint on other surfaces.

One of my earliest painting jobs was doing the lower gate. This gate spends a lot of time in the shade and even in spring was feeling damp and waterlogged and generally wasn’t looking that sharp – especially the fact the bolt was a pile of rust barely holding together.

The rustic delight of unfinished timber.

I’m sure unfinished timber looks great when it’s first built, but the moss dirt and damp doesn’t lead to it aging well.

It's like new!

Much sharper!

Things like the gate take time and need care, but it’s nothing compared to the absolute frustration of painting window frames where a few mm to the wrong side or a stray bristle leads to paint being smeared across the glass.

I did the french doors initially as the paint had peeled and was starting to expose the timber to the elements, some of the putty had even fallen out and needed replacing.

Probably the most frustrating thing I've ever had to do.

Applying painter’s tape to this is one of the most frustrating things I’ve ever had to do :-/

Because I was painting around glass, I applied painter’s tape the whole thing before hand. It took hours, incredibly frustrating and I feel that the end result wasn’t particularly great.

I’ve since found that I can get a pretty tidy result using a sash/trim brush and taking extreme care not to bump the glass, but it is tricky and mistakes do happen. I’m figuring with enough practice I’ll get better at windows… and I have plenty of practice waiting for me with a full house paint job pending. Of course I could pay someone to do it, but at $15k+ for a re-paint, I’m pretty keen to see if I can tackle it myself….


The shed works haven’t proceeded much – I had the noble goal of completely repairing it over summer, but that time just varnished sorting out various other bits and pieces.

On the plus side, thanks to help from one of my colleagues, the shed has been dug out from it’s previously buried state and the rot and damage exposed – next step is to tear off the rotten weatherboards and doors and replace them with new ones, before repainting the whole shed.

Dug out shed

A small 1meter retaining wall would have been more than enough to protect the shed, but instead the earth has ended up piled around it causing it to rot and collapse.


I also had help from dad and toppled the mid-size trees that were in-between the shed and the path. Not only were they blocking out light, but they were also going to be a clear issue to shed and path integrity in the future as they got bigger.

Much tidier!

Much tidier! Just need to fix the shed itself now…

I’m still really keen to get this shed fixed so intend to make a start on measuring and sourcing the timber soon(ish) and maybe taking a few days off work to line up a block of time to really attack and fix it up.


A more pressing issue has been our pathways. We have two long 30-40meter concrete paths, a long ramped one (around 20-30 degree slope) up to the upper street and carpad and another zig-zag path with a mix of ramps and steps heading down to the lower street where the bus stop is.

Both paths are not in the best condition. The lower one requires a complete replacement, it’s probably around 80 years old and the non-reinforced concrete has cracked and shifted all over the place.

The upper one is more structurally intact, but has it’s own share of issues. The first most serious issue is that the steeper upmost end gets incredibly slippery in winter. It seems that although the concrete has been brush-finished whenever it rains, any grip it had just vanishes and it basically becomes a slide.

Jethro vs Autumn

Jethro vs Autumn

Naturally slipping to a broken/leg/face/life isn’t ideal and we’ve been looking at options to fix it. We could convert the steepest bit from a ramp to steps, but steps have their own safety issues and we aren’t keen the lose the ramp as it’s the best way for getting large/heavy items to/from the house.

So a couple months ago I put down some Resene Non-slip Deck & Path which is a tough non-slippery paint product that basically includes a whole heap of sand which turns the smooth concrete path into something more like fine sandpaper.

We weren’t too sure about how good it would be, so we put down a 0.5l strip to test it out on the worst most part of the path.

A/B Testing IRL

A/B Testing IRL

It doesn’t feel that different to brushed concrete in the dry, but in the wet the difference is night & day and you really do feel a bit more attached to the path. We’ll still need to invest in a decent handrail and fence, but this goes a long way towards an elegant fix.

I’ve since brought another 10l and painted the upper portion, essentially all the “good” concrete we have. I thought that it might be too dark but actually it looks very sharp and once we put a new fence up (maybe white picket?) it will look very clean and tidy.

Slick new path!

Old concrete, as good as new! :-)

The other ~30meters down to the house isn’t in such good shape, the surface is quite uneven in places and it’s missing chunks. We have a project to do to repair or replace the rest of it, once done the intention will be to paint the rest of the path in the same colour and it should look and feel great.


All this work requires a fair few tools, I’ve finally clean up the dining room where they had been accumulating and they’re now living properly in the shed.

Shed

Shed

One of the most interesting lessons I’ve had so far is that buying decent tools is often far cheaper than hiring tradies to do something for you – generally tools are cheap, even decent ones, but labour is incredibly expensive.

CHAIN SAW

Why yes, that is a hardwood lamppost that I’m chainsawing.

The same thing applies to parts, it’s generally cheaper to just buy a new replacement of something than it is to fix it – I’m used to this from the IT world, but didn’t expect it from IRL.

In our cases, we had a shower mixer that decided to start letting a constant small stream of water through rather than shutting off properly.

Jethro vs Shower

Jethro vs Shower

Taking it apart and even removing it from the wall entirely isn’t too tricky, but I found after removing it all that the issue wasn’t anything trivial like needing a new o-ring and had to call out the plumbers.

Plumbers took it out, look at and it and are all “yeah that needs a new part”, so I ended up paying for the part + the labour – I’d have been better off just buying the whole new part myself and fitting it rather than trying to fix it.


Never underestimate the amount of waste you produce moving into a new place. I filled a skip with 1/3 concrete rubble, 1/3 polystyrene and 1/3 misc waste and there’s still another skip worth of debris around the property, possibly more once I tear all the rotten timber out of the shed.

Polystyrene is my number one enemy right now, almost everything we had shipped to the house when we moved in came with some and it’s crumbly and completely non-recyclable for good measure >:-(.

Where did all this junk come from?

Where did all this junk come from?


Finally on the inside of the house things haven’t progressed much. Lisa has been working on the interior decor and accessories whilst I’ve done exciting things like overseeing the installation of insulation and fixing the loo in the laundry. :-/

Warming sheep fluff!

Warming sheep fluff!

I hate plumbing!

I hate plumbing!

I also had a whole bunch of fun with the locks – when we moved in I had the locksmith change the tumblers, but we’ve since found the locks were pretty worn out and the tail pieces inside started failing, so I had to buy whole new locks and fit them.

Turns out, whole new locks is way cheaper than getting the locksmith out to change the tumblers. If you’re moving into an older place, I’d recommend consider just getting new locks instead since the old ones probably aren’t much good either.

The only downside is that the sizing was slightly different, so I had to do some “creative woodwork” using a drill bit as a file (I didn’t have a file…. or the right size drill bit. A bit dodgy, but worked out OK).

It's not just the IT world where the lack of standards means a bit of hackery to make stuff function.

It’s not just the IT world where the lack of standards means a bit of hackery to make stuff function.

Tidy job at the end of the day!

Tidy job at the end of the day!


A lot of this work has been annoying in that it’s not directly visible as an improvement, but it’s all been important stuff that needed doing. I’m hoping to spend the next few months getting stuck into some of the bigger improvements like fixing the paths, sheds, etc which will be a lot more visible.

Until then, need to make more evenings to just sit back, relax and enjoy having our own place – feels like I’ve been just far too busy lately.

Beer time

Beer time

Baking images with Packer & Pupistry

One of the common issues when building modern infrastructure-as-code style systems is that whilst automation is great, it also has a habit of failing at the worst possible time. There’s nothing quite like the fun of trying to autoscale only to find that a newer version of a package breaks compatibility or the repository mirror or Puppet master has gone offline breaking the whole carefully tuned process.

Naturally this is an issue. And whilst I’ve seen some organisations simply ignore the issue and place trust in their repos and configuration management servers, I’m also too pessimistic about technology to trust numerous components for any mission critical applications.

Fortunately there is a solution – we can bake a machine image that has all the applications and configuration pre-applied, so that autoscaling has no third party dependencies (or as close to no dependencies as we can get).

Baking has negative connotations of the bad old days when engineers would assemble custom machine images by hand and then copy them to build new systems, but it doesn’t have to be that way. We can still respect infrastructure-as-code principals and use modern tools like Puppet and Packer to reliably build consistent images as needed.

These images could be as simple as a base AMI image for Amazon AWS which includes the stock OS image plus your Puppet setup. Or they could be as complex as a fully configured and provisioned application server ready-to-go at the first boot.

To make baking images easier, I’ve added support for generating Packer templates pre-loaded with bootstrap data into Pupistry, making it quick and easy to get started. Here’s how you can use it:

Assumptions/prerequisites:

  • You’ve already got Pupistry setup and functional (No? Read the tutorial here)
  • You’ve installed the third party Packer utility.
  • You have an Amazon AWS account for doing the AMI build. Note that Packer isn’t exclusive to Amazon, so you can also use the same technique with other providers including Digital Ocean and OpenStack – but you’ll have to write your own template.

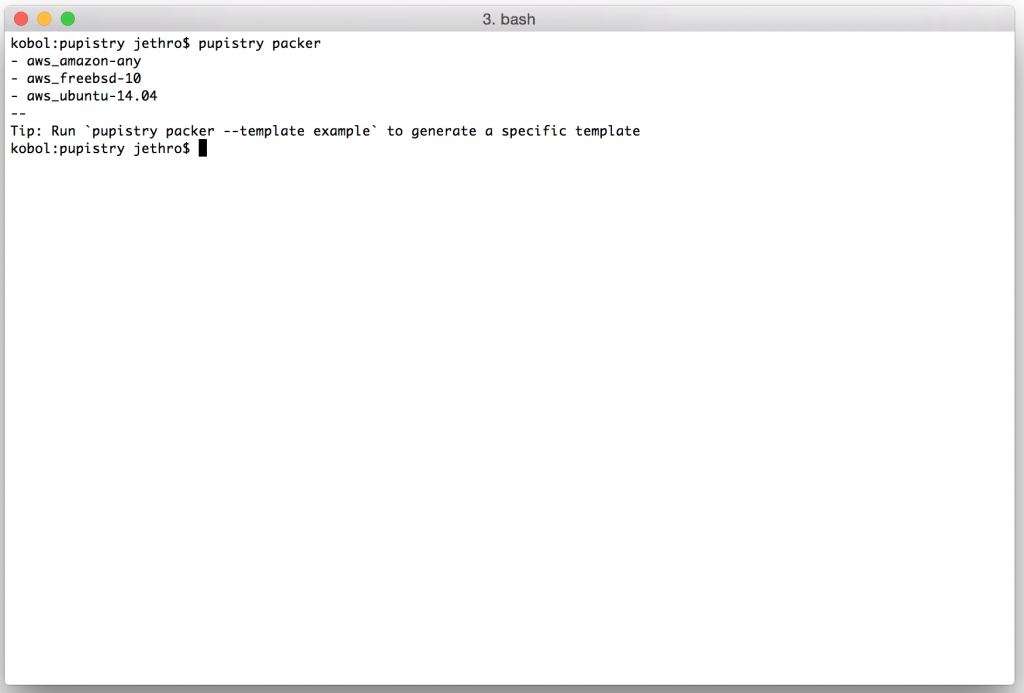
First we can list what Packer templates are available with Pupistry. If the OS/platform of your choice isn’t included, it’s not particularly hard to add it – these are mostly intended to provide a good starting point for customising your own.

pupistry packer

Screen Shot 2015-05-31 at 23.57.20

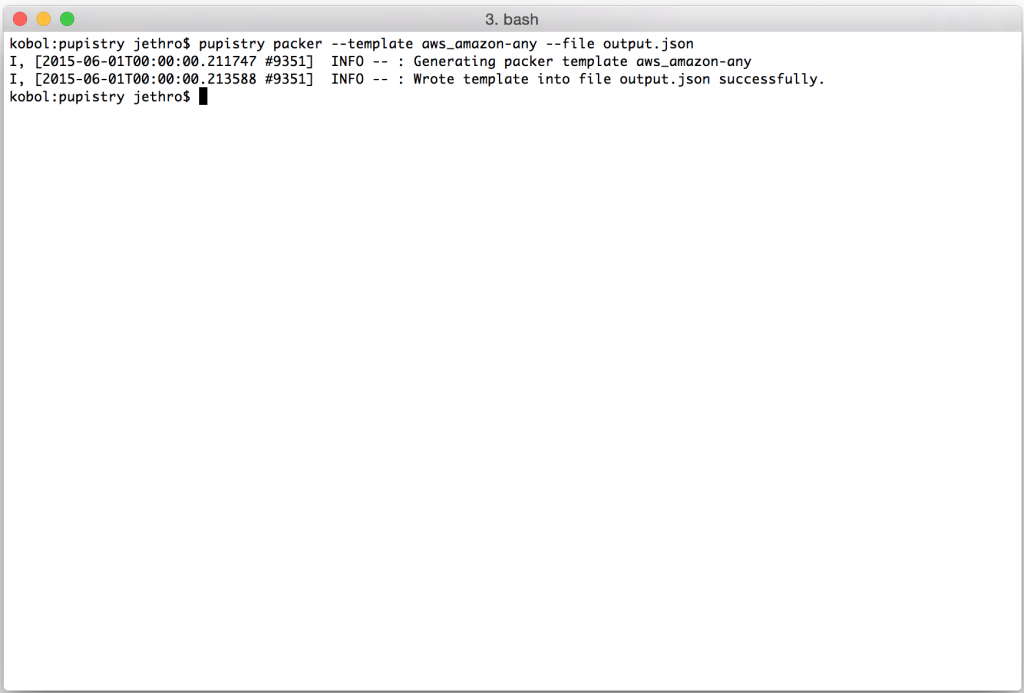
We can select a template with –template NAME and also pass the resulting output to a file with –file NAME.  The following will build an Amazon Linux template pre-loaded with Pupistry and the default manifest applied:

pupistry packer --template aws_amazon-any --file output.json

Screen Shot 2015-06-01 at 00.00.01

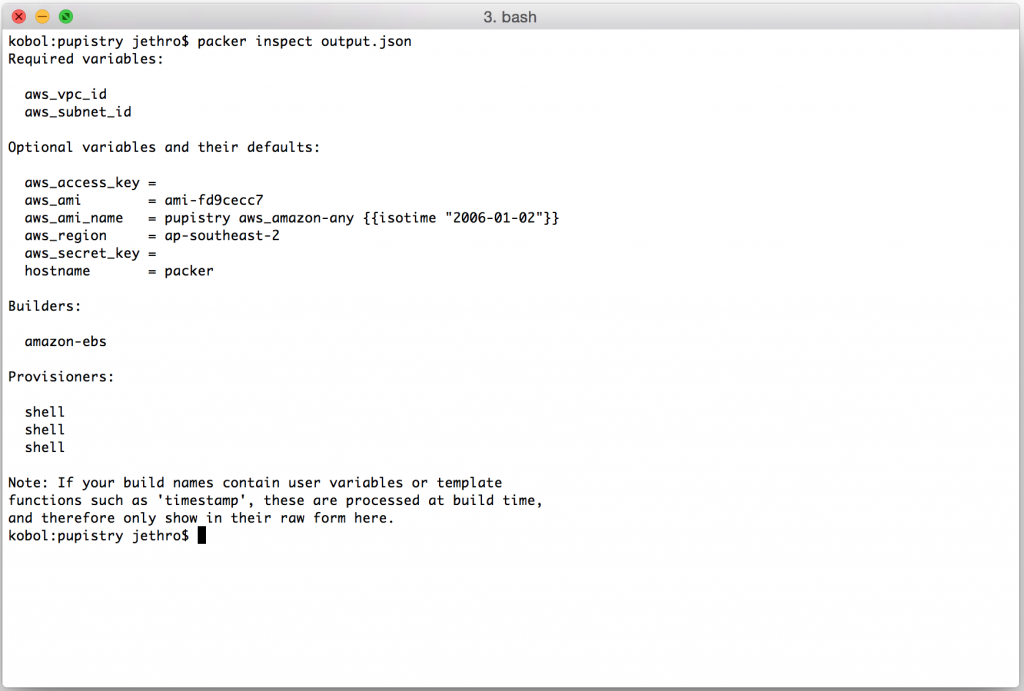
The generated template is a JSON file that includes various instructions to Packer on how to build the image, as well as the bootstrap data that can also be generated independently with pupistry bootstrap. Various variables can be tweaked, we can export out the variables available and see their default settings with:

packer inspect output.json

Screen Shot 2015-06-01 at 00.02.00

You can see here that we must set a VPC ID and Subnet ID – this is because they differ per AWS account and need to be provided. (Side note: technically you can do EC2 classic with Packer and avoid this, but the VPC instance types like t2 are cheaper to run… and we like cheap :-).

The AWS Region and AWS AMI values are interlinked. If you choose to build for a different region, eg us-west-1, you will need to lookup the appropriate AMI ID for that region and change both the aws_ami and aws_region variables when you bake your image. For some reason Amazon chose to make their AMI IDs specific to a particular region which really does make life a bit more difficult than it really needs to be. :-(

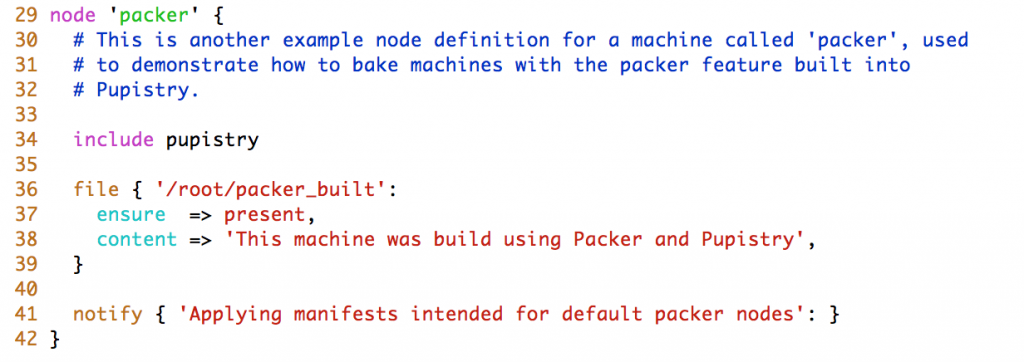
The hostname is worth noting. By default we set it to “packer” so you can target your manifests to handle it specifically, but you could make this anything you wanted such as a particular machine or application type. When using the sample puppet repo that ships by default with Pupistry, we have defined specific configuration to run on the Packer built images:

Screen Shot 2015-06-01 at 00.09.08

Assuming we are happy with the defaults, we just have to set the VPC and Subnet IDs to launch the current image in ap-southeast-2.

packer build \
 -var 'aws_vpc_id=vpc-example' \
 -var 'aws_subnet_id=subnet-example' \
 output.json

As soon as we kick off, we can see that Packer has built a machine in our AWS account to use for the image generation process.

Screen Shot 2015-06-01 at 00.13.53


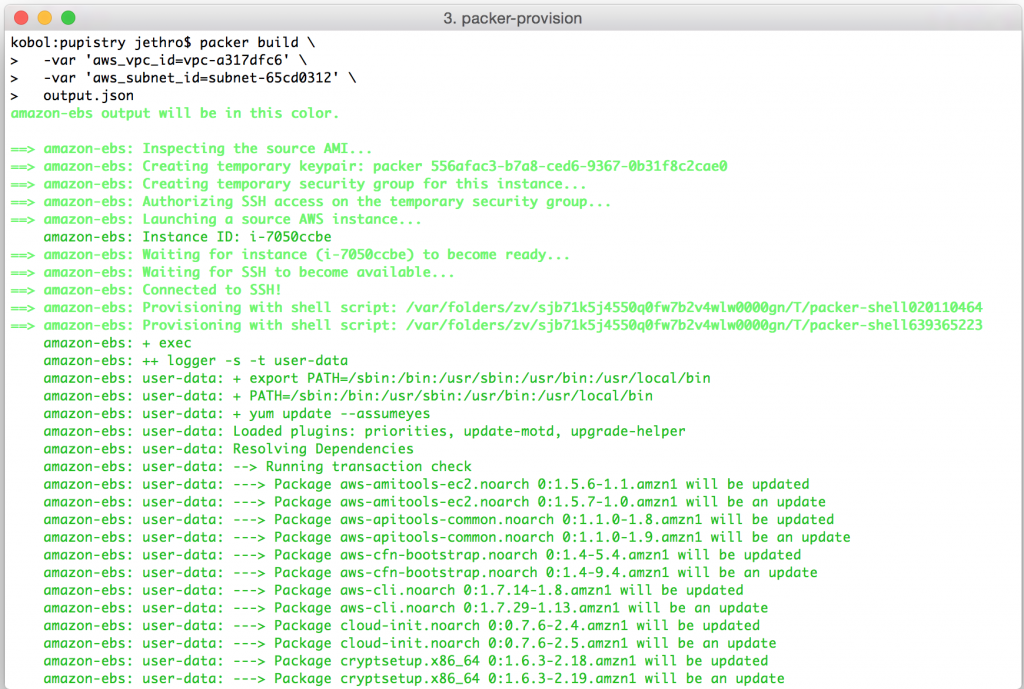
It can take up to a minute for the machine to become available via SSH. Once this happens, Packer opens a connection and starts to feed in the bootstrap commands that have been added into the template by Pupistry.

Screen Shot 2015-06-01 at 00.14.23

This process can take a number of minutes – remember you’re having to install all the various OS updates and then packages and dependencies needed to run Puppet and of course Pupistry itself.

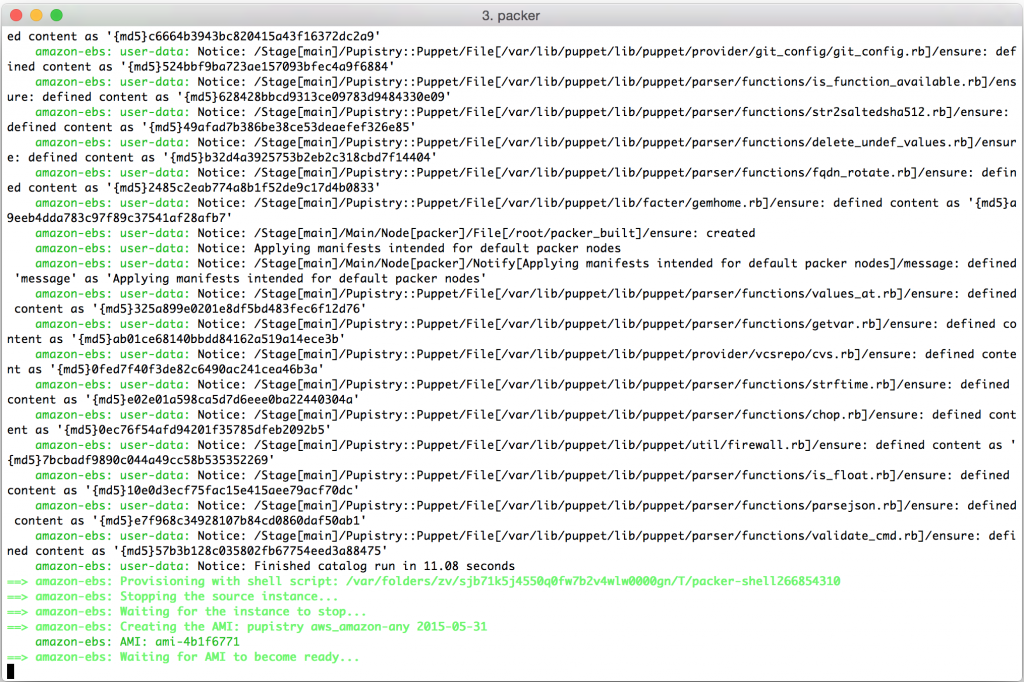
Once all the dependencies are done, Pupistry will run and provision the machine with your Puppet manifests and then return the ID of the AMI that has been generated:

Screen Shot 2015-06-01 at 00.31.57


We can see that Packer has now terminated our temporary machine:

Screen Shot 2015-06-01 at 00.22.28

And given us a shiny new AMI in return:

Screen Shot 2015-06-01 at 00.34.14


We can now use that AMI to launch a new machine and check out what Pupistry did. For convenience, there is a launch button on the AMI page that will build a new machine for the selected AMI, however you can also take the AMI ID and use it in CloudFormation, from the API or from the usual instance creation screen.

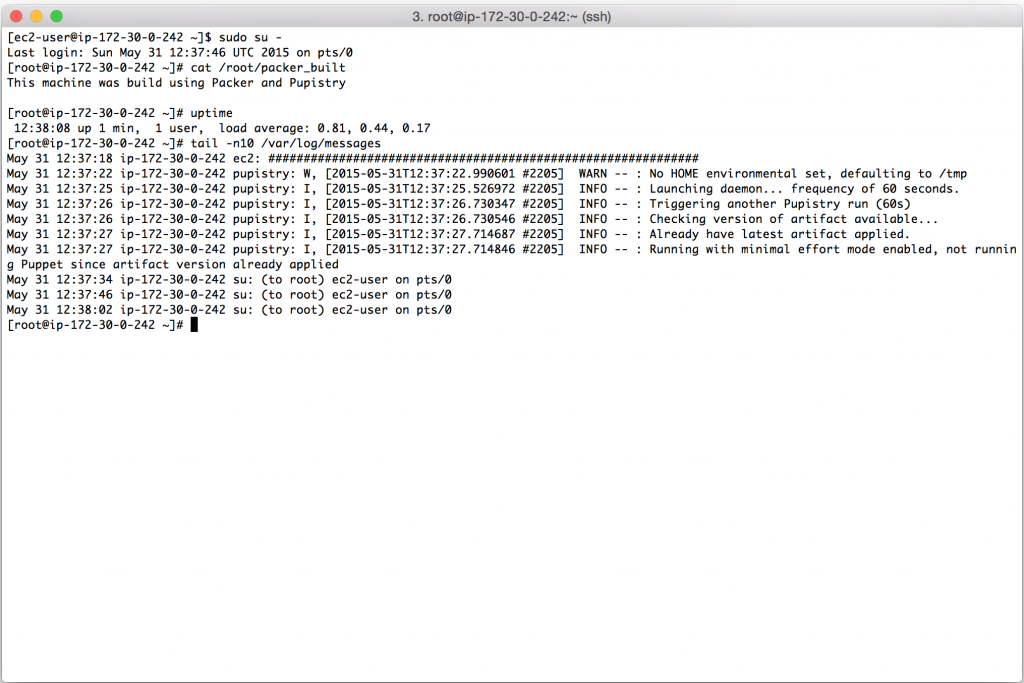
Connecting to the newly spun up instance using our fresh AMI, we can see that it has had the Pupistry rules for the packer node applied and we can also set that the daemon is configured and running in the background.

Except that it took less than 1 minute, rather than needing 5+ minutes to do all the usual updates and dependency installation. And there was no risk of a broken repository or package preventing the launch of our machine. If it was an application server, we could have preloaded it and thrown it right into an ELB within 1 minute after it starting up – that’s ideal for autoscaling!

Screen Shot 2015-06-01 at 00.38.28

Packer supports a number of different options and different providers, so don’t be afraid to pull it down and experiment. You can even write your own custom providers if needed.

Sure you could always just write a script that does all the same things as Packer for your cloud provider of choice, but Packer provides a solid framework for doing this stuff in a reliable and reproducible way saving you time and keeping complexity down.

Easy Lockscreen MacOS

Whilst MacOS is a pretty polished experience, there’s some really simple things that are stupidly hard sometimes such as getting the keybindings to work right for real keyboards or in this case, getting the screen to be lockable without sleeping the computer.

No matter what configuration I set in power management, the only MacOS keyboard combination that does anything for me (Command + Option + Eject/Power/F12) will not only put up the lock screen, but also immediately sleeps the computer, much to the dismay of any background network connections or audio.

One of the issues with MacOS is that for any issue there are several dubious software vendors offering you an app that “fixes” the issue with quality ranging from some excellent utilities all the way to outright dodgy Android/Windows-style crapware addons.

None of these look particularly good. Who the hell wants Android-style swipe unlock on a Mac??

None of these look particularly good. Who the hell wants Android-style swipe unlock on a Mac??

Naturally I’m not keen for some crappy third party app to do something as key as locking my workstation so went looking for the underlying way the screen gets locked. From my trawling I found that the following command executed as a normal user will trigger a sleep of the display, but not the whole machine:

pmset displaysleepnow

Turns out getting MacOS to execute some line of shell is disturbingly easy by using the Automator tool (Available in Applications -> Utilities) and creating a new Service.

Screen Shot 2015-05-26 at 23.47.59

Then add the Run Shell Script action from the Library of actions like below:

Screen Shot 2015-05-26 at 23.47.00

Save it with a logical name like “Lock Screen”. It gets saved into ~/Library/Services/ so in theory should be possible to easily copy it to other machines.

Once saved, your new service will become available to you in System Preferences -> Keyboard -> Shortcuts and will offer you the ability to set a keyboard shortcut.

Screen Shot 2015-05-26 at 23.50.37

And magic, it works. Command + Shift + L is a lot easier in my books than hot corners or clicking stupid menu items. Sadly you don’t have full flexibility of any key, but you should be able to get something that works for you.


For reference, here are my other settings windows. First the power management (Energy Saver) settings. I select “Prevent computer from sleeping automatically” to avoid any surprises when sleeping.

Screen Shot 2015-05-27 at 00.14.29

And secondly, your Security & Privacy settings should require a password after sleep/screen saver:

Screen Shot 2015-05-27 at 00.12.07


Tested on MacOS 10.10 Yosemite with pretty much a stock OS installation on an iMac 5k – I wouldn’t expect any variation by hardware, but YMMV (Your Mileage May Vary).