Tag Archives: code

Any posts relating to software that I have developed, including contributions to other projects, but excluding any packaging work.

Introducing Pupistry

I’ve recently been working to migrate my personal infrastructure from a very conventional and ageing 8 year old colocation server to a new cloud-based approach.

As part of this migration I’m simplifying what I have down to the fewest possible services and offloading a number of them to best-of-breed cloud SaaS providers.

Of course I’m still going to have a few servers for running various applications where it makes the most sense, but ideally it will only be a handful of small virtual machines and a bunch of development machines that I can spin up on demand using cloud providers like AWS or Digital Ocean, only paying for what I use.


The Puppet Master Problem

To make this manageable I needed to use a configuration management system such as Puppet to allow the whole build process of new servers to be automated (and fast!). But running Puppet goes against my plan of as-simple-as-possible as it means running another server (the Puppet master). I could have gone for something like Ansible, but I dislike the agent-less approach and prefer to have a proper agent and being able to build boxes automatically such as when using autoscaling.

So I decided to use Puppet masterless. It’s completely possible to run Puppet against local manifest files and have it apply them, but there’s the annoying issue of how to get Puppet manifests to servers in the first place…. That tends to be left as an exercise to the reader and there’s various collections of hacks floating around on the web and major organisations seem to grow their own homespun tooling to address it.

Just getting a well functioning Puppet masterless setup took far longer than desired and it seems silly given that everyone doing Puppet masterless is going to have to do the same steps over and over again.

User-data is another case of stupidity with every organisation writing their own variation of what is basically the same thing – some lines of bash to get a newly launched Linux instance from nothingness to running Puppet and applying the manifests for that organisation. There’s got to be a better way.


The blessing and challenges of r10k

It gets even more complex when you take the use of r10k into account. r10k is a Puppet workflow solution that makes it easy to include various upstream Puppet modules and pin them to specific versions. It supports branches, so you can do clever things like tell one server to apply a specific new branch to test a change you’ve made before rolling it out to all your servers. In short, it’s fantastic and if you’re not using it with Puppet… you should be.

However using r10k does mean you need access to all the git repositories that are being included in your Puppetfile. This is generally dealt with by having the Puppet master run r10k and download all the git repos using a deployer key that grants it access to the repositories.

But this doesn’t work so well when you have to setup deployer access keys for every machine to be able to read every one of your git repositories. And if a machine is ever compromised, it needs to be changed for every repo and every server again which is hardly ideal.

r10k’s approach of allowing you to assemble various third party Puppet modules into a (hopefully) coherent collection of manifests is very powerful – grab modules from the Puppet forge, from Github or from some other third party, r10k doesn’t care it makes it all work.

But this has the major failing of essentially limiting your security to the trustworthyness of all the third parties you select.

In some cases the author is relatively unknown and could suddenly decide to start including malicious content, or in other cases the security of the platform providing the modules is at risk (eg Puppetforge doesn’t require any two-factor auth for module authors) and a malicious attacker could attack the platform in order to compromise thousands of machines.

Some organisations fix this by still using r10k but always forking any third party modules before using them, but this has the downside of increased manual overhead to regularly check for new updates to the forked repos and pulling them down. It’s worth it for a big enterprise, but not worth the hassle for my few personal systems.

The other issue aside from security is that if any one of these third party repos ever fails to download (eg repo was deleted), your server would fail to build. Nobody wants to find that someone chose to delete the GitHub repo you rely on just minutes before your production host autoscaled and failed to startup. :-(


Pupistry – the solution?

I wanted to fix the lack of a consistent robust approach to doing masterless Puppet and provide a good way to allow r10k to be used with masterless Puppet and so in my limited spare time over the past month I’ve been working on Pupistry. (Pupistry? puppet + artistry == Pupistry! Hopefully my solution is better than my naming “genius”…)

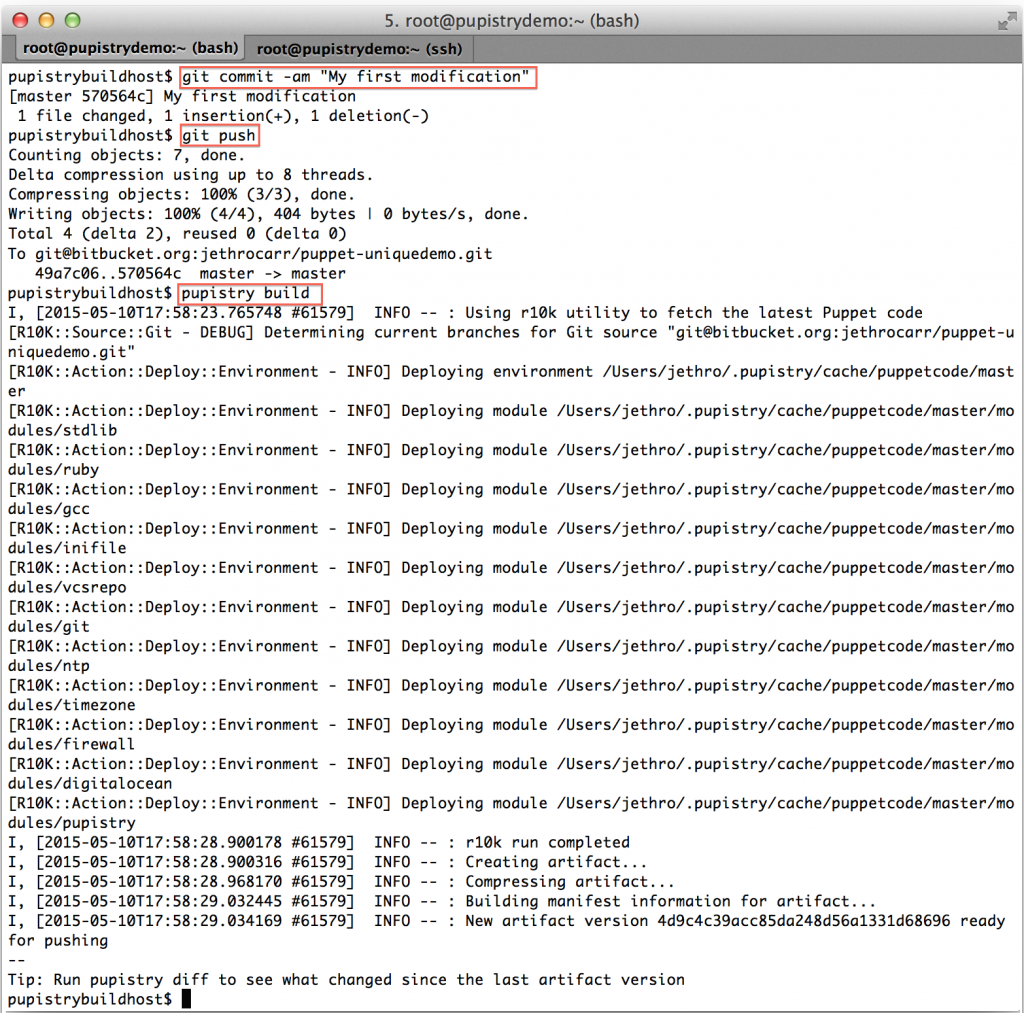
Pupistry is a solution for implementing reliable and secure masterless puppet deployments by taking Puppet modules assembled by r10k and generating compressed and signed archives for distribution to the masterless servers.

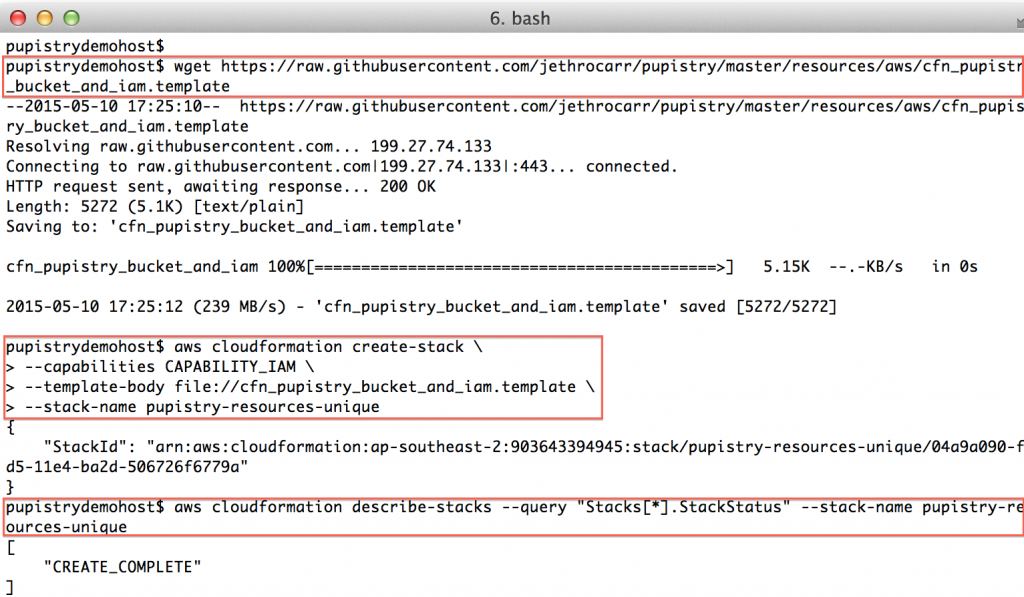
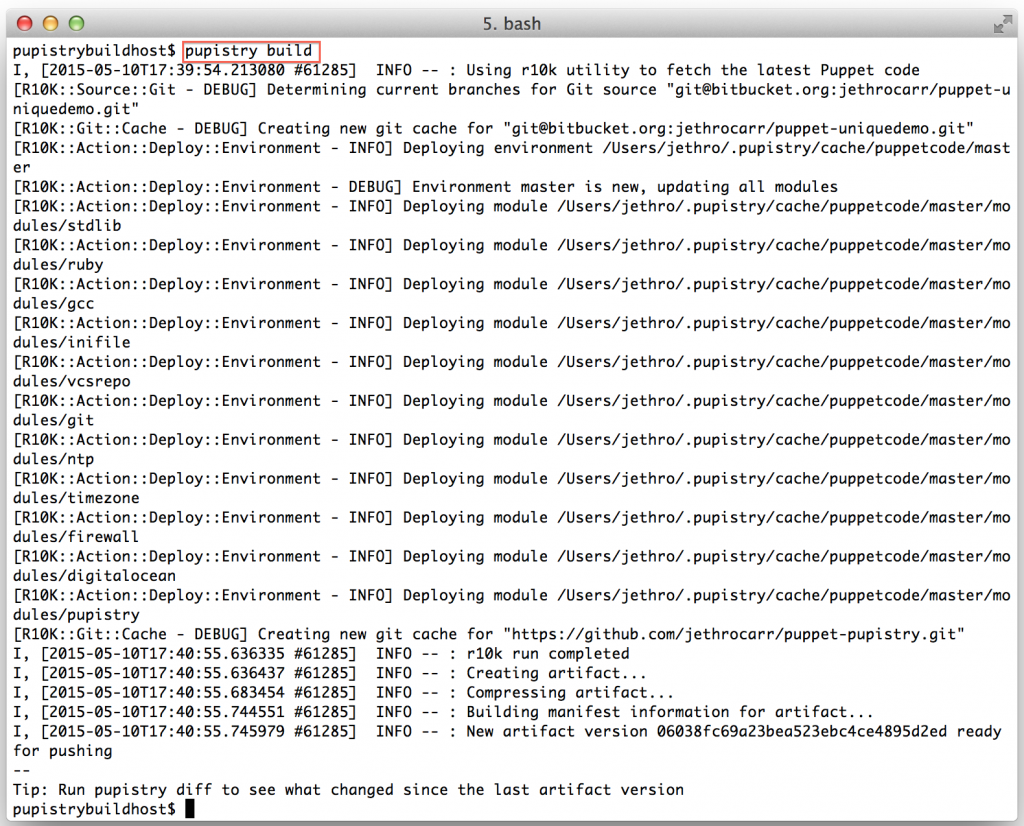
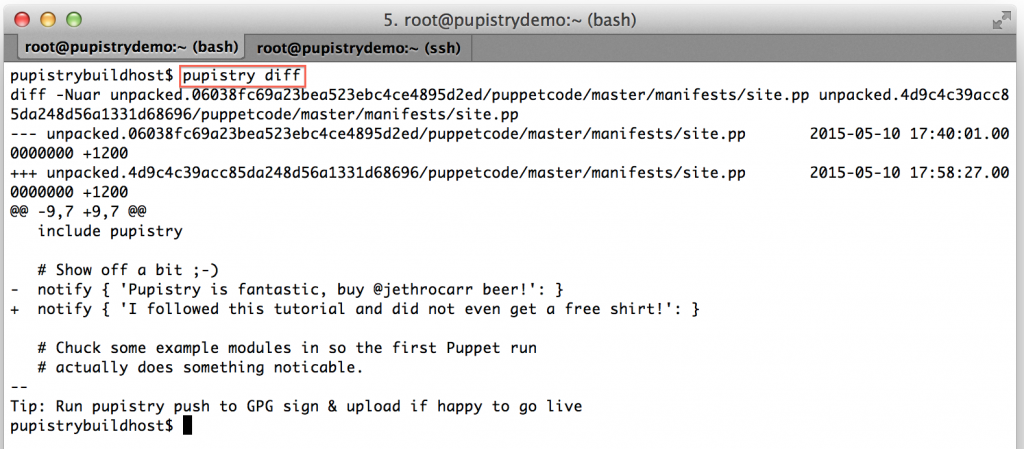
Pupistry builds on the functionality offered by the r10k workflow but rather than requiring the implementing of site-specific custom bootstrap and custom workflow mechanisms, Pupistry executes r10k, assembles the combined modules and then generates a compressed artifact file. It then optionally signs the artifact with GPG and finally uploads it into an Amazon S3 bucket along with a manifest file.

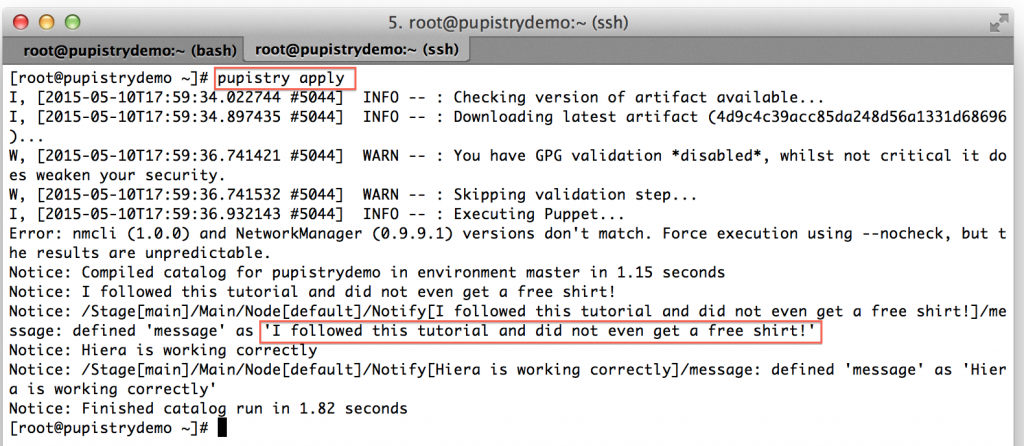
The masterless Puppet machines then runs Pupistry which checks for a new version of the manifest file. If there is, it downloads the new artifact and does an optional GPG validation before applying it and running Puppet. Pupistry ships with a daemon which means you can get the same convenience of  a standard Puppet master & agent setup and don’t need dodgy cronjobs everywhere.

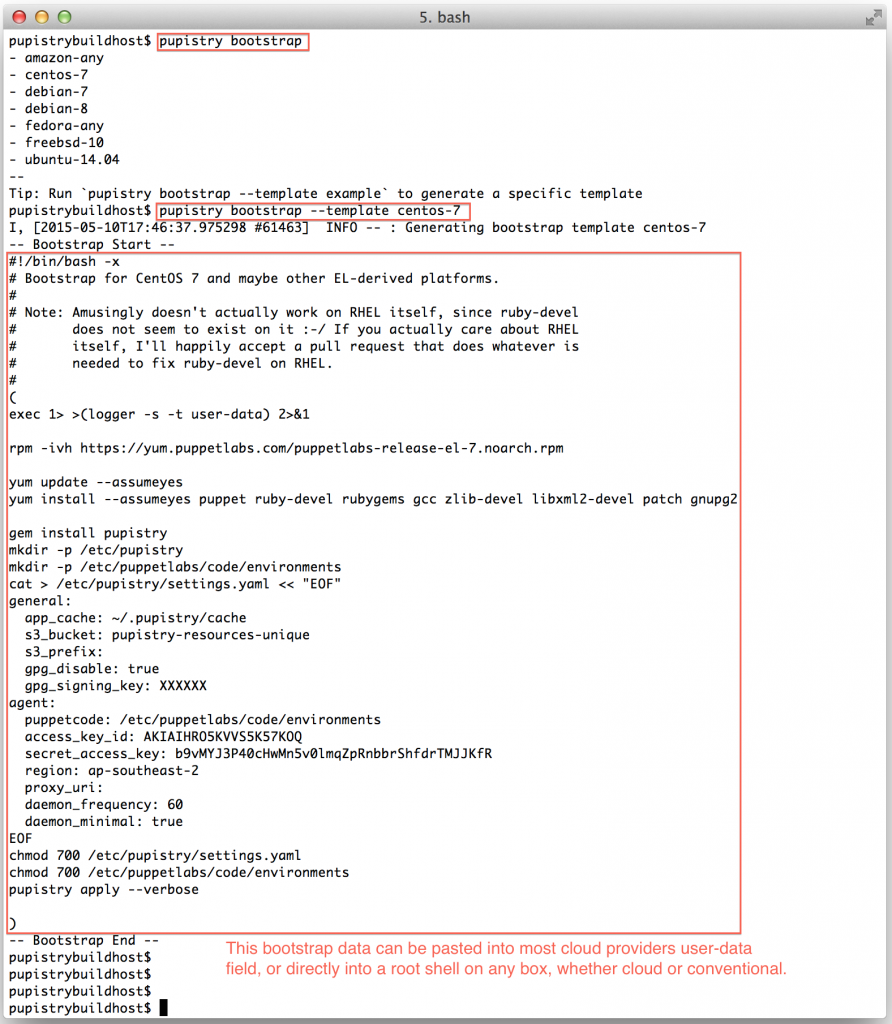
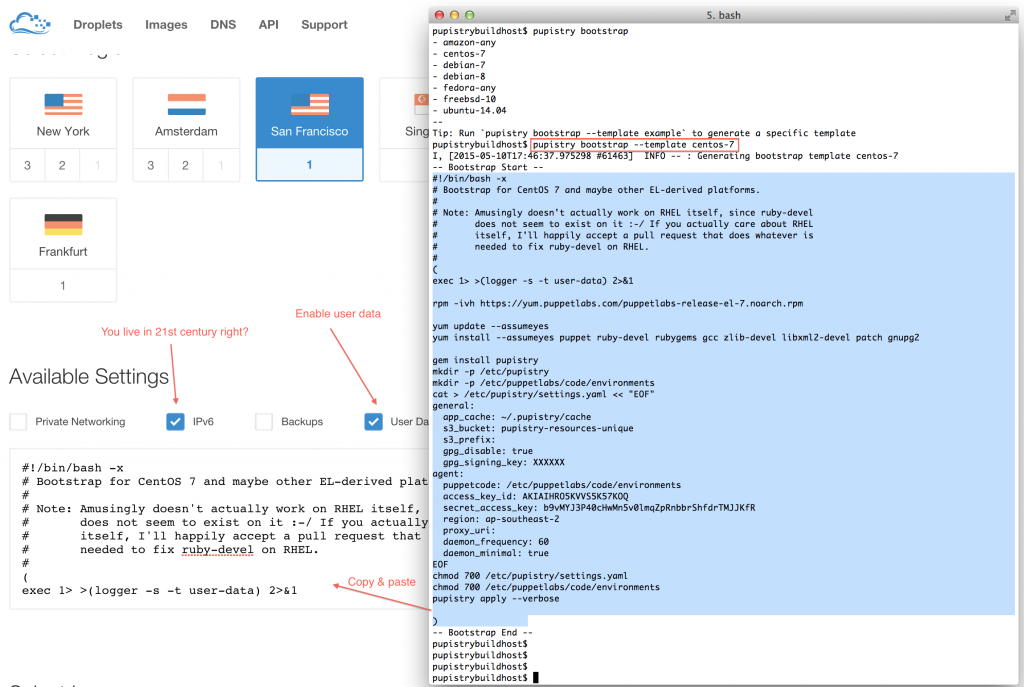
To make life even easier, Pupistry will even spit out bootstrap files for your platform which sets up each server from scratch to install, configure and run Pupistry, so you don’t need to write line after line of poorly tested bash code to get your machines online.

It’s also FAST. It can check for a new manifest in under a second, much faster than Puppet master or r10k being run directly on the masterless server.

Because Pupistry is artifact based, you can be sure your servers will always build since all the Puppetcode is packaged up which is great for autoscaling – although you still want to use a tool like Packer to create an OS image with Pupistry pre-loaded to remove dependency and risk of Rubygems or a newer version of Pupistry failing.


Try it!

https://github.com/jethrocarr/pupistry

If this sounds up your street, please take a look at the documentation on the Github page above and also the introduction tutorial I’ve written on this blog to see what Pupistry can do and how to get started with it.

Pupistry is naturally brand new and at MVP stage, so if you find bugs please file an issue in the tracker. It’s also worth checking the tracker for any other known issues with Pupistry before getting started with it in production (because you’re racing to put this brand new unproven app into production right?).

Pull requests for improved documentation, bug fixes or new features are always welcome, as is beer. :-)

I intend to keep developing this for myself as it solves my masterless Puppet needs really nicely, but I’d love to see it become a more popular solution that others are using instead of spinning some home grown weirdness again and again.

I’ve put some time into making it easy to use (I hope) and also written bootstrap scripts for most popular Linux distributions and FreeBSD, but I’d love feedback good & bad. If you’re using Pupistry and love it, let me know! If you tried Pupistry but it had some limitation/issue that prevented you from adopting it, let me know what it was, I might be able to help. Better yet, if you find a blocker to using it, fix it and send me a pull request. :-)

Ruby Net::HTTP & Proxies

I ran into a really annoying issue today with Ruby and the Net::HTTP class when trying to make requests out via the restrictive corporate proxy at the office.

The documentation states that “Net::HTTP will automatically create a proxy from the http_proxy environment variable if it is present.” however I was repeatedly seeing my connections fail and a tcpdump confirmed that they weren’t even attempting to transit the proxy server.

Turns out that this proxy transversal only takes place if Net::HTTP is invoked as an object, however if you invoke one of it’s methods directly it ignores the proxy environmentals entirely.

The following example application demonstrates the issue:

#!/usr/bin/env ruby

require 'net/http'

puts "Your proxy is #{ENV["http_proxy"]}"

puts "This will work with your proxy settings:"
uri       = URI('https://www.jethrocarr.com')
request   = Net::HTTP.new(uri.host, uri.port)
response  = request.get(uri)
puts response.code

puts "This won't:"
uri = URI('https://www.jethrocarr.com')
response = Net::HTTP.get_response(uri)
puts response.code

Which will give you something like:

Your proxy is http://ihateproxies.megacorp.com:8080
This will work with your proxy settings:
200
This won't:
/System/Library/Frameworks/Ruby.framework/Versions/2.0/usr/lib/ruby/2.0.0/net/http.rb:878:in `initialize': No route to host - connect(2) (Errno::EHOSTUNREACH)
    from /System/Library/Frameworks/Ruby.framework/Versions/2.0/usr/lib/ruby/2.0.0/net/http.rb:878:in `open'
    from /System/Library/Frameworks/Ruby.framework/Versions/2.0/usr/lib/ruby/2.0.0/net/http.rb:878:in `block in connect'
    from /System/Library/Frameworks/Ruby.framework/Versions/2.0/usr/lib/ruby/2.0.0/timeout.rb:52:in `timeout'
    from /System/Library/Frameworks/Ruby.framework/Versions/2.0/usr/lib/ruby/2.0.0/net/http.rb:877:in `connect'
    from /System/Library/Frameworks/Ruby.framework/Versions/2.0/usr/lib/ruby/2.0.0/net/http.rb:862:in `do_start'
    from /System/Library/Frameworks/Ruby.framework/Versions/2.0/usr/lib/ruby/2.0.0/net/http.rb:851:in `start'
    from /System/Library/Frameworks/Ruby.framework/Versions/2.0/usr/lib/ruby/2.0.0/net/http.rb:582:in `start'
    from /System/Library/Frameworks/Ruby.framework/Versions/2.0/usr/lib/ruby/2.0.0/net/http.rb:477:in `get_response'
    from ./proxyexample.rb:18:in `<main>'

Very annoying!

Installing EL7 onto EL5 Xen hosts

With RedHat recently releasing RHEL 7 (and CentOS promptly getting their rebuild out the door shortly after), I decided to take the opportunity to start upgrading some of my ageing RHEL/CentOS (EL) systems.

My personal co-location server is a trusty P4 3.0Ghz box running EL 5 for both host and Xen guests. Xen has lost some popularity in favour of HVM solutions like KVM, however it’s still a great hypervisor and can run Linux guests really nicely on even hardware as old as mine that lacks HVM CPU extensions.

Considering that EL 5, 6 and 7 are all still supported by RedHat, I would expect that installing EL 7 as a guest on EL 5 should be easy – and to be fair to RedHat it mostly is, the installation was pretty standard.

Like EL 5 guests, EL 7 guests can be installed entirely from the command line using the standard virt-install command – for example:

$ virt-install --paravirt \
 --name MyCentOS7Guest \
 --ram 1024 \
 --vcpus 1 \
 --location http://mirror.centos.org/centos/7/os/x86_64/ \
 --file /dev/lv_group/MyCentOS7Guest \
 --network bridge=xenbr0

One issue I had is that the installer no longer prompts for network information to use to download the rest of the installer and instead assumes you have a DHCP server, an assumption that isn’t always correct. If you want to force it to use a static address, append the following parameters to the virt-install command.

 -x 'ip=192.168.1.20 netmask=255.255.255.0 dns=8.8.8.8 gateway=192.168.1.1'

The installer will proceed and give you an option to either use VNC to get a graphical installer, or to accept the more basic/limited text mode installer. In my case I went with the text mode installer, generally this is fine for average installations, except that it doesn’t give you a lot of control over partitioning.

Installation completed successfully, but I was not able to subsequently boot the new guest, with an error being thrown about pygrub being unable to find the boot partition.

# xm create -c vmguest
Using config file "./vmguest".
Traceback (most recent call last):
  File "/usr/bin/pygrub", line 774, in ?
    raise RuntimeError, "Unable to find partition containing kernel"
RuntimeError: Unable to find partition containing kernel
No handlers could be found for logger "xend"
Error: Boot loader didn't return any data!
Usage: xm create <ConfigFile> [options] [vars]


Xen works a little differently than VMWare/KVM/VirtualBox in that it doesn’t try to emulate hardware unnecessarily in paravirtualised mode, so there’s no BIOS. Instead Xen ships with a tool called pygrub, that is essentially an application that implements grub and goes through the process of reading the guest’s /boot filesystem, displaying a grub interface using the config in /boot, then when a kernel is selected grabs the kernel and associated information and launches the guest with it.

Generally this works well, certainly you can boot any of your EL 5 guests with it as well as other Linux distributions with Xen paravirtulised compatible kernels (it’s merged into upstream these days).

However RHEL has moved on a bit since 2007 adding a few new tricks, such as replacing Grub with Grub2 and moving from the typical ext3 boot partition to an xfs boot partition. These changes confuse the much older utilities written for Xen, leaving it unable to read the boot loader data and launch the guest.

The two main problems come down to:

  1. EL 5 can’t read the xfs boot partition created by default by EL 7 hosts. Even if you install optional xfs packages provided by centosplus/centosextras, you still can’t read the filesystem due to the version of xfs being too new for it to comprehend.
  2. The version of pygrub shipped with EL 5 doesn’t have support for Grub2. Well, technically it’s supposed to according to RedHat, but I suspect they forgot to merge in fixes needed to make EL 7 boot.

I hope that RedHat fix this deficiency soon, presumably there will be RedHat customers wanting to do exactly what I’m doing who will apply some pressure for a fix, however until then if you want to get your shiny new EL 7 guests installed, I have a bunch of workarounds for those whom are not faint of heart.


For these instructions, I’m assuming that your guest is installed to /dev/lv_group/vmguest, however these instructions should work equally for image files or block devices.

Firstly, we need to check what the state of the /boot partition is – we need to make sure it is an ext3 volume, or convert it if not. If you installed via the limited text mode installer, it will be an xfs partition, however if you installed via VNC, you might be able to change the type to ext3 and avoid the next few steps entirely.

We use kpartx -a and -d respectively to expose the partitions inside the block device so we can manipulate the contents. We then use the good ol’ file command to check what type of filesystem is on the first partition (which is presumably boot).

# kpartx -a /dev/lv_group/vmguest
# file -sL /dev/mapper/vmguestp1
/dev/mapper/vmguestp1: SGI XFS filesystem data (blksz 4096, inosz 256, v2 dirs)
# kpartx -d /dev/lv_group/vmguest

Being xfs, we’re probably unable to do much – if we install xfsprogs (from centos extras), we can verify it’s unreadable by the host OS:

# yum install xfsprogs
# xfs_check /dev/mapper/vmguestp1
bad sb version # 0xb4b4 in ag 0
bad sb version # 0xb4a4 in ag 1
bad sb version # 0xb4a4 in ag 2
bad sb version # 0xb4a4 in ag 3
WARNING: this may be a newer XFS filesystem.
#

Technically you could fix this by upgrading the kernel, but EL 5’s kernel is a weird monster that includes all manor of patches for Xen that were never included into upstream, so it’s not a simple (or even feasible) operation.

We can convert the filesystem from xfs to ext3 by using another newer Linux system. First we need to export the boot volume into an image file:

# dd if=/dev/mapper/vmguestp1  | bzip2 > /tmp/boot.img.bz2

Then copy the file to another host, where we will unpack it and recreate the image file with ext3 and the same contents.

$ bunzip2 boot.img.bz2
$ mkdir tmp1 tmp2
$ sudo mount -t xfs -o loop boot.img tmp1/
$ sudo cp -avr tmp1/* tmp2/
$ sudo umount tmp1/
$ mkfs.ext3 boot.img
$ sudo mount -t ext3 -o loop boot.img tmp1/
$ sudo cp -avr tmp2/* tmp1/
$ sudo umount tmp1
$ rm -rf tmp1 tmp2
$ mv boot.img boot-new.img
$ bzip2 boot-new.img

Copy the new file (boot-new.img) back to the Xen host server and replace the guest’s/boot volume with it.

# kpartx -a /dev/lv_group/vmguest
# bzcat boot-new.img.bz2 > /dev/mapper/vmguestp1
# kpartx -d /dev/lv_group/vmguest


Having fixed the filesystem, Xen’s pygrub will be able to read it, however your guest still won’t boot. :-( On the plus side, it throws a more useful error showing that it could access the filesystem, but couldn’t parse some data inside it.

# xm create -c vmguest
Using config file "./vmguest".
Using <class 'grub.GrubConf.Grub2ConfigFile'> to parse /grub2/grub.cfg
Traceback (most recent call last):
  File "/usr/bin/pygrub", line 758, in ?
    chosencfg = run_grub(file, entry, fs)
  File "/usr/bin/pygrub", line 581, in run_grub
    g = Grub(file, fs)
  File "/usr/bin/pygrub", line 223, in __init__
    self.read_config(file, fs)
  File "/usr/bin/pygrub", line 443, in read_config
    self.cf.parse(buf)
  File "/usr/lib64/python2.4/site-packages/grub/GrubConf.py", line 430, in parse
    setattr(self, self.commands[com], arg.strip())
  File "/usr/lib64/python2.4/site-packages/grub/GrubConf.py", line 233, in _set_default
    self._default = int(val)
ValueError: invalid literal for int(): ${next_entry}
No handlers could be found for logger "xend"
Error: Boot loader didn't return any data!

At a glance, it looks like pygrub can’t handle the special variables/functions used in the EL 7 grub configuration file, however even if you remove them and simplify the configuration down to the core basics, it will still blow up.

# xm create -c vmguest
Using config file "./vmguest".
Using <class 'grub.GrubConf.Grub2ConfigFile'> to parse /grub2/grub.cfg
WARNING:root:Unknown image directive load_video
WARNING:root:Unknown image directive if
WARNING:root:Unknown image directive else
WARNING:root:Unknown image directive fi
WARNING:root:Unknown image directive linux16
WARNING:root:Unknown image directive initrd16
WARNING:root:Unknown image directive load_video
WARNING:root:Unknown image directive if
WARNING:root:Unknown image directive else
WARNING:root:Unknown image directive fi
WARNING:root:Unknown image directive linux16
WARNING:root:Unknown image directive initrd16
WARNING:root:Unknown directive source
WARNING:root:Unknown directive elif
WARNING:root:Unknown directive source
Traceback (most recent call last):
  File "/usr/bin/pygrub", line 758, in ?
    chosencfg = run_grub(file, entry, fs)
  File "/usr/bin/pygrub", line 604, in run_grub
    grubcfg["kernel"] = img.kernel[1]
TypeError: unsubscriptable object
No handlers could be found for logger "xend"
Error: Boot loader didn't return any data!
Usage: xm create <ConfigFile> [options] [vars]

Create a domain based on <ConfigFile>

At this point it’s pretty clear that pygrub won’t be able to parse the configuration file, so you’re left with two options:

  1. Copy the kernel and initrd file from the guest to somewhere on the host and set Xen to boot directly using those host-located files. However then kernel updating the guest is a pain.
  2. Backport a working pygrub to the old Xen host and use that to boot the guest. This requires no changes to the Grub2 configuration and means your guest will seamlessly handle kernel updates.

Because option 2 is harder and more painful, I naturally chose to go down that path, backporting the latest upstream Xen pygrub source code to EL 5. It’s not quite vanilla, I had to make some tweaks to rip out a couple newer features that were breaking it on EL 5, so I’ve packaged up my version of pygrub and made it available in both source and binary formats.

Download Jethro’s pygrub backport here

Installing this *will* replace the version installed by the Xen package – this means an update to the package on the host will undo these changes – I thought about installing it to another path or making an RPM, but my hope is that Red Hat get their Xen package fixed and make this whole blog post redundant in the first place so I haven’t invested that level of effort.

Copy to your server and unpack with:

# tar -xkzvf xen-pygrub-6f96a67-JCbackport.tar.gz
# cd xen-pygrub-6f96a67-JCbackport

Then you can build the source into a python module and install with:

# yum install xen-devel gcc python-devel
# python setup.py build
running build
running build_py
creating build
creating build/lib.linux-x86_64-2.4
creating build/lib.linux-x86_64-2.4/grub
copying src/GrubConf.py -> build/lib.linux-x86_64-2.4/grub
copying src/LiloConf.py -> build/lib.linux-x86_64-2.4/grub
copying src/ExtLinuxConf.py -> build/lib.linux-x86_64-2.4/grub
copying src/__init__.py -> build/lib.linux-x86_64-2.4/grub
running build_ext
building 'fsimage' extension
creating build/temp.linux-x86_64-2.4
creating build/temp.linux-x86_64-2.4/src
creating build/temp.linux-x86_64-2.4/src/fsimage
gcc -pthread -fno-strict-aliasing -DNDEBUG -O2 -g -pipe -Wall -Wp,-D_FORTIFY_SOURCE=2 -fexceptions -fstack-protector --param=ssp-buffer-size=4 -m64 -mtune=generic -D_GNU_SOURCE -fPIC -fPIC -I../../tools/libfsimage/common/ -I/usr/include/python2.4 -c src/fsimage/fsimage.c -o build/temp.linux-x86_64-2.4/src/fsimage/fsimage.o -fno-strict-aliasing -Werror
gcc -pthread -shared build/temp.linux-x86_64-2.4/src/fsimage/fsimage.o -L../../tools/libfsimage/common/ -lfsimage -o build/lib.linux-x86_64-2.4/fsimage.so
running build_scripts
creating build/scripts-2.4
copying and adjusting src/pygrub -> build/scripts-2.4
changing mode of build/scripts-2.4/pygrub from 644 to 755

# python setup.py install

Naturally I recommend reviewing the source code and making sure it’s legit (you do trust random blogs right?) but if you can’t get it to build/lack build tools/like gambling, I’ve included pre-built binaries in the archive and you can just do

# python setup.py install

Then do a quick check to make sure pygrub throws it’s help message, rather than any nasty errors indicating something went wrong.

# /usr/bin/pygrub


We’re almost ready to try booting again! First create a directory that the new pygrub expects:

# mkdir /var/run/xend/boot/

Then launch the machine creation – this time, it should actually boot and run through the usual systemd startup process. If you installed with /boot set to ext3 via the installer, everything should just work and you’ll be up and running!

If you had to do the xfs to ext3 conversion trick, the bootup process will explode with scary errors like the following:

.......
[ TIME ] Timed out waiting for device dev-disk-by\x2duuid-245...95b2c23.device.
[DEPEND] Dependency failed for /boot.
[DEPEND] Dependency failed for Local File Systems.
[DEPEND] Dependency failed for Relabel all filesystems, if necessary.
[DEPEND] Dependency failed for Mark the need to relabel after reboot.
[  101.134423] systemd-journald[414]: Received request to flush runtime journal from PID 1
[  101.658465] type=1305 audit(1405735466.679:4): audit_pid=476 old=0 auid=4294967295 ses=4294967295 subj=system_u:system_r:auditd_t:s0 res=1
Welcome to emergency mode! After logging in, type "journalctl -xb" to view
system logs, "systemctl reboot" to reboot, "systemctl default" to try again
to boot into default mode.
Give root password for maintenance
(or type Control-D to continue):

The issue is that the conversion of the filesystem changed it’s UUID, plus the filesystem type in /etc/fstab no longer matches.

We can fix this easily by dropping to the recovery shell by entering the root password above and executing the following commands:

guest# sed -i -e '/boot/ s/UUID=[0-9\-]*/\/dev\/xvda1/' /etc/fstab
guest# sed -i -e '/boot/ s/xfs/ext3/' /etc/fstab
guest# cat /etc/fstab | grep '/boot'

Make sure the cat returns a valid /boot line, it should be using /dev/xvda1 as the device and ext3 as the filesystem now.

Finally, stop and start the instance (reboots seem to hang for me):

guest# shutdown -h now
xm create -c vmguest1

It should now boot correctly! Go forth and enjoy your new VM!

CentOS Linux 7 (Core)
Kernel 3.10.0-123.el7.x86_64 on an x86_64

This is certainly a hack – doing this backport of pygrub solved my personal issue, but it’s entirely possible it may break other things, so do your own testing and determine whether it’s suitable for you and your environment or not.

Amberdms Billing System 2.0.1 Release

Just pushed a new stable release of the Amberdms Billing System (version 2.0.1), my open source web-based billing platform that does accounting, invoicing, ISP billing and more.

This release is mostly just a bug fix release to correct a few annoying issues, but it also has some improvements as well.
New Functionality

  • Invoices and credit notes can be downloaded via SOAP API call (thanks to Max Milaney’s contribution).
  • Database schema updater now supported hosted/multi-instance mode.

Bug Fixes

  • Service type “licenses” was missing in release 2.0.0
  • Quotes page was missing edit/delete links (issue 395)
  • Compatibility fixes for MySQL 5.6 STRICT mode.
  • Fixes to the PHP HTTPS redirect (thanks to Dmitry Smirnov)
  • Minor user interface fixes.

Other

  • Upgraded to latest Amberphplib framework.
  • Developer stats collection option provide more details about what gets sent home to developers.

The latest code and installation instructions can be found at:
https://projects.jethrocarr.com/p/oss-amberdms-bs/

You can also find the Amberdms Billing System on GitHub at:
https://github.com/jethrocarr

If you are using RHEL/CentOS 5/6, Ubuntu 12.04 LTS or Debian 7 Wheezy, you can install using your usual package manage by using my repositories at http://repos.jethrocarr.com/.

And for community support, see the mailing list at http://lists.amberdms.com/mailman/listinfo/amberdms-bs.

Route53 with NamedManager 1.8.0

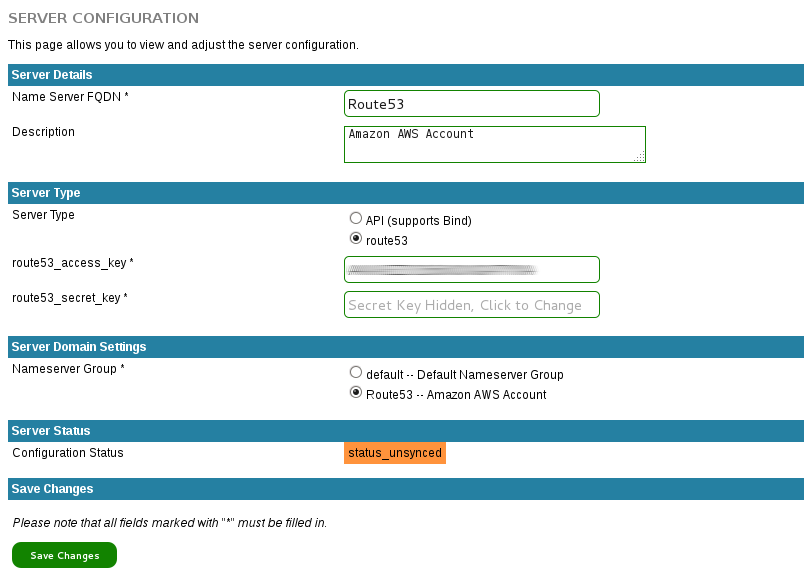
Just released NamedManager 1.8.0, my open source web-based DNS management tool. This release fixes some bugs with MySQL 5.6 and internationalized domain names, but also includes support for using Amazon AWS Route53 alongside the existing Bind9 support.

Just add a name server entry with the type of Route53 and your Amazon credentials and a background process will sync all DNS changes to Route53. You can mix and match thanks to the groups feature, so if you want some zones going to both Bind9 and Route53 and others going to just Route53 or Bind9, you can do so.

NamedManager, now with cloudy goodness.

NamedManager, now with cloudy goodness.

As always, the easiest installation is from the provided RPMs, however you can also install from tarball or from Git – just refer to the installation documentation.

This feature is considered stable, however it is new, so be wary for bugs and issues – and report any issues you encounter back to me via email or the project manager issue tracker.

Exposing name servers with Puppet Facts

Carrying on from the last post, I needed a good reliable way to point my Nginx configuration at a DNS server to use for resolving backends. The issue is that I wanted my Puppet module to be portable across various environments, some which block outbound DNS traffic to external services and others where the networks may be redefined on a frequent basis and maintaining an accurate list of all the name servers would be difficult (eg the cloud).

I could have used dnsmasq to setup a localhost resolver, but when it comes to operational servers, simplicity is key – having yet another daemon that could crash or cause problems is never desirable if there’s a simpler way to solve the issue.

Instead I used Facter (sic), Puppet’s tool for exposing values pulled from the system into variables that can be used in your Puppet manifests or templates. The following custom fact is included in my Puppet module and is run before any configuration is applied to the host running my Nginx configuration:

#!/usr/bin/env ruby
#
# Returns a string with all the IPs of all configured nameservers on
# the server. Useful for including into applications such as Nginx.
#
# I live in mymodulenamehere/lib/facter/nameserver_list.rb
# 

Facter.add("nameserver_list") do
    setcode do
      nameserver = false

      # Find all the nameserver values in /etc/resolv.conf
      File.open("/etc/resolv.conf", "r").each_line do |line|
        if line =~ /^nameserver\s*(\S*)/
          if nameserver
            nameserver = nameserver + " " + $1
          else
            nameserver = $1
          end
        end
      end

      # If we can't get any result (bad host config?) default to a
      # public DNS server that is likely to be reachable.
      unless nameserver
        nameserver = '8.8.8.8'
      end

      nameserver
    end
end

On a system with a typically configured /etc/resolv.conf file such as:

search example.com
nameserver 192.168.0.1
nameserver 10.1.1.1

The fact will expose the nameservers in a space-delineated string such as:

# facter -p | grep 'nameserver_list'
nameserver_list => 192.168.0.1 10.1.1.1

I can then use the Fact inside my Puppet templates for Nginx to configure the resolver:

server {
    ...
    resolver <%= @nameserver_list %>;
    resolver_timeout 1s;
    ...
}

This works pretty well, but there are a couple things to watch out for:

  1. If the Fact fails to execute at all, your configuration will be broken. Having said that, it’s a very simple Fact and there’s not a lot that really could fail (eg no dependencies on other apps/non-standard resources).
  2. Linux hosts resolve DNS using the nameservers specified in the order in /etc/resolv.conf. If one fails, they move on and try the next. However Nginx differs, and just uses the list of provides nameservers in round-robin fashion. This is fine if your nameservers are all equals, but if some are more latent or less reliable than others, it could cause slight delays.
  3. You want to drop the resolver_timeout to 1 second, to ensure a failing nameserver doesn’t hold up re-resolution of DNS for too long. Remember that this re-resolution should only occur when the TTL of the DNS records for the backend has expired, so even if one DNS server is bad, it should have almost no impact to performance for your requests.
  4. Nginx isn’t going to pickup stuff in /etc/hosts using these resolvers. This should be common sense, but thought I better put that out there just-in-case.
  5. This Ruby could be better, but I’m not a dev and hacked it up in 15mins. The regex should probably also be improved to handle some of the more exotic /etc/resolv.confs that I’m sure people manage to write.

Android, the leading propietary mobile operating system

The Linux kernel has had a long history in the mobile space, with the successes and benefits of the OS in the embedded world transferring across to the smart phone and tablet market once devices evolved to a level requiring (and supporting) powerful multitasking operating systems.

But whilst there had been other Linux-based mobiles before, it wasn’t until Android was first released to the world by Google that Linux began to obtain true mass-maket consumer acceptance.  With over 1 billion devices activated by late 2013, Android is certainly the single most successful mobile Linux distribution ever and possibly even the single largest mobile OS on basis of number of devices sold.

Whilst Open Source and Free Software [By Free Software I mean software that is Libre, ie Free as in Freedom, rather than Free as in Beer] had historically succeeded strongly in the server space, it always suffered limited mass market appeal in the desktop. With the sudden emergence and success of Android, proponents of both Open Source and Free Software camps could enjoy a moment of victory and success. Sure we may not have won the desktop wars, and sure it wasn’t GNU/Linux in the traditional sense, but damnit, we had a Linux kernel in every other consumer device, something worth celebrating!


Whilst Android still features the Linux kernel, it differs from a conventional GNU/Linux system, as it doesn’t feature the GNU user space and applications. When building Android, Google took the Open Source Linux kernel but threw out most of the existing user space, instead building a new Apache-licensed user space designed for consumers and interaction via touch interfaces.

For Google themselves, Android was a way to prevent vendors like Microsoft or Apple getting a new monopoly in the mobile world where they could then squeeze Google out and strangle their business in the new emerging market – a world where Microsoft or Apple could dictate what browser or search engine that a user could use would not be in Google’s best financial interests and it was vital to take steps to prevent that from being possible.

The proposition to device vendors is that Android was an answer to reducing their R&D costs to compete with incumbent market players, making their devices more attractive and allowing some collaboration with their peers via means of a common application platform which would attract developers and enable a strong ecosystem, that in turn would make Android phones more attractive for consumers.

For Google and device vendors, this was a win-win relationship and it quickly began to pay off.


Yet even as soon as we started consuming the delicious Android desert (with maybe a slightly dubious Google advertising crust we could leave on the side), we found the taste souring with every mouthful. For whilst Google and device vendors brought into the idea of Android the operating system, they never brought into the idea of the Free Software movement which had lead to the software and community that had made this success possible in the first place.

To begin with, unlike the GNU/Linux distributions pre-dating Android which generally fostered collaboration and joint effort around a shared philosophy of working together to make a better system, Android was developed in a closed-room model, with Google and select partners developing new features in private before throwing out completed releases to coincide with new devices. It’s an approach that’s perfectly compliant with Open Source licensing, but not necessarily conducive to building a strong community.

Even the open source nature of the OS was quickly tainted, with device vendors taking Android and instead of evolving the source code as part of a community effort, they added in their own proprietary front ends and variations, shipped devices with locked boot loaders preventing OS customisation and shoved binary drivers and firmware into their device kernels.

This wasn’t the activity of just a few bad vendors either. Even Google’s own popular “Google Nexus” series targeted at developers of both applications and operating system requires proprietary blobs to get hardware such as cellular radios, WiFi, Cameras and GPUs to function. [Depending whom you ask, this is a violation of the Linux kernel’s GPLv2 license, but there is disagreement amongst kernel developers and the fears that a ban on kernel proprietary drivers will just lead to vendors moving the proprietary blobs to user space, a legally valid but still ethically dubious approach.]

Google’s main maintainer for AOSP recently departed Google over frustrations getting Qualcomm to release drivers for the 2013 revision of the popular Nexus 7 tablet, which illustrates the hurdles that developers face when getting even just the binaries from vendors.

Despite all these road blocks thrown up, a strong developer community has still managed to form around hacking on the Android source code, with particular credit to Cyanogenmod a well polished and very popular enhanced distribution of Android, Replicant which seeks to build a purely free Android OS replacing binary blobs along the way, and FDroid a popular alternative to the “Google Play” application store offering only Free Software licensed applications for download.

It’s still not perfect and there’s a lot of work left to do – projects like Cyanogenmod and Replicant still tend to need many proprietary modules if you want to make full use of the features of your device. The community is working on fixing these short comings, but it’s always much more frustrating having to play catch up to vendors, rather than working collaboratively with them.

But whilst this community effort can resolve the issue of proprietary drivers and applications and lead us to a proper Free Software Android, there is a much more tricky issue coming up which could cause far greater headaches.
In order to resolve the issue of Android version fragmentation amongst vendors causing challenges for application developers, Google has been introducing new APIs inside a package called “Google Play Services”, which is a proprietary library distributed only via the Google Play application store.

Any application that is reliant on this new library (not to mention over existing proprietary components such as Google Cloud Messaging used for push notifications) will be unable to run on pure Free Software devices that are stripped of non-free components. And whilst at the immediate moment the features offered by this API are mostly around using specific Google cloud-based APIs and features which are non-free by their very nature, there’s nothing preventing more and more features being included in this API in future, reducing the scope of applications that will run on a Free Software Android.

If Google Play Services proves to be a successful way for Google to enforce consistency and conformity on their platform to tackle the fragmentation issues they face, it’s not inconceivable that they’ll push more and more library functions into proprietary layers distributed via the Play Store like this.


But if Google chooses to change Android in this way, I feel that it will be inappropriate to continuing calling Android an Open Source or Free Software operating system. Instead it will be better described as a proprietary operating system with an open core – in similar fashion to that of Apple’s MacOS.

Such an evolution could lead to two distinct forks of Android being created:

  1. Propietary/Android, the version identified by the public, offered by Google and their associated vendors, a polished experience but with increasingly reduced user and developer freedoms.
  2. Free/Android, the community variations with it’s own application ecosystem that diverges away from Propietary/Android as more and more applications refuse to run on it due to Free/Android lacking libraries like Google Play Services.

Some readers will ponder why having some proprietary components is such a concern – who really wants to hack around with drivers or application compatibility APIs? Generally they’re not the most exciting part of computers [subjectively speaking of course] and on some level I can understand this mindset.

But proprietary software chunks are more than just being an annoyance to developers who want to tinker. Proprietary software makes your device opaque, obscuring what the software is doing, how it works and how it can be (ab)used.

The Google Play application has the capability to install content on your phone, a feature often used by users to install applications to their device from their browser. But does the source code of the the Google Play application ensure that it can never happen without your awareness? There’s already due cause to distrust the close association between companies like Google and the NSA, without the ability to see inside the software’s source code, you can’t be sure of it’s capabilities.

Building applications around proprietary APIs like Google Play Services removes the freedom of a user to decided to replace calls to proprietary systems to free ones. It may be preferable to use a Free Software mapping API rather than Google’s privacy lacking Maps offering for example, but without the source code, it’s not possible to make this change.

Even something as innocent as a driver or firmware of hardware such as the GSM modem could be turned into a weapon by a powerful adversary, by taking advantage of backdoors in the firmware to deliver malware to spy on an individual – whether for the “right” reasons or not, depends on your moral views and whom is doing the spying at the time.

Admittedly a pessimistic view, but I’ve laid out my personal justifications for taking this approach before and believe we need to look at how this technology could potentially (hopefully never) be used against individuals for immoral reasons.


I think Android illustrates the differences between Open Source and Free Software extremely well. Whilst Android is licensed under an Open Source license, it doesn’t have the same philosophy of Free Software.

It’s source code is open because it provided Google with a commercial advantage, not because Google believe that user freedom is important. Google and their partners have no qualms about making future applications and/or features proprietary, even at the detriment to developers and users by restricting their freedoms to understand and modify the software in their device.

Richard M. Stallman (RMS), the founder of the Free Software movement, wrote about the differences in Free Software vs Open Source and tells how whilst these two different ideologies have overlapping goals, at times they also differ. In some ways the terminology Open Source can be dangerous, as it lets us lose sight of the real reasons why software needs to be Free for Freedom’s sake above all.


Interestingly, despite how strongly I feel about Free Software,  I’ve found it somewhat personally easy to ignore concerns of proprietary software on mobiles for a prolonged period of time. In many ways, I see my mobile as  just a tool and not a serious “real” computer like my GNU/Linux laptop where I conduct most of my digital activities.  It’s possibly a result of my historical experiences with the devices, starting off using mobiles when they were just phones only and having had them slowly gain more capabilities around me, but always being seen as “phones” rather than “pocket computers”.

I’m certainly a digital native, a child of the internet generation separated from my parent’s generation by being the first to really grow up with widely available internet connectivity and computers. But to me, computers are still laptops and servers, despite having a good understanding of the mobile space and using mobile devices every day to possibly excessive amounts.

Yet for the current and next generation growing up, mobile phones and tablets are *the* computer that will define their learning experiences and interaction with the world – they may very well end up never owning a conventional computer, for the old guard of Windows, Linux and PC are gone, replaced with iOS, Android and handhelds.

It’s clear that mobiles operating systems are the platform of the future, it’s time we consider them equals with our conventional operating systems and impose the same strict demands for privacy and freedom that we have grown to expect onto the mobile space. I know that personally I don’t trust my Android mobile even one tenth as much as I trust my GNU/Linux laptop and this is unacceptable when my phone already has access to my files, my emails, my inner most private communications with others and who knows what else.


So the question is, how do we get from the Kinda-Propietary/Android we have now, to the Free/Android that we need?

I know there are some who will take a purist approach of running only pure Free Software Android and ignoring any applications or features that don’t run on it as-is. Unfortunately taking this approach will inevitably lead to long term discrepancies between the mass market Android OS and the Free Software purists pulling the OS feature set in different directions.

A true purist risks becoming a second class citizen – we are already at the stage where not being able to run popular applications can seriously restrict your ability to take part in our world – consider the difficulties of not being able to load applications needed to use public transport, do banking (online or NFC banking) or to communicate with friends due to all these applications requiring a freedom impacting proprietary layer.

It will be difficult to encourage users and application developers to use a Free Software Android build if they discover their existing collection of applications that rely on various proprietary APIs and library features no longer work, so we need to be somewhat pragmatic and make it easier for them to take up Free Software and still run proprietary applications on top of a free base, until such time as free alternatives arise for their applications.

I think the solution is a collection of three different (but all vital) efforts:

  1. Firstly, to support development of community Android distributions, such as Cyanogenmod and Replicant, something which has been successful so far, it’s clear that Google isn’t interested in working as equals with the community, so having a strong independent community is important for grass-roots innovation.
  2. Secondly to support the replacement of binary blobs in the core Android OS, such as the work that the Replicant project has started with writing Free Software drivers for hardware.
  3. Thirdly (and not at all least) we need to make it easy to provide the same functionality in Free/Android as Proprietary/Android by re-implementing closed source applications and libraries such as Google Play application store, Google Cloud Messaging (Push notifications) and the Google Play Services library/API.

Whether we like it or not, Google’s version of Android will be the platform than the majority of developers target long term. It doesn’t suit all developers, but it has suited most Free (as in beer and/or Freedom) and paid application developers for Android well enough for a long period already that I don’t see it being easy to de-rail that momentum.

If we can re-implement Google’s proprietary layers to a level sufficient for maintaining compatibility with the majority of these applications, it opens up some interesting possibilities. A Free/Android mobile with a Free/PlayServices API layer developed using the documented API calls published by Google is entirely possible and would allow users to run a Free/Android mobile and still maintain support for the majority of public applications being released for the Android platform, even if they use more and more proprietary API features.

Such a compatibility layer will enable users to run applications on their own terms – a user might decide to only run Free as in Freedom software, or they could decide that running proprietary software is OK sometimes -and that’s an acceptable choice, but the user is the one that should be making it, not Google or their device vendor.

Potentially we could take this idea a step further and re-implement features like contact and setting synchronisation against a Free Software server that technically capable users can choose to setup on their own servers, giving them the benefits of cloud-type technologies without loss of freedoms and privacy that takes place if using the Google proprietary features.


I’m not alone in these concerns – neither RMS or the Free Software Foundation (FSF) have been idle on this issue – RMS has an excellent write up on the freedom of Android here, and on a more mainstream level, the FSF is running campaigns promoting freeing Android phones and encouraging efforts to keep the platform Free as in Freedom.

I’m currently taking steps to move my Android Mobile off various proprietary dependencies to Free Software alternatives – it’s going to be slow and gradual and it will take time to determine replacements for various applications and libraries.

I haven’t done much in the way of Android application development, but I’m not afraid to pick up some Java if that’s what it takes to fill in a few gaps to get there – and if it means reverse engineering some features like Google Play Services, I’ll go down that path if need be.

Because Free Software computing is vital for privacy, vital for security and vital for a free society itself. And if the cost is a few weekends hacking at code, it’s a price well worth paying.

WordPress & SSL Fixes

I’ve been using WordPress for this blog for a number of years now – at some point I realised that whilst writing my own code is fun, there’s no need to reinvent yet-another-fucking-blog-platform and ended up selecting WordPress to use for my content, on the basis of it’s strong and active development and community.

Generally it’s pretty good, but there are times it disappoints, such as WordPress expecting servers to have FTP for unpacking updates and plugins (it’s 2013 guys, SFTP at least!), excessively setting cookies which makes caching layers more complex and doing stupid stuff with storing full URLs inside the database for page links and image resources.

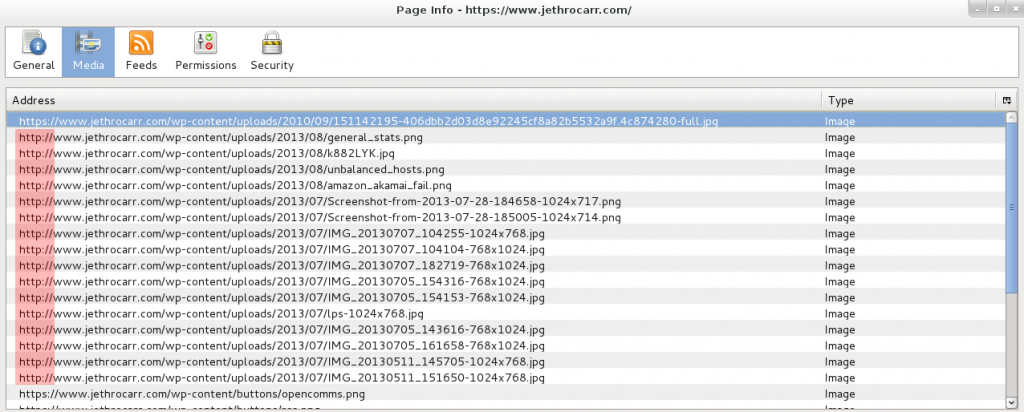
The latter has been impacting me in particular. Visitors to my site have had the option of using HTTP or HTTPS (SSL secured) access methods for some time, but annoyingly whenever I posted an article with images, WordPress includes all the images using http://. This mixed content type prevents browsers from showing the lock icon (best case) or throws up a nasty error (worst case) depending on the browser and it’s level of concern for user safety for mismatched content.

Dubious Firefox is dubious about this site.

Dubious Firefox is dubious about this site, no lock icon of security here!

Despite having accessed the site on https://, WordPress still uses http:// for my images.

Despite having accessed the site on https://, WordPress still uses http:// for my images.

I could work around this by setting the WordPress base URL for my site to be https://www.jethrocarr.com, but then images served at the unsecured http:// site would also be served via SSL, which is just adding pointless load to the server (not that SSL termination really adds much load these days, but damnit, I’m being a purist here!).

I was hoping that it was a misconfiguration of my WordPress setup, but reading online it seems that this is a known issue with WordPress and a whole bunch of modules, hacks and themes have sprung up to fix/workaround the issue…

Of course there’s an easier way – fix it at the webserver layer! Both Nginx and Apache have modules to do substitutions in page content on load, for Nginx there’s HttpSubModule and for Apache there is mod_substitute. In my case with stock Apache 2.2 on CentOS 5, I was able to fix the whole issue by adding the following to my SSL vhost configuration:

# Fix SSL URLs thanks to WordPress hardcoding http:// links to images :'(
<Location />
    AddOutputFilterByType SUBSTITUTE text/html
    Substitute "s|http://www.example.com|https://www.example.com|"
</Location>

Following this, things look much better:

The lock icon of browser approval!

The lock icon of browser approval!

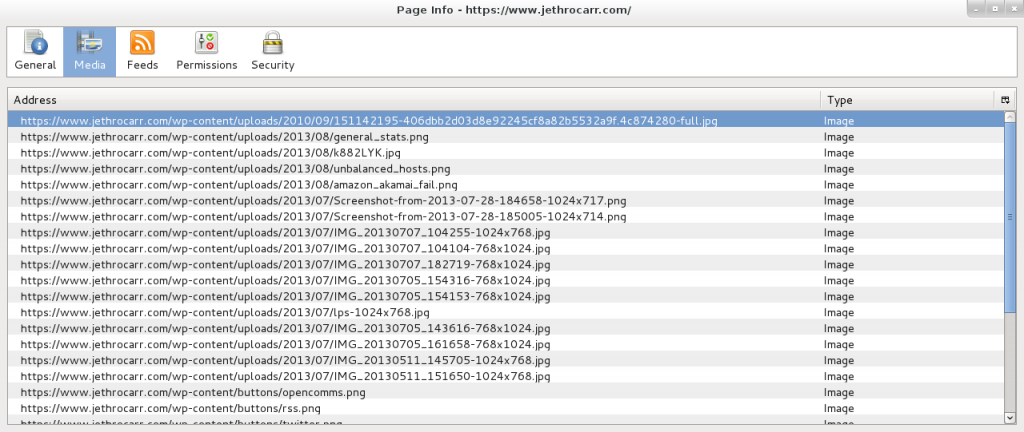
All media files are now https://, not http://

All media files are now https://, not http://

Technically this substitution will have some level of performance impact, as it has to process the generated HTML content and check for strings to replace, but the impact is so low that I wasn’t able to measure it amongst the usual variation of page response times – and it’s not going to be anywhere as slow as mod_php and WordPress itself anyway. ;-)

Finally, if you haven’t already, you probably want to change the following in wp-config.php:

define('FORCE_SSL_ADMIN', true);

This forces all WordPress logins and wp-admin activities to take place under HTTPS which is a pretty good idea if you ever post to your blog from an unsecured network.

Awstats 7.2 + extras RPMs

I’ve been a long term user of Awstats for reporting on visitor traffic to my websites. Whilst it’s a little dated, it’s simplicity and reliance only on the web server logs makes it ideal for any application, including general websites such as blog, but also more specialised sites such as my package repositories which can’t make use of more sophisticated client-side Javascript tracking methods as files are being downloaded by non-browser clients.

Simple web 1.0 goodness. No fancy AJAX graphs here son!

Simple web 1.0 goodness. No fancy AJAX graphs here son!

That repository server in particular (repos.jethrocarr.com) is now pushing 20-40GB of traffic per month to around 2500-3000 servers. Unfortunately Awstats doesn’t differentiate between general purpose file grabbers and the Yum downloader for RPM-based distributions, and it makes it difficult to see if downloads are from machines vs mirror scripts scanning and re-downloading files.

I also run dual-stack IPv4 and IPv6 – Awstats includes some useful GeoIP modules to lookup where user traffic comes from, but it doesn’t support mixed IPv4 and IPv6 by default and as my IPv6 traffic usage increases, this could be a problem as the “Unknown” country counter increases.

To fix this, I’ve written a patch for adding Yum user agent support and also merged in a patch by Sven Strickroth which adds a geoip6 module that does both IPv4 and IPv6 country lookups using the popular MaxMind GeoLite databases.

I’ve built packages for CentOS/RHEL/etc 5 & 6, which are available at my repositories at repos.jethrocarr.com. The awstats package I’ve built includes these two patches and also pulls in a current copy of MaxMind’s GeoIP database and required dependencies, so you’re all good to go immediately.

If you’re after the patches themselves, you can download them directly:

NamedManager 1.6.0

I’ve just finished up a few changes to NamedManager this weekend and released version 1.6.0. It provides a few bug fixes and small improvements, as well as the addition of support for IPv6 PTR (reverse) records, so you can now maintain both forwards and reverse DNS for both IPv4 and IPv6 with NamedManager.

IPv6 AAAA records on a domain

IPv6 AAAA records on a domain

When you add records with NamedManager, you can have a reverse PTR record added for your particular A or AAAA record by ticking a checkbox. NamedManager then generates the appropriate reverse record for you, simplifying the process of managing DNS.

IPv6 PTR records

IPv6 PTR records

If you’re interested in NamedManager you can download NamedManager from my project website (Tarball or Git), from GitHub, or download RPMs for RHEL/CentOS 5/6.