Tag Archives: geek

Anything IT related (which is most things I say) :-)

Sydney’s Powerhouse Museum

The Powerhouse Museum in Sydney is a science/tech/design museum offering a range of exhibits including space, robotics, history, fashion and other geeky and design related topics.

I went there on a special event day so the usual $12 entrance fee had been halved (yay!) and spent a few hours having a good look around the museum.

No tech museum would be complete without a steam exhibit – the powerhouse actually has some of the engines in a powered state, although there wasn’t a whole lot going on when I was there.

Before data centers, these were the power houses of industry.

Before data centers, these were the power houses behind the world’s industry.

Old destination board from a railway station.

Old destination board from a railway station.

The man walking infront of a steam engine with a red flag to limit it's speed seems about as hopeless as the RIAA/MPAA wanting to stop digital downloads.

The man walking in front of a steam engine with a red flag to limit it’s speed seems about as hopeless as the RIAA/MPAA wanting to stop digital downloads…. you can’t restrict new technology for long.

There’s also a good exhibit of space technology, including an actual F-1 rocket engine, the most powerful liquid fuelled rocket ever developed and the machine responsible for powering the Saturn V which took humanity to the moon.

(from the left) F-1 rocket engine

(from the left) F-1 rocket engine, a sounding rocket (research), several models of famous space craft and satellites and more.

F-1 Engine!

F-1 Engine! These things are NOT small!

\m/ squeeeee

\m/ :-D

Rocket thruster used in command modules.

Rocket thruster used in command modules.

1/3 scale Soyuz pair coupled together.

1/3 scale Soyuz pair coupled together.

Retro computer inside the space station module mockup.

Retro computer inside the space station module mockup.

Replica Mars Rover - The Soviets sure made some weird looking hardware.

Replica Mars Rover – The Soviets sure made some weird looking hardware.

There are a range of robotics exhibits, including some neat demonstrations of industrial robotic arms that are bit more uncommon to see.

All hail the robotic overlords!

All hail the robotic overlords!

Everyone loves hexapods!

Everyone loves hexapods!

Plus a bunch of other random bits:

Weird looking aircraft

Weird looking aircraft

Electrifying Touch

Electrifying Touch

At times the selection of exhibits feels a bit disjointed, things certainly don’t flow quite as well as some of the other science and technology museums I’ve been to and some areas a bit worn and dated –  having said that, they are in the process of renovations, so it might be fairer to re-evaluate it in a year or so.

That being said, it’s worth a visit, just for some of the awesomeness they have there – plus how often can you take a picture of you and your partner standing underneath an F1 rocket engine? :-)

Houston, set engines to snuggly!

Houston, set engines to snuggly!

Das Keyboard Ultimate Silent

With the recent move to Sydney, I’ve had to leave my beloved IBM Model M keyboards back in New Zealand – sadly they’re a bit heavy and large to effectively pack into my luggage without sacrificing some much needed clothes.

Even if I was to bring them over here to Australia with me, the Model M’s are too loud for me to use in a shared office environment – my Model M was previously banned from my last employers office after they could hear it through two walls and down a phone at the other end….

Instead I’ve brought a Das Keyboard Ultimate Silent. I’ve been a fan of the Das Keyboard idea for a while – just like the IBM Model M they’re traditional clicky mechanical keyboards, but have modern features such as USB, lighter bodies and (love them or hate them) Windows keys that are useful for both Windows and MacOS users.

Das Keyboards come in both labelled (Professional) and unlabelled (Ultimate) revisions, and the option of either standard loud clicky keys or the “silent” model – considering I’m working in a shared office space, I elected to go for the silent edition.

Mmmmm sleek black sexiness.

Mmmmm sleek black sexiness.

I’ve been using the Ultimate Silent for about two months now, general impressions are:

  • It’s an excellent keyboard that’s well worth the $150 AUD price tag. I’ve had heaps of comments from co-workers on how great it feels to type on, command line power geeks can’t be wrong. ;-)
  • The keys still have the tactile feedback of a mechanical clicky keyboard. Whilst the responsive spring-back is a little more subdued than on the Model Ms, it still delivers a very nice feel.
  • The blank keys are AWESOME. People who try to use my computer are always really put off at first, however if you’re a touch typist it won’t take long to get used to it.
  • It’s not exactly silent -“quieter” is a more accurate term, I certainly have the loudest keyboard in the office, but it’s nowhere near as loud as an actual Model M is. The sound is more a subdued tap as the keys hit the bottom of the keyboard when typing, rather than the audible click of a traditional clicky keyboard.
  • My colleagues are a pretty good bunch of people since they haven’t murdered me for loudly typing and stretching the “silent” label to the limits. ;-)
  • I have occasional issues with finding a particular symbol key (things like ^ or &), but I can touch type almost any of the 104 keys on it without an issue.

Personally I’ll keep using the IBM Model Ms as my personal keyboard, they’re great quality keyboards and I love the fact I can keep using something designed in 1980s (mine were manufactured in 1994) on my computer for possible the rest of my life, but I’d be very content with using a Das Keyboard personally as well as professionally if I didn’t already have the Model M.

It always amazes me how often geeks will spend huge money on their computers and then neglect the keyboard or buy something that features lots of flashy lights and special keys, but ignore the most important requirement of good typing ergonomics and performance.

I haven’t tried the clicky version of the Das Keyboard myself so I can’t really compare it – I expect you’d find that the clicky version has a even nicer feedback (like the Model M) but the silent is the better investment if you work near anyone else.

I brought mine from AusPCMarket who have local stock and it arrived in a couple of working days without an issue, otherwise buy direct from Das Keyboards.

Debian Testing with Cinnamon

I’ve been running Debian Stable on my laptop for about 10 months for a number of reasons, but in particular as a way of staying away from GNOME 3 for a while longer.

GNOME 3 is one of those divisive topics in the Linux community, people tend to either love it or hate it – for me personally I find the changes it’s introduced impact my workflow negatively, however if I was less of a power user or running Linux on a tablet, I can see the appeal of the way GNOME 3 is designed.

Since GNOME 3 was released, there have been a few new options that have arisen for users craving the more traditional desktop environment offered – two of the popular options are Cinnamon and MATE.

MATE is a fork of GNOME 2, so duplicates all the old libraries and applications, where as Cinnamon is an alternative GNOME Shell, which means that it uses the GNOME 3 libraries and applications.

I’m actually a fan of a lot of the software made by the GNOME project, so I decided to go down the Cinnamon path as it would give me useful features from GNOME 3 such as the latest widgets for bluetooth, audio, power management and lock screens, whilst still providing the traditional window management and menus that I like.

As I was currently on Debian Stable, I upgraded to Debian Testing which provided the required GNOME 3 packages, and then installed Cinnamon from source – pretty easy since there’s only two packages and as they’ve already packaged for Debian, just a dpkg-buildpackage to get installable packages for my laptop.

So far I’m pretty happy with it, I’m able to retain my top & bottom menu bar setup and all my favorite GNOME applets and tray features, but also take advantages of a few nice UI enhancements that Cinnamon has added.
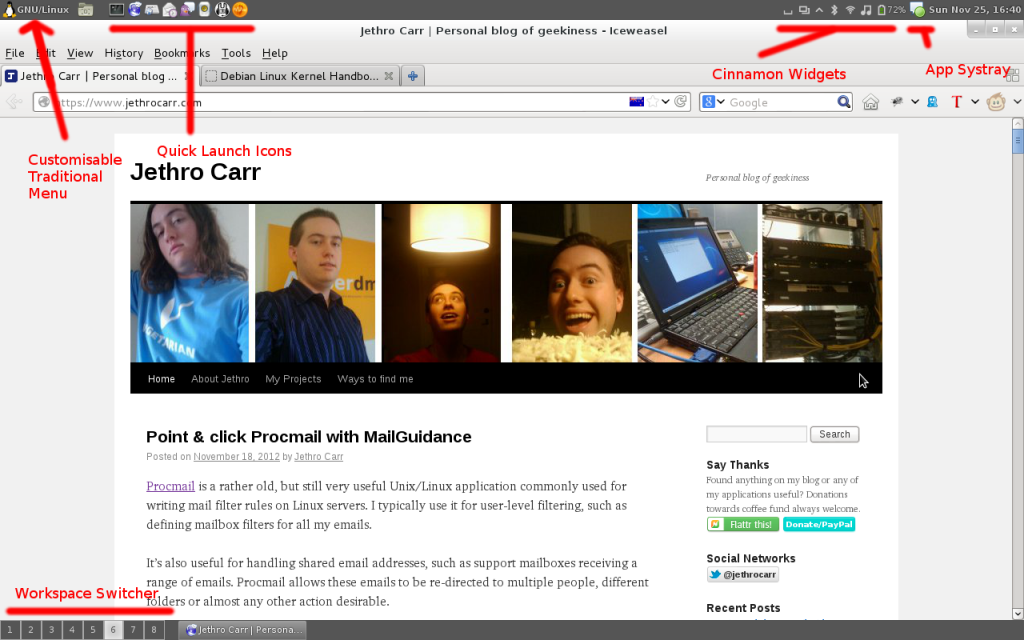
All the traditional features we know and love.

One of the most important features for me was a functional workspace system that allows me to setup my 8 different workspaces that I use for each task. Cinnamon *mostly* delivers on this – it correctly handles CTL+ALT+LEFT/RIGHT to switch between workspaces, it provides a taskbar workspace switcher applet and it lets me set whatever number of workspaces I want to have.

Unfortunately it does seem to have a bug/limitation where the workspace switcher doesn’t display mini icons showing what windows are open on which workspace, something I often use for going “which workspace did I open project blah on?”. I also found that I had to first add the 8 workspaces I wanted by using CTL+ALT+UP and clicking the + icon, otherwise it defaulted to the annoying dynamic “create more workspaces as you need them” behavior.

On the plus side, it does offer up a few shinier features such as the graphical workspace switcher that can be opened with CTL+ALT+UP and the window browser which can be opened with CTL+ATL+DOWN.

You can never have too many workspaces! If you’re similarly anal-retentive as me you can go and name each workspace as well.

There’s also a few handy new applets that may appeal to some, such as the multi-workspace window list, allowing you to select any open window across any workspace.
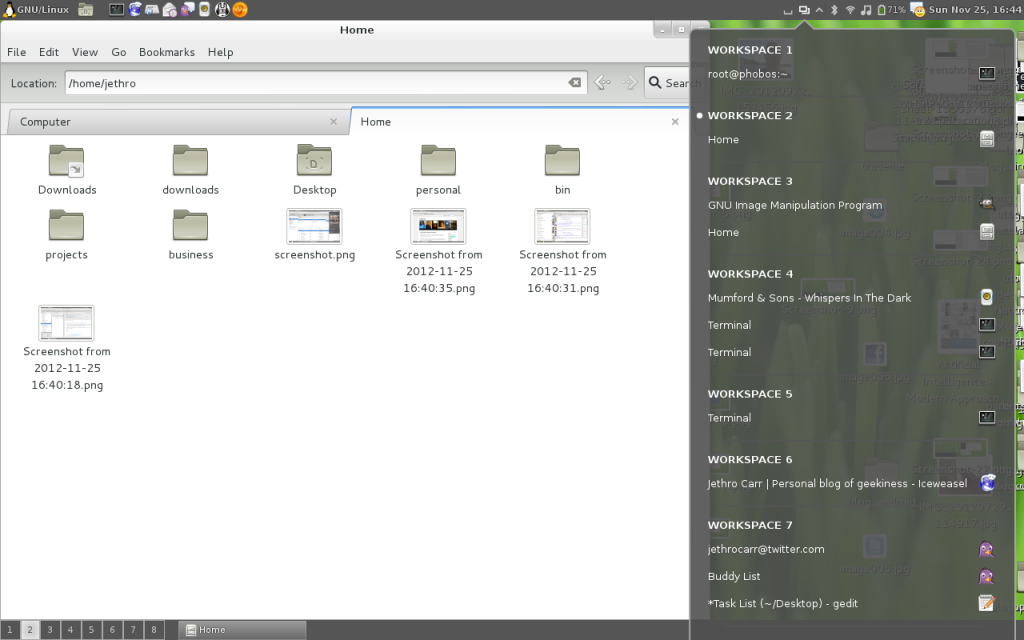
Window applet dropdown, with Nautilus file manager off to the left.

I use Rhythmbox for music playback – I’m not a huge fan of the application, mostly since it doesn’t cope well with playing content off network shares over WAN links, but it does have a nice simple UI and good integration into Cinnamon:
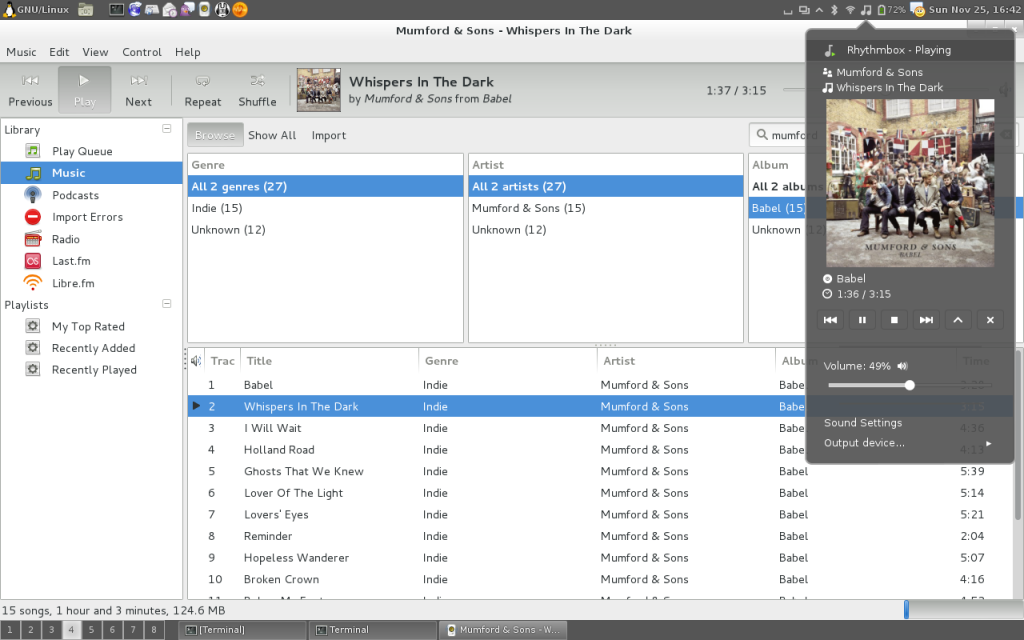
Break out the tweed jackets and moleskins, you can play your folk rock in glorious GTK-3 graphics.

The standard Cinnamon theme is pretty decent, but I do find it has an overabundance of gray, something that is quite noticeable when using a window heavy application such as Evolution.
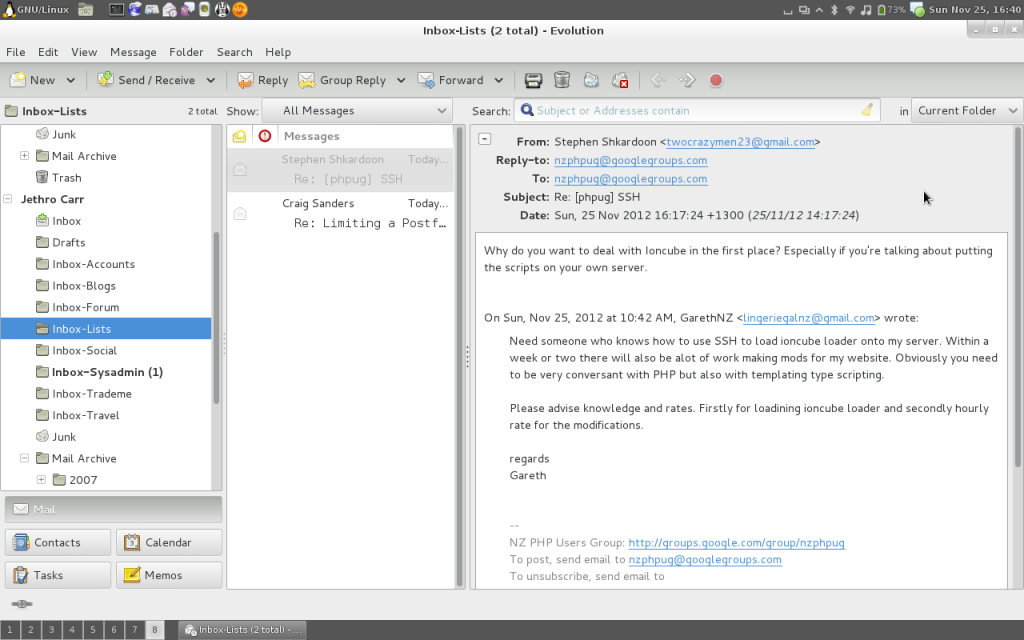
Didn’t you get the memo? Gray is in this year!

Of course there are a lot of other themes available so if the grayness gets to you, there are other options. You also have the usual options to change the window border styles, it’s something I might do personally since I’m finding that the chunky window headings are wasting a bit of my laptop’s very limited screen real estate.

Overall I’m pretty happy with Cinnamon and plan to keep using it for the foreseeable future on this laptop – if you’re unhappy with GNOME 3 and preferred the older environment, I recommend taking a look at it.

I’ve been using it on a laptop with a pretty basic Intel GPU (using i810 driver) and had no issue with any of the accelerated graphics, everything feels pretty snappy –  there is also a 2D Cinnamon option at login if your system won’t do 3D under any circumstance.

Point & click Procmail with MailGuidance

Procmail is a rather old, but still very useful Unix/Linux application commonly used for writing mail filter rules on Linux servers. I typically use it for user-level filtering, such as defining mailbox filters for all my emails.

It’s also useful for handling shared email addresses, such as support mailboxes receiving a range of emails. Procmail allows these emails to be re-directed to multiple people, different folders or almost any other action desirable.

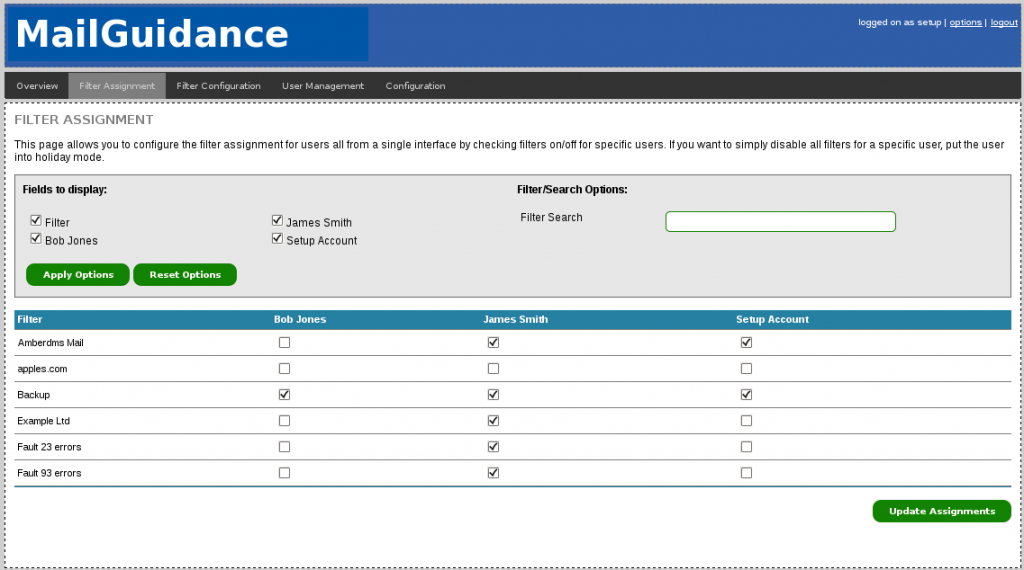
To make it easier to manage Procmail rule sets in this scenario, I built a tool called “MailGuidance”. It’s an open source PHP/MySQL application which allows a user to create Procmail filters in a web environment and having it then generate the appropriate configuration in the background on the server.

Define whom in your organisation should be getting emails for each matching filter.

MailGuidance is intended for small organisations or an individual seeking a web-based way of managing their procmail rules, it’s intentionally simple and does limit the power of procmail somewhat in exchange for making an easy to use experience for users.

  • Easy web based interface where filters can be enabled/disabled per user.
  • User “holiday mode” where all emails to that user get redirected to another until they return, so that nothing gets forgotten.
  • Optional email archiving into different folders.
  • Configurable behavior for archiving and unmatched mail.
  • Works perfectly with IPv6. :-)

Configurable behaviors.

Going away? Send all that albino monkey porn you’ve subscribed to through to your colleague instead!

The best use case for MailGuidance so far has been for handling server log and error emails, by filtering and then redirecting them to the appropriate people/teams to avoid spamming system administrators with irrelevant messages.

I spent some time this weekend tweaking it a bit more and have now packaged some releases and opened up the repository publicly – you can download stable version 1.0.0 or read more about it on my project page here. RPMs are available for users of RHEL/clones.

Introducing FlatTraffic

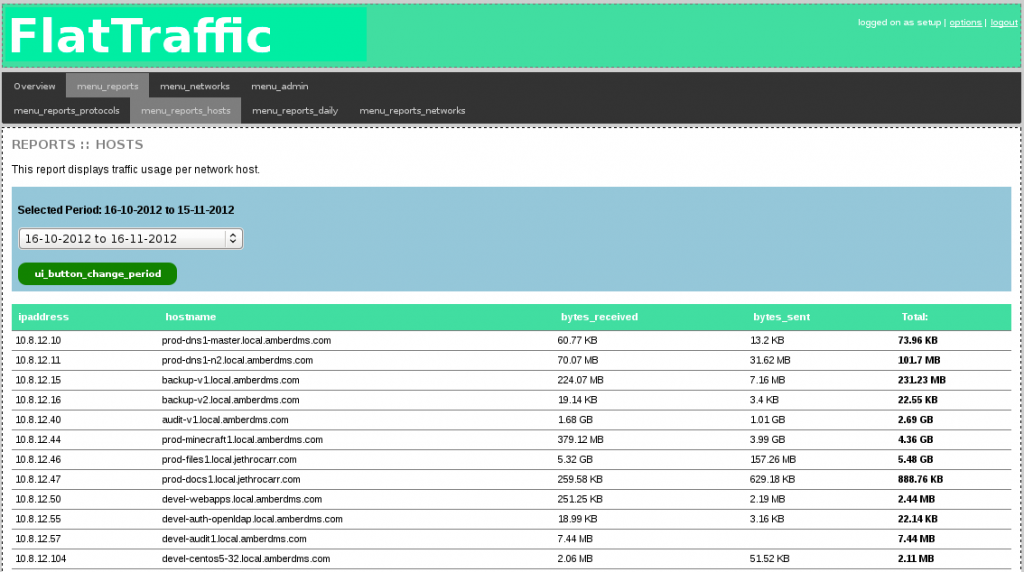
FlatTraffic is an AGPL web interface for analyzing NetFlow records and showing statistics designed to make it clear and easy to determine which hosts of the network are consuming data.

It’s still in beta stage, the application is functional and is documented, but may have bugs and need a few tweaks here and there to bring it up to a stable grade… I’m releasing now so that people can start using and breaking it to get a well tested piece of code to enable a 1.0.0 release.

I’d be lying if I said this was a complete list of my computers….

As you are probably aware, New Zealand (and Australia to a lesser degree) are victims of the much hated internet data cap, an unfortunate response to the economic pressures of providing internet services in our markets.

This is a particular issue when you have situations such as flatmates sharing a connection or a a collection of servers behind an internet link which are hungrily consuming the data cap every second.

To help keep the peace with flatmates I started writing this application when I was back in Wellington to report on traffic usage, using a SQL DB of NetFlow records collected by the gateway. It got put on hold somewhat after moving to Auckland and getting a fat DSL plan from Snap NZ, however it recently got resurrected so that I could track down which host on my home server was chewing through the much smaller data cap at it’s new home at my parents place (sadly my full tower beauty wouldn’t fit into my plane luggage).


FlatTraffic is focused at being a geek home/small server environment tool rather than a general purpose NetFlow analyzer – there are more powerful tools already available for that, my design focus with FlatTraffic is simplicity and doing one job really well.

FlatTraffic assumes you’re using it in a conventional ISP customer situation and allows you to configure the monthly date that your service renews on, so that it will show data usage periods that match your billing period. You can also configure other key options such as 1000 vs 1024 bytes and what automatic DB truncating options should be turned on.

Graphical configuration options, eat your heart out Microsoft developers.

There are currently four reports defined in FlatTraffic:

  1. Traffic consumed by protocol.
  2. Traffic consumed by host (with reverse DNS lookup resolution of host IPs)
  3. Traffic consumed per day.
  4. Traffic consumed by configured network range.

Helpful daily totals, aligned with your ISP’s billing period.

FlatTraffic doesn’t replace a NetFlow collector, you still need to understand the principles of setting up NetFlow traffic accounting and configuring a collector that stores records into a SQL database.

I’ve included some sample scripts for use with flowd (from the flow-tools collection) however I’m going to work on adding support for some better collectors. There’s also work needed for IPv6, since whilst the app UI is IPv6 compatible, the NetFlow reporting is strictly IPv4 only currently.

(Unfortunately I also have issues in that the iptables module I’m using to generate NetFlow records don’t seem to have an ip6tables version, so I’m a bit stuck for generating IPv6 records currently without adding a device between my server and the WAN connection :-(  ).

In my own environment I hand out static DHCP leases to all my systems along with having configured reverse DNS so when doing a host report I can clearly see which host is responsible for what usage – if you have dynamically addressed hosts doing lots of traffic, things won’t be too helpful until you fix the leases for at least the high users.

To keep performance reasonable when working with huge NetFlow databases, FlatTraffic queries summary data for the selected date period and then caches into MySQL MEMORY tables to make subsequent reports quick and non resource intensive.

Please sir, can I have some more flow records?

I’m currently using it with NetFlow DBs with several months worth of data without issue, but it needs further and wider testing to determine how scalable it really is. I’ve worked to avoid putting much memory hungry logic in PHP, instead FlatTraffic tries to do as much as possible inside MySQL itself and uses some easily indexable queries.

To get started with FlatTraffic, visit the project page and install from either RPM, Source Tarball or direct from SVN – and send me feedback, good or bad. If you’re using another type of NetFlow collector other than flowd and would like support take a look at this page. Also note that there’s no reason why FlatTraffic couldn’t end up using other sources of data, it’s not architecturally limited to just NetFlow if you can get similar traffic details in some other form that would do fine.

If you end up using this application, please let me know how you find, always good to know what is/isn’t useful for people.

Munin 2.0.x on EL 5/6 with IPv6

I’ve been looking forwards to Munin 2 for a while – whilst Munin has historically been a great monitoring resource, it’s always been a little bit too fragile for my liking and the 2.x series sounds like it will correct a number of limitations.

Munin 2.0.6 packages recently became available in the EPEL repository, making it easy to add Munin to your RHEL/CentOS/OracleEL 5/6 servers.

Unfortunately the upgrade managed to break value collection for all my hosts, thanks to the fact that I run a dual-stack IPv4/IPv6 network. :-(

Essentially there were two problems encountered:

  1. Firstly, the Munin 2.x master attempts to talk to the nodes via IPv6 by default, as it typical of applications when running in a dual stack environment. However when it isn’t able to establish an IPv6 connection, instead of falling back to IPv4, Munin just fails to connect.
  2. Secondly, the Munin nodes weren’t listing on IPv6 as they should have been – which is the cause of the first problem.

The first problem is an application bug, or possibly a bug in one of the underlying libraries that Munin-node is using. I haven’t gone to the effort of tracing and debugging it at this stage, but if I get some time it would be good to fix properly.

The second is a packaging issue – there are two dependency issues on EL 5 & 6 that need to be resolved before munin-node will support IPv6 properly.

  1. perl-IO-Socket-INET6 must be installed – whilst it may not be a package dependency (at time of writing anyway) it is a functional dependency for IPv6 to work.
  2. perl-Net-Server as provided by EPEL is too old to support listening on IPv6 and needs to be upgraded to version 2.x.

Once the above two issues are corrected, make sure that the munin configuration is correctly configured:

host *
allow ^127\.0\.0\.1$
allow ^192\.168\.1$
allow ^fdd5:\S*$

I configure my Munin nodes to listen to all interfaces (host *) and to allow access from localhost, my IPv4 LAN and my IPv6 LAN. Note that the allow lines are just regex rather than CIDR notation.

If you prefer to allow all connections and control access by some other means (such as ip6tables firewall rules), you can use just the following as your only allow line:

allow ^\S*$

Once done, you can verify that munin-node is listening on an IPv6 interface. :-)

ipv4host$ netstat -na | grep 4949
tcp 0 0 0.0.0.0:4949 0.0.0.0:* LISTEN
ipv6host$  netstat -na | grep 4949
tcp 0 0 :::4949 :::* LISTEN

I’ve created packages that solve these issues for EL 5 & EL 6 which are now available in my repos – essentially an upgraded perl-Net-Server package and an adjusted EPEL Munin package that includes the perl-IO-Socket-Net package as a dependency.

Blessed is the DSL

As all you loyal readers should have noticed by now is that my blog has been a little quiet since I moved to Sydney. I can assure you it’s not from a lack of interest, but rather a lack of time and essential living resources such as DSL conspiring to prevent me from posting.

I’ve been in Sydney for just over 4 weeks now and have a few blog posts to write, so will complete these over the next few days. :-)

We managed to find a flat and moved into it 2 weeks ago, right in the middle of the CBD with only a 25min walk to my work office – sadly DSL took a little longer to get sorted (thanks Telstra @#$%^&*U) but I now have a nice shiny DSL connection with the good people at Internode.

It’s been an interesting experiment using 3G as my primary internet connection these last few days – as first it’s OK, but it becomes noticeable at how bad performing it is after only a few days. Slow bandwidth making downloads of small files a noticeable factor, latency making SSH connections laggy and non-responsive.

Even simple stuff like listening to music is hard – I have all my music on my server in NZ and simply play it directly off the samba share across my VPN and use cachefilesd to cache recently accessed files on my laptop – this works great on fixed line connections, but fails horribly on 3G which is generally fast enough most of the time for 256k MP3, but has nowhere near enough of a data cap and the connection drops really mess with playback.

The poor 3G performance is not helped by the fact that AU city 3G networks are generally poor – combination of factors, bad coverage, buildings and huge volumes of users, I actually found that NZ’s mobile network was generally better performing all round.

On the other hand, the new LTE networks (“4G”) here are stunningly impressive – colleague is frequently getting 24mbit (and as much as 32mbit) download on his 4G Samsung S3, which is even faster than my CBD ADSL2+ line. Of course this means you’ll chomp though your 1GB monthly plan in about 4.2 minutes… :-/

It was an interesting experience, but I’m now very happy to have a real connection back. Not having a home server is a bit of an adjustment, I’m down to just a DSL modem plugged into my Mikrotik RB493G…

I may look at putting in a larger file server cache locally here at some point, currently looking at the best option for pulling large content from NZ to AU and holding it in cache for the optimal time, almost need a cache that I can instruct to pre-seed on demand – eg  “cache all recent accesses from my NZ file server, but also cache the following 4GB file I’ve just requested so that I can watch it when I get home tonight”.

As I write this, we’ve only had DSL for 5 hours and have already pulled 2GB with just casual browsing…. I think the 200GB cap will be enough for us, but one of the perks of living in AU is that I could get up to a 1.2TB cap if I really wanted. ;-)

Cuckoo Clock NZ

Having arrived in Sydney, I’m staying with some of Lisa’s relatives who have kindly provided us with a room for a while until we get our own place sorted out.

One of the things they have in their house, is a proper mechanical cuckoo clock, which I find highly amusing every time it pops open and emits chirps. I decided it would be fun to write a twitter cuckoo clock.

It’s pretty simple code-wise, just need to generate a tweet every hour with a cuckoo for each hour on a 12-hour clock and a bit of general sanity checking, such as checking what time the last tweet was posted, so if crond goes nuts it won’t spam the feed.

Behold, the amazingness of the Twitter cuckoo clock.

I decided to make it slightly more interesting, so every time it tweets, there is a 1-in-10 chance of it posting some other message from a list of defined messages, as per the above example.

You can check it out at @cuckooclocknz and you can check out the small bit of Python that powers it on my repos. I was tempted to make some for AU, but I was lazy and just did NZ, since my servers are running in NZ timezone and there’s only one timezone for the whole country unlike AU…

Slowly getting more used to Python coding, I’m not a huge fan yet, there’s some nice things about it, like the enforced indenting structure, but some odd things that throw me after years of PHP and Perl, such as for loops and the stricter type handling that need getting used to.

Twitter Auto Delete

Despite me making a clean break from Twitter earlier this year, I’ve ended up back on it on a casual basis, mostly due to the number of my friends on there who only chat or are only reachable via it. :-(

I decided that this time I’d like to treat Twitter more like an IRC chat room, ie a place to chat casually with friends, but not as a formal permanent record – so I made some tweaks to how I was using it:

  1. Primary interaction with Twitter is via PrplTwtr, a plugin for Pidgin, which makes Twitter act like any other chat room, to avoid the habit of having Twitter open in my browser being an invasive distraction. If friends @reply me or DM me, I get a new IM message notification, but otherwise I can ignore it happily.
  2. I wrote a small script that automatically goes and deletes all my Twitter messages after 24 hours – this is enough time for me to chat comfortably with friends, but makes it hard for outsiders to go and data mine my feed and it’s less of a permanent recordable cached record, or link to my tweets long term.

It’s not a perfect setup, whilst it prevents someone from casually going back and seeing my history and engagements with others, it doesn’t stop someone recording my tweets over an extended period to build up their own data pool about me, and of course I have no way of knowing if when I delete a tweet, if it really disappears from the pool of information that Twitter sells to data miners to use.

But it’s good enough that I can chat with friends and keep up-to-date with their lives without leaving a huge digital footprint for any randoms to trawl through.

There are some auto-deleter services around, but I didn’t trust any of them to not do malicious things with my account (eg spamming their presence), plus I wanted it to delete all my tweets *except* my blog post feed.

I found that there’s a pretty decent Twitter module for Python and decided to use this as an exercise to finally learn some proper Python, something I’ve somewhat avoided for lack of a good learning exercise.

The result is a simple Twitter auto-deleter script that is called by Cron every 4 hours and runs a check and deletes any tweets older than 24 hours – the basics is pretty simple really:

39    # query my user status list
40    mytimeline = api.GetUserTimeline(screen_name=user_name,count=query_quantity,include_rts=True)
41    
42    for status in mytimeline:
43    
44        if re.match("^New Blog Post", status.text):
45            #print "Blog post! No delete wanted"
46            continue
47    
48        if status.created_at_in_seconds < cond_time_before:
49            api.DestroyStatus(status.id)
50       
51            print "Deleting Tweet:"
52            print "- Created At: " + status.created_at
53            print "- Content: " + status.text

Note that with GetUserTimeline, you need to specify include_rts=True as an explicit option, so that it includes anything you’ve retweeted in the timeline returned.

Favorites are special wee critters and require a separate GetFavorites call, I don’t use Favorites, so wanted this delete to remove any favorites created by accidental miss-clicks.

You can check out my source here – if you want to run it on your own server, you’ll need to use your account to setup a dev API key and access tokens etc. And you may want to adjust things like the deletion of favorites or retention of blog posts.

I’ve pondered turning this into a simple web-hosted service for people to use, so if you’re the sort of person who can’t use this script yourself but would like the ability to auto-delete your tweets, let me know and I’ll ponder doing it if there’s interest.

I’m sure Twitter will probably kill off more and more of these API calls in future, but at the moment they’re exposing just enough logic to enable me to do this. :-)

Do note that if you run this on a big account, you will hit the maximum API call limit VERY quickly, hence a configured query quantity limit to restrict how many tweets are loaded per execution – you could get away with several hundred every 60mins if you wanted to delete all your twitter history as fast as possible without actually blowing away the account.

Android OpenVPN & Jelly Bean

Last night my Galaxy Nexus finally got the Jelly Bean update pushed to it via Over-The-Air – I’m not sure why it’s taken until now to get it, but ICS has been working fine so I never bothered to build Android from source again.

It was slightly disturbing that the update came down over 3G data, whilst I have a fair bit of cap, a lot of NZders are on pretty low cellphone datacaps and the update is around 160MB.

The upgrade was pretty seamless, however it broke my Openvpn for Android setup, preventing me from connecting to any of my servers or email. According to the application, there is a known issue that when the OS updates, you need to re-establish the trust relationship with the Android keystore, which you can do by editing the VPN and re-selecting the certificate and selecting “allow”.

Unfortunately, that didn’t work for me, it would keep repeating the error and refusing to run.  There wasn’t much useful in adb logcat either:

I/ActivityManager(  303): Displayed de.blinkt.openvpn/.MainActivity: +213ms
I/ActivityManager(  303): START {act=android.intent.action.MAIN cmp=de.blinkt.openvpn/.LaunchVPN (has extras) u=0} from pid 4071
I/ActivityManager(  303): START {flg=0x20000 cmp=de.blinkt.openvpn/.LogWindow u=0} from pid 4071
I/keystore(  130): uid: 1000 action: t -> 1 state: 1 -> 1 retry: 4
I/keystore(  130): uid: 1000 action: x -> 1 state: 1 -> 1 retry: 4
V/OpenSSL-keystore( 4071): keystore_bind_fn
V/OpenSSL-keystore( 4071): keystore_engine_setup
V/OpenSSL-keystore( 4071): keystore_loadkey(0x5c30c3d0, "1000_USRPKEY_mobile-jethro", 0x0, 0x0)
I/keystore(  130): uid: 10067 action: b -> 7 state: 1 -> 1 retry: 4
W/keystore_client( 4071): Error from keystore: 7
V/OpenSSL-keystore( 4071): Cannot get public key for 1000_USRPKEY_mobile-jethro

I had a read and came across this bug report in Android, suggesting that the names of some certificates could be a problem.

My certificate was mobile-jethro.p12, so I named it to mobile.p12 and imported it again – which resolved the problem! Bit of a nasty character handling bug it seems….