Tag Archives: geek

Anything IT related (which is most things I say) :-)

Android via serial to Arduino

Whilst I’ve been pretty busy lately, I recently made another order from Mindkits and got to work with testing some of my ideas for my Arduino-based remote management solution for my home server.

There’s 4 major parts to this solution

  1. Connectivity to the computer’s serial port (a motherboard 10-pin header) and being able to communicate with the serial port using the Arduino.
  2. An Arduino controlled switch to turn the computer motherboard’s reset pins on and off.
  3. Connection into one of my old HTC Magic Android cellphones.
  4. Connection of 1-wire temperature sensors in key parts of the server’s case.

I’m using a stock standard Arduino Uno/Eleven for this project, for two main reasons:

  1. The HTC Magic phone is quite an old model of Android phones, effectively it’s the second generation after the original G1 and was the first officially available Android phone in New Zealand. Whilst I have loaded the last stable version of Cynogenmod released for it onto the phone, it’s only Android 2.2 and doesn’t feature the Android USB Accessory API support, so there was no point getting something like the USBDroid model.
  2. Rather than paying extra for ethernet connectivity, I’m planning to write an Android application that runs on the phone in the background that provides all the logic behind the remote management program for the server and connectivity via Wifi, 3G and SMS – I figure that the Android platform is better places for the management program anyway with a more sophisticated software

I purchased some protoshields for the Arduino, so my plan is to develop all my circuit logic as an addon shield so it will be possible to stack other shields on in future if I want to add some new applications/functionality to the system.

I’m new to the electronics, the Arduino coding AND the Android development requirements, so it’s an awesome learning curve project for me to start getting my head around all these technologies. :-)

The easiest bit to solve is the control of the computer’s reset header – I need this in order to be able to reboot a crashed system, something that has happened a couple of times due to flaky hardware.

To control the reset, I can use a simple transistor switched circuit, there’s a few resources around for novices to follow, I found this one useful. The only concerns I have is that I need to research and find out what the voltage on the reset headers is – I’m assuming 5V, but it could be anything from 3V to 12V….

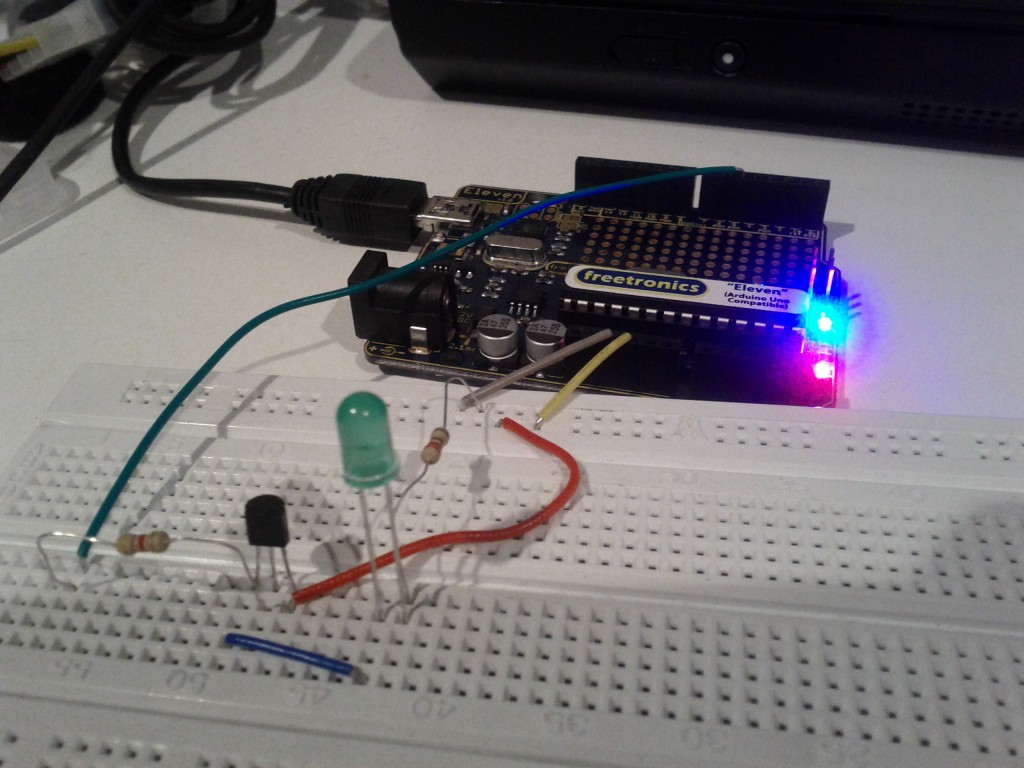
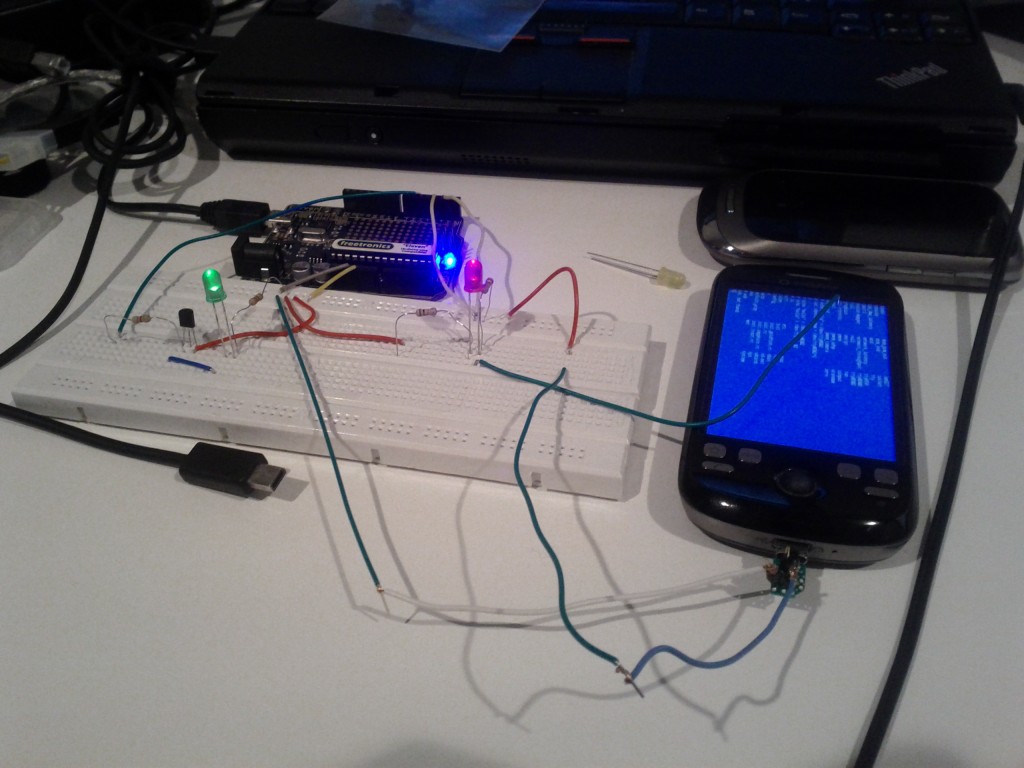
Tested the switch by using the Arduino to turn on the LED using a transistor.

The connectivity to the server seems pretty straightforwards – I’ll be using an RS232 shifter circuit (like this one) to connect the PC serial port to the Arduino, although I might end up re-implementing that circuit directly on the protoshield and using a 10-pin IEC connector to plug directly into the motherboard’s serial header

The phone will be connected using the debug serial port in the HTC Magic – it seems a number of the earlier HTC models can provide serial over some of the extra pins in the ExtUSB plug they use.

I’m not totally sure how I’ll be connecting both serial ports just yet – the Ardunio has one hardware UART onboard on pins 0 and 1, but I’m not sure if I can use those without losing the ability to manage the Arduino via it’s USB port – ideally I want the capability to still update the Arduino from the server it’s connected to.

It is possible to connect additional serial ports using software and there’s even a handy library for it, so I have that option for one or both ports. I’ll just have to code my software to be aware that the connection might be lossy or imperfect and to be patient and retry stuff.

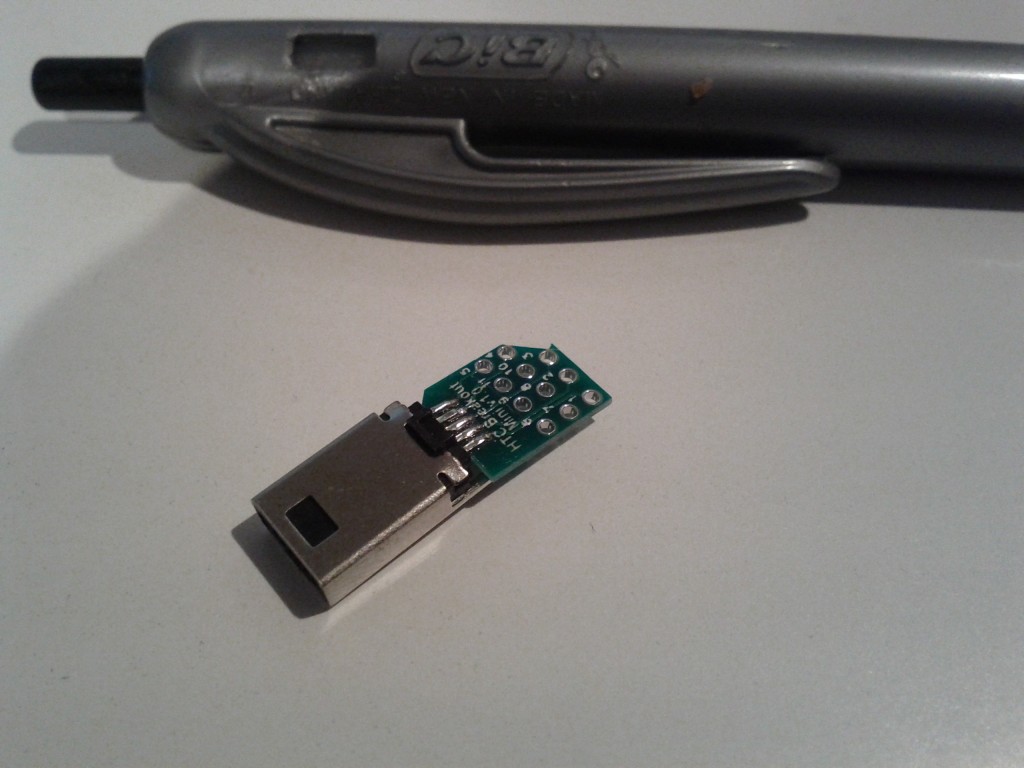
I purchased an (expensive!) breakout board for the ExtUSB port which will make the soldering a *bit* easier, but considering the size of it, it still won’t be any walk in the park…

From uber-tiny to just plain tiny :-/

Fortunately since I’m using Cynogenmod, all the OS-side software is sorted and the kernel built with the correct parameters to enable the serial port functionality, providing me with a /dev/ttyMSM2 character device out-of-the-box.

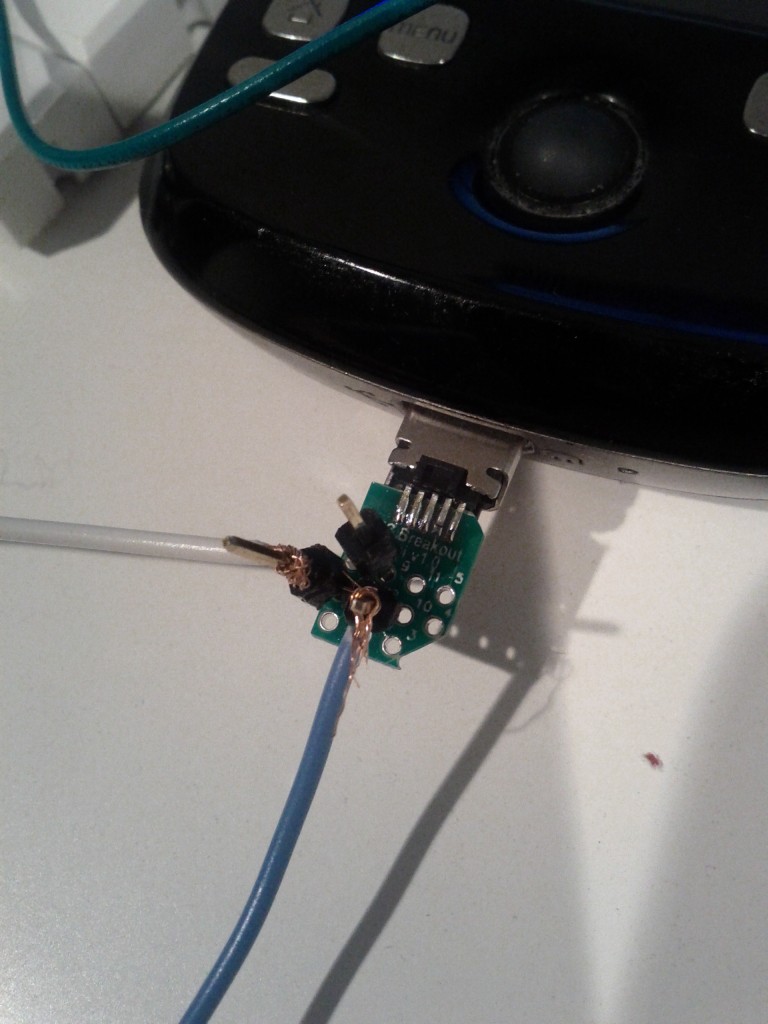
Because I wanted to give it a go and see how the phone ran, I used some header pins to connect to the breakout board as they fit in the holes snugly – there must be some better tools available for connecting to PCBs and device legs without soldering for testing purposes, so I’ll need to do some more research for future.

World’s dodgiest serial connection – also GND and TX pins connected only, it sends 2.8V into the Arduino which is OK, but I need to do a step down circuit before I can transmit from 5V back into the phone.

Hacky hacks

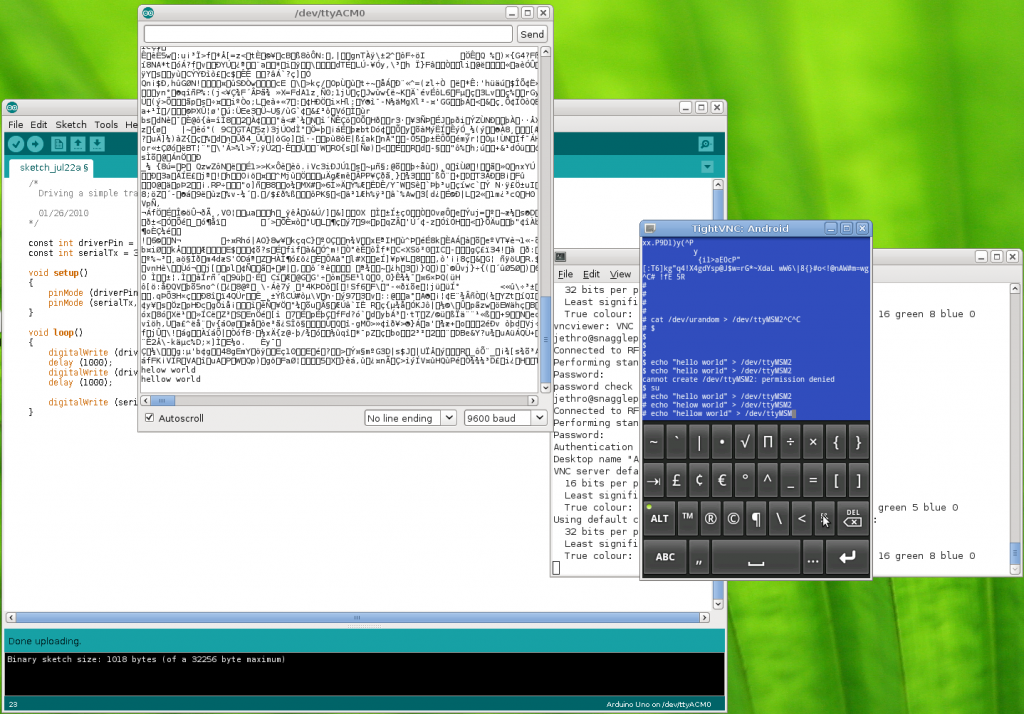
VNCd into the phone and sending messages over the serial line, which is connected to pin 1 (TX) on the Arduino, so the messages appear in the serial monitor

Based on these results it’s looking good – at least I’ve validated my understand of what is possible, so the next step is to turn some of this into a proper circuit.

My current plan is to do a short wire run from the ExtUSB connector breakout board into a small PCB which will split the output into the 3 wires for serial (RX, TX, Ground) and also take the 4 wires for USB and connect them to a USB port, so that I can plugin a USB cable to charge and manage the phone. From there, I can run the 3 serial wires to a header on the protoshield I’m building to connect into the Arduino.

I’ll have to work out how the Android phone and the Arduino will communicate for the management functionality, at this stage I’m planning to have an app that would send specific commands to the Arduino via serial and maybe the ability to get the output from the server’s serial port via the serial link to the Android phone by encapsulating the data or some other behavior.

Next steps is to get a better soldering iron so hopefully will be able to do the initial soldering I need for the HTC magic serial connection next weekend. :-)

Null Modem Trick

I dug out my Soekris 4801 and needed to hookup a serial connection to figure out what the was actually running and to reconfigure as required.

After digging through my cables I found a DB-9 serial female to female cable and hooked it up, only to frustratingly find that the cable wasn’t infact a null modem cable, and actually a somewhat obscure female-to-female DCE-to-DTE.

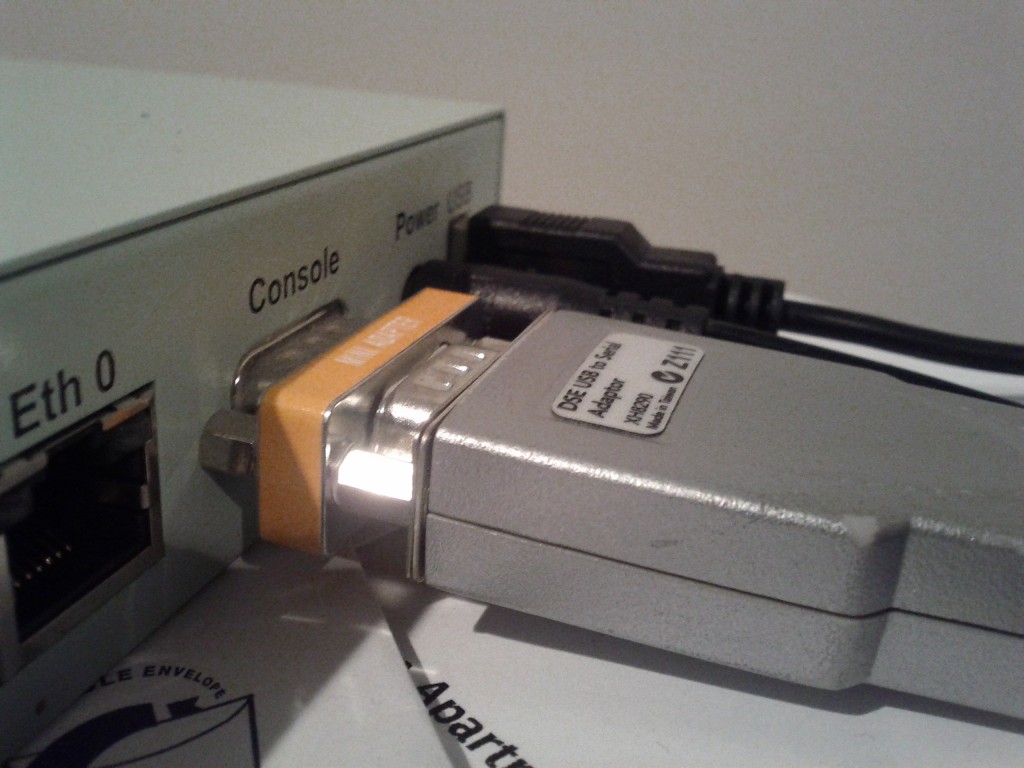
Then I realized, that I don’t need to buy yet-another-cable to have to carry around, instead my USB-to-serial adapter already features a long cable – so just attach an adapter and solved!

As long as the adapter allows you to unscrew the screw thread sockets, you can then fit it directly between the serial device and the USB-to-serial adapter. :-)

The 80s called, it wants it's communications method back!

Soldering Adventures

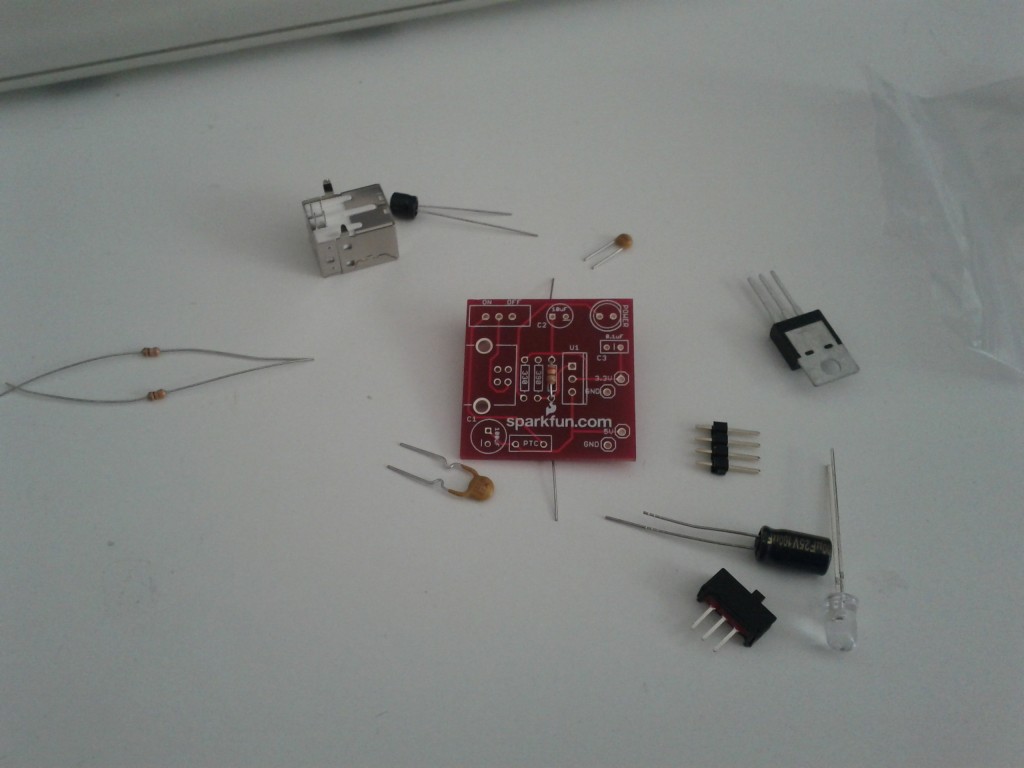
As part of my efforts to learn more about electronics, I recently obtained a power supply kit that breaks the standard 5V USB output into 3.3V and 5V bread-board connectable outputs from Mindkits (who resell Sparkfun kits in NZ, amongst other stuff).

I went for a USB-powered model rather than a typical round-pin DC supply, since I have an abundance of USB power sources with me all the time (both laptop and wall adaptors) and it’s much better than having yet another damn power brick hanging around.

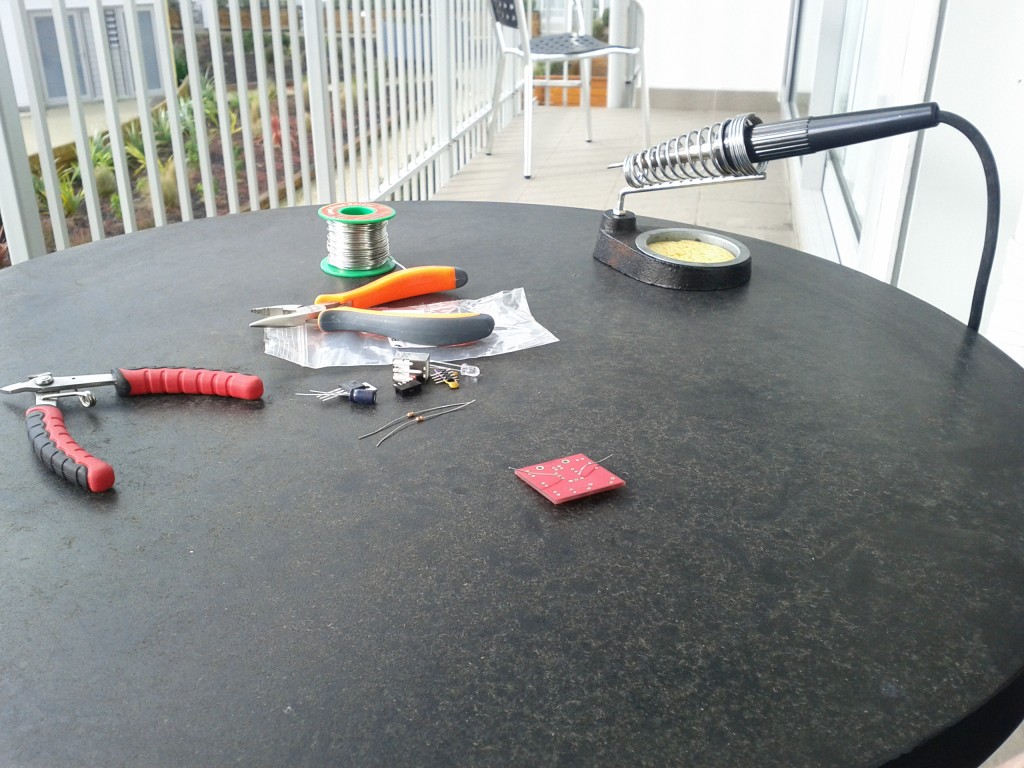
I finally managed to get around to making the time to try it out this weekend and dug out the soldering iron to tackle the challenge – past soldering exploits have never fared particularly well, but I figure sooner or later I’ll learn something and make a working device. ;-)

How hard could this possibly be? :-P

One of the biggest challenges I found was actually holding such a small PCB still, whilst trying to align solder and the iron – think one of my next purchases will be some sort of clamp to hold the board in place.

I’m not convinced that my soldering iron is particularly good either, need to do some research on the best type of soldering head (round vs chisel?). I’d probably go better with more gun shaped soldering iron than the round pencil design, I just tend to find it easier to align.

Ready, set, solder!

I started off doing the small components like resisters and small caps, before moving on to the voltage regular, switch, USB port and pin headers.

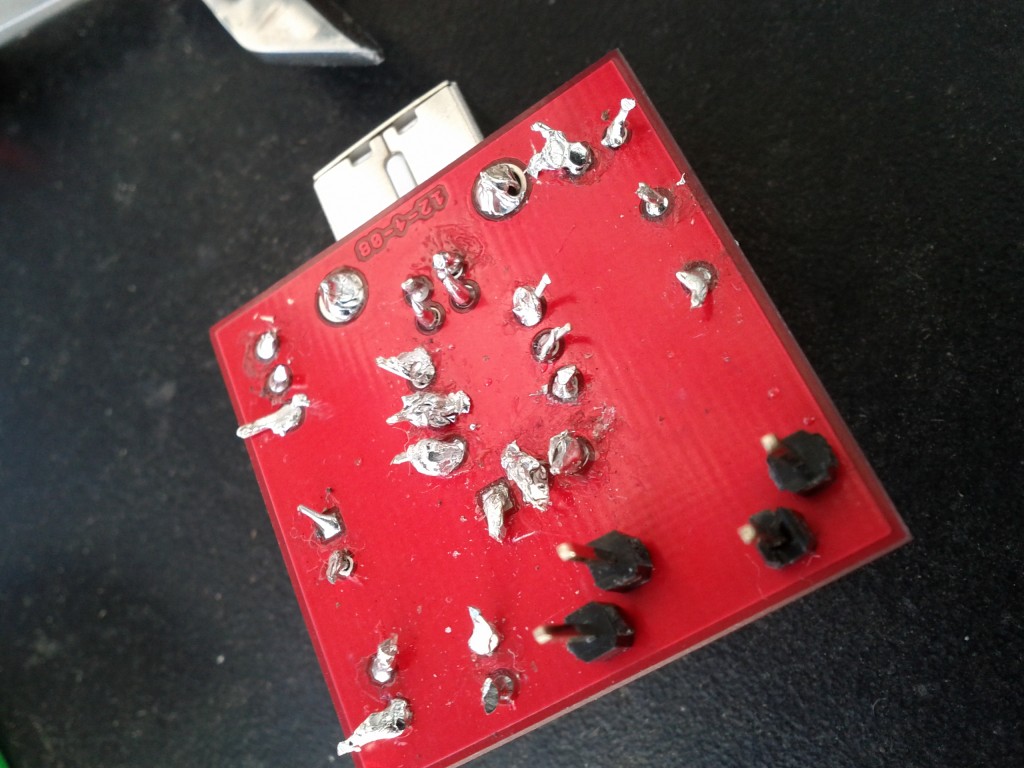
Apologies to any electrical engineers or skilled hobbyist reading this blog, but my soldering is pretty terrible, as you can see. Take note that this is the first thing I’ve soldered that actually works :-P

Oh god, oh god my eyes!

I started with the resisters in the middle, as you can see my soldering was pretty terrible there – used too much solder and ended up making large messy blobs.

Later I got better at briefly heating the legs and then applying the solder in a way that allowed it to run down and bond with the PCB, so my later joins got a lot better, eg the USB socket with it’s 4 close small pins.

I got an impromptu lesson to using a multimeter as the circuit wouldn’t work initially – I had managed to make a PSU that was always on (ignoring the switch status) and provided no 3.3V output.

Thanks to the simplicity of this kit, it was pretty easy to test each component to figure out where my bad joins were and I re-soldered a few of the bad earlier joins.

The only real headache was the voltage regulator – for some reason I had real difficulty getting the solder to bond with the middle pin and the PCB and had to redo it several times – it’s still not perfect TBH :-(

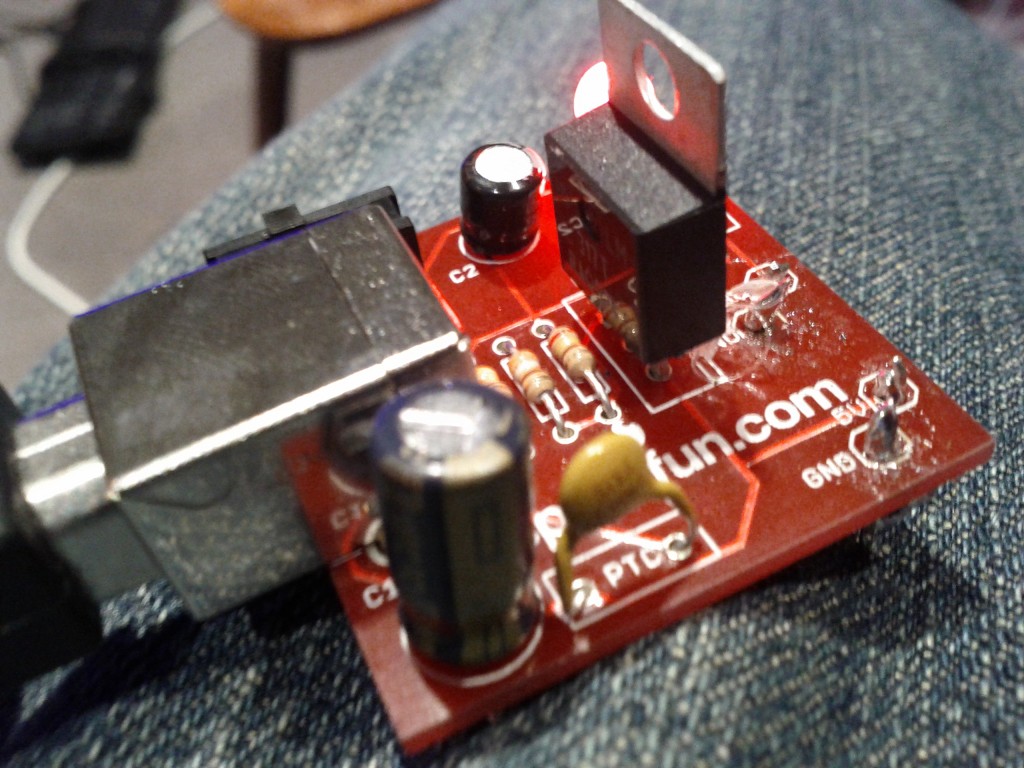
Assembled :-D

Shiny shiny! (OMG, an artsy picture without using Instagram!)

So far the kit seems pretty good, it was really easy to assemble with the clear silkscreen markings – most work I had to do was lookup the resister code/colors, which is trivial thanks to Electrodroid on my phone. :-)

The one design issue I do have with the kit, is that the positioning of the breadboard connectors requires you to break the header pins into single units, but doing this really weakens the design, since it’s just one tiny solder joint holding the pin to the PCB – I do fear the force of inserting and removing from breadboards will wear it down a bit over time.

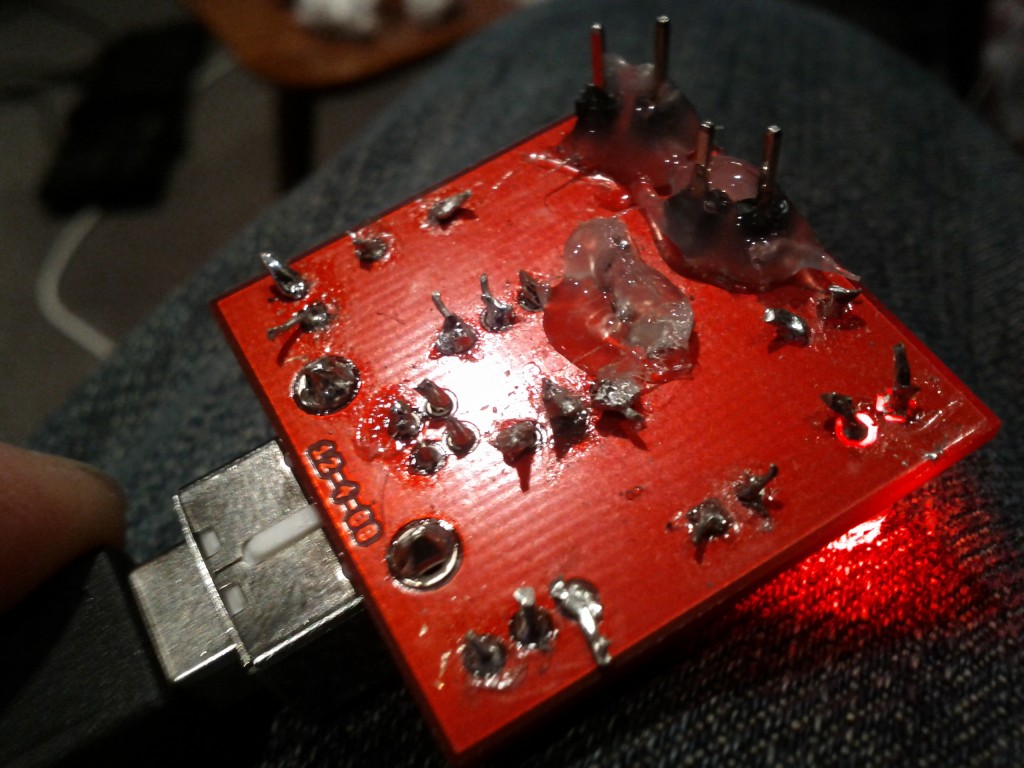
To counter this a bit, I’ve stuck a blob of hot glue around the headers, to give them a bit more integrity – although the 3.3V pin soldering joint is playing up and might need redoing anyway.

Hot glue solves all! (also stuck some around the voltage regulator as one of the solder joints isn't that great, but I can't fix it without risking ruining the PCB trace)

Looking at the round-DC connector version of the kit, the design instead has two pairs of 2x pin headers, which I suspect will make it a bit more sturdy.

Overall whilst it’s a painful learning curve trying to get the soldering right, I didn’t burn myself *too* badly and whilst not a shining example of art, the board works and powers up.

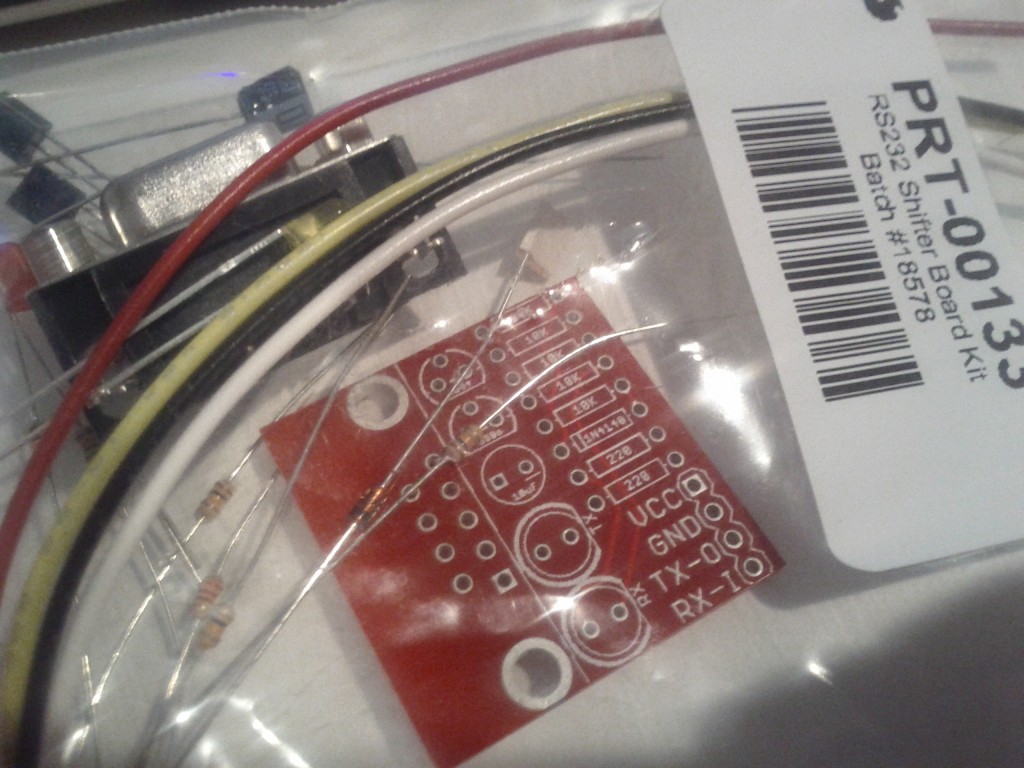
Next time, I’ll be tackling the RS232 shifter kit and then working to hook up an RS232 power to an Arduino’s digital pins using a software serial driver. And after that, I might have a go at making some temperature sensor 1-wire boards to install around my server case using the small square prototyping boards I brought.

Hopefully by then my soldering will be an acceptable level. :-)

Next kit to make - the RS232 shifter, with lots of lovely close resisters to solder.

Lenovo & tp-fan fun

I quite like my Lenovo X201i laptop, I’ve been using it for a couple years now and it’s turned out to be the ideal combination of size and usability – the 12″ form factor means I can carry it around easily enough, it has plenty of performance (particularly since I upgraded it to an SSD and 8GB of RAM) and I can see myself using it for the foreseeable future.

Unfortunately it does have a few issues… the crappy “Thinkpad Wireless” default card that comes in it caused me no end of headaches and the BIOS has always been a

Thankfully most of the major BIOS flaws have been resolved in part due to subsequent updates, but also thanks to the efforts of the Linux kernel developers to work around weird bits of the BIOS’s behavior.

Sadly not all issues have been resolved, in particular, the thermal management is still flawed and fails to adequately handle the maximum heat output of the laptop. I recently discovered that when you’re unfortunate enough to run some very CPU intensive single-threaded processes, by keeping 1/4 cores at 100% for an extended period of time the Lenovo laptop will overheat and issue an emergency thermal shutdown to the OS.

During this time the fan increases in speed, but still has quite a low noise level and airflow volume, which is very hot to the touch, it appears the issue is due to the Lenovo BIOS not ramping the fan speed up high enough to meet the heat being produced.

Thanks to the excellent Thinkwiki site, there’s detailed information on how you can force specific fan speeds using the thinkpad_acpi kernel module, as well as details on various scripts and fan control solutions people have written.

What’s interesting is that when running the fan on level 7 (the maximum speed), the fan still doesn’t spin particularly fast or loudly, no more than when the overheating occurs. But reading the wiki shows that there is a “disengaged” mode, where the fan will run at the true maximum system speed.

It appears to me that the BIOS has the 100% speed setting for the fan set at too low a threshold, the smart fix would be to correct the BIOS so that 100% is actually the true maximum speed of the fan and to scale up slowly to keep the CPU at a reasonable temperature.

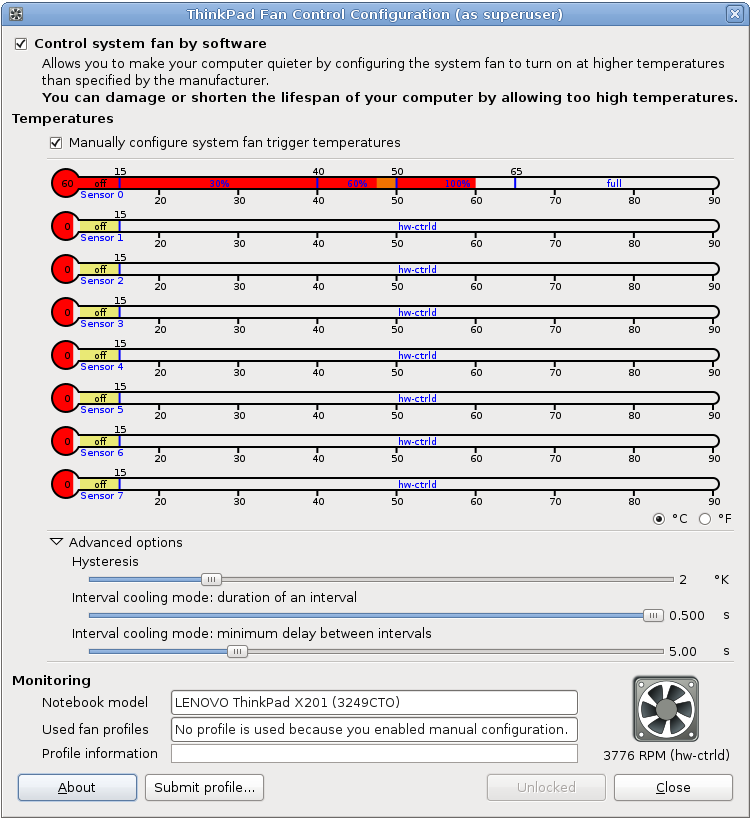
In order to fix it for myself, I obtained the tp-fan program, which runs a python daemon to monitor and adjust the fan speeds in the system based on the configured options. Sadly it’s not able to scale between “100%” and “disengaged” speeds, meaning I have the choice of quiet running or loud running but no middle ground.

Thanks to tpfan’s UI, I was able to tweak the speed positions until I obtained the right balance, the fans will now run at up to 100% for all normal tasks, often sitting just under 50 degrees at 60% fan speed.

When running a highly CPU intensive task, the fan will jump up to the max speed and run at that until the temperature drops sufficiently.  In practice it’s worked pretty well, I don’t get too much jumping up and down of the fan speed and my system hasn’t had any thermal shutdowns since I started using it.

Whilst it’s clearly a fault with the Lenovo BIOS not handling the fans properly, it raised a few other questions for me:

  • Why does the OS lack logic to move CPU intensive tasks between cores? Shuffling high intensive loads between idle cores would reduce the heat and require less active cooling by the system fans – even on a working system that won’t overheat, this would be a good way to reduce power consumption.
  • Why doesn’t the OS have a feature to throttle the CPU clock speed down as the CPU temperature rises? It would be better than having the all or nothing approach that it currently enforces, better to have a slower computer than a fried computer.

Clearly I need some more free time to start writing kernel patches for my laptop, although I fear what new dangerous geeky paths this might lead me into. :-/

Keeping Android Wifi Awake

I run a number of backgrounded applications on my Android phone, such as Nagios (server monitoring) CSipSimple (VoIP/SIP), OpenVPN (SSL-based VPN) and IMAP idle (push email).

Whilst this does impact battery life somewhat, I’ve got things reasonably well tuned so that the frequency of polling and keepalives is just long enough to prevent firewall timeouts, but long enough to avoid excessive waking of 3G & wifi hardware.

(For example, the default OpenVPN keepalive of 10 seconds is far more aggressive than what is actually needed, in reality, I was able to drop my phone back to one keepalive every 5 minutes – short enough to keep sessions active, but long enough that the transmitting hardware can sleep regularly whilst it isn’t needed).

However one problem I wasn’t able to fix, was the amount that the wifi disconnected – this would really screw up things, since services such as IMAP idle and SIP were trying to run over the VPN, but this would be broken by the VPN being dropped when wifi turned itself off.

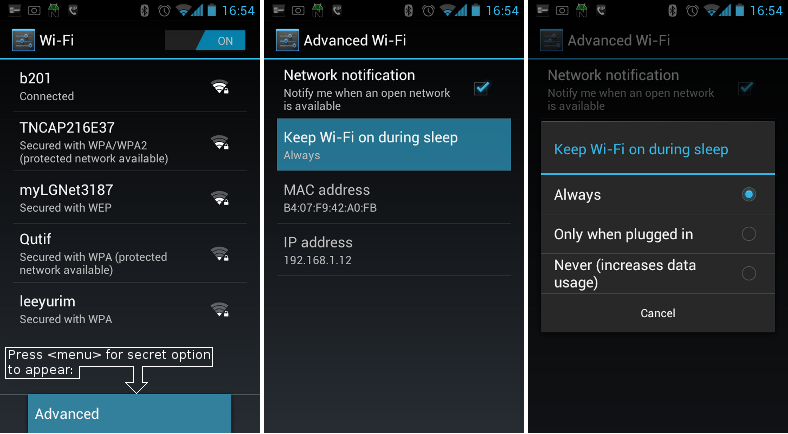
I found the fix thanks to a friend who came around and told me about the hidden “Advanced” menu in the wifi network selection page:

When on the wifi network selection screen, you need to press the menu key (not sure what the option is for newer Android phones that don’t have the menu key any more?) and then a single “Advanced” menu item will appear.

Selecting this item will give you a couple extra options, including the important “Keep Wi-Fi on during sleep” option that stops the phone from dropping the wifi connection whenever you turn off the screen.

This resolved my issues with backgrounded services and I found it also made the phone generally perform better when doing any data-related services, since wifi didn’t have to renegotiate with the AP as frequently.

It’s not totally perfect, Android seems to sometimes have an argument with the AP and then drop the connection and waste a minute trying to reconnect, but it’s a lot better than it was. :-)

cifs, ipv6 and rhel 5

Unfortunately with my recent project enabling IPv6 across my entire personal server environment, I’ve bumped into a number of annoying issues – nothing that isn’t fixable, but things that are generally frustrating and which just shouldn’t be an issue.

Particular thanks goes to my many RHEL/CentOS 5 virtual machines, which lack some pretty key stuff such as:

  • IPv6 connection tracking preventing the ESTABLISHED,RELATED ip6tables rules from working.
  • Unexpected behavior of certain bootscript configuration options.
  • Lack of IPv6 support with CIFS (Samba/SMB) share mounting.
  • Some weirdness with Dovecot I still need to resolve.

(Personally, based on the number of headaches I’ve found with RHEL 5, my recommendation is accelerate any plans to upgrade to RHEL 6 – or some other distribution – before deploying IPv6 in production.)

At the moment, CIFS IPv6 support on RHEL 5 & 6 has been causing me the most pain. My internal file server is dual stacked and has both A and AAAA DNS records – it’s a stock-standard CentOS 6 box running distribution-shipped Samba packages and works perfectly from the server side and modern IPv6 hosts have no issue mounting the shares via IPv6.

Very typical dual stack configuration:

# host fileserver.example.com 
fileserver.example.com has address 192.168.0.10
fileserver.example.com has IPv6 address 2001:0DB8::10

However, when I run the following legitimate and syntactically correct command to mount the CIFS share provided by the Samba server on other RHEL 5 hosts, it breaks with a error message that is typical of incorrect syntax with the mount options:

# mount -t cifs //fileserver.example.com/tmp /mnt/tmpshare -o user=nobody
mount: wrong fs type, bad option, bad superblock on //fileserver.example.com/tmp,
       missing codepage or other error
       In some cases useful info is found in syslog - try
       dmesg | tail  or so

Taking a look a the kernel log, it shows a non-descriptive error explanation:

kernel:  CIFS VFS: cifs_mount failed w/return code = -22

This isn’t particularly helpful, made more infuriating by the fact that I know the command syntax is correct and should be working perfectly fine.

Seeing as a number of things broke after switching on IPv6 across the entire network, I’ve become even more of a cynical bastard and ran some tests using specifically stated IPv6 and IPv4 addresses in the mount command.

I found that by passing the IPv6 address instead of the DNS name, you can produce the additional error message which offers some additional insight:

kernel: CIFS: ip address too long

Huh. Looks like a text book IPv6 support bug to me. (Even I have made this mistake in some older generation web apps that didn’t foresee long 128-bit addresses).

In testing, I found that the following commands are all acceptable on a dual-stack network with a RHEL 5 host:

# mount -t cifs //192.168.0.10/tmp /mnt/tmpshare -o user=nobody
# mount -t cifs //fileserver.example.com/tmp /mnt/tmpshare -o user=nobody,ip=192.168.0.10

However all ways of specifying IPv6 will fail, as well as pure DNS resolution:

# mount -t cifs //2001:0DB8::10/tmp /mnt/tmpshare -o user=nobody
# mount -t cifs //fileserver.example.com/tmp /mnt/tmpshare -o user=nobody,ip=2001:0DB8::10
# mount -t cifs //fileserver.example.com/tmp /mnt/tmpshare -o user=nobody

No method of connecting via IPv6 would work, leaving stock RHEL 5 hosts only being able to work with CIFS shares via IPv4. :-(

Unfortunately this error is due to a known kernel bug in 2.6.18, which was fixed in 2.6.31, but sadly not backported to RHEL 5’s kernel (as of version 2.6.18-308.8.1.el5 anyway), leaving RHEL 5 users in a position where the stock OS is unable to mount CIFS shares on an IPv6 or dual-stacked network. :-(

The ideal solution would be to patch the kernel to resolve the issue – and in fact if you are running on a native IPv6-only (not dual stacked), it would be the only option to get a working solution.

However, typically if you’re using RHEL, custom kernels aren’t that popular due to the impact they make to supportability/guarantee of the platform by vendor and added headaches of security update tracking and application, so another approach is needed.

The following methods will all work for stock RHEL/Centos 5:

  • Use the ip=X mount option to overule DNS.
  • Add an entry to /etc/hosts.
  • Have a separate DNS entry that only has an A record for your file servers (ie //fileserverv4only.example.com/)
  • Disable IPv6 entirely (and suffer the scorn of your cooler IPv6 enabled friends).

These solutions all suck – having manually fixed IPs isn’t great for long term supportability, additional DNS records is an additional pain for management, and let’s not even begin to cover why disabling IPv6 entirely is wrong.

Of course RHEL 5 is a little outdated now, so I took a look at how RHEL 6 fared. On the plus side, it *can* mount IPv6 shares, all of the following mount commands are accepted without fault:

# mount -t cifs //192.168.0.10/tmp /mnt/tmpshare -o user=nobody
# mount -t cifs //2001:0DB8::10/tmp /mnt/tmpshare -o user=nobody
# mount -t cifs //fileserver.example.com/tmp /mnt/tmpshare -o user=nobody,ip=192.168.0.10
# mount -t cifs //fileserver.example.com/tmp /mnt/tmpshare -o user=nobody,ip=2001:0DB8::10

However, any mount of a IPv6 server using the DNS name will still fail, just like how they did with RHEL 5:

# mount -t cifs //fileserver.example.com/tmp /mnt/tmpshare -o user=nobody

The solution is that you need to install the “cifs-utils” package which provides the /sbin/mount.cifs binary offering smarter handling of shares – once installed, all mount command options will work OK on RHEL 6, including the standard DNS-based command we all know and love. :-D

I had always assumed that all Linux systems that could mount CIFS shares had the /sbin/mount.cifs binary installed, but it seems that’s not the case, rather the standard /bin/mount command can handle mounting CIFS using just the standard kernel mount() function

However when /bin/mount detects a /sbin/mount.FILESYSTEM binary, it will call that process instead of calling the kernel mount() directly, these binaries can offer additional logic and handling off the mount command before passing it through to the Linux kernel.

For example, the following strace from a RHEL 5 host shows that /sbin/mount checks for the existence of /sbin/mount.cifs, before then going on to call the Linux kernel mount() directly with the provided arguments:

stat64("/sbin/mount.cifs", 0xbfc9dd20)  = -1 ENOENT (No such file or directory)
...
mount("//fileserver.example.com/tmp", "/mnt", "cifs", MS_MGC_VAL, "user=nobody,password=nobody") = -1 EINVAL (Invalid argument)

But a RHEL 6 host with cifs-utils installed provides /sbin/mount.cifs, which appears to do it’s own name resolution, then establishes a connection to both the IPv4 and IPv6 sockets, before deciding which to use and instructs the kernel using the ip=X parameter.

stat64("/sbin/mount.cifs", {st_mode=S_IFREG|0755, st_size=29376, ...}) = 0
clone(Process 1666 attached
...
[pid  1666] mount("//fileserver.example.com/tmp/", ".", "cifs", 0, "ip=2001:0DB8::10",user=nobody,password=nobody) = 0

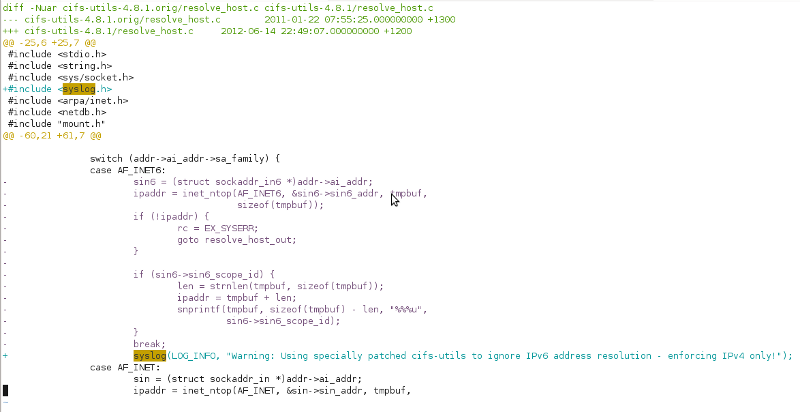
So I had an idea….. what if I could easily modify a version of cifs-utils to run on RHEL 5 dual-stack servers, yet only ever resolve DNS queries to IPv4 addresses to work around the kernel issue? :-D

Turns out you can – effectively I just made the nastiest hack ever by just tearing out the IPv6 name resolver. :-/

I’m going to hell for this, but damn, feels good man. ;-)

I wasn’t totally evil, I added an info level syslog notice about the IPv4 enforcement incase any poor admin is ever getting puzzled by someone’s customized RHEL 5 box refusing to connect to CIFS shares IPv6 – that would be a bit too cruel. ;-)

The hack is pretty crude, it actually just breaks the IPv6 socket connection attempt and so it then falls back to IPv4, so it throws up a couple errors in the logs, but doesn’t actually impact the mounting at all.

mount.cifs: Warning: Using specially patched cifs-utils to ignore IPv6 address resolution - enforcing IPv4 only!
kernel:  CIFS VFS: Error connecting to socket. Aborting operation
kernel:  CIFS VFS: cifs_mount failed w/return code = -111

But wait, there’s more! I have shiny cifs-util i386/x86_64/SRPM packages with this evil hack available for download from amberdms-os repository (or directly from the server here).

Naturally this is a bit of a kludge, don’t trust it for mission critical stuff, you ONLY need it for RHEL 5, not RHEL 6 and I can’t guarantee it won’t eat all your data and bring upon the end times, etc, etc.

I’ve tested it on my devel systems and it seems like the nicest fix – sure it won’t work for any hosts needing to run on native IPv6, but by the time I come to drop IPv4 addressing entirely I certainly will have moved on my last hosts from RHEL 5 to something a bit newer. :-)

Largefiles strike again!

With modern Linux systems – hell, even systems from 5+ years ago – there’s usually very little issue with handling large files (> 2GB), in fact files considered large a decade ago are now tiny in comparison.

However sometimes poor sysadmins like myself have to support much older machines, in my case, a legacy accounting platform which is tied to the RHEL 2.1 host it was installed on and you suddenly get to re-discover the headaches that plagued sysadmins before us.

In my case, the backup scripts for this application suddenly stopped working recently with the error of:

cpio: standard input is closed: Value too large for defined data type

Turns out that their data had finally crept over the 2GB limit, which left cpio able to write the backup, but unable to read it for verification or restore purposes.

Thankfully cpio does support largefiles, but it’s a case of adding -D_FILE_OFFSET_BITS=64 to the gcc options at build time, so I built which fixes the problem (or at least till we hit the 16GB filesystem limits) ;-)

The version of cpio on the server is ancient, dating back to 2001 (with RHEL 2.1 being first released in 2002), so it’s over a decade old now, and I found it quite difficult to obtain the source for the specific installed version of cpio on the server, Red Hat seemed to be missing the exact release (they have -23 and -28, but not -25) so I pulled the Red Hat 8 source which comes from around the same time period – one of the advantages of having RHN is being able to quickly pull old packages, both binary and source. :-)

If you have this exact issue with a legacy system using cpio, feel free to grab my binary or source package from my repos and save yourself some build time. :-)

mailx contains invalid character

Whilst my network is predominately  CentOS 5 hosts, I’ve started moving many of them to CentOS 6, mostly on a basis of doing so whenever a host needs a particularly newer version, since I don’t really want to spend an entire week rebuilding all 30-odd VMs.

One problem I encountered was a number of scripts failing when sending emails, throwing out messages to STDERR:

[example] contains invalid character '['
send-mail: invalid option -- 's'
send-mail: fatal: usage: send-mail [options]

What I found is that on CentOS/RHEL 5, the following would work fine:

# mail root -s "[example] message"
test message content
Cc: 
#

But on CentOS/RHEL 6, it would ignore the subject field (as can be seen by it re-asking for it) and then fail with an annoying “invalid character” error:

# mail root -s "[example] message"
[example] contains invalid character '['
Subject: 
test message content
EOT
#
# send-mail: invalid option -- 's'
send-mail: invalid option -- 's'
send-mail: fatal: usage: send-mail [options]
#

Turns out that between mailx version 8.1.1 and mailx version 12.4, the mailx binary got a lot more fussy about the formatting of the command line options.

Viewing the help on both versions shows that options need to come before the destination user, however it seems that older versions of mailx were a bit slacker and accepted some flexibility of command line options.

Usage: mail -eiIUdEFntBDNHRV~ -T FILE -u USER -h hops -r address \
 -s SUBJECT -a FILE -q FILE -f FILE -A ACCOUNT -b USERS -c USERS \
 -S OPTION users

The correct solution, is to always have the target user as the final field, after the command line options, aka:

# mail -s "[example] message" root
test message content
Cc: 
#

This will work happily on all versions since it’s correct syntax of the command line options.

Hopefully everyone else is smart enough to do this the right way the first time, but figured I’d post this incase some other poor sysadmin is having the same confusion over the invalid character message. :-)

Munin Performance

Munin is a popular open source network resource monitoring tool which polls the hosts on your network for statistics for various services, resources and other attributes.

A typical deployment will see Munin being used to monitor CPU usage, memory usage, amount of traffic across network interface, I/O statistics and more – it’s very handy for seeing long term performance trends and for checking the impact that upgrades or adjustments to the environment have made.

Whilst having some overlap with Nagios, Munin isn’t really a replacement, more an addition – I use Nagios to do critical service and resource monitoring and use Munin to graph things in more detail – something that Nagios doesn’t natively do.

A typical Munin graph - Munin provides daily, weekly, monthly and yearly graphs (RRD powered)

Rather than running as a daemon, the Munin master runs a cronjob every 5minutes that calls a sequence of scripts to poll the configured servers and generate new graphs.

  1. munin-update to poll configured hosts for new statistics and store the information in RRD databases.
  2. munin-limits to highlight perceived issues in the web interface and optionally to a file for Nagios integration.
  3. munin-graph to generate all the graphs for all the services and hosts.
  4. munin-html to generate the html files for the web interface (which is purely static).

The problem with this model, is that it doesn’t scale particularly well – once you start getting a substantial number of servers, the step-by-step approach can start to run out of resources and time to complete within the 5minute cron period.

For example, the following are the results for the 3 key scripts that run on my (virtualised) Munin VM monitoring 18 hosts:

sh-3.2$ time /usr/share/munin/munin-update
real    3m22.187s
user    0m5.098s
sys     0m0.712s

sh-3.2$ time /usr/share/munin/munin-graph
real    2m5.349s
user    1m27.713s
sys     0m9.388s

sh-3.2$ time /usr/share/munin/munin-html
real    0m36.931s
user    0m11.541s
sys     0m0.679s

It’s a total of around 6 minutes time to run – long enough that the finishing job is going to start clashing with the currently running job.

So why so long?

Firstly, munin-update – munin-update’s time is mostly spent polling the munin-node daemon running on all the monitored systems and then a small amount of I/O time writing the new information to the on-disk RRD files.

The developers have appeared to realise the issue of scale with munin-update and have the ability to run it in a forked mode – however this broke horribly for me with a highly virtualised environment, since sending a poll to 12+ servers all running on the one physical host would cause a sudden load spike and lead to a service poll timeout, with no values being returned at all. :-(

This occurs because by default Munin allows a maximum of 5 seconds for each service query to complete across all hosts and queries all the hosts and services rapidly, ignoring any that fail to respond fast enough. And when querying a large number of servers on one physical host, the server would be too loaded to respond quickly enough.

I ended up boosting the timeouts on some servers to 60 seconds (particular the KVM hosts themselves, as there would sometimes be 60+ LVM volumes that Munin wanted statistics for), but it still wasn’t a good solution and the load spikes would continue.

There are some tweaks that can be used, such as adjusting the max number of forked processes, but it ended up being more reliable and easier to support to just run a single thread and make sure it completed as fast as possible – and taking 3 mins to poll all 18 servers and save to the RRD database is pretty reasonable, particular for a staggered polling session.


After getting munin-update to complete in a reasonable timeframe, I took a look into munin-html and munin-graph – both these processes involve reading the RRD databases off the disk and then writing HTML and RRDTool Graphs (PNG files) to disk for the web interface.

Both processes have the same issue – they chew a solid amount of CPU whilst processing data and then they would get stuck waiting for the disk I/O to catch up when writing the graphs.

The I/O on this server isn’t the fastest at the best of times, considering it’s an AES-256 encrypted RAID 6 volume and the time taken to write around 200MB of changed data each time was a bit too much to do efficiently.

Munin offers some options, including on-demand graph generation using CGIs, however I found this just made the web interface unbearably slow to use – although from chats with the developer, it sounds like version 2.0 will resolve many of these issues.

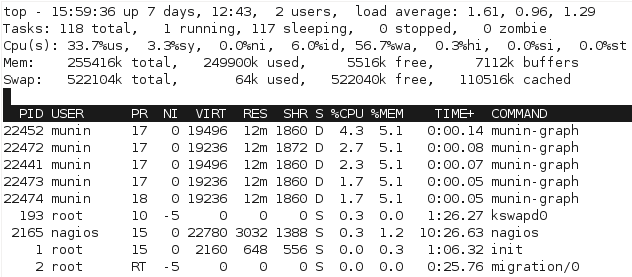
I needed to fix the performance with the current batch generation model. Just watching the processes in top quickly shows the issue with the scripts, particular with munin-graph which runs 4 concurrent processes, all of them waiting for I/O. (Linux process crash course: S is sleeping (idle), R is running, D is performing I/O operations – or waiting for them).

Clearly this isn’t ideal – I can’t do much about the underlying performance, other than considering putting the monitoring VM onto a different I/O device without encryption, however I then lose all the advantages of having everything on one big LVM pool.

I do however, have plenty of CPU and RAM (Quad Phenom, 16GB RAM) so I decided to boost the VM from 256MB to 1024MB RAM and setup a tmpfs filesystem, which is a in-memory filesystem.

Munin has two main data sources – the RRD databases and the HTML & graph outputs:

# du -hs /var/www/html/munin/
227M    /var/www/html/munin/

# du -hs /var/lib/munin/
427M    /var/lib/munin/

I decided that putting the RRD databases in /var/lib/munin/ into tmpfs would be a waste of RAM – remember that munin-update is running single-threaded and waiting for results from network polls, meaning that I/O writes are going to be spread out and not particularly intensive.

The other problem with putting the RRD databases into tmpfs, is that a server crash/power down would lose all the data and that then requires some regular processes to copy it to a safe place, etc, etc – not ideal.

However the HTML & graphs are generated fresh each time, so a loss of their data isn’t an issue. I setup a tmpfs filesystem for it in /etc/fstab with plenty of space:

tmpfs  /var/www/html/munin   tmpfs   rw,mode=755,uid=munin,gid=munin,size=300M   0 0

And ran some performance tests:

sh-3.2$ time /usr/share/munin/munin-graph 
real    1m37.054s
user    2m49.268s
sys     0m11.307s

sh-3.2$ time /usr/share/munin/munin-html 
real    0m11.843s
user    0m10.902s
sys     0m0.288s

That’s a decrease from 161 seconds (2.68mins) to 108 seconds (1.8 mins). It’s a reasonable increase, but the real difference is the massive reduction in load for the server.

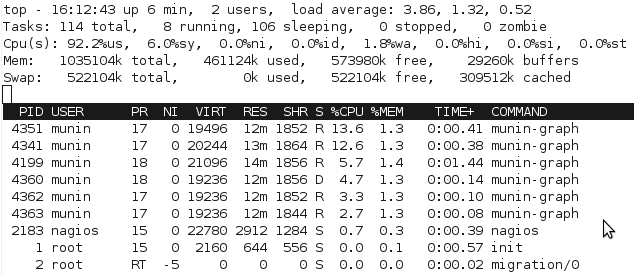
For a start, we can see from watching the processes with top that the processor gets worked a bit more to complete the process, since there’s not as much waiting for I/O:

With the change, munin-graph spends almost all it’s time doing CPU processing, rather than creating I/O load – although there’s the occasional period of I/O as above, I suspect from the time spent reading the RRD databases off the slower disk.

Increased bursts of CPU activity is fine – it actually works out to less CPU load, since there’s no need for the CPU to be doing disk encryption and hammering 1 core for a short period of time is fine, there’s plenty of other cores and Linux handles scheduling for resources pretty well.

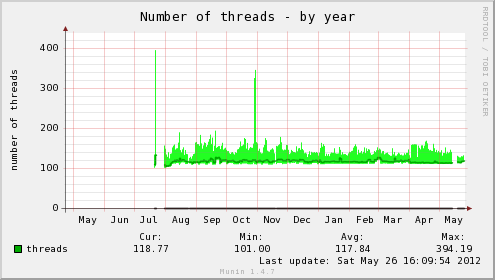
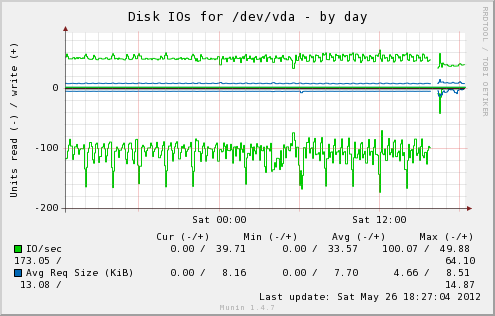
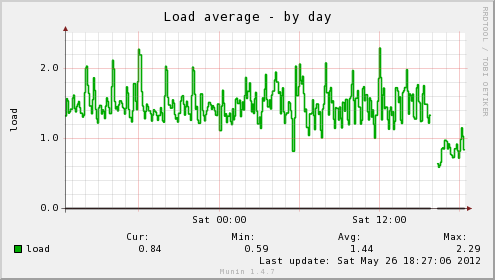
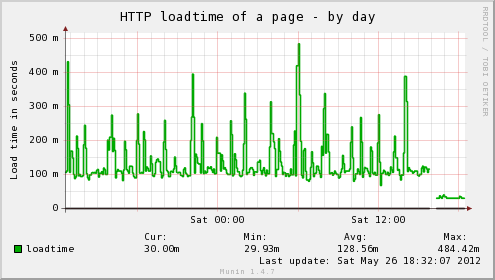
We can really see the difference with Munin’s own graphs for the monitoring VM after making the change:

In addition, the host server’s load average has dropped significantly, as well as the load time for the web interface on the server being insanely fast, no more waiting for my browser to finish pulling all the graphs down for a page, instead it loads in a flash. Munin itself gives you an idea of the difference:

If performance continues to be a problem, there are some other options such as moving RRD databases into memory, patching Munin to do virtualisation-friendly threading for munin-update or looking at better ways to fix CGI on-demand graphing – the tmpfs changes would help a bit to start with.

find-debuginfo.sh invalid predicate

I do a lot of packaging for RHEL/CentOS 5 hosts, often this packaging is backporting of newer software versions, typically I’ll pull Fedora’s latest package and make various adjustments to it for RHEL 5’s older environment – typically things like package name changes, downgrade from systemd to init and correcting any missing build dependencies.

Today I came across this rather unhelpful error message:

+ /usr/lib/rpm/find-debuginfo.sh /usr/src/redhat/BUILD/my-package-1.2.3
find: invalid predicate `'

This error is due to the newer Fedora spec files often not explicitly setting the value of BuildRoot which then leaves the package to install into the default location, which isn’t always defined on RHEL 5 hosts.

The correct fix is to define the build root in the spec file with:

BuildRoot: %{_tmppath}/%{name}-%{version}-%{release}-root-%(%{__id_u} -n)

This will set both %{buildroot} and $RPM_BUILD_ROOT, so no matter whether you’re using either syntax, the files will be installed into the right place.

However, this error is a symptom of a bigger issue – without defining BuildRoot, the package will still compile and complete make install, however instead of the installed files going into /var/tmp/packagename…etc, the files will be installed directly into the actual / filesystem, which is generally ReallyBad(tm)

Now if you were building the package as a non-privileged user, this would have failed at the install phase and you would not have gotten as far as the invalid predicate error.

But if you were naughty and building as the root user, the package would have installed into / without complaint and clobbered any existing files installed on the build host. And the first sign of something being wrong is the invalid predicate error when the find debug script gets provided with no files.

This is the key reason why you are highly recommended to build all packages as a non-privileged user, so that if the build incorrectly tries to install anything into /, the install will be denied and the user will quickly realize things aren’t installing into the right place.

Building as root can be even worse than just “whoops, I overwrote the installed version of mypackage whilst building a new one” or “blagh annoying invalid predicate error” – consider the following specfile line:

rm -rf $RPM_BUILD_ROOT/%{_includedir}

On a properly defined package, this would execute:

rm -rf /var/tmp/packagename/usr/include/

But on a package lacking a BuildRoot definition it becomes:

rm -rf /usr/include/

Yikes! Not exactly what you want – of course, running as a non-root user would save you, since that rm command would be refused and you’d quickly figure out the issue.

I will leave it as an exercise of the reader to determine why I commented about this specific example… ;-)

IMHO, rpmbuild should be patched to just outright refuse to compile packages as the root user so this mistake can’t happen, it seems silly to allow a bad packaging habit to be used when the damages are so severe.