Tag Archives: geek

Anything IT related (which is most things I say) :-)

Installing EL7 onto EL5 Xen hosts

With RedHat recently releasing RHEL 7 (and CentOS promptly getting their rebuild out the door shortly after), I decided to take the opportunity to start upgrading some of my ageing RHEL/CentOS (EL) systems.

My personal co-location server is a trusty P4 3.0Ghz box running EL 5 for both host and Xen guests. Xen has lost some popularity in favour of HVM solutions like KVM, however it’s still a great hypervisor and can run Linux guests really nicely on even hardware as old as mine that lacks HVM CPU extensions.

Considering that EL 5, 6 and 7 are all still supported by RedHat, I would expect that installing EL 7 as a guest on EL 5 should be easy – and to be fair to RedHat it mostly is, the installation was pretty standard.

Like EL 5 guests, EL 7 guests can be installed entirely from the command line using the standard virt-install command – for example:

$ virt-install --paravirt \
 --name MyCentOS7Guest \
 --ram 1024 \
 --vcpus 1 \
 --location http://mirror.centos.org/centos/7/os/x86_64/ \
 --file /dev/lv_group/MyCentOS7Guest \
 --network bridge=xenbr0

One issue I had is that the installer no longer prompts for network information to use to download the rest of the installer and instead assumes you have a DHCP server, an assumption that isn’t always correct. If you want to force it to use a static address, append the following parameters to the virt-install command.

 -x 'ip=192.168.1.20 netmask=255.255.255.0 dns=8.8.8.8 gateway=192.168.1.1'

The installer will proceed and give you an option to either use VNC to get a graphical installer, or to accept the more basic/limited text mode installer. In my case I went with the text mode installer, generally this is fine for average installations, except that it doesn’t give you a lot of control over partitioning.

Installation completed successfully, but I was not able to subsequently boot the new guest, with an error being thrown about pygrub being unable to find the boot partition.

# xm create -c vmguest
Using config file "./vmguest".
Traceback (most recent call last):
  File "/usr/bin/pygrub", line 774, in ?
    raise RuntimeError, "Unable to find partition containing kernel"
RuntimeError: Unable to find partition containing kernel
No handlers could be found for logger "xend"
Error: Boot loader didn't return any data!
Usage: xm create <ConfigFile> [options] [vars]


Xen works a little differently than VMWare/KVM/VirtualBox in that it doesn’t try to emulate hardware unnecessarily in paravirtualised mode, so there’s no BIOS. Instead Xen ships with a tool called pygrub, that is essentially an application that implements grub and goes through the process of reading the guest’s /boot filesystem, displaying a grub interface using the config in /boot, then when a kernel is selected grabs the kernel and associated information and launches the guest with it.

Generally this works well, certainly you can boot any of your EL 5 guests with it as well as other Linux distributions with Xen paravirtulised compatible kernels (it’s merged into upstream these days).

However RHEL has moved on a bit since 2007 adding a few new tricks, such as replacing Grub with Grub2 and moving from the typical ext3 boot partition to an xfs boot partition. These changes confuse the much older utilities written for Xen, leaving it unable to read the boot loader data and launch the guest.

The two main problems come down to:

  1. EL 5 can’t read the xfs boot partition created by default by EL 7 hosts. Even if you install optional xfs packages provided by centosplus/centosextras, you still can’t read the filesystem due to the version of xfs being too new for it to comprehend.
  2. The version of pygrub shipped with EL 5 doesn’t have support for Grub2. Well, technically it’s supposed to according to RedHat, but I suspect they forgot to merge in fixes needed to make EL 7 boot.

I hope that RedHat fix this deficiency soon, presumably there will be RedHat customers wanting to do exactly what I’m doing who will apply some pressure for a fix, however until then if you want to get your shiny new EL 7 guests installed, I have a bunch of workarounds for those whom are not faint of heart.


For these instructions, I’m assuming that your guest is installed to /dev/lv_group/vmguest, however these instructions should work equally for image files or block devices.

Firstly, we need to check what the state of the /boot partition is – we need to make sure it is an ext3 volume, or convert it if not. If you installed via the limited text mode installer, it will be an xfs partition, however if you installed via VNC, you might be able to change the type to ext3 and avoid the next few steps entirely.

We use kpartx -a and -d respectively to expose the partitions inside the block device so we can manipulate the contents. We then use the good ol’ file command to check what type of filesystem is on the first partition (which is presumably boot).

# kpartx -a /dev/lv_group/vmguest
# file -sL /dev/mapper/vmguestp1
/dev/mapper/vmguestp1: SGI XFS filesystem data (blksz 4096, inosz 256, v2 dirs)
# kpartx -d /dev/lv_group/vmguest

Being xfs, we’re probably unable to do much – if we install xfsprogs (from centos extras), we can verify it’s unreadable by the host OS:

# yum install xfsprogs
# xfs_check /dev/mapper/vmguestp1
bad sb version # 0xb4b4 in ag 0
bad sb version # 0xb4a4 in ag 1
bad sb version # 0xb4a4 in ag 2
bad sb version # 0xb4a4 in ag 3
WARNING: this may be a newer XFS filesystem.
#

Technically you could fix this by upgrading the kernel, but EL 5’s kernel is a weird monster that includes all manor of patches for Xen that were never included into upstream, so it’s not a simple (or even feasible) operation.

We can convert the filesystem from xfs to ext3 by using another newer Linux system. First we need to export the boot volume into an image file:

# dd if=/dev/mapper/vmguestp1  | bzip2 > /tmp/boot.img.bz2

Then copy the file to another host, where we will unpack it and recreate the image file with ext3 and the same contents.

$ bunzip2 boot.img.bz2
$ mkdir tmp1 tmp2
$ sudo mount -t xfs -o loop boot.img tmp1/
$ sudo cp -avr tmp1/* tmp2/
$ sudo umount tmp1/
$ mkfs.ext3 boot.img
$ sudo mount -t ext3 -o loop boot.img tmp1/
$ sudo cp -avr tmp2/* tmp1/
$ sudo umount tmp1
$ rm -rf tmp1 tmp2
$ mv boot.img boot-new.img
$ bzip2 boot-new.img

Copy the new file (boot-new.img) back to the Xen host server and replace the guest’s/boot volume with it.

# kpartx -a /dev/lv_group/vmguest
# bzcat boot-new.img.bz2 > /dev/mapper/vmguestp1
# kpartx -d /dev/lv_group/vmguest


Having fixed the filesystem, Xen’s pygrub will be able to read it, however your guest still won’t boot. :-( On the plus side, it throws a more useful error showing that it could access the filesystem, but couldn’t parse some data inside it.

# xm create -c vmguest
Using config file "./vmguest".
Using <class 'grub.GrubConf.Grub2ConfigFile'> to parse /grub2/grub.cfg
Traceback (most recent call last):
  File "/usr/bin/pygrub", line 758, in ?
    chosencfg = run_grub(file, entry, fs)
  File "/usr/bin/pygrub", line 581, in run_grub
    g = Grub(file, fs)
  File "/usr/bin/pygrub", line 223, in __init__
    self.read_config(file, fs)
  File "/usr/bin/pygrub", line 443, in read_config
    self.cf.parse(buf)
  File "/usr/lib64/python2.4/site-packages/grub/GrubConf.py", line 430, in parse
    setattr(self, self.commands[com], arg.strip())
  File "/usr/lib64/python2.4/site-packages/grub/GrubConf.py", line 233, in _set_default
    self._default = int(val)
ValueError: invalid literal for int(): ${next_entry}
No handlers could be found for logger "xend"
Error: Boot loader didn't return any data!

At a glance, it looks like pygrub can’t handle the special variables/functions used in the EL 7 grub configuration file, however even if you remove them and simplify the configuration down to the core basics, it will still blow up.

# xm create -c vmguest
Using config file "./vmguest".
Using <class 'grub.GrubConf.Grub2ConfigFile'> to parse /grub2/grub.cfg
WARNING:root:Unknown image directive load_video
WARNING:root:Unknown image directive if
WARNING:root:Unknown image directive else
WARNING:root:Unknown image directive fi
WARNING:root:Unknown image directive linux16
WARNING:root:Unknown image directive initrd16
WARNING:root:Unknown image directive load_video
WARNING:root:Unknown image directive if
WARNING:root:Unknown image directive else
WARNING:root:Unknown image directive fi
WARNING:root:Unknown image directive linux16
WARNING:root:Unknown image directive initrd16
WARNING:root:Unknown directive source
WARNING:root:Unknown directive elif
WARNING:root:Unknown directive source
Traceback (most recent call last):
  File "/usr/bin/pygrub", line 758, in ?
    chosencfg = run_grub(file, entry, fs)
  File "/usr/bin/pygrub", line 604, in run_grub
    grubcfg["kernel"] = img.kernel[1]
TypeError: unsubscriptable object
No handlers could be found for logger "xend"
Error: Boot loader didn't return any data!
Usage: xm create <ConfigFile> [options] [vars]

Create a domain based on <ConfigFile>

At this point it’s pretty clear that pygrub won’t be able to parse the configuration file, so you’re left with two options:

  1. Copy the kernel and initrd file from the guest to somewhere on the host and set Xen to boot directly using those host-located files. However then kernel updating the guest is a pain.
  2. Backport a working pygrub to the old Xen host and use that to boot the guest. This requires no changes to the Grub2 configuration and means your guest will seamlessly handle kernel updates.

Because option 2 is harder and more painful, I naturally chose to go down that path, backporting the latest upstream Xen pygrub source code to EL 5. It’s not quite vanilla, I had to make some tweaks to rip out a couple newer features that were breaking it on EL 5, so I’ve packaged up my version of pygrub and made it available in both source and binary formats.

Download Jethro’s pygrub backport here

Installing this *will* replace the version installed by the Xen package – this means an update to the package on the host will undo these changes – I thought about installing it to another path or making an RPM, but my hope is that Red Hat get their Xen package fixed and make this whole blog post redundant in the first place so I haven’t invested that level of effort.

Copy to your server and unpack with:

# tar -xkzvf xen-pygrub-6f96a67-JCbackport.tar.gz
# cd xen-pygrub-6f96a67-JCbackport

Then you can build the source into a python module and install with:

# yum install xen-devel gcc python-devel
# python setup.py build
running build
running build_py
creating build
creating build/lib.linux-x86_64-2.4
creating build/lib.linux-x86_64-2.4/grub
copying src/GrubConf.py -> build/lib.linux-x86_64-2.4/grub
copying src/LiloConf.py -> build/lib.linux-x86_64-2.4/grub
copying src/ExtLinuxConf.py -> build/lib.linux-x86_64-2.4/grub
copying src/__init__.py -> build/lib.linux-x86_64-2.4/grub
running build_ext
building 'fsimage' extension
creating build/temp.linux-x86_64-2.4
creating build/temp.linux-x86_64-2.4/src
creating build/temp.linux-x86_64-2.4/src/fsimage
gcc -pthread -fno-strict-aliasing -DNDEBUG -O2 -g -pipe -Wall -Wp,-D_FORTIFY_SOURCE=2 -fexceptions -fstack-protector --param=ssp-buffer-size=4 -m64 -mtune=generic -D_GNU_SOURCE -fPIC -fPIC -I../../tools/libfsimage/common/ -I/usr/include/python2.4 -c src/fsimage/fsimage.c -o build/temp.linux-x86_64-2.4/src/fsimage/fsimage.o -fno-strict-aliasing -Werror
gcc -pthread -shared build/temp.linux-x86_64-2.4/src/fsimage/fsimage.o -L../../tools/libfsimage/common/ -lfsimage -o build/lib.linux-x86_64-2.4/fsimage.so
running build_scripts
creating build/scripts-2.4
copying and adjusting src/pygrub -> build/scripts-2.4
changing mode of build/scripts-2.4/pygrub from 644 to 755

# python setup.py install

Naturally I recommend reviewing the source code and making sure it’s legit (you do trust random blogs right?) but if you can’t get it to build/lack build tools/like gambling, I’ve included pre-built binaries in the archive and you can just do

# python setup.py install

Then do a quick check to make sure pygrub throws it’s help message, rather than any nasty errors indicating something went wrong.

# /usr/bin/pygrub


We’re almost ready to try booting again! First create a directory that the new pygrub expects:

# mkdir /var/run/xend/boot/

Then launch the machine creation – this time, it should actually boot and run through the usual systemd startup process. If you installed with /boot set to ext3 via the installer, everything should just work and you’ll be up and running!

If you had to do the xfs to ext3 conversion trick, the bootup process will explode with scary errors like the following:

.......
[ TIME ] Timed out waiting for device dev-disk-by\x2duuid-245...95b2c23.device.
[DEPEND] Dependency failed for /boot.
[DEPEND] Dependency failed for Local File Systems.
[DEPEND] Dependency failed for Relabel all filesystems, if necessary.
[DEPEND] Dependency failed for Mark the need to relabel after reboot.
[  101.134423] systemd-journald[414]: Received request to flush runtime journal from PID 1
[  101.658465] type=1305 audit(1405735466.679:4): audit_pid=476 old=0 auid=4294967295 ses=4294967295 subj=system_u:system_r:auditd_t:s0 res=1
Welcome to emergency mode! After logging in, type "journalctl -xb" to view
system logs, "systemctl reboot" to reboot, "systemctl default" to try again
to boot into default mode.
Give root password for maintenance
(or type Control-D to continue):

The issue is that the conversion of the filesystem changed it’s UUID, plus the filesystem type in /etc/fstab no longer matches.

We can fix this easily by dropping to the recovery shell by entering the root password above and executing the following commands:

guest# sed -i -e '/boot/ s/UUID=[0-9\-]*/\/dev\/xvda1/' /etc/fstab
guest# sed -i -e '/boot/ s/xfs/ext3/' /etc/fstab
guest# cat /etc/fstab | grep '/boot'

Make sure the cat returns a valid /boot line, it should be using /dev/xvda1 as the device and ext3 as the filesystem now.

Finally, stop and start the instance (reboots seem to hang for me):

guest# shutdown -h now
xm create -c vmguest1

It should now boot correctly! Go forth and enjoy your new VM!

CentOS Linux 7 (Core)
Kernel 3.10.0-123.el7.x86_64 on an x86_64

This is certainly a hack – doing this backport of pygrub solved my personal issue, but it’s entirely possible it may break other things, so do your own testing and determine whether it’s suitable for you and your environment or not.

Rescuing a corrupt tarfile

Having upgraded OS recently, I was using a poor quality sneakernet of free USB sticks to transfer some data from my previous installation. This dodgy process strangely enough managed to result in some data corruption of my .tar.bz2 file, leaving me in the position of having to go to other backups to recover my data. :-(

$ tar -xkjvf corrupt_archive.tar.bz2
....
jcarr/Pictures/fluffy_cats.jpg
jcarr/Documents/favourite_java_exceptions.txt

bzip2: Data integrity error when decompressing.
    Input file = (stdin), output file = (stdout)

It is possible that the compressed file(s) have become corrupted.
You can use the -tvv option to test integrity of such files.

You can use the `bzip2recover' program to attempt to recover
data from undamaged sections of corrupted files.

tar: Unexpected EOF in archive
tar: Error is not recoverable: exiting now

This is the first time I’ve ever experienced a corruption like this with .tar.bz2. The file was the expected size, so it wasn’t a case of a truncated file, the data was there but something part way through the file was corrupted and causing bzip2 to fail with decompression.

Bzip2 comes with a recovery utility, which works by rescuing each block into an individual file. We then run -t over them to identify any blocks which are clearly corrupt, and delete them accordingly.

$ bzip2recover corrupt_archive.tar.bz2
$ bzip2 -t rec*.tar.bz2

Then we can put the blocks back together in an uncompressed form of the original file (in this case tar);

$ bzip2 -dc rec*.tar.bz2 > recovered_data.tar

Finally we want to extract the actual tar file itself to get the data. However, tar might not be too happy about having lost some blocks inside it, or having other forms of corruption.

# tar -xvf recovered_data.tar
...
jcarr/Pictures/fluffy_cats.jpg
jcarr/Documents/favourite_java_exceptions.txt
tar: Skipping to next header
tar: Archive contains ‘\223%\322TGG!XہI.’ where numeric off_t value expected
tar: Exiting with failure status due to previous errors

I couldn’t figure out a way to get tar to skip over, or repair the file, however I did find a few posts online suggesting the use of the much older cpio utility that still exists on most unixes today.

$ cpio -ivd -H tar < recovered_data.tar

This worked perfectly! cpio complained about some files it couldn’t recover, but it recovered the vast majority of the damaged contents. Of course I can’t trust any files completely that I’ve restored, always possible there is some small corruption after such a restore, however if you lack backups, or your backups themselves are corrupted, this could be the way to go to get back some of your precious data.

In this case I was lucky that the header of the file was still intact  – if bzip2 or tar can’t read the file header to identify it as a tar.bz2 to being with, other measures may need to be taken. There’s heaps of suggestions online, just make a copy of the corrupted file first then try the different suggested methods till you find an approach that (hopefully) works for you.

2degrees or not 2degrees?

Coming back to New Zealand from Australia, I was faced with needing to pick a telco to use. I’ve used all three New Zealand networks in the past few years (all pre-4G/LTE) and don’t have any particular reason/loyalty to use any specific network.

I decided to stay on the 2degrees network that I had parked my number on before going to Sydney, so I figured I’d put together a brief review of how I’ve found them and what I think about it so far.

Generally there were three main incentives for me to stay on 2degrees:

  1. AU/NZ mobile or landline minutes are all treated equally. As I call and SMS my friends and colleagues in AU all the time, this works very nicely. And if I need to visit AU, their roaming rates aren’t unaffordable.
  2. All plans come with free data sharing between devices – I can share my data with up to 5 devices at no extra cost. Laptop with 3G, tablet, spare phone? No worries, get a SIM card and share away.
  3. Rollover minutes & data – what you don’t use in one month accrues for up to a year.

And of course their pricing is sharp – coming into the New Zealand market as the underdog, 2degrees started going after the lower end prepay market, before moving up to offer a more sophisticated data network.

For $29, I’m now getting 1GB of data, 300 minutes AU/NZ and unlimited SMS AU/NZ. But also received an additional once-off bonus of 2GB data for moving to a no-commitment plan and another 200MB per month as a bonus for my data shared device; it’s insanely good value really.


Of course good pricing and features aren’t any good if the quality of the service is poor or the data-rate substandard. 2degrees still lack 4G/LTE in Wellington (has just been introduced in Auckland) which is going to set them back a bit, however they do still deliver quite a decent result.

Performance of my 1 year old Samsung Galaxy Note 2 (LTE/4G model operating on 3G-only network) was good with a 22.16 Mb/s download and 2.56 MB/s upload from my CBD apartment. It’s actually faster than the apartment WiFi ISP provider currently. (Unsure why the ping below is so bad, it’s certainly not that bad when testing… possibly some issue with the app on my device).

889233841It does pay to have a good device – older devices aren’t necessarily capable of the same speeds, the performance with my 4 year old Lenovo X201i with Qualcomm Gobi 2000 built-in 3G hardware is quite passable, but it’s not quite the speed demon of my cellphone at only 6.16 Mb/s down and 0.36 Mb/s up. Still faster than many ADSL connections however, I was only getting about 4 Mb/s down in my Sydney CBD apartment recently!

3618043332Whilst I haven’t got any metrics to show, the performance outside of the cities in regional and rural areas is still reasonable. 2degrees roams onto Vodafone for parts of their coverage outside the main areas, which means that you need to make sure your phone/device is configured to allow national data roaming (or you’ll get *no* data coverage), and it also means you’re suspectable to Vodafone’s network performance, which is one of the worst I’ve used (yes AU readers, even worse than Vodafone AU).

Generally the performance is perfectly fine for my requirements – I don’t download heaps of data, but I do use a lot of applications that are latency and packet loss sensitive. I look forwards to seeing what it’s like once 2degrees get their LTE network in Wellington and I can get the full capability out of my phone hardware.

2degrees is also trailing a service of offering free WiFi access – I’m in the trial and have been testing, generally the WiFi is very speedy and I was getting speeds of around 21 Mb/s down and 9 Mb/s up whilst walking around, but it’s let down by the poor transition that Android (and presumably other vendors) make when moving between WiFi and 3G networks. Because the WiFi signal hangs on longer than it can actually sustain traffic, it leads to small service dropouts in data when moving between the two networks – this isn’t 2degrees’ fault, rather a limitation of WiFi and the way Android handles it, but it reflects badly on telco hybrid WiFi/GSM network approaches.


It’s not all been perfect – I’ve had some issues with 2degrees, mostly when using them as a prepay provider. The way data is handled for prepay differs to on-plan, and it’s possible to consume all your available data, then eat through your credit without any warning, something that cost me a bit more than I would like a couple of times when on prepay.

This is fixed with on-plan, which gives you tight spend control (define how much you want to cap your bill at) and also has a mode that allows you to block non-plan based data spend, to avoid some unexpected usage generating you an expensive bill. I’d recommend going with one of their plans rather than their prepay because of this functionality alone, not to mention that the plans tend to offer a bit better value.
On the plus side, their twitter support was fantastic and sorted me out with extra data credit in compensation. Their in-store support has also been great, when I went to buy an extra SIM ($5) to data share to my laptop, the guy at the counter told me about a promotion, gave me a free SIM and chucked 200MB/month on it, all that I wasn’t expecting.

It’s a nice change, generally telco customer service is some of the worst examples around, so it’s nice to have a positive interaction, although 2degrees do need to make an effort to stop having certain spend protections limited to their plan customers and not prepay – A good customer service interaction is nice, but not having to talk to them in the first place is even better.


So how do I find 2degrees compared to the other networks? I’ve found NZ networks generally a mixed bag in the past – Telecom XT has been the best performing one, but I’ve always found their pricing a bit high and Vodafone is just all round poor in both customer service and data performance. With the current introduction of 4G/LTE by all the networks, it’s a whole another generation of technology and what’s been a good or bad network in the past, may no longer apply, but we need to wait another year or so for the coverage and uptake to increase to see how it performs under load.

For now the low cost and free data sharing of up to 5 devices will keep me on 2degrees for quite some time. If someone else was paying, maybe I’d consider Telecom XT for the bit better performance, but the value of 2degrees is too good to ignore.

Like anything, your particular use case and requirements may vary – shop around and see what makes sense for your requirements.

Funny tasting Squid Resolver

squid_logoSquid is a very popular (and time tested) proxy server, it’s generally the go-to solution for a  proxy server in a *nix environment and is capable of providing general caching proxy services (including transparent) as well as more sophisticated reverse proxy solutions.

I recently ran into an issue where Squid was refusing to resolve some DNS addresses on our network – not an uncommon problem if using a public DNS server instead of an internal-only DNS server by mistake.

The first step was to check the nameservers listed in /etc/resolv.conf and make sure they were correct and returning valid results. In this case they were, all the name servers correctly resolved the address without any issue.

Next step was to check for specific configuration in Squid – some applications like Squid and Nginx allow you to specifically set their nameservers to something other than the contents of /etc/resolv.conf. In this case, there was no such configuration, in fact there was no configuration relating to DNS at all, meaning it would have to fall back to the operating system resolver.

Or does it? Generally Linux applications use the OS resolver which follows a set order to discover hosts defined explicitly in /etc/hosts, or tries the nameservers in /etc/resolv.conf. When either file is changed, the changes are reflected immediately on the next query for those addresses.

However Squid has it’s own approach. Unless it’s using DNS name servers specifically defined in it’s configuration file, instead of using the OS resolver it reads the configuration in /etc/resolv.conf as a once-off startup action, then continues to use the name servers that were defined for the lifetime of the process.

You can see this in the logs – at startup time Squid logs the servers it’s using in cache.log:

# grep nameserver /var/log/squid/cache.log
2014/07/02 11:57:37| Adding nameserver 192.168.1.10 from /etc/resolv.conf

From this, the sequence of events is simple to figure out:

  1. A server was brought online, using a public DNS server that lacked some of our internal records.
  2. Squid was started up, reading in that DNS server from /etc/resolv.conf.
  3. The DNS server addresses were corrected and immediately resolved all other applications – but Squid stuck with the old address still, so continued to refuse the queries.

Resolving the immediate issue is as simple as restarting the Squid process to force it to pickup the new resolver settings. But what if your DNS server values could change at any future stage without warning?

If you’re using Puppet, you could use a custom fact (like this one) that exposes the current name servers on the system, then writes them into the Squid configuration file using the dns_nameservers configuration parameter and notifies the Squid service to reload on any change of the configuration file.

Or if your squid server is always going to be using a particular DNS server, regardless of what the host is using, you can simply set the dns_nameservers parameter in Squid to point to the desired servers.

Thunderbolt and other Macbook hardware issues with Linux

Having semi-recently switched to a Macbook Pro Retina 15″ at work, I decided to give MacOS a go. It’s been interesting, it’s not too bad an operating system and whilst it is something I could use on an ongoing basis, I quickly longed for the happy embrace of GNU/Linux where I have a bit more power and control over the system.

Generally the Linux kernel supports most of the Macbook hardware out-of-the-box (As of 3.15 anyway), but with a couple exceptions:

  • I believe support for the dual GPU mode switching is now fixed, however the model I’m using now is Intel only, so I can’t test this unfortunately.
  • The Apple Webcam does not yet have a driver. The older iSight driver doesn’t work, since the new gen of hardware is a PCIe connected device, not USB.
  • The WiFi requires a third party driver to be built for your kernel. You’ll want the latest Broadcom 802.11 STA driver in order for it to built with new kernel versions. Ubuntu users, get this version, or more recent.
  • If you’re having weird hangs where the Macbook just halts frequently waiting on on I/O, add “libata.force=noncq” kernel parameter. It seems that there is some bug with this SSD and some kernel versions that leads to weird I/O halts, which is fixed by this option.
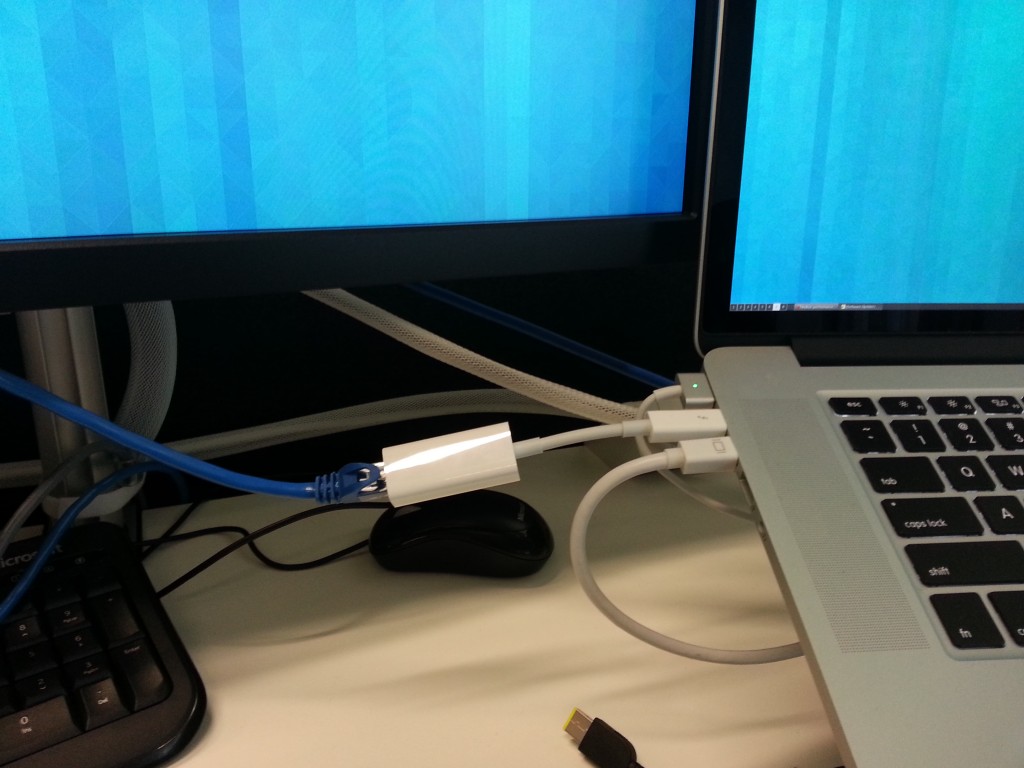
  • Thunderbolt support is limited to only working on devices connected at boot up, no hotplug. Additionally, when using Thunderbolt, Suspend/Resume is disabled (although it works otherwise if there’s no Thunderbolt involved).

Of all these issues, the lack of Thunderbolt support was the one that was really frustrating me, since I need to use a Thunderbolt based Ethernet adaptor currently on a daily basis and I always rely on Suspend and Resume heavily.

Thankfully two kernel developers, Andreas Noever and Matthew J Garrett have been working on a series of kernel patches that introduce support for Thunderbolt hotplug and thus allow it to work on suspend and resume.

Sadly whilst this patch is awesome, it doesn't yet do wireless Thunderbolt for when the ethernet cable you want is too bloody short.

You too can now enjoy the shackles of a wired LAN connection like it’s 1990 all over again!

It doesn’t sound like it has been easy based on the posts on MJG’s blog which are well worth a read – essentially the Apple firmware does weird things with the Thunderbolt hardware when the OS doesn’t identify itself as Darwin (MacOS’s kernel) and likes to power stuff down after suspend/resume, so it’s taken some effort to debug and put in hardware-specific workarounds.
It will surely only be a matter of time before these awesome patches are merged, but if you need them right now and are happy to run rather beta kernel patches (who isn’t??) then the easiest way is to checkout their Git repo of 3.15 with all the patches applied. This repository should build cleanly via the usual means, and provide you with a new kernel module called “thunderbolt”.I’ve been testing it for a few days and it looks really good. I’ve had no kernel panics, freezes, devices failing to work or any issues with suspend/resume with these patches – the features that they claim to work, just work.  The only catches are:

  • If you boot the Macbook with the Thunderbolt device attached, it will be treated like a PCIe hotplug device… except that when you remove it, that Thunderbolt port won’t work again until the next restart. I recommend booting the Macbook with no devices attached, then hotplug once started to avoid this issue. I always remove before suspend and re-connect after resume as well (mostly because it’s a laptop and it’s easy to do so and avoid any issues).
  • The developers advise that Thunderbolt Displays don’t work at this time (however Mini DisplayPort connected screens work fine, even though they share the same socket).
  • The developers advise that chaining Thunderbolt devices is not yet supported. So stick to one device per port for now.

If you’re using Linux on a Macbook, I recommend grabbing the patched source and doing a build. Hopefully all these patches make their way into 3.16 or 3.17 and make this post irrelevant soon.

If you’re extra lazy and trust a random blogger’s binary packages, I’ve built deb packages for Ubuntu 13.10 (and should work just fine on 14.04 as well) for both the Thunderbolt enabled kernel as well as the Broadcom WiFi. You can download these packages here.

Adjusting from Sydney to Wellington

It’s a been a good few months back home in Wellington, getting settled back into the city and organising catch ups with old friends. It’s also been a very busy couple months, with me getting straight back into work and projects, as well as looking for a house to buy with Lisa!

Obligatory couplesy photo.

Obligatory couplesy photo. I should really take better ones of these…

I’m happy to be home here in New Zealand, certainly loving the climate and the lifestyle a lot more than Sydney, although there are certainly a number of things I miss from/about Sydney.


The most noticeable change is that I’m feeling healthier and fitter than ever before, probably on account of doing a lot more physical activity, wandering around the city and suburbs on foot and climbing up hills all the time. The lower pollution probably isn’t bad either – by international scales Sydney is a “clean” city, but when compared to a small New Zealand city, it was very noticeably polluted and I can smell the difference in air quality.

Being only a short distance from the outdoors at all times is a pretty awesome perk of being home. Once I get a car and a mountain bike, a lot more will open up to me, currently I’ve just invested in some good walking boots and have been doing close wanders to the city like Mt Kaukau, up over Roseneath and around Miramar Peninsula.

Wind turbines, rolling hills, sunlight... wait, this isn't a data center!

Wind turbines, rolling hills, sunlight… wait, this isn’t a data centre! What’s wrong with me?? Why am I here?


The other very noticeable difference for me has been my work lifestyle. Moving from working in the middle of the main office for a large company to working semi-remotely from a branch office is a huge change when you consider the loss of daily conversation and informal conversations with my colleagues in the office, as well as the ease of being involved in incidents and meetings when there in person.

Saving journalism in the 21st century.

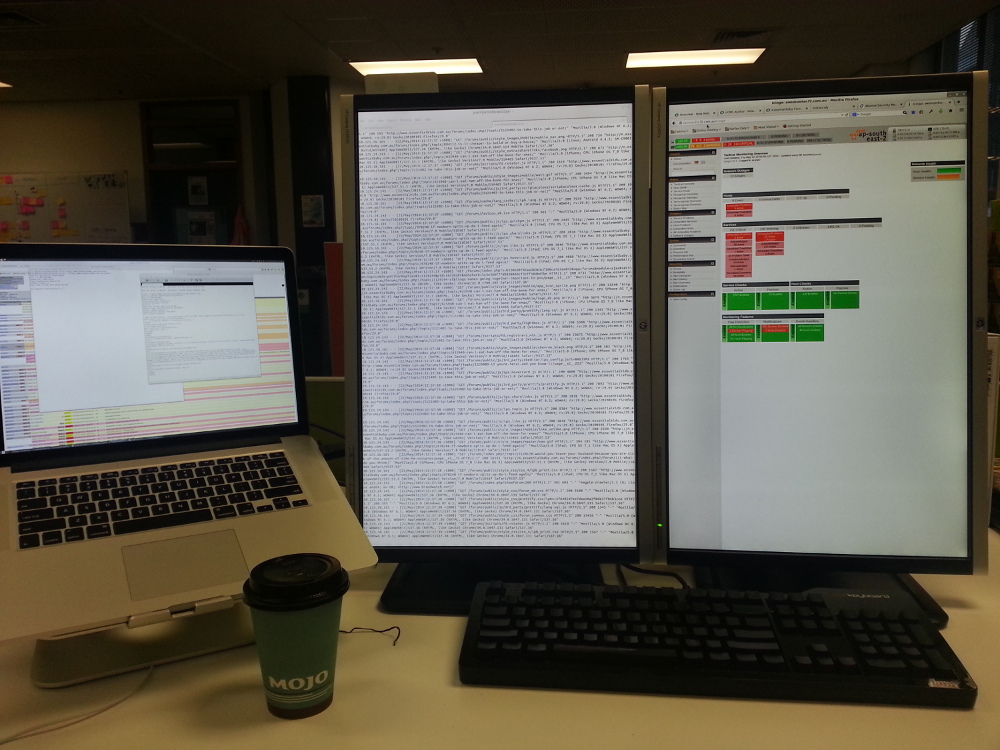
Work battle station. Loving the dual vertical 24″ ATM, but I lose them in a week when we move to the new office. :'(

The Wellington staff I work with are awesome, but I do miss the time I spent with the operational engineers in Sydney. Working with lots of young engineers who lived for crazy shit like 10 hour work days then spending all evening at the pub arguing about GNU/Linux, Ruby code, AWS, Settlers of Catan and other important topics was a really awesome experience.

Wellington also has far fewer of my industry peers than Sydney, simply due to it’s scale. It was a pretty awesome experience bumping into other Linux engineers late at night on Sydney streets, recognised as one of the clan by the nerdy tshirt jokes shared between strangers. And of course Sydney generally has far more (and larger) meetups and what I’d describe as a general feel of wealth and success in my field – people are in demand, getting rewarded for it, and are generally excited about all the developments in the tech space.

Not that you can’t get this in Wellington – but the scale is less. Pay is generally a lot lower, company sizes smaller, and customer bases small… there aren’t many places in New Zealand where I could work and look after over a thousand Linux servers serving millions of unique visitors a day for example.

I personally don’t see myself working for any New Zealand companies for a while, at this current point in time, I think the smart money for young kiwis working in technology is to spend some time in Australia, get a reputation and line up some work you can bring home and do remotely. New Zealand has a lot of startups, as well as the traditional telcos and global enterprise integrators, but the work I’ve seen in the AU space is just another step up in both challenge and remuneration. Plus they’re crying out for staff and companies are more willing to consider more flexible relationships and still pay top dollar.

It’s not all negative of course –  Wellington still has a good number of IT jobs, and in proportion to other lines of work, they pay very well still – you’re never going to do badly working domestically. Plus there’s the fact that Wellington is home to a hotbed of startup companies including the very successful Xero which has gone global… Longer term I hope a lot of these hopeful companies succeed and really help grow NZ as a place for developing technology and exporting it globally whilst still retaining NZ-based head offices, giving kiwis a chance to work on world-class challenges.


Moving home means I’ve also been enjoying  Wellington’s great food and craft beer quite a bit, and I’m probably spending more here than in Sydney on brunch, dinners, coffee and of course delicious craft beer. Hopefully all the walking around the hills of Wellington compensates for it!

Sydney is known for being an expensive place to live, but I’m finding Wellington is much more expensive for coffee and food. The upside is that the general quality and standard is high, whereas I’d find Sydney quite hit and miss, particularly with coffee.

I suspect the difference is due to the economy of scale – if you have a hole-in-the-wall coffee shop in Sydney, you’ll probably serve 100x as many people as you will in Wellington, even after paying higher rents, it works out in your favour. Additionally essential foods are GST free, which makes them instantly 15% less than in New Zealand.

Doesn't get more kiwi than chocolate fish

Doesn’t get more kiwi than complementary chocolate fish with your coffee.

The craft beer scene here is also fantastic, I’m loving all the new beers that have appeared whilst I’ve been away, as well as the convenience of being able to pickup single bottles of quality craft beer at the local supermarket. I’ve been enjoying Tuatara, Epic and Stoke heavily lately, however they’re just a fraction of the huge market in NZ that’s full of small breweries as well as brew-pubs offering their own unique local fare.

Delicious

Delicious pale ale with NZ hops from Tuatara, a very successful craft brewery in the Wellington region.

I’m still amazed at how poor the beer selection was in Sydney’s city bars and bottle stores. It’s bad enough that you can’t buy alcohol at the supermarket, but the bottlestores placed near to them have very little quality craft beer available for selection.

I remember the bottlestore in Pyrmont (Sydney’s densest residential suburb) had a single fridge for “craft” beer which was made up of James Squire’s which is actually a Lion brand masquerading as a craft beer, and Little Creatures which although is quite good, happens to be owned by Lion as well.

Drinking out at the pubs had the same issue, with many pubs offering only brews from C.U.B and Lion and often no craft beers on tap. Sure, there were specific pubs one could go to for a good drink, but they were certainly in the minority in the city, where as Wellington makes it hard not to find good beer.

Just before I left Sydney, The Quarryman opened up in Pyrmont which brought an excellent range of AU beers to a great location near my home and work, however it’s a shame that this sort of pub was generally an infrequent find.

There’s a good write up on the SMH about the relationship between the big two breweries and the pubs, which mentions that the Australian Competition and Consumer Commission (ACCC) is looking into the situation – would be nice if some action gets taken to help the craft beers make their way into the pubs a bit more.

I might be enjoying my craft beer a bit *too* much! ;-)

I might be enjoying my craft beer a bit *too* much! ;-)


The public transport is also so different back here in Wellington. Being without a car in both cities, I’ve been making heavy use of buses and trains to get around – particularly since I’ve been house hunting and going between numerous suburbs over the course of a single day.

Sydney Rail far beats anything Wellington – or New Zealand for that matter – has to offer. Going from the massive 8 carriage double-decker Sydney trains that come every 3-15mins to Wellington’s single decker 2 carriage trains that come every 30-60mins makes it feel like a hobby railway line. And having an actual conductor come and clip your paper-based ticket? Hilarious! At least Wellington has been upgrading most of it’s trains, the older WW2-era relics really did make it feel like a hobby/historic railway….

No mag swipe on this ticket!

No magnetic swipe on this train ticket!

But not everything is better in Sydney on this front – Wellington buses have been a bliss to travel on compared to Sydney, on account of actually having an integrated electronic smartcard system on the majority of buses.

I found myself avoiding buses in Sydney because of their complicated fare structure and as such I tended to infrequently go to places that weren’t on the rail network due to the hassle it entailed. Whereas in Wellington, I can jump on and off anything and not have to worry about calculating the number of sections and having the right type of ticket.

The fact that Sydney is *still* working on pushing out smartcards in 2014 is just crazy when you think about the size of the city and it’s position on the world stage. Here’s hoping the Opal rollout goes smoothly and my future trips around Sydney are much easier.


Finally the other most noticeable change? It’s so lovely and cold! I seriously prefer the colder climate, although lots of people think I’m nuts for giving up the hot and sunny days of Sydney, but it just feels so much more comfortable to me – I guess I tend to just “run hot”, I’m always pumping out heat… guess it works well for a cold climate. :-)

In event of a Wellington winter, your Thinkpad can double as a heating device.

In event of a Wellington winter, your Thinkpad can double as a heating device.

Head Crash

Now that I’m back in Wellington, I’ve spent some time going through my boxes of parts relating to my server, and collected all 6 wrecked Seagate hard disks that gave me so much grief last year.

My friend @macropiper took them apart – most of them didn’t show anything interesting, but one particular disk had suffered an impressive head crash – a collision of the hard drive head with the disk platters.

Uhoh

You can see the groove that the disk heads have carved into the platters. And all that dust? That’s metal fragments that got torn off the disk platter surface.

boom

The disk head and platter have essentially sanded each other down.

This is the first time I’ve ever seen an actual disk head crash before. It’s an odd occurrence, being a server drive, this disk would never have been subjected to any motion at all when powered up and spinning.

Presumably the disk controller must have suffered a critical failure and mis-guided the drive heads all the way into the platters. Pity I wasn’t in the room when it happened, I bet that would have sounded pretty impressive. And sadly expensive.

There are no seasons in the datacenter

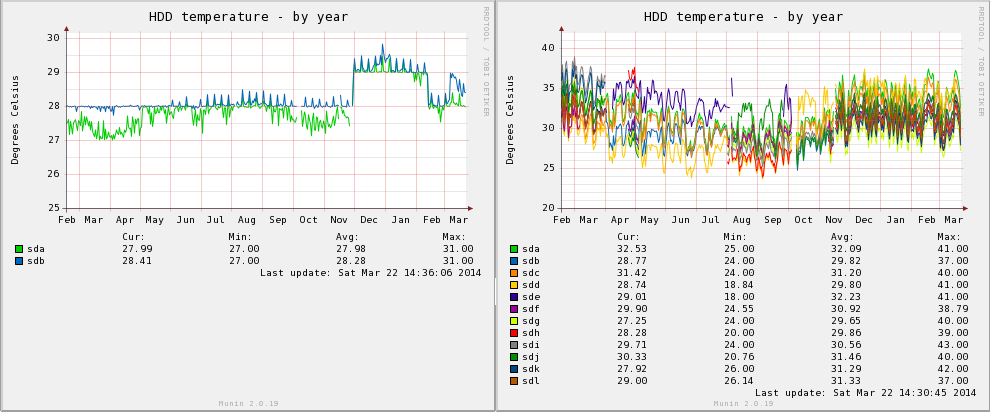
I always like reviewing the Munin temperature graphs between my co-located server and my home server, the temperature range fluctuations in non-air conditioned rooms is always quite interesting – as much as 25 degrees Celsius over the course of the year, inline with the seasons.

Tmp

Co-location machine (left), home machine (right).

t,p

Co-location machine (left), home machine (right).

Jethro does Mac: Terminals

With a change in job, I recently shifted from my primary work computer being a Lenovo X1 Carbon running GNU/Linux to using an Apple Macbook Pro Retina 15″ running MacOS.

It’s not the first time that I’ve used MacOS as my primary workstation, but I’ve spent the vast majority of my IT life working in a purely GNU/Linux environment so it was interesting having to try and setup my usual working habits and flow with this new platform.

I’m going to do a few blog posts addressing my thoughts and issues with this platform and how I’ve found it compared to my GNU/Linux laptops. I’m going to look at both hardware and software and note down a few fixes and tricks that I’ve learnt along the way.


Part 4: Terminals and adventures with keybindings

I’ve already written about the physical issues with the Macbook keyboard, but there’s another issue with this input device – keybindings.

As mentioned previously, the Macbook lacks various useful keys, such as home and end, instead, you need to use a key combination such as Apple + Left/Right to achieve the same result. However for some inexplicable reason, Apple decided that the Terminal should have it’s own special behaviour, so it does not obey the same keybindings. In any other MacOS program, using these key combinations will achieve the desired results. But with Terminal, it results in random junk appearing in the terminal – or nothing at all.

For an engineer like myself this is the single most frustrating issue I’ve had with MacOS to date – having the Terminal essentially broken out of the box on their own hardware is quite frankly unacceptable and I suspect a reflection on how Apple cares far more about consumer users than power users.

Whilst Apple’s Terminal offers the ability to configure keybindings, it has two major problems that make it unusable:

  1. Whilst there is an entry for keys called “Home” and “End”, these entries seem to map to actual physical Home/End keys, but not the key combinations of Apple + Home/End, which appear as-is to the OS. So any configuration done for the Home/End won’t help.
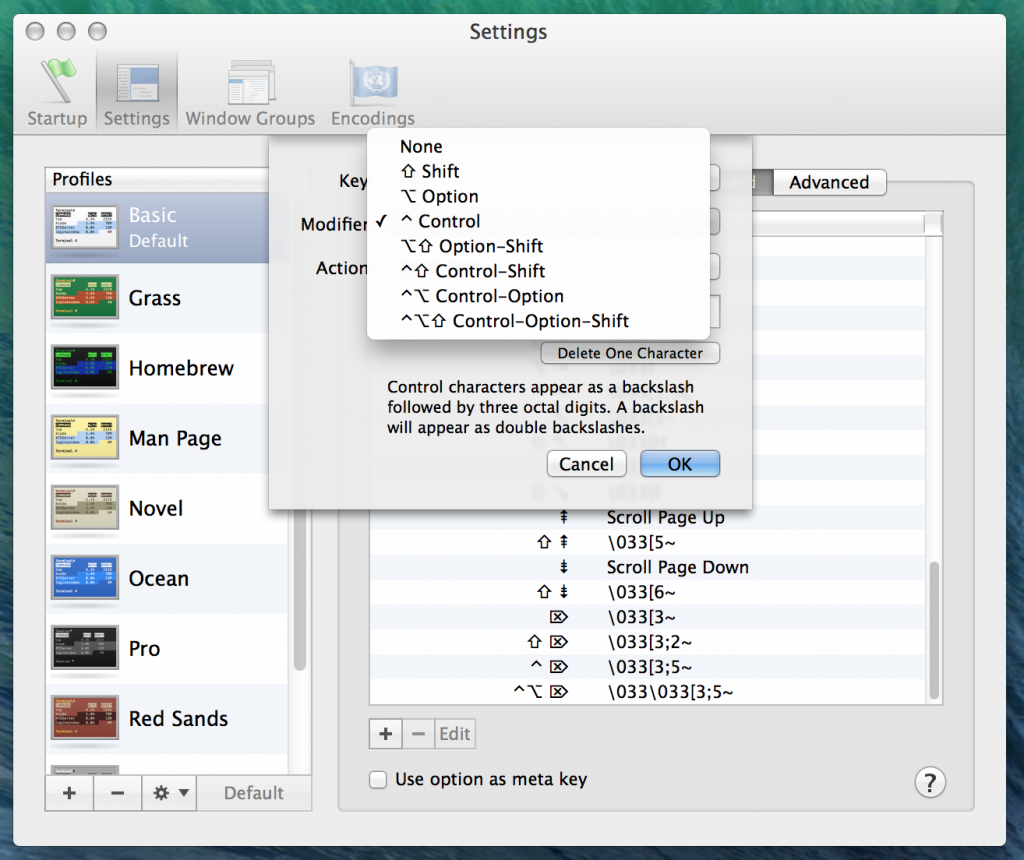
  2. Instead we need to configure a key combination with a modifier of Apple key. But MacOS Terminal doesn’t allow the Apple key to be used as a modifier.
MacOS stock terminal keybinding configuration.

MacOS stock terminal keybinding configuration – no Apple key option here!

The result is, there’s no way to properly fix the MacOS Terminal and in my view, it’s essentially useless. Whilst if I was using an external keyboard with a physical home/end key it wouldn’t be too much of a problem since I can set a keybinding, there are times I do actually want to be able to use the laptop keyboard effectively!

I ended up fixing it by installing the popular iTerm2 third party terminal application- in many ways it’s similar to the stock terminal, but it offers various additional configuration options.

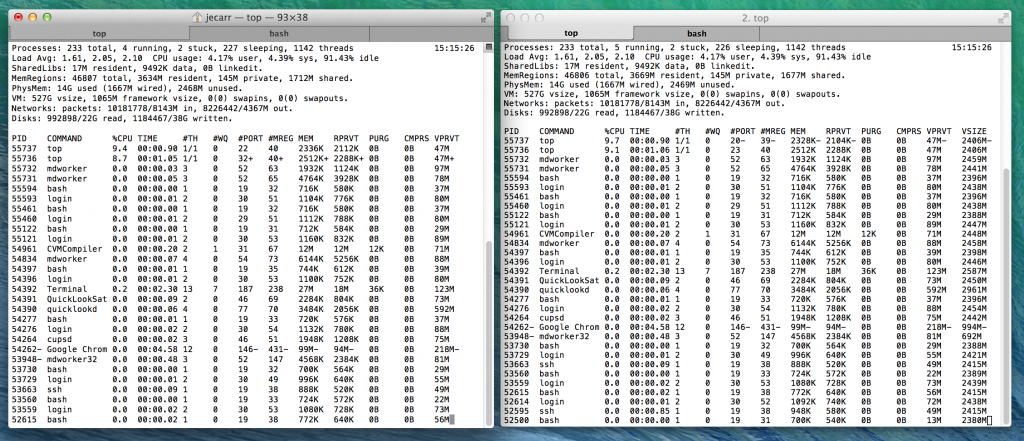
iTerm2 and MacOS Terminal alongside each other.

iTerm2 and MacOS Terminal alongside each other, configured to use same colour scheme and fonts.

For me the only thing that I really care about is the fact that it adds the ability to setup keybindings with the Apple + Home/End key options.

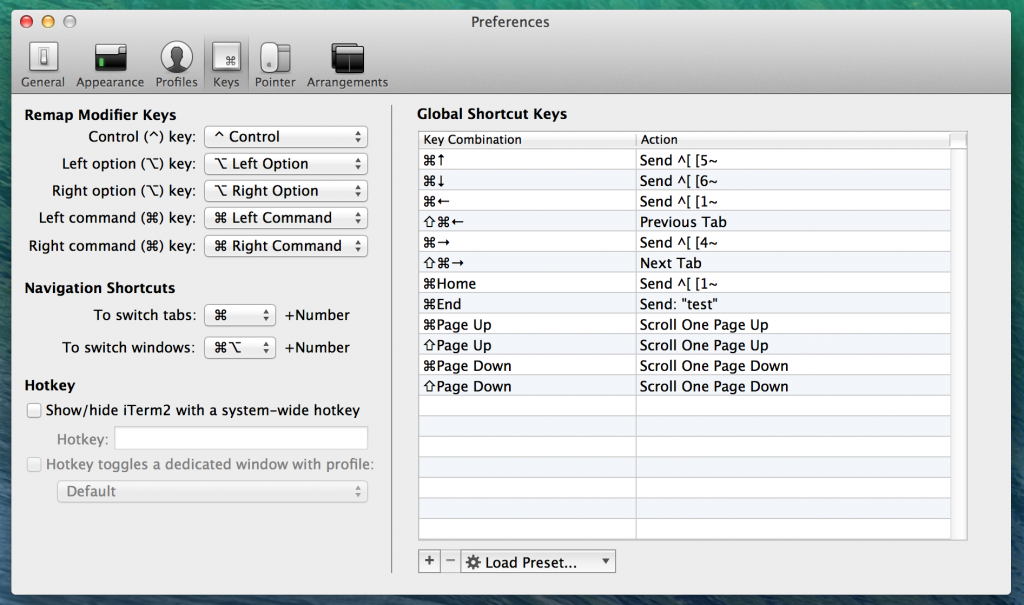
iTerm2

The killer feature – the ability to set key combinations with the Apple key!

Setting the above and then creating an ~/.input.rc file (as per these instructions) resolved the keybinding issues for me, and made iTerm2 consistent with all the MacOS applications.

"\e[1~": beginning-of-line
"\e[4~": end-of-line
"\e[5~": history-search-backward
"\e[6~": history-search-forward
"\e[3~": delete-char
"\e[2~": quoted-insert
"\e[5C": forward-word
"\e[5D": backward-word
"\e\e[C": forward-word
"\e\e[D": backward-word
set completion-ignore-case On

The key combinations work correct in the local shell, Vim and also via SSH connections to other systems. Perfect! I just wish I didn’t have to do this in the first place…


See other posts in this series via the jethro does mac tag as I explore using MacOS after years of GNU/Linux only.

The awesome tablet money can’t buy

Most people working in technology and have heard of and formulated some opinion about the Microsoft Surface tablet, now in it’s second generation of hardware. For some it’s a poor attempt to compete with the iPad, for others it’s the greatest laptop replacement they’ve ever seen, destined to bring the brilliance of Windows 8.1 to the masses.

Surface

Whilst I think it’s good for Apple and Android to have some competition in the tablet market, the Windows platform itself is of no interest to a GNU/Linux using, free-software loving individual like myself. What I do find interesting about the Microsoft Surface, is not the software, but rather the excellent high-specification hardware they’ve managed to cram into 980g of handheld excellence.

I’ve been using my Lenovo X201i Thinkpad for about 4 years now and it’s due for an upgrade – whilst still very functional, the lack of AES-NI and a low resolution display and poor GPU is starting to get quite frustrating, not to mention the weight!

The fully speced Microsoft Surface 2 Pro features a Core i5 CPU, 8GB of RAM and 512GB SSD, plus the ability to drive up to two external displays – qualities that would make it suitable as my primary workstation, whether on the go, or docked into larger displays at home – essentially a full laptop replacement.

Since the Microsoft Surface Pro 2 is x86-based and supports disabling secure-boot, it is possible to run GNU/Linux natively on the device, suddenly making it very attractive for my requirements.

It’s not a perfect device of course – the unit is heavy by tablet standards, and the lack of a 3G or LTE modem is a frustrating limitation. Battery life of the x86 Pro series is not where near as good as a low power ARM chip (although the Haswell Core i5 certainly has improved things over the generation 1 device)..

There’s also the question of cost, the fully speced unit is around $2,600 NZD which puts it in the same bracket as high end expensive laptops.

Remember ads? Before adblocker?

Personally I feel these ads need more design effort other than the product name and the convincing slogan of “Get it”!

Microsoft has certainly spared no expense advertising the Surface. With billboards, placement marketing in TV series and internet advertising, it’s hard not to notice them. Which is why it’s even more surprising that Microsoft made the monumental mistake of not stocking enough units to buy.

I’m not sales or marketing expert, but generally my understanding is that if you want people to buy something, you should have stock to sell to them. If I walk into the Apple store down the road, I can buy an iPad in about 5mins. But if I try to buy the competing Microsoft Surface, I get the depressing statement that the unit is “Out of Stock”:

All models of Surface Pro 2, out of stock on AU online store.

All models of Surface Pro 2, out of stock on AU online store.

In fact, even it’s less loved brother, the ARM-based Windows RT version which can’t run anything other than Microsoft Store applications is out of stock as well.

Even the fundamentally flawed RT-family of devices is sold out.

Even the feature limited RT-family of devices is sold out.

The tablets seem to have been out of stock since around December 2013, which suggests that the Christmas sales exhausted all the stock and Microsoft has been unable to resupply it’s distributors.

Possibly Microsoft limited the volume of units manufactured in fear of ending up with unsold units (like the difficult to shift Surface RT Gen-1 series that got written down) and didn’t manufacture as many units as they otherwise would have – a gamble that has shown itself to be a mistake. I wonder how many missed sales have resulted, where people gave up waiting and either went for a third party Windows tablet, or just purchased an iPad?

Microsoft hasn’t even provided an ETA for more stock or provided an email option to be advised and get first dibs on new stock when it arrives eventually.

Of interest, when comparing NZ and AU stock availability and pricing, the price disparity isn’t too bad. The top model Surface Pro 2 costs AUD $1854 excluding GST, whereas the New Zealand model sells for NZD $2260 excluding GST, which is currently around AUD $2137.

This is a smallish difference of around $283, but this is probably due to Microsoft pricing the tablet when the exchange rate was around $0.80 AUD to $1 NZD.

What I would expect, is that when they (eventually!) import additional stock to replenish supplies, the pricing should be re-adjusted to suit the current exchange rate – which is more around $0.95 AUD to $1 NZD.

Kiwi pricing

Kiwi pricing is a bit more eh bru? 15% GST vs 10% GST in Australia is the biggest reason for the disparity.

Whether they do this or not, remains to be seen – but considering how expensive it is, if they can drop the price without impacting the profit margin it could only help make it more attractive.

For now, I’m just keeping an eye on the stock – in many ways not being able to buy one certainly helps the house fund, but the fact is that I need to upgrade my Lenovo laptop at some point in the next year at the latest. If Microsoft can sort out their stock issues, the Surface could well be that replacement.