Tag Archives: linux

Automatically restarting GNU/Linux hosts upon hung storage

We recently experienced a weird and frustrating problem with storage reliability on our RabbitMQ cluster running on AWS c5-series EC2 instances with EBS storage and Ubuntu LTS 16.04.

  1. One of our three-node RabbitMQ cluster instances will experience an issue that results in it being unable to persist anything to disk, on any mounted volume on the instance.
  2. When this happens, the instance is *supposed* to remove itself from the cluster as an unhealthy member and have the remaining two instances take over all responsibilities with zero downtime to operational systems.
  3. Sadly for some unknown reason, the way this issue impacts RabbitMQ does not result in the instance being evicted from the cluster. Instead, it remains in the cluster exchanging healthy status messages with other members, but (and this is the critical bit) it manages to then jam up queues across the entire cluster, bringing down the two healthy instances along with the one unhealthy.
  4. Operations (me) gets paged to solve a critical outage on the platform that’s going to impact customers.

The problem is super weird in that it occurs somewhat randomly – no obvious correlation to load, time of day – but it does tend to happen after the instance has been running for at least a few weeks. It also occurs on any of the three RabbitMQ instances, so it’s not something specifically weird about any one instance in the fleet.

The one thing we do know, is that the issue is storage related. Firstly nothing is persisted in the logs (RabbitMQ or system/kernel) from the time the issue occurs and secondly we can see a large spike in disk I/O wait time in our Datadog monitoring for the instance, showing that the instance is stuck with processes waiting for the disk to respond.

Why RabbitMQ is impacted in this manner is unclear. It makes sense that the cluster quorum and status negotiation wouldn’t require working disk to keep running, but in every test we made where we deliberately broke the storage, the RabbitMQ process would correctly detect something was wrong on the host and go into an unhealthy state, removing it from the cluster. Tested ripping out EBS storage whilst still mounted, corrupting with dd, force unmounting, etc… nothing could trigger the exact same behaviour.

Reviewing what differs about production was difficult since it didn’t persist any of the kernel or RabbitMQ logs, however we did manage to extract some information from the AWS instance console for one of the impacted systems before we restarted it:

Ubuntu 16.04.4 LTS localhost ttyS0
[349442.682614] Not tainted 4.4.0-1062-aws #71-Ubuntu
[349442.684363] "echo 0 > /proc/sys/kernel/hung_task_timeout_secs" disables this message.
[349442.686890] INFO: myprocess:1956 blocked for more than 120 seconds.

Essentially the Linux kernel is proceeding to log a number of different processes (basically everything on the box that does anything) as being blocked for over 120 seconds, thanks to the storage failing and being unable to do anything about it to unblock the processes

Given we have been unable to identify the exact fault or reproduce the behaviour (could be something in the Linux Kernel, could be something in AWS c5 or EBS…), we needed a solution that would at least help us by terminating any instance that experienced this storage issue.

The solution is helpfully identified by the kernel log lines above. We can use the hung task panic feature in the Linux kernel to force a host to immediately reboot itself if processes are hung for too long.

We do this using two different sysctl configuration changes (note – you need to set these up in /etc/sysctl.conf to survive reboots):

# Panic if a hung task was found
sysctl kernel.hung_task_panic=1

# Reboot 5 seconds after panic
sysctl kernel.panic=5

The first instructs the kernel to panic if a hung task (any task blocked for more than 120 seconds) occurs. The second, instructs it to reboot shortly after this occurs. We set it to 5 seconds, to give time for any logging to persist or be delivered about the hung task before it’s reboot, although in this particular situation, with all storage being busted its of very limited benefit.

This has been in place for several months now and is working beautifully. Every so often an instance experiences this fault and instead of causing any disruption, it is quickly self-terminated and replaced. Because it terminates completely, the RabbitMQ cluster negotiation is successfully able to re-assign responsibilities to the other instances in the cluster.

In theory there is a 2-minute period where the unhealthy instance is still running, however reviewing the production metrics, it appears that when the fault occurs, RabbitMQ doesn’t immediately break – sometimes it continues to run for 15mins or more before jamming up the cluster. So having it run for 2 minutes has turned out to be just fine.

Ideally going forwards we need to setup a network logging endpoint for these hosts to see if we can capture anything like a stack trace from a kernel driver. It seems likely that it’s a Linux kernel bug rather than an AWS EBS bug, since the issue is resolved with a soft reboot, rather than a force stop-start of the instance via the AWS API, meaning it’s still running on the same hypervisor host, etc. But until then, this kernel configuration parameter means we are not going to disrupt operational services when the fault does occur.

FailberryPi – Diverse carrier links for your home data center

Given the amount of internet connected things I now rely on at home, I’ve been considering redundant internet links for a while. And thanks to the affordability of 3G/4G connectivity, it’s easier than ever to have a completely diverse carrier at extremely low cost.

I’m using 2degrees which has a data SIM sharing service that allows me to have up to 5 other devices sharing the one data plan, so it literally costs me nothing to have the additional connection available 24×7.

My requirements were to:

  1. Handle the loss of the wired internet connection.
  2. Ensure that I can always VPN into the house network.
  3. Ensure that the security cameras can always upload footage to AWS S3.
  4. Ensure that the IoT house alarm can always dispatch events and alerts.

I ended up building three distinct components to build a failover solution that supports flipping between my wired (VDSL) and wireless (3G) connection:

  1. A small embedded GNU/Linux system that can bridge a USB 3G modem and an ethernet connection, with smarts to recover from various faults (like crashed 3G stick).
  2. A dynamic DNS solution, since my mobile telco certainly isn’t going to give me a static IP address, but I need inbound traffic.
  3. A DNS failover solution so I can redirect inbound requests (eg home VPN) to the currently active endpoint automatically when a failure has occurred.


The Hardware

I considered using a Mikrotik with USB for the 3G link – it is a supported feature, but I decided to avoid this route since I would need to replace my perfectly fine router for one with a USB port, plus I know from experience that USB 3G modems are fickle beasts that would be likely to need some scripting to workaround various issues.

For the same reason I excluded some 3G/4G router products available that take a USB modem and then provide ethernet or WiFi. I’m very dubious about how fault tolerant these products are (or how secure if consumer routers are anything to go by).

I started off the project using a very old embedded GNU/Linux board and 3G USB modem I had in the spare parts box, but unfortunately whilst I did eventually recycle this hardware into a working setup, the old embedded hardware had a very poor USB controller and was throttling my 3G connection to around 512kbps. :-(

Initial approach – Not a bomb, actually an ancient Gumstix Verdex with 3G modem.

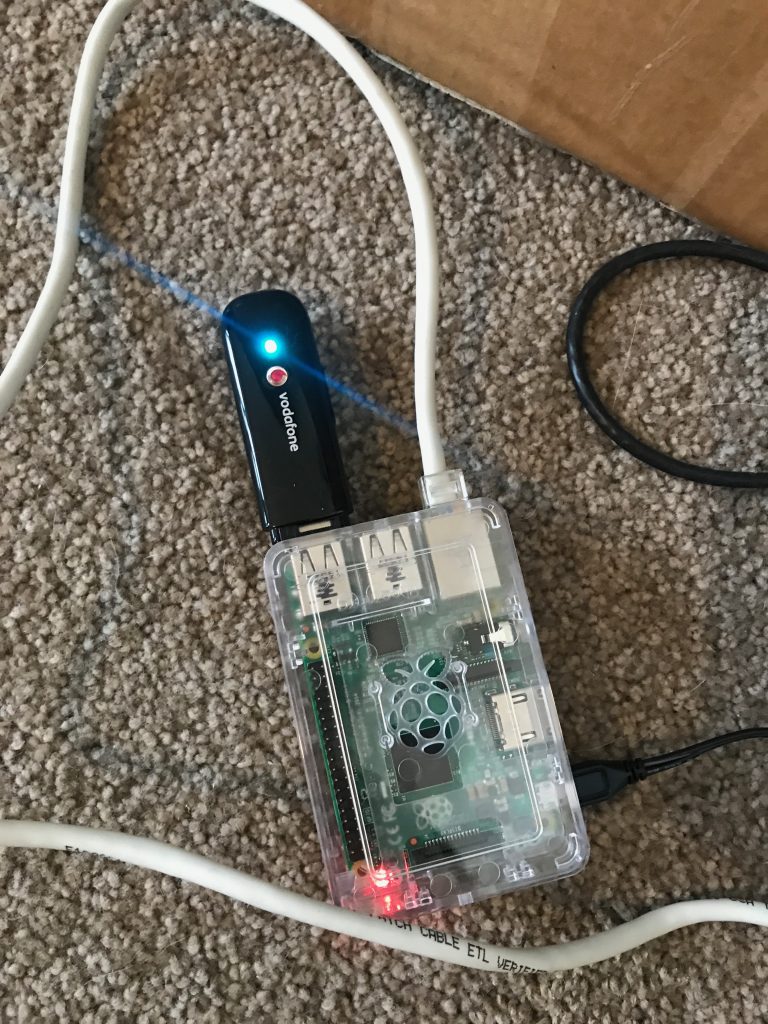
So I started again, this time using the very popular Raspberry Pi 2B hardware as the base for my setup. This is actually the first time I’ve played with a Raspberry Pi and I actually really enjoyed the experience.

The requirements for the router are extremely low – move packets between two interfaces, dial a modem and run some scripts. It actually feels wasteful using a whole Raspberry Pi with it’s whole 1GB of RAM and Quad Core ARM CPU, but they’re so accessible and cost affordable, it’s not worth the time messing around with any more obscure embedded boards.

Pie ingredients

It took me all of 5 mins to assemble and boot an OS on this thing and have a full Debian install ready for work. For this speed and convenience I’ll happily pay a small price premium for the Raspberry Pi than some other random embedded vendors with much more painful install and upgrade processes.

Baked!

It’s important to get a good power supply – 3G/4G modems tend to consume the full 500mW available to them. I kept getting under voltage warnings (the red light on the Pi turns off) with a 2.1 Amp phone charger I was using. Ended up buying the official 2.5 Amp Raspberry Pi charger, which powers the Raspberry Pi 2 + the 3G modem perfectly.

I brought the smallest (& cheapest) class 10 Micro SDHC card possible – 16GB. Of course this is way more than you actually need for a router, 4GB would have been plenty.

The ZTE MF180 USB 3G modem I used is a tricky beast on Linux, thanks to the kernel seeing it as a SCSI CDROM drive initially which masks the USB modem features. Whilst Linux has usb_modeswitch shipping as standard these days, I decided to completely disable the SCSI CDROM feature as per this blog post to avoid the issue entirely.


The Software

The Raspberry Pi I was given (thanks Calcinite! ?) had a faulty GPU so the HDMI didn’t work. Fortunately Raspberry Pi doesn’t let such a small issue like no display hold it back – it’s trivial to flash an image to the SD card from another machine and boot a headless installation.

  1. Download Raspbian minimal/lite (Debian + Raspberry Pi goodness).
  2. Installed image to the SD card using the very awesome Etcher.io (think “safe dd” for noobs) as per the install instructions using my iMac.
  3. Enable SSH as per instructions: “SSH can be enabled by placing a file named ssh, without any extension, onto the boot partition of the SD card. When the Pi boots, it looks for the ssh file. If it is found, SSH is enabled, and the file is deleted. The content of the file does not matter: it could contain text, or nothing at all.”
  4. Login with username “pi” and password “raspberry”.
  5. Change the password immediately before you put it online!
  6. Upgrade the Pi and enable automated updates in future with:
    apt-get update && apt-get -y upgrade
    apt-get install -y unattended-upgrades

The rest is somewhat specific to your setup, but my process was roughly:

  1. Install apps needed – wvdial for establishing the 3G connection via AT commands + PPP, iptables-persistent for firewalling, libusb-dev for building hub-ctrl and jq for parsing JSON responses.
    apt-get install -y wvdial iptables-persistent libusb-dev jq
  2. Configure a firewall. This is very specific to your network, but you’ll want both ipv4 and ipv6 rules in /etc/iptables/rules.* Generally you’d want something like:
    1. Masquerade (NAT) traffic going out of the ppp+ and eth0 interfaces.
    2. Permit forwarding traffic between the interfaces.
    3. Permit traffic in on port 9000 for the health check server.
  3. Enable IP forwarding (net.ipv4.ip_forward=1) in /etc/sysctl.conf.
  4. Build hub-ctrl. This utility allows the power cycling of the USB controller + attached devices in the Raspberry Pi, which is extremely useful if your 3G modem has terrible firmware (like mine) and sometimes crashes hard.
    wget https://raw.githubusercontent.com/codazoda/hub-ctrl.c/master/hub-ctrl.c
    gcc -o hub-ctrl hub-ctrl.c -lusb
  5. Build pinghttpserver. This is a tiny C-based webserver which we can use to check if the Raspberry Pi is up (Can’t use ICMP as detailed further on).
    wget -O pinghttpserver.c https://gist.githubusercontent.com/jethrocarr/c56cecbf111af8c29791f89a2c30b978/raw/9c53f66fbed609d09652b8c4ceff0194876c05a3/gistfile1.txt
    make pinghttpserver
  6. Configure /etc/wvdial.conf. This will vary by the type of 3G/4G modem and also the ISP in use. One key value is the APN that you use. In my case, I had to set it to “direct” to ensure I got a real public IP address with no firewalling, instead of getting a CGNAT IP, or a public IP with inbound firewalling enabled. This will vary by carrier!
    [Dialer Defaults]
    Init1 = ATZ
    Init2 = ATQ0 V1 E1 S0=0 &C1 &D2 +FCLASS=0
    Init3 = AT+CGDCONT=1,"IP","direct"
    Stupid Mode = 1
    Modem Type = Analog Modem
    Phone = *99#
    Modem = /dev/ttyUSB2
    Username = { }
    Password = { }
    New PPPD = yes
  7. Edit /etc/ppp/peers/wvdial to enable “defaultroute” and “replacedefaultroute” – we want the wireless connection to always be the default gateway when connected!
  8. Create a launcher script and (once tested) call it from /etc/rc.local at boot. This will start up the 3G connection at boot and launch various processes we need. (this could be nicer and be a collection of systemd services, but damnit I was lazy ok?). It also handles reboots and powercycling USB if problems are encountered for (an attempt) at automated recovery.
    wget -O 3g_failover_launcher.sh https://gist.githubusercontent.com/jethrocarr/a5dae9fe8523cf74d30a065d77d74876/raw/57b5860a9b3f6a048b02b245f3628ee60ea766dc/3g_failover_launcher.sh

At this point, you should be left with a Raspberry Pi that gets a DHCP lease on it’s eth0, dials up a connection with your wireless telco and routes all traffic it receives on eth0 to the ppp interface.

In my case, I setup my Mikrotik router to have a default GW route to the Raspberry Pi and the ability to failover based on distance weightings. If the wired connection drops, the Mikrotik will shovel packets at the Raspberry Pi, which will happily NAT them to the internet.


The DNS Failover

The work above got me an outbound failover solution, but it’s no good for inbound traffic without a failover DNS record that flips between the wired and wireless connections for the VPN to target.

Because the wireless link would be getting a dynamic IP addresses, the first requirement was a dynamic DNS service. There are various companies around offering free or commercial products for this, but I chose to use a solution built around AWS Lambda that can be granted access directly to my DNS hosted inside Route53.

AWS have a nice reference dynamic DNS solution available here that I ended up using (Sadly not using the Serverless framework so there’s a bit more point+click setup than I’d like, but hey).

Once configured and a small client script installed on the Raspberry Pi, I had reliable dynamic DNS running.

The last bit we need is DNS failover. The solution I used was the native AWS Route53 Health Check feature, where AWS adjust a DNS record based on the health of monitored endpoints.

I setup a CNAME with the wired connection as the “primary” and the wireless connection as the “secondary”. The DNS CNAME will always point to the primary/wired connection, unless it’s health check fails, in which case the CNAME will point to the secondary/wireless connection. If both fail, it fails-safe to the primary.

A small webserver (pinghttpserver) that we built earlier is used to measure connectivity – the Route53 Health Check feature unfortunately lacks support for ICMP connectivity tests hence the need to write a tiny server for checking accessibility.

This webserver runs on the Raspberry Pi, but I do a dst port NAT to it on both the wired and wireless connections. If the Pi should crash, the connection will always fail safe to the primary/wired connection since both health checks will fail at once.

There is a degree of flexibility to the Route53 health checks. You can use a CloudWatch alarm instead of the HTTP check if desired. In my case, I’m using a Lambda I wrote called “lambda-ping” (creative I know) which is a Lambda that does HTTP “pings” to remote endpoints and recording the response code, plus latency. (Annoyingly it’s not possible to do ICMP pings with Lambda either, since the container that Lambda execute inside of lack the CAP_NET_RAW kernel capability, hence the “ping-like” behaviour).

lambda-ping in action

I use this, since it gives me information for more than just my failover internet links (eg my blog, sites, etc) and acts like my Pingdom / Newrelic Synthetics alternative.


Final Result

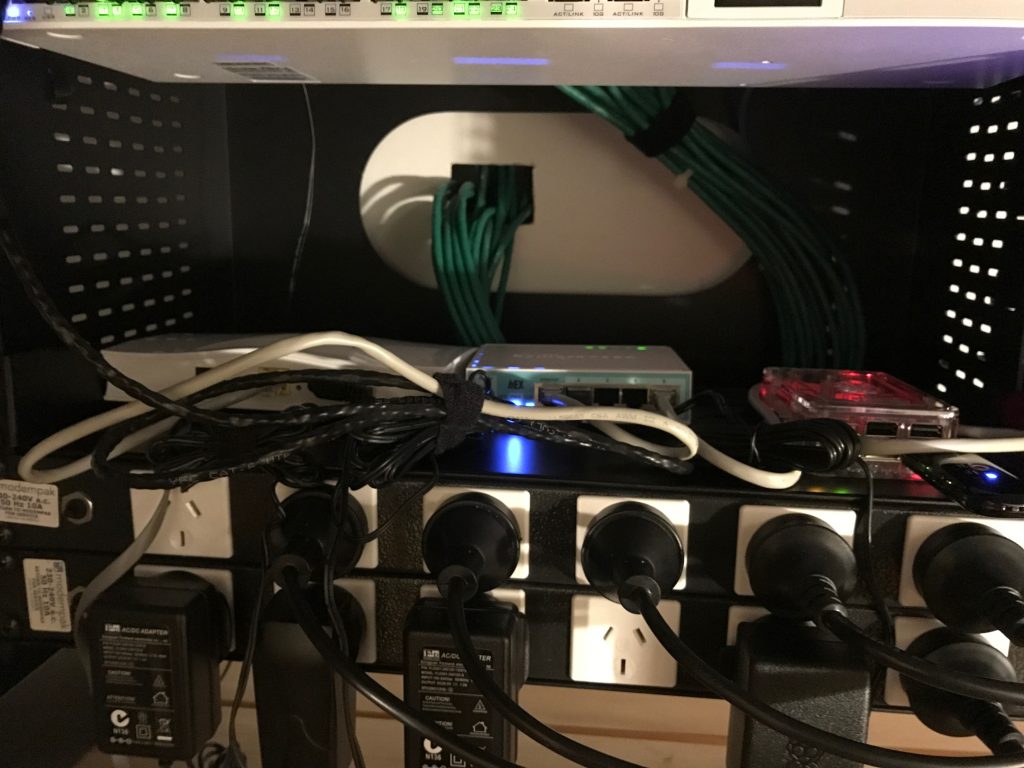
After setting it all up and testing, I’ve installed the Raspberry Pi into the comms cabinet. I was a bit worried that all the metal casing would create a faraday cage, but it seems to be working OK (I also placed it so that the 3G modem sticks out of the cabinet surrounds).

So far so good, but if I get spotty performance or other issues I might need to consider locating the FailberryPi elsewhere where it can get clear access to the cell towers without disruption (maybe sealed ABS box on the roof?). For my use case, it doesn’t need to be ultra fast (otherwise I’d spend some $ and upgrade to 4G), but it does need to be somewhat consistent and reliable.

Installed on a shelf in the comms cabinet, along side the main Mikrotik router and the VDSL modem

So far it’s working well – the outbound failover could do with some tweaking to better handle partial failures (eg VDSL link up, but no international transit), but the failover for the inbound works extremely well.

Few remaining considerations/recommendations for anyone considering a setup like this:

  1. If using the one telco for both the wireless and the wired connection, you’re still at risk of a common fault taking out both services since most ISPs will share infrastructure at some level – eg the international gateway. Use a completely different provider for each service.
  2. Using two wired ISPs (eg Fibre with VDSL failover)  is probably a bit pointless, they’re probably both going back to the same exchange or along the some conduit waiting for a  single backhoe to take them both out at once.
  3. It’s kind of pointless if you don’t put this behind a UPS, otherwise you’ll still be offline when the power goes out. Strongly recommend having your entire comms cabinet on UPS so your wifi, routing and failover all continue to work during outages.
  4. If you failover, be careful about data usage. Your computers won’t know they’re on an expensive mobile connection with limited data and they’ll happily download updates, steam games, backups, etc…. One approach is using a firewall to whitelist select systems only for failover (eg IoT devices, alarm, cameras) and leaving other devices like laptops blocked to prevent too much billshock.
  5. Partial ISP outages are still a PITA. Eg, if routing is broken to some NZ ISPs, but international is fine, the failover checks from ap-southeast-2 won’t trigger. Additional ping scripts could help here (eg check various ISP gateways from the Pi), but that’s getting rather complex and tries to solve a problem that’s never completely fixable.
  6. Just buy a Raspberry Pi. Don’t waste time/effort trying to hack some ancient crap together it wastes far too much time and often falls flat. And don’t use an old laptop/desktop, there’s too much to fail on them like fans, HDDs, etc. The Pi is solid embedded electronics.
  7. Remember that your Pi is essentially a server attached to the public internet. Make sure you configure firewalls and automatic patching and any other hardening you deem appropriate for such a system. Lock down SSH to keys only, IP restrict, etc.

Easy APT repo in S3

When running a number of Ubuntu or Debian servers, it can be extremely useful to have a custom APT repo for uploading your own packages, or third party packages that lack their own good repositories to subscribe to.

I recently found a nice Ruby utility called deb-s3 which allows easy uploading of dpkg files into an S3-hosted APT repository. It’s much easier than messing around with tools like reprepro and having to s3 cp or sync files up from a local disk into S3.

One main warning: This will create a *public* repo by default since it works out-of-the-box with the stock OS and (in my case) all the packages I’m serving are public open source programs that don’t need to be secured. If you want a *private* repo, you will need to use apt-transport-s3 to support authenticating with S3 to download files and configure deb-s3 for private upload.

Install like any other Ruby Gem:

gem install deb-s3

Adding packages is easy. First make sure your aws-cli is working OK and an S3 bucket has been created, then upload with:

deb-s3 upload \
--bucket example \
--codename codename \
--preserve-versions \
mypackage.deb

You can then add the repo to a Ubuntu or Debian server with:

# We trust HTTPS rather than GPG for this repo - but you can config
# GPG signing if you prefer.
cat > /etc/apt/sources.list.d/myrepo.list << EOF
deb [trusted=yes] https://example.s3.amazonaws.com codename main
EOF

# and ensure you update the package info on the server
apt-get update

Alternatively, here’s an example of how to add the repo with Puppet:

apt::source { 'myrepo':
 comment        => 'This is our own APT repo',
 location       => 'https://example.s3.amazonaws.com',
 release        => $::os["distro"]["codename"],
 repos          => 'main',
 allow_unsigned => true, # We don't GPG sign, HTTPS only
 notify_update  => true, # triggers apt-get update
}

Puppet Training

I recently ran a training session for our development team at Fairfax introducing them to the fundamentals of Puppet.

To assist with this training, I’ve developed a bunch of scripts and learning modules which I’ve now open sourced at https://github.com/jethrocarr/puppet-training

Using these modules you can:

  • Provision a pre-configured Puppet master + Puppet client to use for exercises.
  • Learn the basics of an r10k/git workflow for Puppet modules.
  • Create a module and get used to Puppet resources like package, file and service.
  • Learn the basics of ordering and dependencies.
  • Use Hiera to set params.

It’s not as complete a course as I’d like. I did about half a day using these modules and another half the day adhoc. Ideally I’d like to finish off writing modules at some point, but it takes a reasonably long period to write anything like this and there’s only so many hours in a week :-)

Putting up here as they might be of interest to people. PRs are always welcome as well.

Building a mail server with Puppet

A few months back I rebuilt my personal server infrastructure and fully Puppetised everything, even the mail server. Because I keep having people ask me how to setup a mail server, I’ve gone and adjusted my Puppet modules to make them suitable for a wider audience and open sourced them.

Hence announcing – https://github.com/jethrocarr/puppet-mail

This module has been designed for hobbyists or small organisation mail server operators whom want an easy solution to build and manage a mail server that doesn’t try to be too complex. If you’re running an ISP with 30,000 mailboxes, this probably isn’t the module for you. But 5 users? Yourself only? Keep on reading!

Mail servers can be difficult to configure, particularly when figuring out the linking between MTA (eg Postfix) and LDA (eg Dovecot) and authentication (SASL? Cyrus? Wut?), plus there’s the added headaches of dealing with spam and making sure your configuration is properly locked down to prevent open relays.

By using this Puppet module, you’ll end up with a mail server that:

  • Uses Postfix as the MTA.
  • Uses Dovecot for providing IMAP.
  • Enforces SSL/TLS and generates a legitimate cert automatically with LetsEncrypt.
  • Filters spam using SpamAssassin.
  • Provides Sieve for server-side email filtering rules.
  • Simple authentication against PAM for easy management of users.
  • Supports virtual email aliases and multiple domains.
  • Supports CentOS (7) and Ubuntu (16.04).

To get started with this module, you’ll need a functional Puppet setup. If you’re new to Puppet, I recommend reading Setting up and using Pupistry for a master-less Puppet setup.

Then it’s just a case of adding the following to r10k to include all the modules and dependencies:

mod 'puppetlabs/stdlib'

# EPEL & Jethro Repo modules only required for CentOS/RHEL systems
mod 'stahnma/epel'
mod 'jethrocarr/repo_jethro'

# Note that the letsencrypt module needs to be the upstream Github version,
# the version on PuppetForge is too old.
mod 'letsencrypt',
  :git    => 'https://github.com/danzilio/puppet-letsencrypt.git',
  :branch => 'master'

# This postfix module is a fork of thias/puppet-postfix with some fixes
# to make it more suitable for the needs of this module. Longer-term,
# expect to merge it into this one and drop unnecessary functionality.
mod 'postfix',
  :git    => 'https://github.com/jethrocarr/puppet-postfix.git',
  :branch => 'master'

And the following your Puppet manifests (eg site.pp):

class { '::mail': }

And in Hiera, define the specific configuration for your server:

mail::server_hostname: 'setme.example.com'
mail::server_label: 'My awesome mail server'
mail::enable_antispam: true
mail::enable_graylisting: false
mail::virtual_domains:
 - example.com
mail::virtual_addresses:
  'nickname@example.com': 'user'
  'user@example.com': 'user'

That’s all the Puppet config done! Before you apply it to the server, you also need to make sure both your forward and reverse DNS is correct in order to be able to get the SSL/TLS cert and also to ensure major email providers will accept your messages.

$ host mail.example.com
mail.example.com has address 10.0.0.1

$ host 10.0.0.1
1.0.0.10.in-addr.arpa domain name pointer mail.example.com.

For each domain being served, you need to setup MX records and also a TXT record for SPF:

$ host -t MX example.com
example.com mail is handled by 10 mail.example.com.

$ host -t TXT example.com
example.com descriptive text "v=spf1 mx -all"

Note that SPF used to have it’s own DNS type, but that was replaced in favour of just using TXT.

The example above tells other mail servers that whatever system is mentioned in the MX record is a legitmate mail server for that domain. For details about what SPF records and what their values mean, please refer to the OpenSPF website.

Finally, you should read the section on firewalling in the README, there are a number of ports that you’ll probably want to restrict to trusted IP ranges to prevent attackers trying to force their way into your system with password guess attempts.

Hopefully this ends up being useful to some people. I’ve replaced my own internal-only module for my mail server with this one, so I’ll continue to dogfood it to make sure it’s solid.

That being said, this module is new and deals with a complex configuration so I’m sure there will be some issues people run into – please raise any problems you have on the Github issues page and I’ll do my best to assist where possible.

Faking a Time Capsule with a GNU/Linux server

Apple MacOS’s Time Machine feature is a great backup solution for general desktop use, but has some annoying limitations such as only working with either locally attached storage devices or with Apple’s Time Capsule devices.

Whilst the Time Capsules aren’t bad devices, they offer a whole bunch of stuff I already have and don’t need – WiFi access point, ethernet router, and network attached storage and they’re not exactly cheap either. They also don’t help anyone wanting to backup to an off-site cloud server/VPS via a VPN.

So instead of a Time Capsule, I’m using a project called netatalk to allow a GNU/Linux server to provide an AFP file share to MacOS which acts as a Time Machine suitable target.

There’s an annoyance with Time Machine where it only officially works with AFP shares specially flagged as “Time Machine” shares. So whilst Apple has embraced SMB2 as the file sharing protocol of future use, you can’t use SMB2 for Time Machine backups (Well technically you can by enabling unsupported volumes in MacOS, but then you lack the ability to restore from backup via the MacOS recovery tools).

To make life easy, I’ve written a Puppet module that install netatalk and configures a Debian GNI/Linux server to act as a Time Capsule for all local users.

After installing the Puppet module (r10k or puppet module tools), you can simply define the directory and how much space to report to each client:

class { 'timemachine':
  location     => '/mnt/backup/timemachine',
  volsizelimit => '1000000', # 1TB per user backing up
}

To setup each MacOS machine, you will need to first connect to the share using Finder. You can do this with Finder -> Go -> Connect to Server and then entering afp://SERVERNAME and authenticating with your PAM credentials for the server.

After connecting, the share should now appear under Time Machine preferences. If you experience any issues connecting, check the /var/log/afpd.log file for debug information on the server – common issues include not having created the directories for the shares or having incorrect permissions on them.

Upcycling 32-bit Mac Minis

The first generation Intel Apple Mac Mini (Macmini1,1) has a special place as the best bang-for-buck system that I’ve ever purchased.

Purchased for around $1k NZD in 2006, it did a stint as a much more sleep-friendly server back after I started my first job and was living at my parents house. It then went on to become my primary desktop for a couple of years in conjunction with my laptop. And finally it transitioned into a media centre and spent a number of years driving the TV and handling long running downloads. It even survived getting sent over to Sydney and running non-stop in the hot blazing hell inside my apartment there.

My long term relationship on the left and a more recent stray obtained second hand.

My long term relationship on the left and a more recent stray I obtained. Clearly mine takes after it’s owner and hasn’t seen the sun much.

Having now reached it’s 10th birthday, it’s started to show it’s age. Whilst it handles 720p content without an issue, it’s now hit and miss whether 1080p H264 content will work without unacceptable jitter.

It’s previously undergone a few upgrades. I bumped it from the original 512MB RAM to 2GB (the max) years ago and it’s had it’s 60GB hard drive replaced with a more modern 500GB model. But neither of these will help much with the video decoding performance.


Given we had recently obtained something that the people at Samsung consider a “Smart” TV, I decided to replace the Mac Mini with the Plex client running natively on the TV and recycle the Mac Mini into a new role as a small server to potentially replace a much more power hungry AMD Phenom II system that performs somewhat basic storage and network tasks.

Unfortunately this isn’t as simple as it sounds. The first gen Intel Mac Minis arrived on the scene just a bit too soon for 64-bit CPUs and so are packing the original Intel Core Solo or Intel Core Duo (1 or 2 cores respectively) which aren’t clocked particularly high and are only 32bit capable.

Whilst GNU/Linux *can* run on this, supported versions of MacOS X certainly can’t. The last MacOS version supported on these devices is Mac OS X 10.6.8 “Snow Leopard” 32-bit and the majority of app developers for MacOS have decided to set their minimum supported platform at 64-bit MacOS X 10.7.5 “Lion” so they can drop the old 32-bit stuff – this includes the popular Chrome browser which now only provides 64-built builds. Basically OS X Snow Leopard is the Win XP of the MacOS world.

Even running 32-bit GNU/Linux can be an exercise in frustration. Some distributions now only ship 64-bit builds and proprietary software vendors don’t always bother releasing 32-bit builds of their apps limiting what you can run on them.


On the plus side, this earlier generation of Apple machines was before Apple decided to start soldering everything together which means not only can you replace the RAM, storage, drives, WiFi card, you can also replace the CPU itself since it’s socketed!

I found a great writeup of the process at iFixit which covers the process of replacing the CPU with a newer model.

Essentially you can replace the CPUs in the Macmini1,1 (2006) or Macmini2,1 (2007) models with any chip compatible with Intel Socket M, the highest spec model available being the Intel Core 2 Duo 2.33 Ghz T7600.

At ~$60NZD for the T7600, it was a bit more than I wanted to spend for a decade old CPU. However moving down slightly to the T7400, the second hand price drops to around ~$20NZD per CPU with international shipping included. And at 2.177Ghz it’s no slouch, especially when compared to the original 1.5Ghz single core CPU.

It took a while to get here, I used this seller after the first seller never delivered the item and refunded me when asked about it. One of my CPUs also arrived with a bent pin, so there was some rather cold sweat moments straightening the tiny pin with a screw driver. But I guess this is what you get for buying decade old CPUs from a mysterious internet trader.

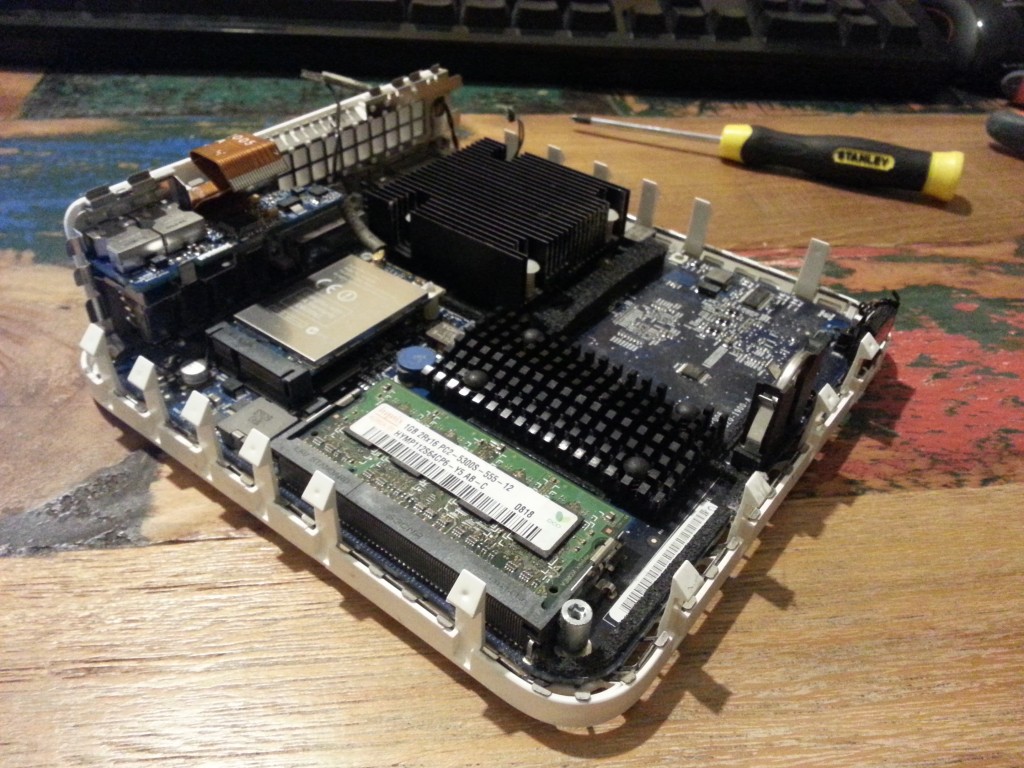
I'm naked!

I was surprised at the lack of dust inside the unit given it’s long life, even the fan duct was remarkably dust-free.

The replacement is a bit of a pain, you have to strip the Mac Mini right down and take the motherboard out, but it’s not the hardest upgrade I’ve ever had to do – dealing with cheap $100 cut-your-hand-open PC cases were much nastier than the well designed internals of the Mac. The only real tricky bit is the addition and removal of the heatsink which worked best with a second person helping remove the plastic pegs.

I did it using a regular putty knife, needle-nose pliers, phillips & flat head screw drivers and one Torx screw driver to deal with a single T10 screw that differs from the rest of the ones in the unit.

Moment of truth...

Recommend testing this things *before* putting the main case back together, they’re a pain to open back up if it doesn’t work first run.

The end result is an upgrade from a 1.5 Ghz single core 32bit CPU to 2.17 Ghz dual core 64bit CPU – whilst it won’t hold much to a modern i7, it will certainly be able to crunch video and server tasks quite happily.


The next problem was getting an OS on there.

This CPU upgrade opens up new options for MacOS fans, if you hack the installer a bit you can get MacOS X 10.7.5 “Lion” on there which gives you a 64-bit OS that can still run much of the current software that’s available. You can’t go past Lion however, since the support for the Intel GMA 950 GPU was dropped in later versions of MacOS.

Given I want them to run as servers, GNU/Linux is the only logical choice. The only issue was booting it… it seems they don’t support booting from USB flash drives.

These Mac Minis really did fall into a generational gap. Modern enough to have EFI and no legacy ports, yet old enough to be 32-bit and lack support for booting from USB. I wasn’t even sure if I would even be able to boot 64-bit Linux with a 32-bit EFI…


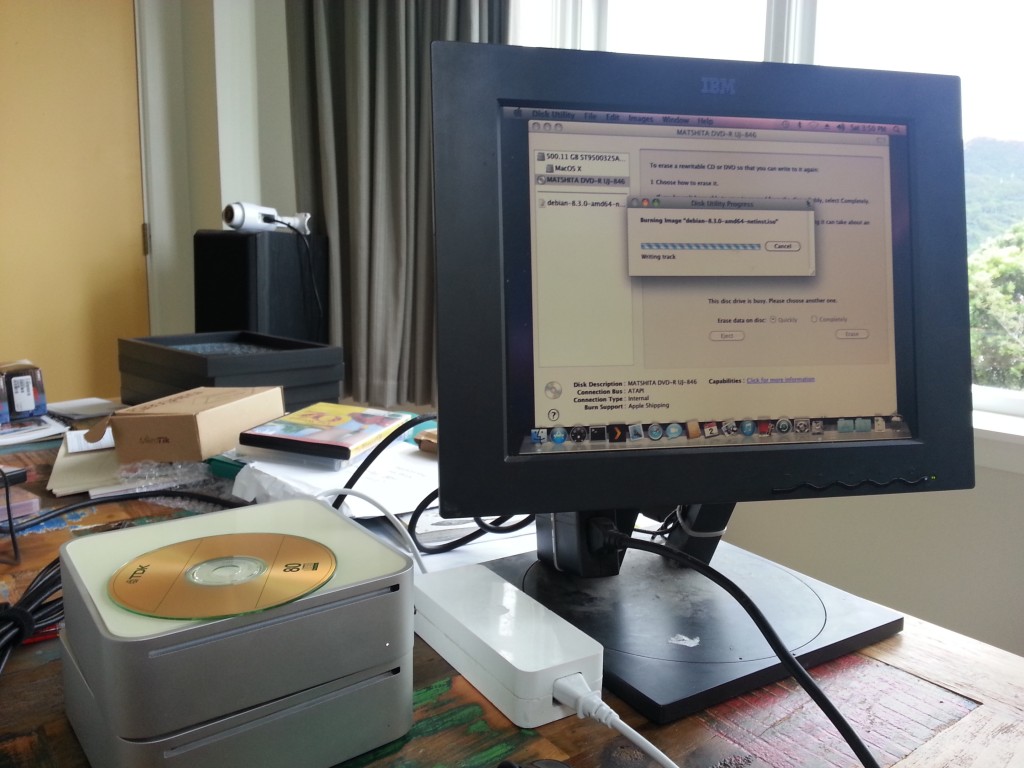
Given it doesn’t boot from USB and I didn’t have any firewire devices lying around to try booting from, I fell back to the joys of optical media. This was harder than it sounds given I don’t have any media and barely any working drives, but my colleague thankfully dug up a couple old CD-R for me.

They're basically floppy disks...

“Daddy are those shiny things floppy disks?”

I also quickly remembered why we all moved on from optical media. My first burn appeared to succeed but crashed trying to load the bootloader. And then refused to eject. Actually, it’s still refusing to eject, so there’s a Debian 8 installer that might just be stuck in there until it’s dying days… The other unit’s optical drive didn’t even work at all, so I couldn’t even do the pain of swapping around hardware to get a working combination.


Having exhausted the optional of a old-school CD-based GNU/Linux install, I started digging into ways to boot from another partition on the machine’s hard drive and found a project called rEFInd.

This awesome software is an alternative boot manager for EFI. It differs from a boot loader slightly, in a traditional BIOS -> Boot Loader -> OS world, rEFInd is equivalent to a custom BIOS offering better boot functionality than the OEM vendor.

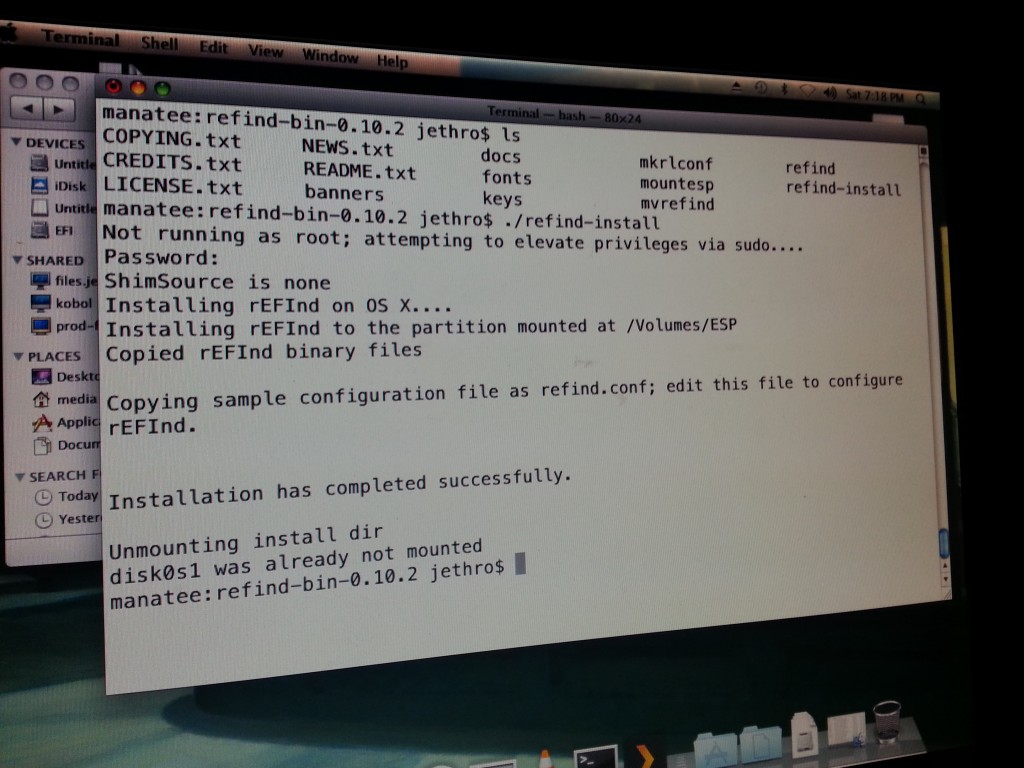
It works by installing itself into a small FAT partition that lives on the hard disk – it’s probably the easiest low-level tool I’ve ever installed – download, unzip, and run the installer from either MacOS or Linux.

./unsuckefi

Disturbingly easy from the existing OS X installation

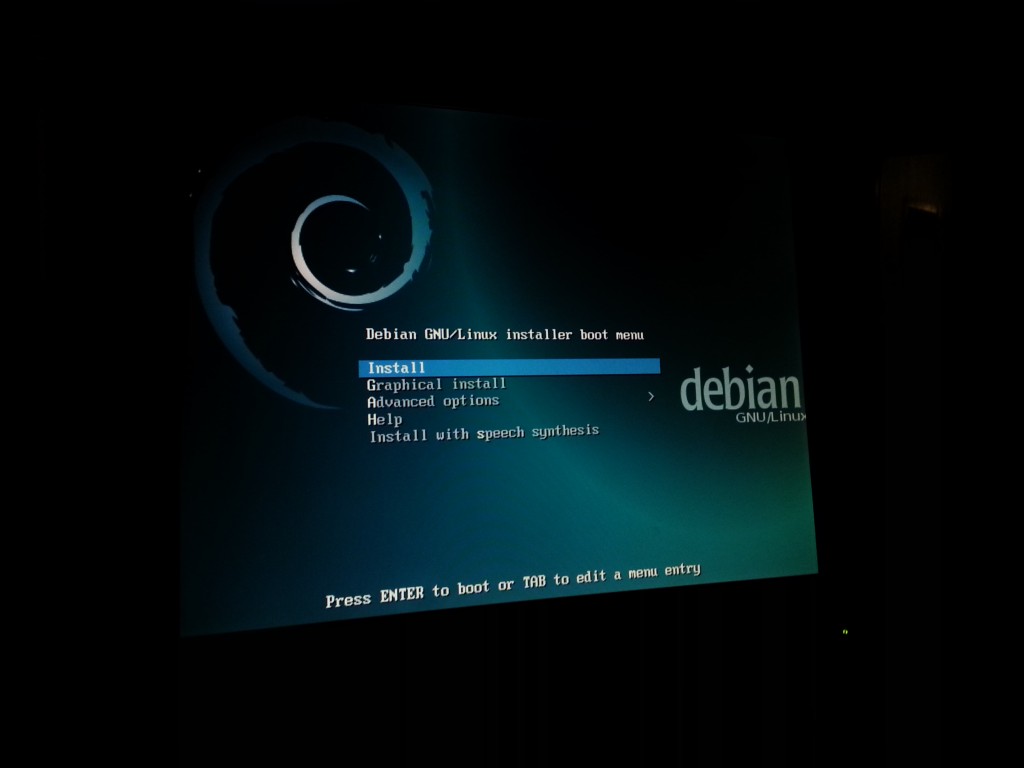
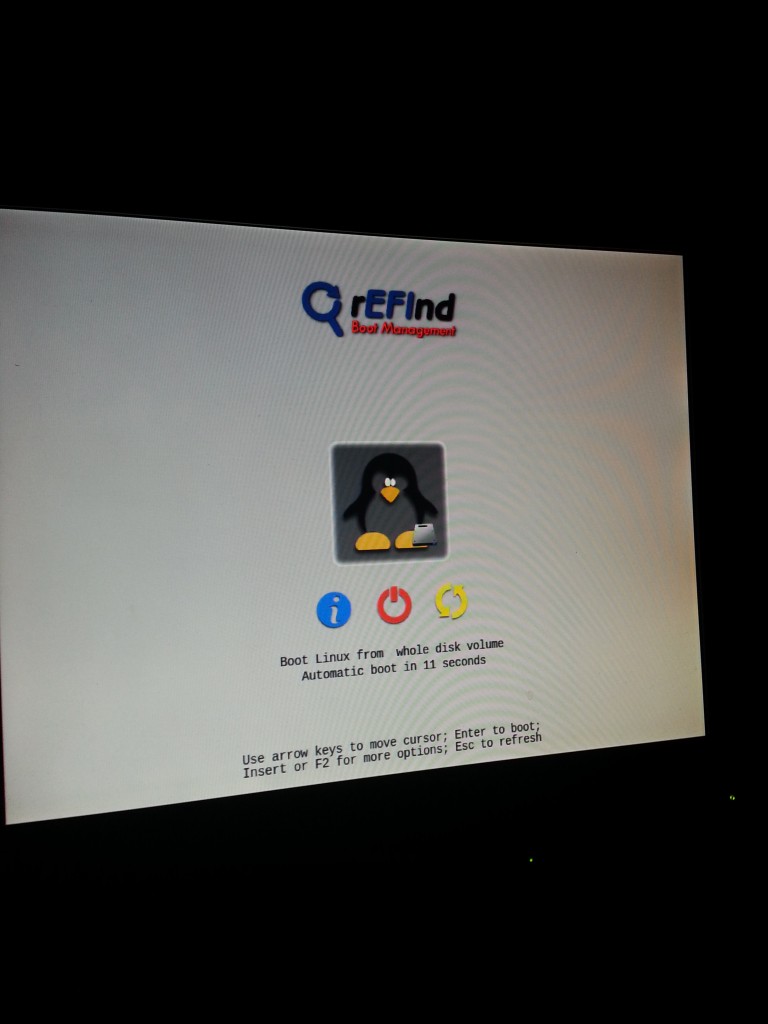
Once installed, rEFInd kicks in at boot and offers the ability to boot from USB flash drives, in addition to the hard drive itself!

Legacy

The USB flash installer has been detected as “Legacy OS from whole disk volume”.

Yusss!

Yusss, Debian installer booted from USB via rEFInd!

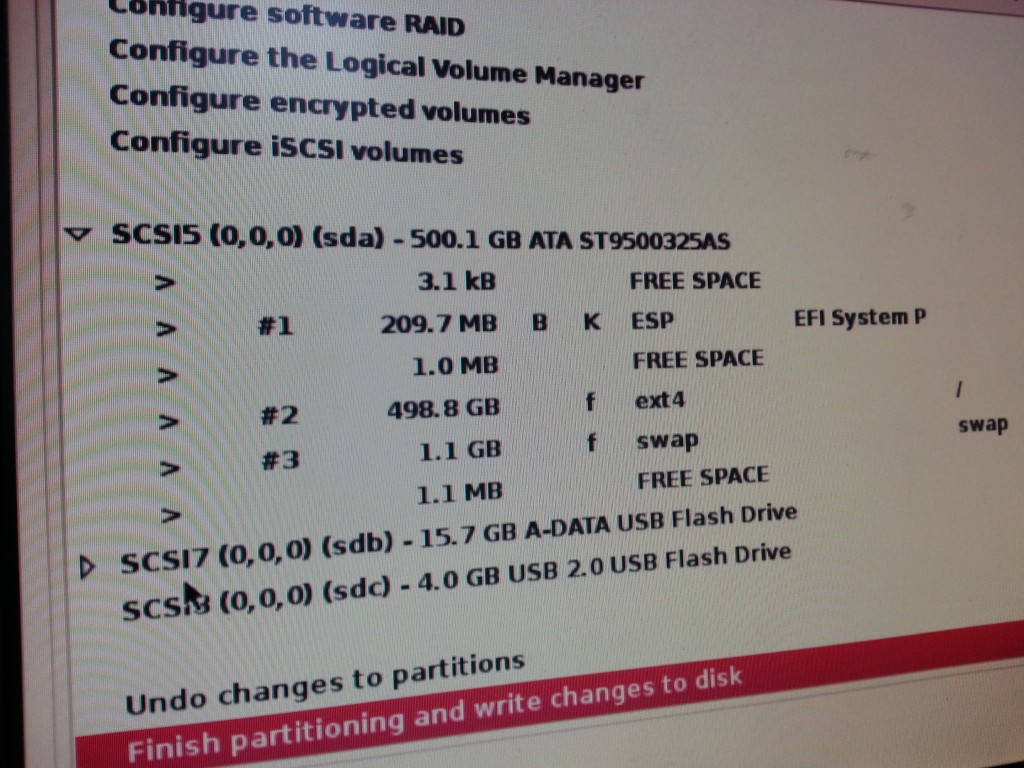
A typical Debian installation followed, only thing I was careful about was not to delete the 209.7MB FAT filesystem used by EFI – I figured I didn’t want to find out what deleting that would mean on a box that was hard enough to boot as it is…

This is an ugly partition table

The small < 1MB free space between the partitions here irks me so much, I blame MacOS for aligning the partitions weirdly.

Once installed. rEFInd detected Linux as the OS installed on the hard drive and booted into GRUB and from there the usual Linux boot process works fine.

Launch the penguins!

Launch the penguins!

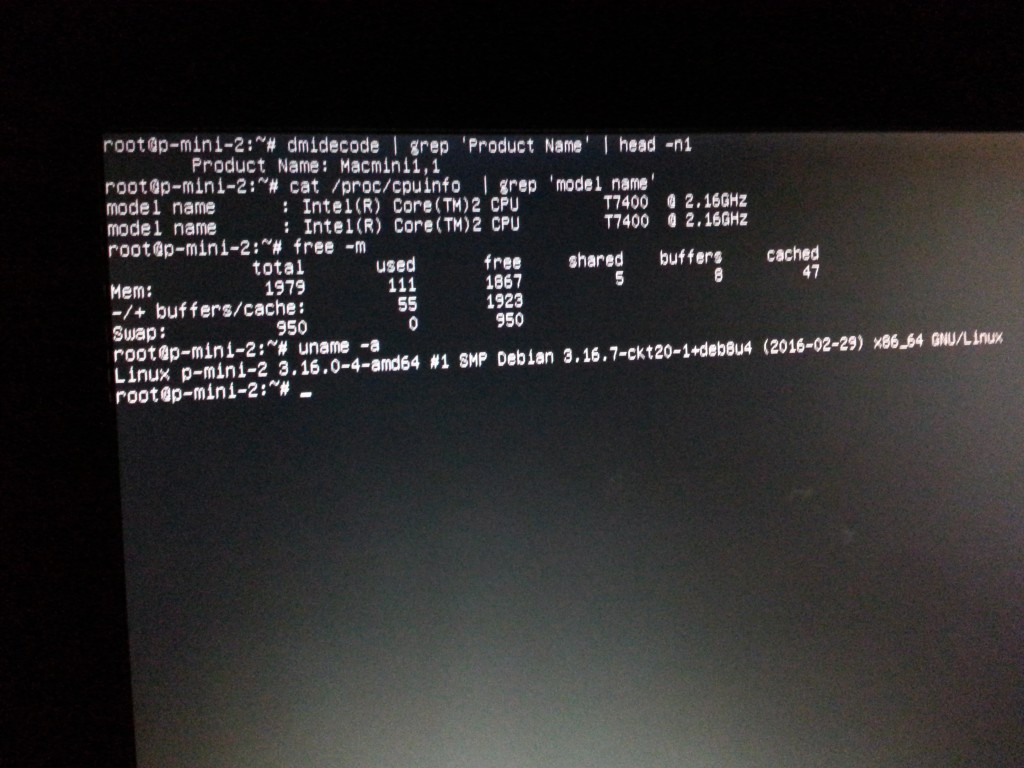
This spec sheet violates the manafacturer's warranty!

Final result -2GB RAM, 64bit CPU, delicious delicious GNU/Linux x86_64

I can confirm that both 32bit and 64bit Debian works nicely on this box (I installed 32-bit first by mistake) – so even without doing the CPU upgrade, if you want to get a bit more life out of these early unsupported Mac Minis, they’d happily run a 32-bit Debian desktop so you can enjoy wonders like a properly patched browser and operating system.

Not all other distributions will work – Ubuntu for example don’t include EFI support on their 32-bit installer which will probably cause some headaches. You should be OK with any of the major 64-bit distributions since they tend to always support EFI.


The final joy I ran into is that when I set up the Mac Mini as a headless box, it didn’t boot… it just turned on and never appeared on the network.

Seems that the Mac Minis (even the later unibody generation) have some genius firmware that disables the GPU hardware if no screen is attached, which then messes up most operating systems on it.

The easy fix, is to hack together a fake VGA load by connecting a 100Ω resister between pins 2 and 7 of a DVI-to-VGA adaptor (such as the one that ships with the Mac Mini).

I need to make a tidier/better version of this, but it works!

I need to make a tidier/better version of this, but it works!

No idea what engineer thought this was a good feature, but thankfully it’s an easy and cheap fix, especially since I have a box littered with these now-useless adaptors.


The end result is that I now have 2x 64-bit first gen Mac Minis running Debian GNU/Linux for a cost of around $20NZD and some time dismantling/reassembling them.

I’d recommend these small Mac Minis for server purposes, but the NZ second hand prices are still a bit too expensive for their age to buy specifically for this… Once they start going below $100 they’d make reasonable alternatives to something like the Intel NUC or Raspberry Pi for small serving tasks.

The older units aren’t necessarily problem free either. Whilst the build quality is excellent, after 10 years things don’t always work right. Both of my optical drives no longer function properly and one of the Mac Minis has a faulty RAM slot, limiting it to 1GB instead of the usual 2GB.

And of course at 10 years whom knows how much longer they’ll run for – but it’s been a good run so far, so here’s to another 10 years (hopefully)! The real limiting factor is going to be the 1GB/2GB RAM long term.

Setting up and using Pupistry

As mentioned in my previous post, I’ve been working on an application called Pupistry to help make masterless Puppet deployments a lot easier.

If you’re new to Pupistry, AWS, Git and Puppet, I’ve put together this short walk through on how to set up the S3 bucket (and IAM users), the Pupistry application, the Git repo for your Puppet code and building your first server using Pupistry’s bootstrap feature.

If you’re already an established power user of AWS, Git and Puppet, this might still be useful to flick through to see how Pupistry fits into the ecosystem, but a lot of this will be standard stuff for you. More technical details can be found on the application README.

Note that this guide is for Linux or MacOS users. I have no idea how you do this stuff on a Windows machine that lacks a standard unix shell.


1. Installation

Firstly we  need to install Pupistry on your computer. As a Ruby application, Pupistry is packaged as a handy Ruby gem and can be installed in the usual fashion.

sudo gem install pupistry
pupistry setup

01-installThe gem installs the application and any dependencies. We run `pupistry setup` in order to generate a template configuration file, but we will still need to edit it with specific settings. We’ll come back to that.

You’ll also need Puppet available on your computer to build the Pupistry artifacts. Install via the OS package manager, or with:

sudo gem install puppet


2. Setting up AWS S3 bucket & IAM accounts

We need to use an S3 bucket and IAM accounts with Pupistry. The S3 bucket is essentially a cloud-based object store/file server and the IAM accounts are logins that have tight permissions controls.

It’s a common mistake for new AWS users to use the root IAM account details for everything they do, but given that the IAM details will be present on all your servers, you probably want to have specialised accounts purely for Pupistry.

Firstly, make sure you have a functional installation of  the AWS CLI (the modern python one, not the outdated Java one). Amazon have detailed documentation on how to set it up for various platforms, refer to that for information.

Now you need to create:

  1. An S3 bucket. S3 buckets are like domain names -they have a global namespace across *all* AWS accounts. That means someone might already have a bucket name that you want to use, so you’ll need to choose something unique… and hope.
  2. An IAM account for read-only access which will be used by the servers running Pupistry.
  3. An IAM account for read-write access for your workstation to make changes.

To save you doing this all manually, Pupistry includes a CloudFormation template, which is basically a defined set of instructions for AWS to execute to build infrastructure, in our case, it will do all the above steps for you. :-)

Because of the need for a globally unique name, please replace “unique” with something unique to you.

wget https://raw.githubusercontent.com/jethrocarr/pupistry/master/resources/aws/cfn_pupistry_bucket_and_iam.template

aws cloudformation create-stack \
--capabilities CAPABILITY_IAM \
--template-body file://cfn_pupistry_bucket_and_iam.template \
--stack-name pupistry-resources-unique

Once the create-stack command is issued, you can poll the status of the stack, you need it to be in “CREATE_COMPLETE” state before you can continue.

aws cloudformation describe-stacks --query "Stacks[*].StackStatus" --stack-name pupistry-resources-unique
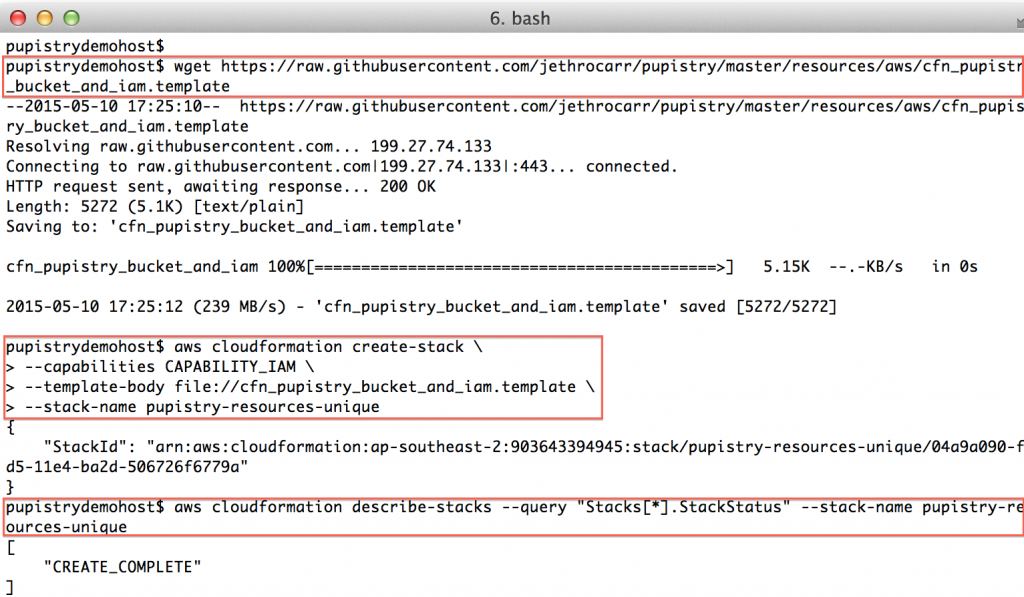
02-s3-setup-init


If something goes wrong and your stack status is an error eg “ROLLBACK”, the most likely cause is that you chose a non-unique bucket name. If you want easy debugging, login to the AWS web console and look at the event details of your stack. Once you determine and address the problem, you’ll need to delete & re-create the stack again.
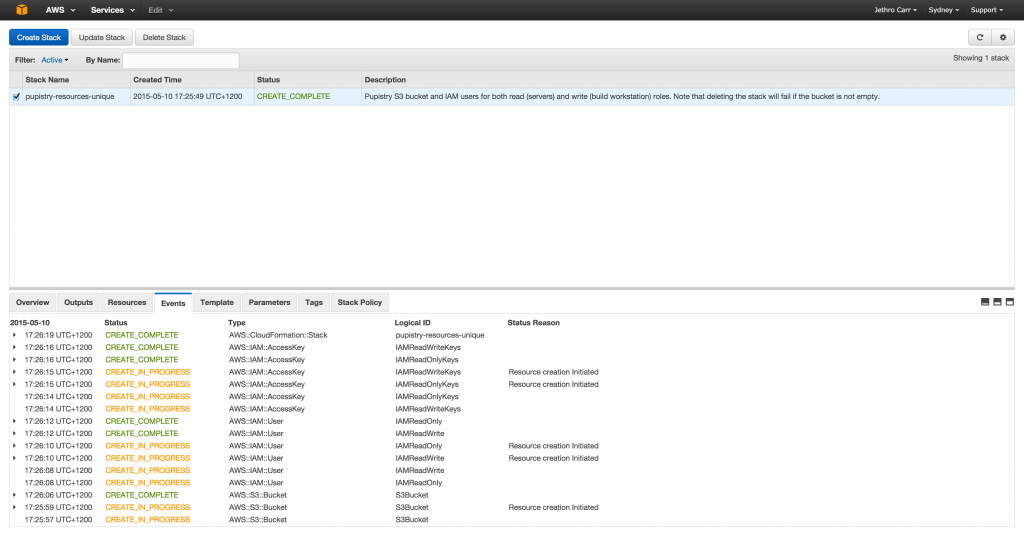
04-s3-aws-cfn-gui

AWS’s web UI can make debugging CFN a bit easier to read than the CLI tools thanks to colour coding and it not all being in horrible JSON.


Once you have a CREATE_COMPLETE stack, you can then get the stack outputs, which tell you what has been built. These outputs we then pretty much copy & paste into pupistry’s configuration file.

aws cloudformation describe-stacks --query "Stacks[*].Outputs[*]" --stack-name pupistry-resources-unique
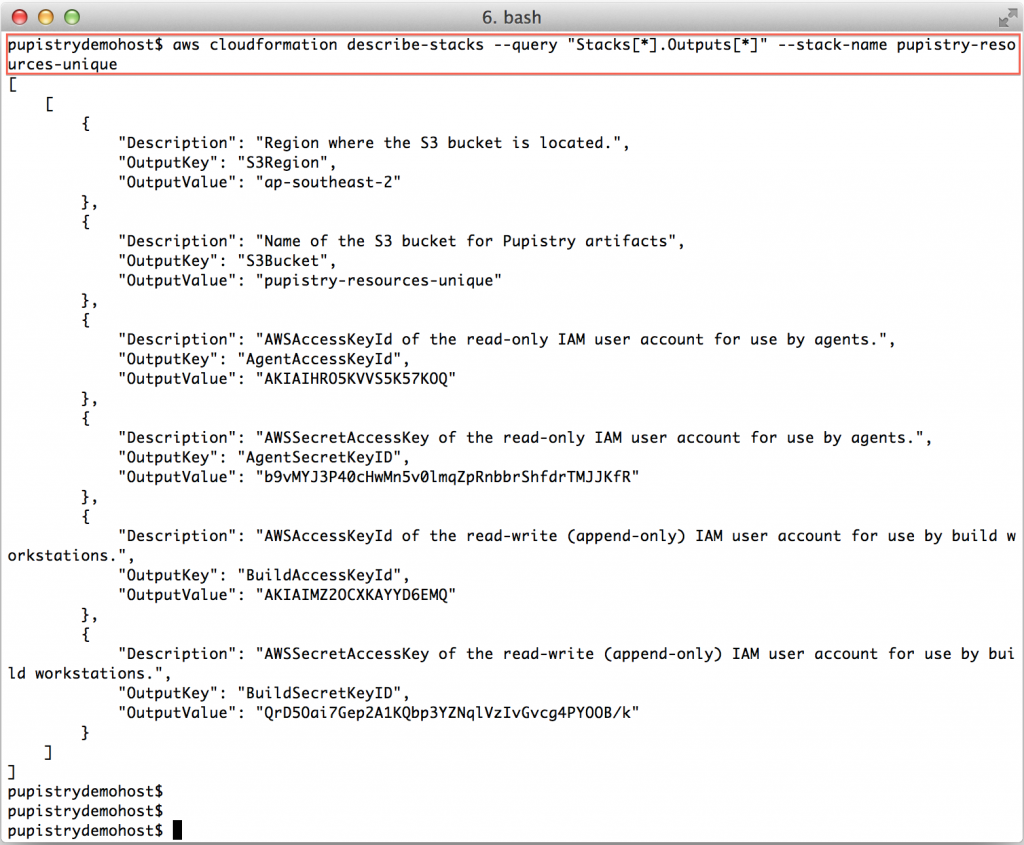
03-s3-setup-explain

Incase you’re wondering – yes, I have changed the above keys & secrets since doing this demo!! Never share your access and secret keys and it’s best to avoid committing them to any repo, even if private.

Save the output, you’ll need the details shortly when we configure Pupistry.


3. Setup your Puppetcode git repository

Optional: You can skip this step if you simply want to try Pupistry using the sample repo, but you’ll have to come back and do this step if you want to make changes to the example manifests.

We use the r10k workflow with Pupistry, which means you’ll need at least one Git repository called the Control Repo.

You’ll probably end up adding many more Git repositories as you grow your Puppet manifests, more information about how the r10rk workflow functions can be found here.

To make life easy, there is a sample repo to go with Pupistry that is a ready-to-go Control Repo for r10k, complete with Puppetfile defining what additional modules to pull in, a manifests/site.pp defining a basic example system and base Hiera configuration.

You can use any Git service, however for this walkthrough, we’ll use Bitbucket since it’s free to setup any number of private repos as their pricing model is on the number of people in a team and is free for under 5 people.

Github’s model of charging per-repo makes the r10k puppet workflow prohibitively expensive, since we need heaps of tiny repos, rather than a few large repos. Which is a shame, since Github has some nice features.

Head to https://bitbucket.org/ and create an account if you don’t already have one. We can use their handy import feature to make a copy of the sample public repo.

Select “Create Repository” and then click the “Import” in the top right corner of the window.

05-bitbucket-create

Now you just need to select “GitHub” as a source with the URL of https://github.com/jethrocarr/pupistry-samplepuppet.git and select a name for your new repo:
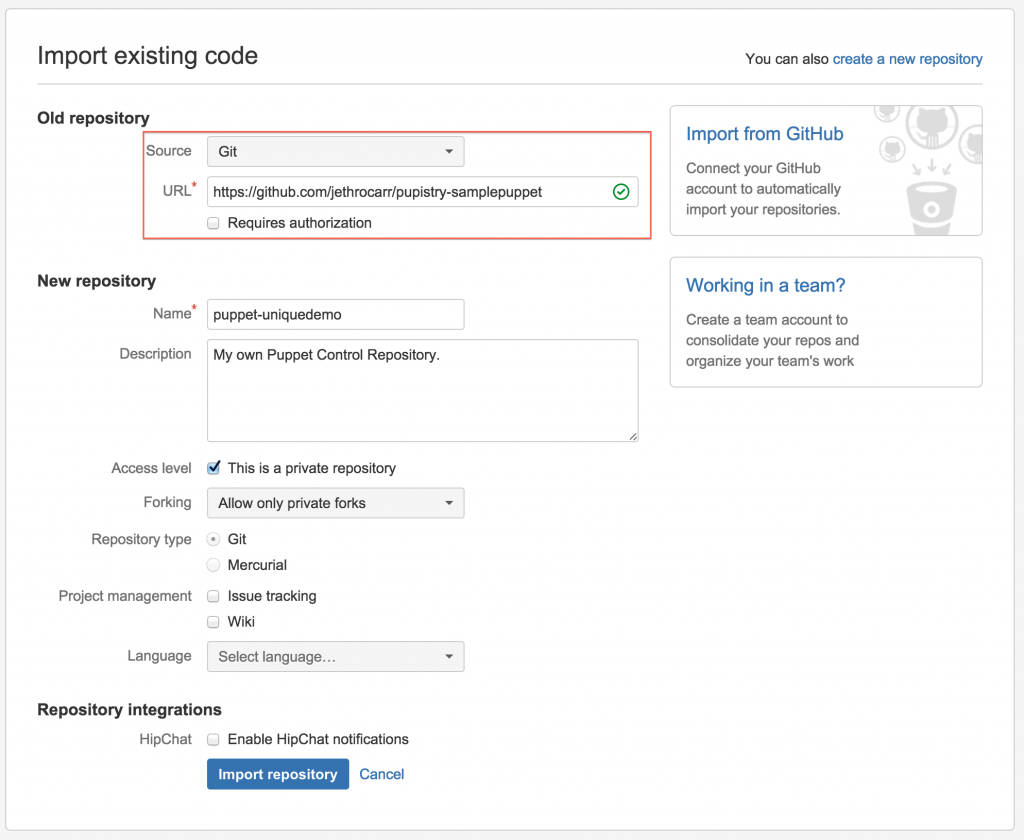
06-bitbucket-import

Once the import completes, it will look a bit like this:

07-bitbucket-done

The only computers that need to be able to access this repository is your workstation. The servers themselves never use any of the Git repos, since Pupistry packages up everything it needs into the artifact files.

Finally, if you’re new to Bitbucket, you probably want to import their key into your known hosts file, so Pupistry doesn’t throw errors trying to check out the repo:

ssh-keyscan bitbucket.org >> ~/.ssh/known_hosts


4. Configuring Pupistry

At this point we have the AWS S3 bucket, IAM accounts and the Git repo for our control repo in Bitbucket. We can now write the Pupistry configuration file and get started with the tool!

Open ~/.pupistry/settings.yaml with your preferred text editor:

vim ~/.pupistry/settings.yaml

09-config-edit

There are three main sections to configure in the file:

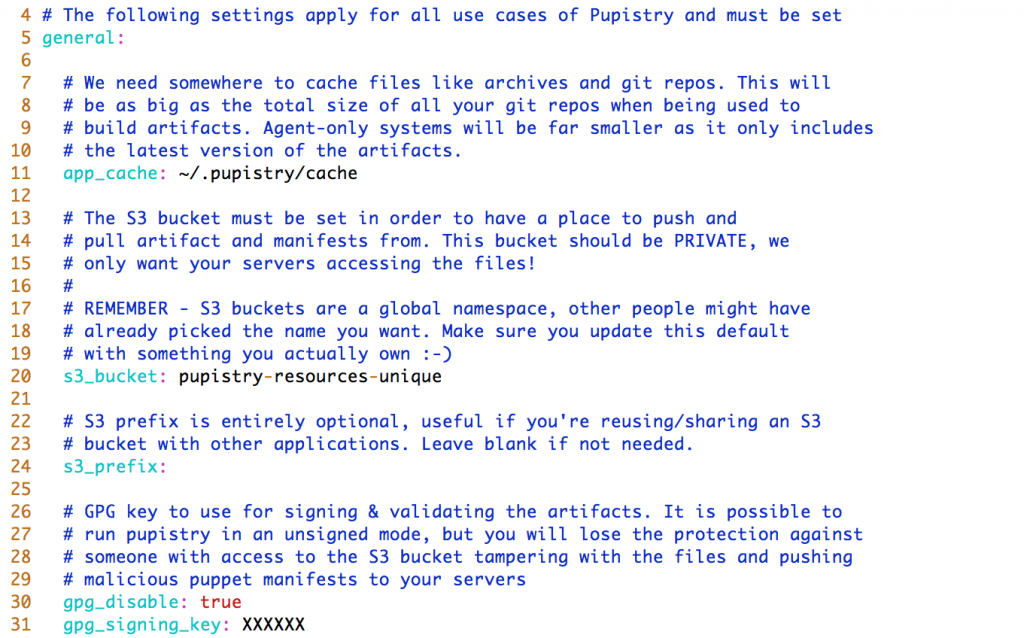
  1. General – We need to define the S3 bucket here. (For our walk though, we are leaving GPG signing disabled, it’s not mandatory and GPG is beyond the scope for this walkthrough):10-config-general
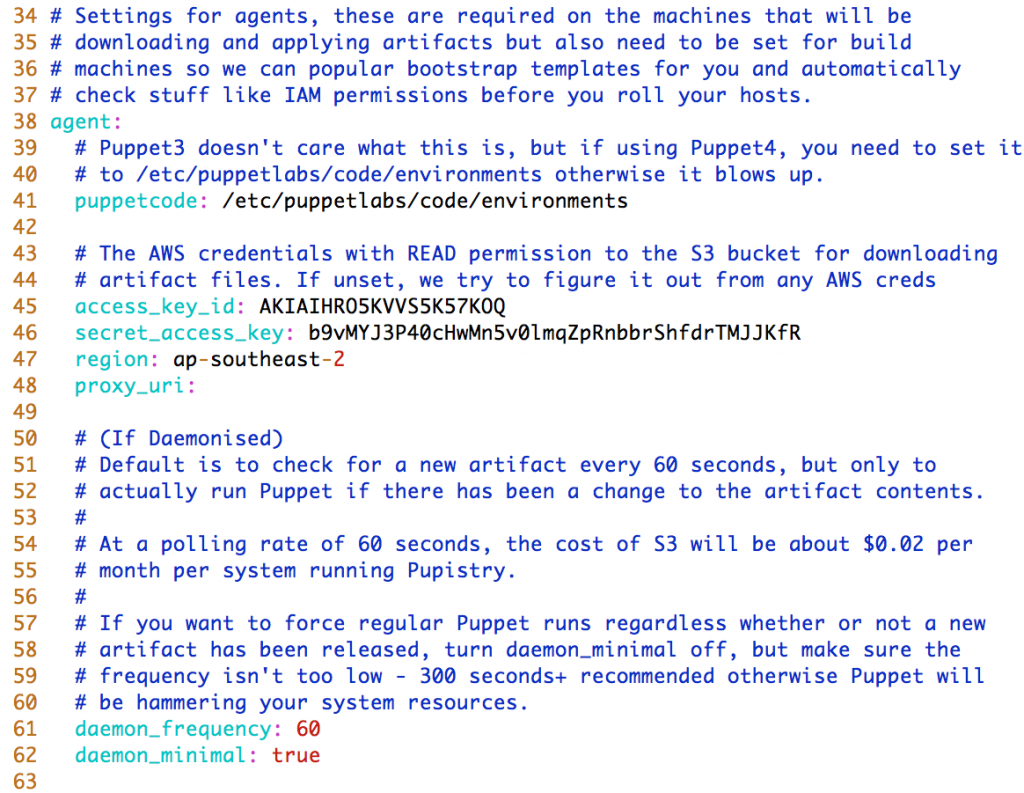
  2. Agent – These settings impact the servers that will be running Pupistry, but you need to set them on your workstation since Pupistry will test them for you and pre-seed the bootstrap data with the settings:11-config-agent
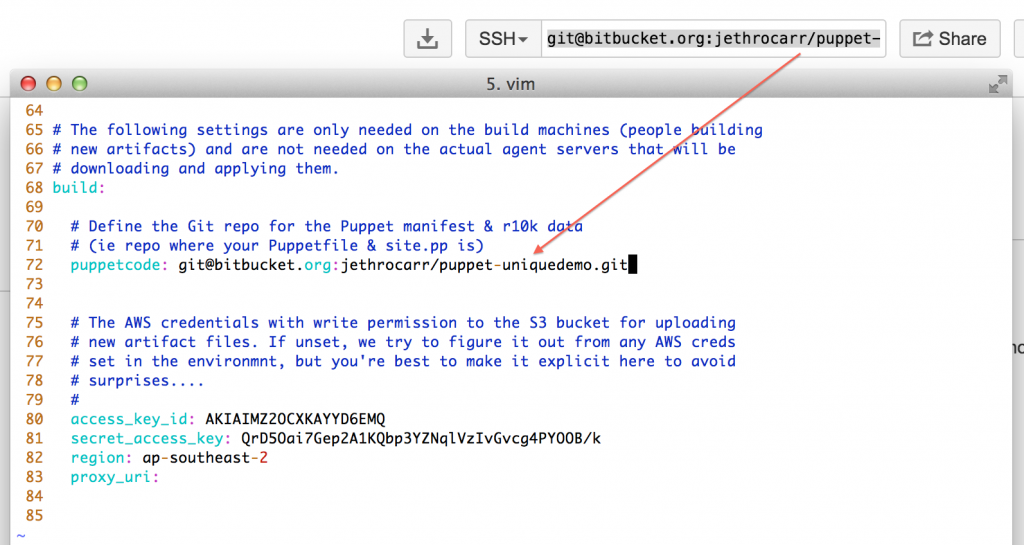
  3. Build – The settings that are used on your workstation to generate artifacts. If you create your own repository in Bitbucket, you need to change the puppetcode variable to the location of your data. If you skipped that step, just leave it on the default sample repo for testing purposes.12-config-use-bitbucket

Make sure you set BOTH the agent and the build section access_key_id and secret_access_key using the output from the CloudFormation build in step 2.


5. Building an artifact with Pupistry

Now we have our AWS resources, our control repository and our configuration – we can finally use Pupistry and build some servers!

pupistry build
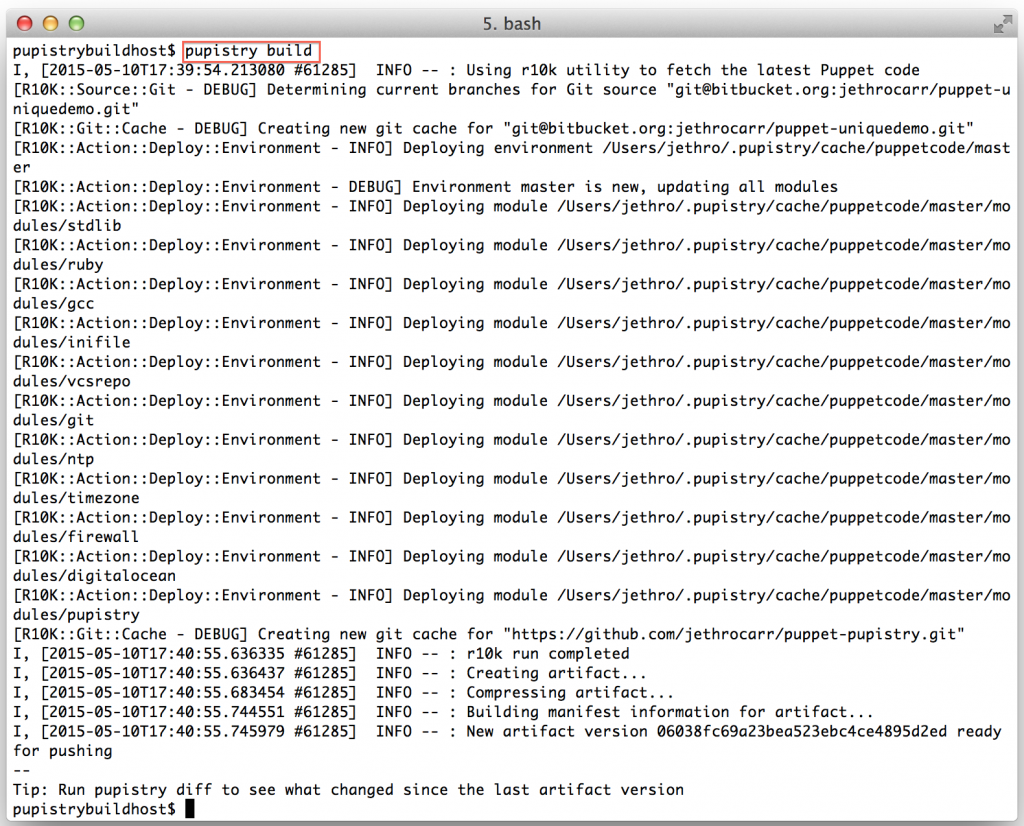
13-pupistry-build

Since this our first artifact, there won’t be much use to running diff, however as part of diff Pupistry will verify your agent AWS credentials are correct, so it’s worth doing.

pupistry diff

14-pupistry-diff

We can now push our newly built artifact to S3 with:

pupistry push

15-pupistry-push

In regards to the GPG warning – Pupistry interacts with AWS via secure transport and the S3 bucket can only be accessed via authorised accounts, however the weakness is that if someone does manage to break into your account (because you stuck your AWS IAM credentials all over a blog post like a muppet), an attacker could replace the artifacts with malicious ones and exploit your servers.

If you do enable GPG, this becomes impossible, since only signed artifacts will be downloaded and executed by your servers – an invalid artifact will be refused. So it’s a good added security benefit and doesn’t require any special setup other than getting GPG onto your workstation and setting the ID of the private key in the Pupistry configuration file.

We’ve now got a valid artifact. The next step is building our first server with Pupistry!


6. Building a server with Pupistry

Because having to install Pupistry and configure it on every server you ever want to build wouldn’t be a lot of fun manually, Pupistry automates this for you and can generate bootstrap scripts for most popular platforms.

These scripts can be run as part of user data on most cloud providers including AWS and Digital Ocean, as well as cut & paste into the root shell of any running server, whether physical, virtual or cloud-based.

The bootstrap process works by:

  1. Using the default OS tools to download and install Pupistry
  2. Write Pupistry’s configuration file and optionally install the GPG public key to verify against.
  3. Runs Pupistry.
  4. Pupistry then pulls down the latest artifact and executes the Puppetcode.
  5. In the case of the sample repo, the Puppetcode includes the puppet-pupistry module. This modules does some clever stuff like setting up a pluginsync equalivent for master-less Puppet and installs a system service for the Pupistry daemon to keep it running in the background – just like the normal Puppet agent! This companion module is strongly recommended for all users.

You can get a list of supported platforms for bootstrap mode with:

pupistry bootstrap

Once you decide which one you’d like to install, you can do:

pupistry bootstrap --template NAME
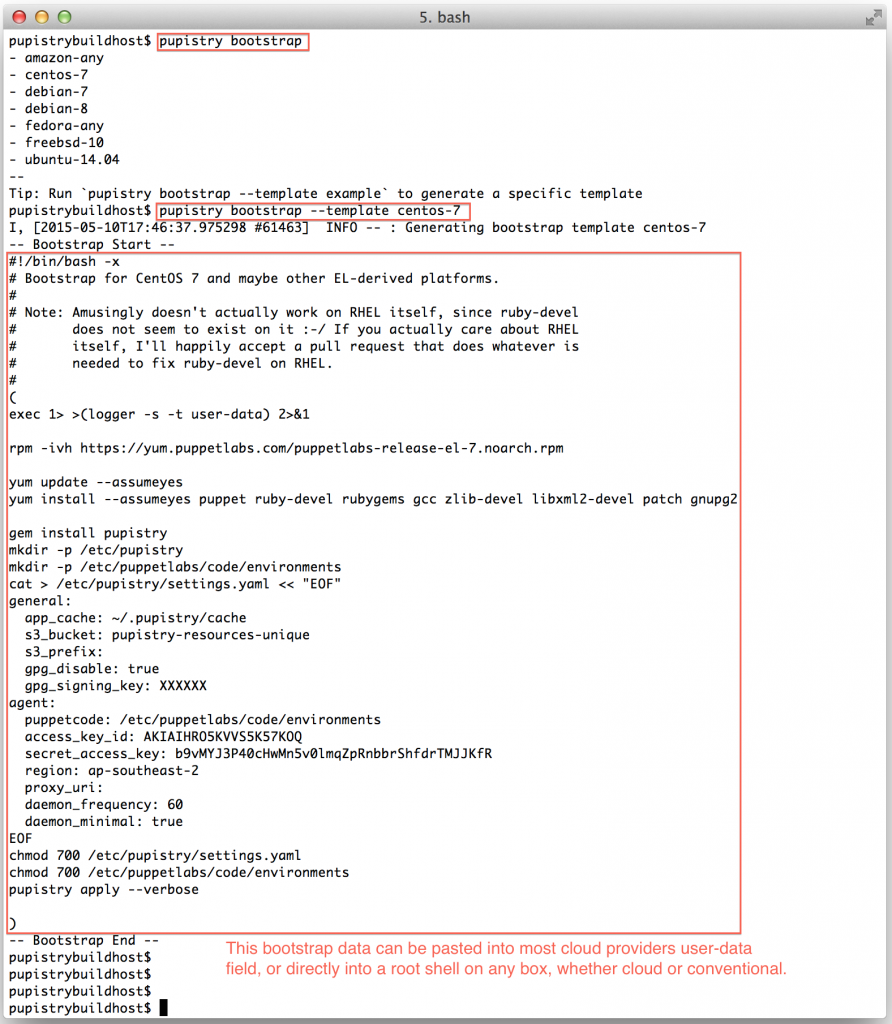
16-pupistry-bootstrap

Pupistry cleverly fills in all the IAM account details and seeds the configuration file based on the settings defined on your workstation. If you want to change behaviours like disabling the daemon, change it in your build host config file and it will be reflected in the bootstrap file.


To test Pupistry you can use any server you want, but this walkthrough shows an example using Digital Ocean which is a very low cost cloud compute provider with a slick interface and much easier learning curve than AWS. You can sign up and use them here, shamelessly clicking on my referrer link so my hosting bill gets paid – but also get yourself $10 credit in the process. Sweetas bru!

Once you have setup/logged into your DigitalOcean account, you need to create a new droplet (their terminology for a VM – AWS uses “EC2 Instance”). It can be named anything you want and any size you want, although this walkthrough is tight and suggests the cheapest example :-)
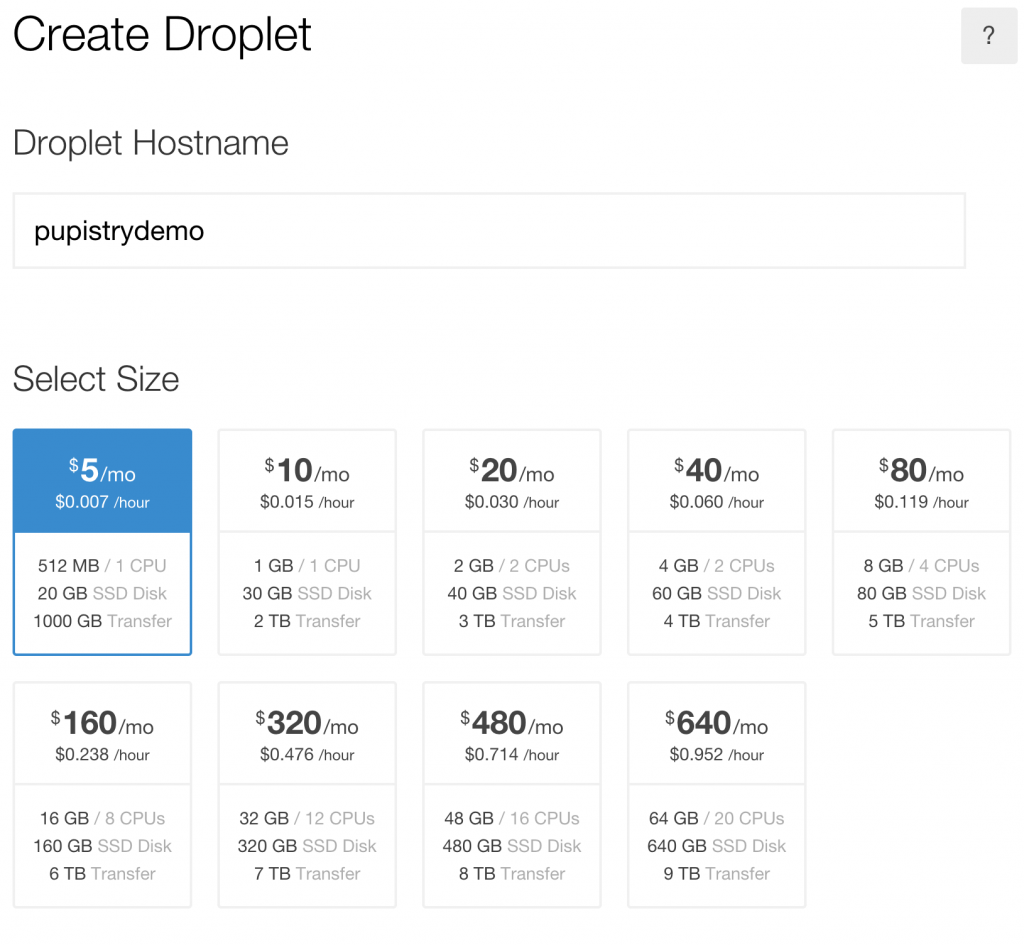
18-digitalocean-create-droplet-1


Now it is possible to just boot the Digital Ocean droplet and then cut & paste the bootstrap script into the running machine, but like most cloud providers Digital Ocean supports a feature called User Data, where a script can be pasted to have it execute when the machine starts up.
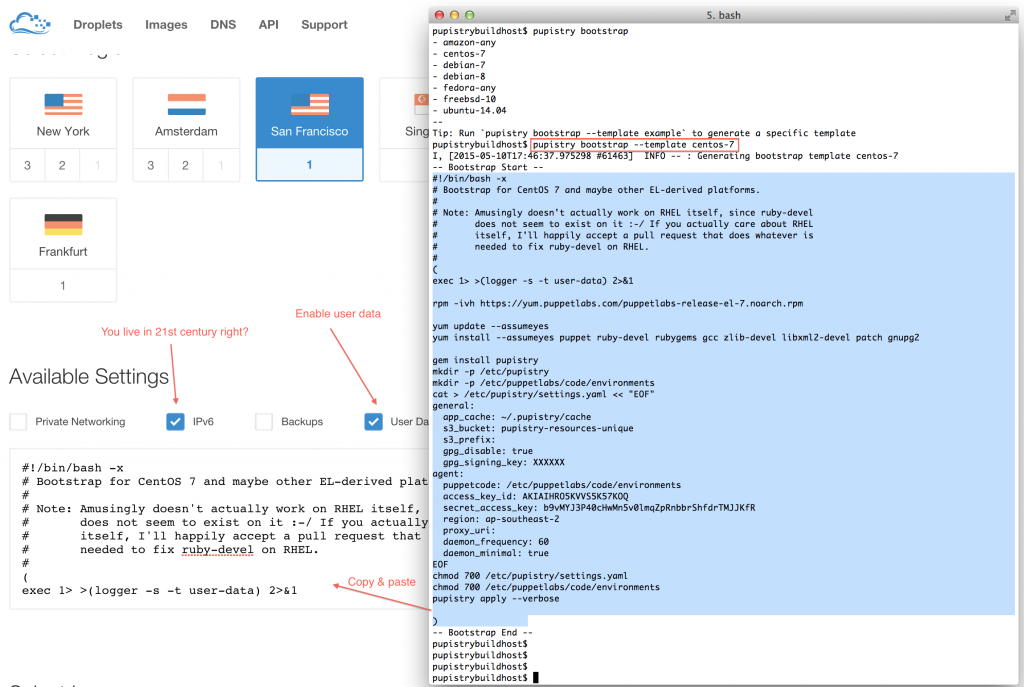
19-digitalocean-create-droplet-2

AWS users can get their user data in base64 version as well by calling pupistry bootstrap with the –base64 parameter – handy if you want to copy & paste the user data into other files like CloudFormation stacks. Digital Ocean just takes it in plain text like above.

Make sure you use the right bootstrap data for the right distribution. There are variations between distributions and sometime even between versions, hence various different bootstrap scripts are provided for the major distributions. If you’re using something else/fringe, you might have to do some of your own debugging, so recommend testing with a major distribution first.
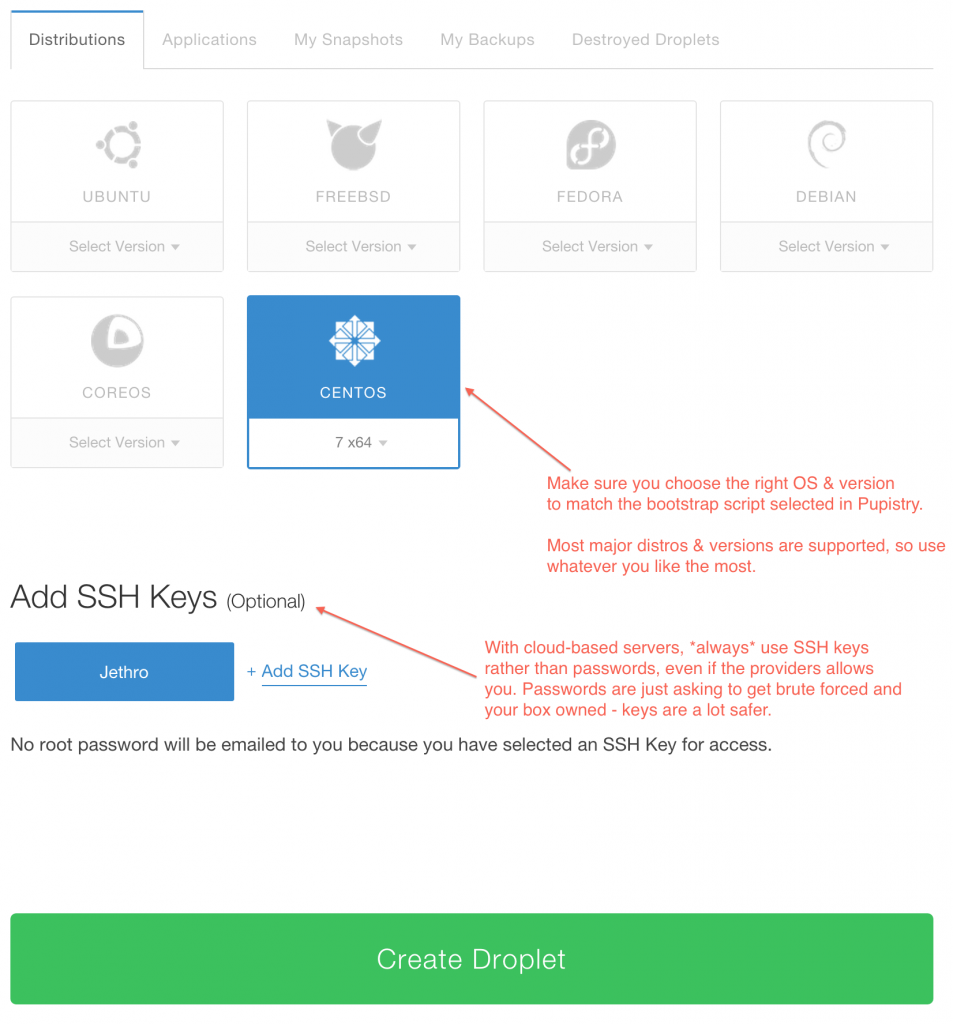
20-digitalocean-create-droplet-3

Once you create your droplet, Digital Ocean will go away for 30-60 seconds and build and launch the machine. Once you SSH into it, tail the system log to see the user data executing in the background as the system completes it’s inaugural startup. The bootstrap script echos all commands it’s running and output into syslog for debugging purposes.
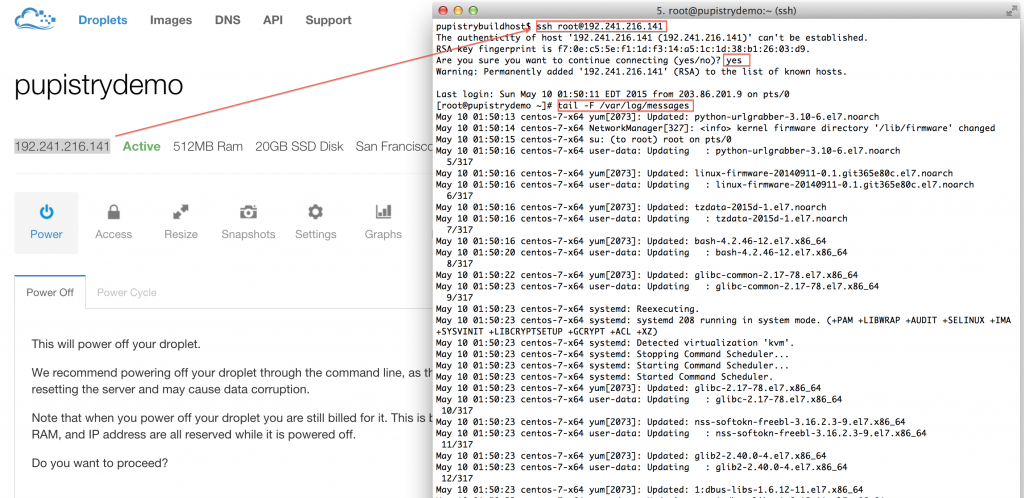
21-digitalocean-connect-to-server


Watch the log file until you see the initial Puppet run take place. You’ll see Puppet output followed by Notice: Finished catalog run at some stage of the process. You’ll also see the Pupistry daemon has launched and is now running in the background checking for updates every minute.
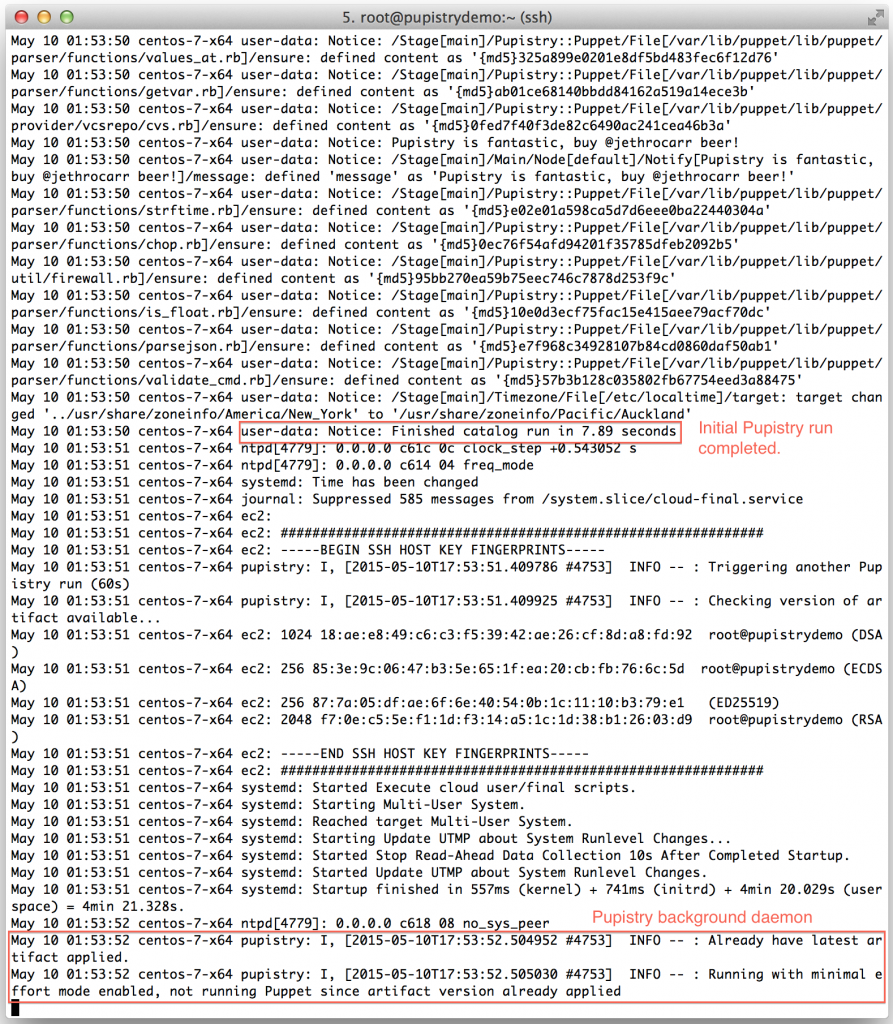
21-initial-pupistry-run

If you got this far, you’ve just done a complete build and proven that Pupistry can run on your server without interruption – because of the user data feature, you can easily automate machine creation & pupistry run to complete build servers without ever needing to login – we only logged in here to see what was going on!


7. Using Pupistry regularly

To make rolling out Puppet changes quick and simply, Pupistry sets up a background daemon job via the puppet-pupistry companion module which installs init config for most distributions for systemd, upstart and sysvinit. You can check the daemon status and log output on systemd-era distributions with:

service pupistry status
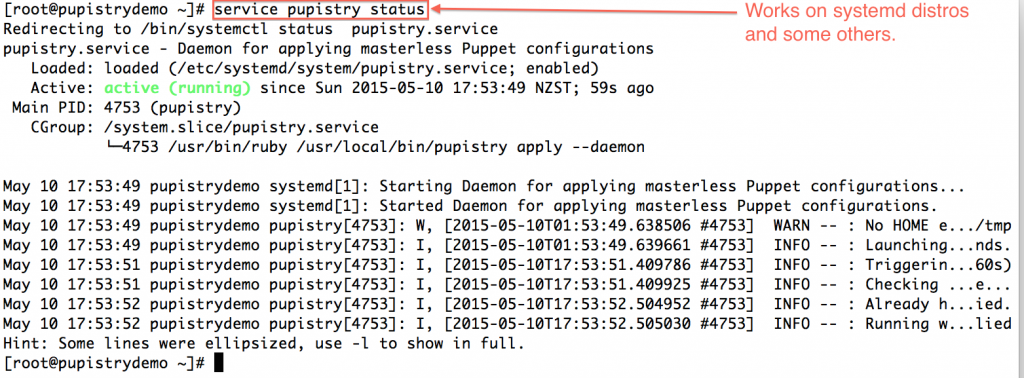
21-pupistry-daemon-details

If you want to test changes, then you probably may want to stop the daemon whilst you do your testing. Or you can be *clever* and use branches in your control repo – Pupistry daemon defaults to the master branch.

When testing or not using the daemon, you can run Pupistry manually in the same way that you can run the Puppet agent manually:

pupistry apply

22-pupistry-manual

Play around with some of the commands you can do, for example:

Run and only show what would have been done:

pupistry apply --noop

Apply a specific branch (this will work with the sample repo):

pupistry apply --environment exampleofbranch

To learn more about what commands can be run in apply mode, run:

pupistry help apply


8. Making a change to your control repo

At this point, you have a fully working Pupistry setup that you can experiment with and try new things out. You will want to check out the repo from bitbucket with:

git clone <repo>

Screen Shot 2015-05-10 at 23.31.02


Your first change you might want to make is experimenting with changing some of the examples in your repository and pushing a new artifact:

23-custom-puppetcode-1


When Puppet runs, it reads the manifests/site.pp file first for any node configuration. We have a simple default node setup that takes some actions like using some notify resources to display messages to the user. Try changing one of these:
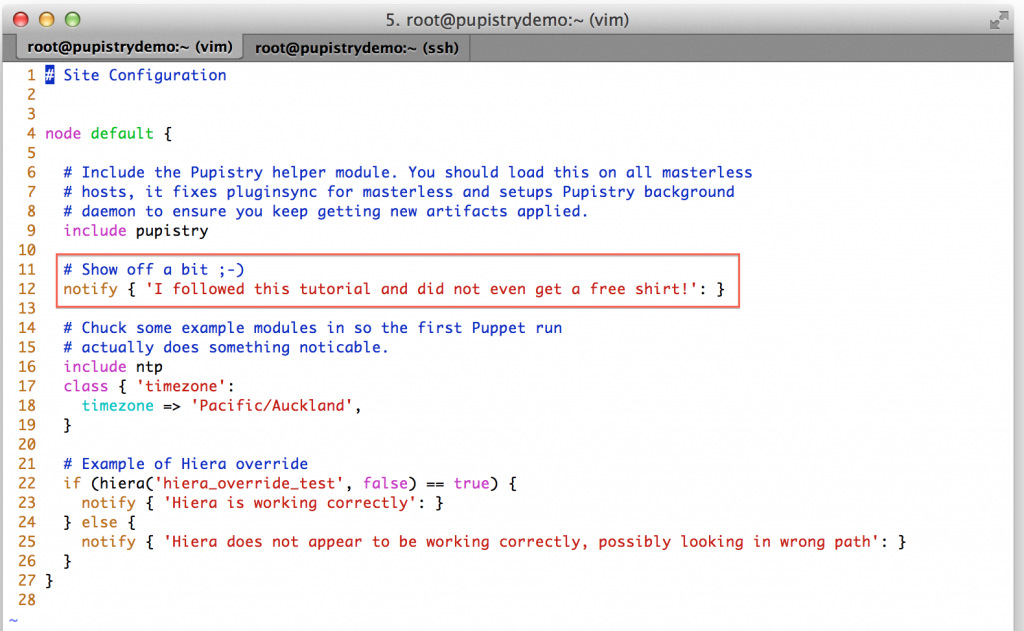
24-custom-puppetcode-2

Make a commit & push the change to Bitbucket, then build a new artifact:
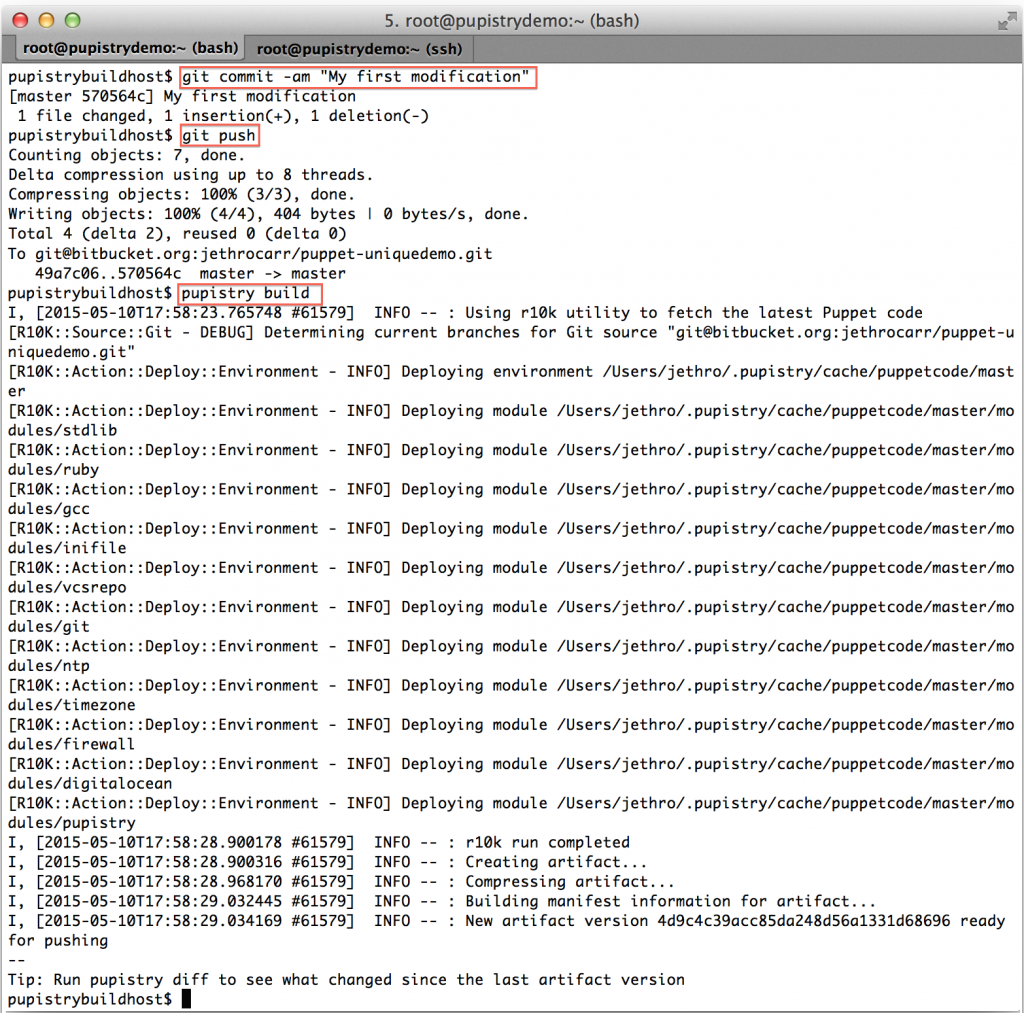
25-custom-puppetcode-3


We can now see the diff command in action:
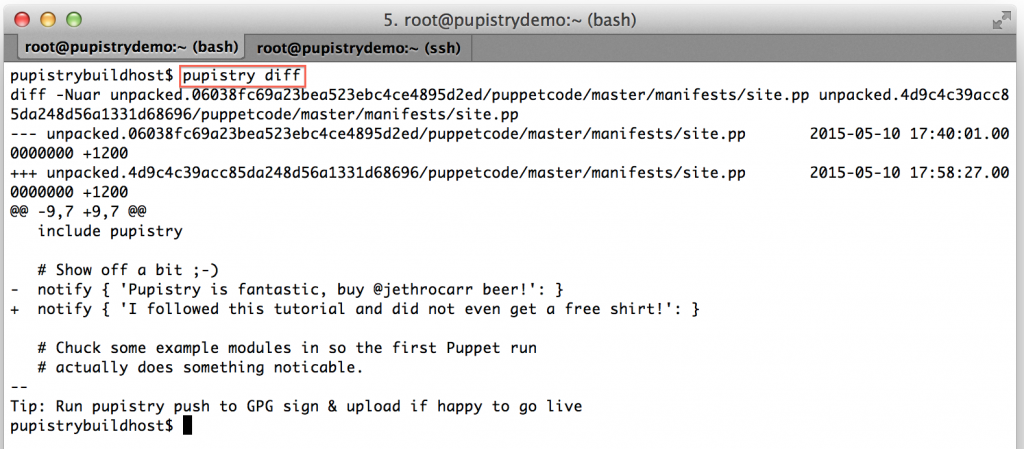
26-custom-puppetcode-4


If you’re happy with the changes, you can then push your new artifact to S3 and it will quickly deploy to your servers within the next minute if running the daemon.

27-custom-puppetcode-5

You can also run the Pupistry apply manually on your target server to see the new change:
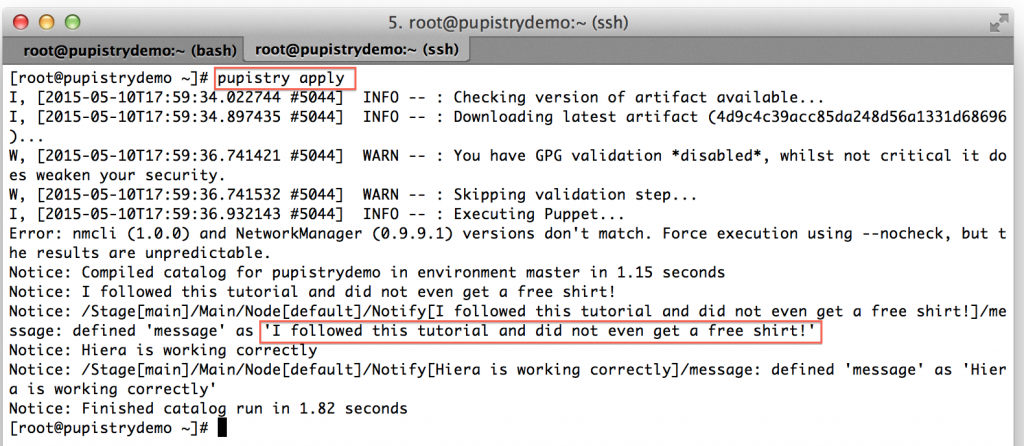
28-custom-puppetcode-6

At this point you’ve been able to setup AWS, setup Git, setup Pupistry, build a server and push new Puppet manifests to it! You’re ready to begin your exciting adventure into master-less Puppet and automate all the things!


9. Cleanup

Hopefully you like Pupistry and are now hooked, but even if you do, you might want to cleanup everything you’ve just created as part of this walkthrough.

First you probably want to destroy your Digital Ocean Droplet so it doesn’t cost you any further money:
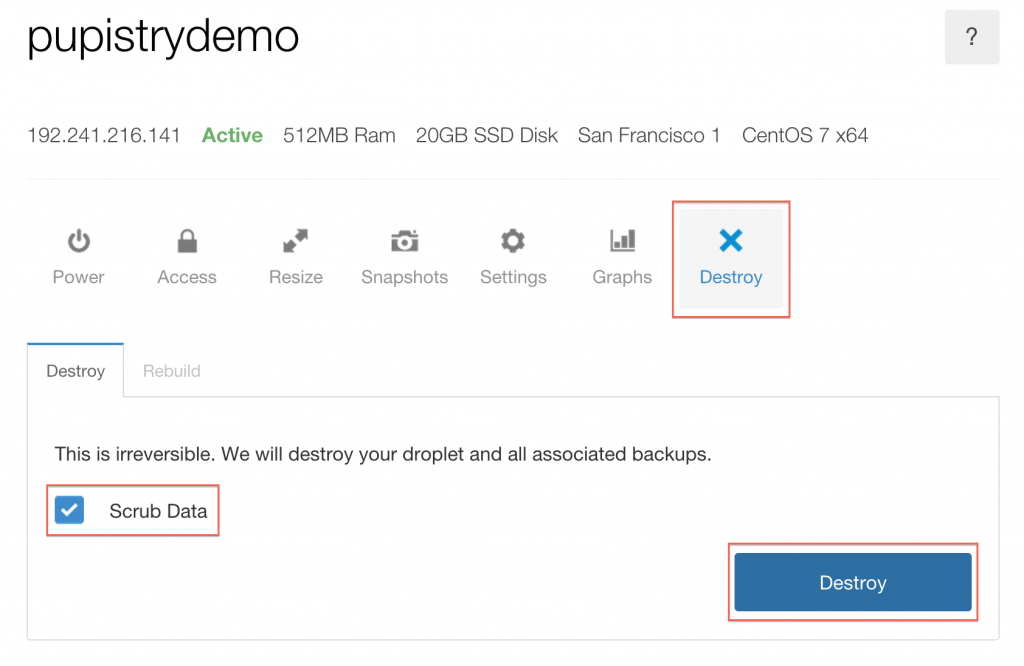
29-cleanup-digitialocean

If you want to keep continuing with Pupistry with your new Pupistry Bitbucket control repo and your AWS account you can, but if you want to purge them to clean up and start again:

Delete the BitBucket repo:
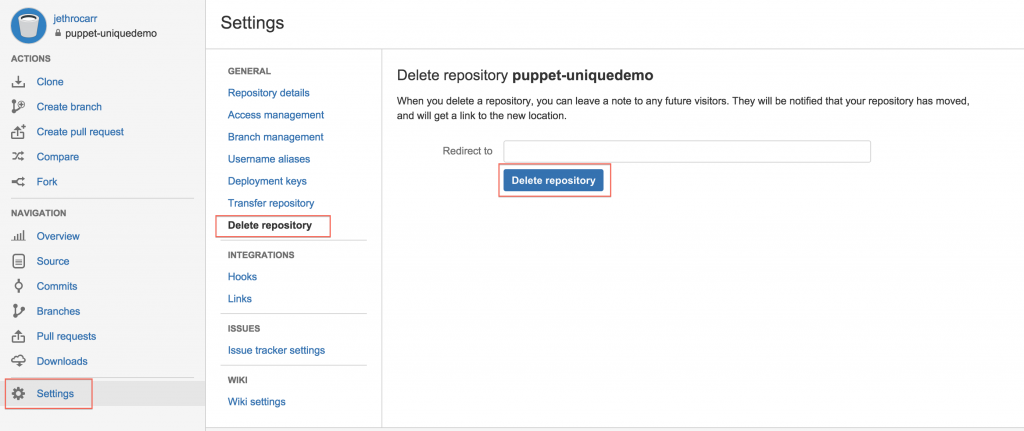
30-cleanup-bitbucket

Delete the AWS S3 bucket contents, then tear down the CloudFormation stack to delete the bucket and the users:

31-cleanup-aws

All done – you can re-run this tutorial from clean, or use your newfound knowledge to setup your proper production configuration.


Further Information

Hopefully you’ve found this walkthrough (and Pupistry) useful! Before getting started properly on your Pupistry adventure, please do read the full README.md and also my introducing Pupistry blog post.


Pupistry is a very new application, so if you find bugs please file an issue in the tracker, it’s also worth checking the tracker for any other known issues with Pupistry before getting started with it in production.

Pull requests for improved documentation, bug fixes or new features are always welcome.

If you are stuck and need support, please file it via an issue in the tracker. If your issue relates *directly* to a step in this tutorial, then you are welcome to post a comment below. I get too many emails, so please don’t email me asking for support on an issue as I’ll probably just discard it.

You may also find the following useful if you’re new to Puppet:

Remember that Pupistry advocates the use of masterless Puppet techniques which isn’t really properly supported by Puppetlabs, however generally Puppet modules will work just fine in master-less as well as master-full environments.

Puppet master is pretty standard, whereas Puppet masterless implementations differ all over the place since there’s no “proper” way of doing it. Pupistry hopefully fills this gap and will become a defacto standard for masterless over time.


Introducing Pupistry

I’ve recently been working to migrate my personal infrastructure from a very conventional and ageing 8 year old colocation server to a new cloud-based approach.

As part of this migration I’m simplifying what I have down to the fewest possible services and offloading a number of them to best-of-breed cloud SaaS providers.

Of course I’m still going to have a few servers for running various applications where it makes the most sense, but ideally it will only be a handful of small virtual machines and a bunch of development machines that I can spin up on demand using cloud providers like AWS or Digital Ocean, only paying for what I use.


The Puppet Master Problem

To make this manageable I needed to use a configuration management system such as Puppet to allow the whole build process of new servers to be automated (and fast!). But running Puppet goes against my plan of as-simple-as-possible as it means running another server (the Puppet master). I could have gone for something like Ansible, but I dislike the agent-less approach and prefer to have a proper agent and being able to build boxes automatically such as when using autoscaling.

So I decided to use Puppet masterless. It’s completely possible to run Puppet against local manifest files and have it apply them, but there’s the annoying issue of how to get Puppet manifests to servers in the first place…. That tends to be left as an exercise to the reader and there’s various collections of hacks floating around on the web and major organisations seem to grow their own homespun tooling to address it.

Just getting a well functioning Puppet masterless setup took far longer than desired and it seems silly given that everyone doing Puppet masterless is going to have to do the same steps over and over again.

User-data is another case of stupidity with every organisation writing their own variation of what is basically the same thing – some lines of bash to get a newly launched Linux instance from nothingness to running Puppet and applying the manifests for that organisation. There’s got to be a better way.


The blessing and challenges of r10k

It gets even more complex when you take the use of r10k into account. r10k is a Puppet workflow solution that makes it easy to include various upstream Puppet modules and pin them to specific versions. It supports branches, so you can do clever things like tell one server to apply a specific new branch to test a change you’ve made before rolling it out to all your servers. In short, it’s fantastic and if you’re not using it with Puppet… you should be.

However using r10k does mean you need access to all the git repositories that are being included in your Puppetfile. This is generally dealt with by having the Puppet master run r10k and download all the git repos using a deployer key that grants it access to the repositories.

But this doesn’t work so well when you have to setup deployer access keys for every machine to be able to read every one of your git repositories. And if a machine is ever compromised, it needs to be changed for every repo and every server again which is hardly ideal.

r10k’s approach of allowing you to assemble various third party Puppet modules into a (hopefully) coherent collection of manifests is very powerful – grab modules from the Puppet forge, from Github or from some other third party, r10k doesn’t care it makes it all work.

But this has the major failing of essentially limiting your security to the trustworthyness of all the third parties you select.

In some cases the author is relatively unknown and could suddenly decide to start including malicious content, or in other cases the security of the platform providing the modules is at risk (eg Puppetforge doesn’t require any two-factor auth for module authors) and a malicious attacker could attack the platform in order to compromise thousands of machines.

Some organisations fix this by still using r10k but always forking any third party modules before using them, but this has the downside of increased manual overhead to regularly check for new updates to the forked repos and pulling them down. It’s worth it for a big enterprise, but not worth the hassle for my few personal systems.

The other issue aside from security is that if any one of these third party repos ever fails to download (eg repo was deleted), your server would fail to build. Nobody wants to find that someone chose to delete the GitHub repo you rely on just minutes before your production host autoscaled and failed to startup. :-(


Pupistry – the solution?

I wanted to fix the lack of a consistent robust approach to doing masterless Puppet and provide a good way to allow r10k to be used with masterless Puppet and so in my limited spare time over the past month I’ve been working on Pupistry. (Pupistry? puppet + artistry == Pupistry! Hopefully my solution is better than my naming “genius”…)

Pupistry is a solution for implementing reliable and secure masterless puppet deployments by taking Puppet modules assembled by r10k and generating compressed and signed archives for distribution to the masterless servers.

Pupistry builds on the functionality offered by the r10k workflow but rather than requiring the implementing of site-specific custom bootstrap and custom workflow mechanisms, Pupistry executes r10k, assembles the combined modules and then generates a compressed artifact file. It then optionally signs the artifact with GPG and finally uploads it into an Amazon S3 bucket along with a manifest file.

The masterless Puppet machines then runs Pupistry which checks for a new version of the manifest file. If there is, it downloads the new artifact and does an optional GPG validation before applying it and running Puppet. Pupistry ships with a daemon which means you can get the same convenience of  a standard Puppet master & agent setup and don’t need dodgy cronjobs everywhere.

To make life even easier, Pupistry will even spit out bootstrap files for your platform which sets up each server from scratch to install, configure and run Pupistry, so you don’t need to write line after line of poorly tested bash code to get your machines online.

It’s also FAST. It can check for a new manifest in under a second, much faster than Puppet master or r10k being run directly on the masterless server.

Because Pupistry is artifact based, you can be sure your servers will always build since all the Puppetcode is packaged up which is great for autoscaling – although you still want to use a tool like Packer to create an OS image with Pupistry pre-loaded to remove dependency and risk of Rubygems or a newer version of Pupistry failing.


Try it!

https://github.com/jethrocarr/pupistry

If this sounds up your street, please take a look at the documentation on the Github page above and also the introduction tutorial I’ve written on this blog to see what Pupistry can do and how to get started with it.

Pupistry is naturally brand new and at MVP stage, so if you find bugs please file an issue in the tracker. It’s also worth checking the tracker for any other known issues with Pupistry before getting started with it in production (because you’re racing to put this brand new unproven app into production right?).

Pull requests for improved documentation, bug fixes or new features are always welcome, as is beer. :-)

I intend to keep developing this for myself as it solves my masterless Puppet needs really nicely, but I’d love to see it become a more popular solution that others are using instead of spinning some home grown weirdness again and again.

I’ve put some time into making it easy to use (I hope) and also written bootstrap scripts for most popular Linux distributions and FreeBSD, but I’d love feedback good & bad. If you’re using Pupistry and love it, let me know! If you tried Pupistry but it had some limitation/issue that prevented you from adopting it, let me know what it was, I might be able to help. Better yet, if you find a blocker to using it, fix it and send me a pull request. :-)

First thoughts and tips on EL 7

Generally one RHEL/CentOS/Scientific Linux (aka EL) release isn’t radically different to another, however the introduction of EL 7 is a bit of a shake up, introducing systemd, which means new init system, new ways of reading logs plus dropping some older utilities you may rely on and introducing new defaults.

I’m going through and upgrading some of my machines currently so I’ve prepared a few tips for anyone familiar with EL 4/5/6 and getting started with the move to EL 7.


systemd

The big/scary change introduced by RHEL 7 is systemd – love it or hate it, either way it’s here to stay. The good news is that an existing RHEL admin can keep doing most of their old tricks and existing commands.

Red Hat’s “service” command still works and now hooks into either legacy init scripts or new systemd processes. And rather than forcing everyone to use the new binary logging format, RHEL 7 logs messages to both the traditional syslog plain text files, as well as the new binary log format that you can access via journalctl – so your existing scripts or grep recipes will work as expected.

Rather than write up a whole bunch about systemd, I recommend you check out this blog post by CertDepot which details some of the commands you’ll want to get familiar with. The Fedora wiki is also useful and details stuff like enabling/disabling services at startup time.

I found the transition pretty easy and some of the new tricks like better integration between output logs and init are nice changes that should make Linux easier to work with for new users longer term thanks to better visibility into what’s going on.


Packages to Install

The EL minimum install lacks a few packages that I’d consider key, you may also want to install them as part of your base installs:

  • vim-enhanced – No idea why this doesn’t ship as part of minimum install so as a vim user, it’s very, very frustrating not having it.
  • net-tools – this provides the traditional ifconfig/route/netstat family of network tools. Whilst EL has taken the path of trying to force people onto the newer iproute tools there are still times you may want the older tools, such as for running older shell scripts that haven’t been updated yet.
  • bind-utils – Like tools like host or nslookup? You’ll want this package.
  • mailx – Provides the handy mail command for when you’re debugging your outbound mail.


Networking

Firstly be aware that your devices might no longer be simple named ethX, as devices are now named based on their type and role. Generally this is an improvement, since the names should line up more with the hardware on big systems for easier identification, and you can still change the device names if you prefer something else.

Changing the hostname will cause some confusion for long time RHEL users, rather than a line in /etc/sysconfig/network, the hostname is now configured in /etc/hostname like other distributions.

The EL 7 minimum installation now includes NetworkManager as standard. Whilst I think NetworkManager is a fantastic application, it doesn’t really have any place on my servers where I tend to have statically configured addresses and sometimes a few static routes or other trickiness like bridges and tunnels.

You can disable network manager (and instead use the static “network” service) by running the following commands:

systemctl stop NetworkManager
systemctl disable NetworkManager
systemctl restart network

Red Hat have documentation on doing static network configuration, although it is unfortunately weak on the IPv6 front.

Most stuff is the same as older versions, but the approach of configuring static routes bit me. On EL 5 you configured a /etc/sysconfig/network-scripts/route-ethX file to define IPv4 and IPv6 routes that should be created when that interface comes up. With EL7 you now need to split the IPv4 and IPv6 routes apart, otherwise you just get a weird error when you bring the interface up.

For example, previously on an EL 5 system I would have had something like:

# cat /etc/sysconfig/network-scripts/route-eth1
10.8.0.0/16 via 10.8.5.2 dev eth1
2001:db8:1::/48 via 2001:db8:5::2 dev eth1
#

Whereas you now need something like this:

# cat /etc/sysconfig/network-scripts/route-eth1
10.8.0.0/16 via 10.8.5.2 dev eth1
#

# cat /etc/sysconfig/network-scripts/route6-eth1
2001:db8:1::/48 via 2001:db8:5::2 dev eth1
#

Hopefully your environment is not creative enough to need static routes around the place, but hey, someone out there might always be as crazy as me.


Firewalls

EL 7 introduces FirewallD as the default firewall application – it offers some interesting sounding features for systems that frequently change networks such as mobile users, however I’m personally quite happy and familiar with iptables rulesets for my server systems which don’t ever change networks.

Fortunately the traditional raw iptables approach is still available, Red Hat dragged their existing iptables/ip6tables service scripts over into systemd, so you can still save your firewall rules into /etc/sysconfig/iptables and /etc/sysconfig/iptables respectively.

# Disable firewalld:
systemctl disable firewalld
systemctl stop firewalld

# Install iptables
yum install iptables-service
systemctl enable iptables
systemctl enable ip6tables
systemctl start iptables
systemctl start ip6tables


LAMP Stack

  • Apache has been upgraded from 2.2 to 2.4. Generally things are mostly the same, but some modules have been removed which might break some of your configuration if you take a lift+shift approach.
  • MySQL has been replaced by MariaDB (community developed fork) which means the package names and service have changed, however all the mysql command line tools still exist and work fine.
  • PHP has been upgraded to 5.4.16 which a little bit dated already – over the lifespan of EL 7 it’s going to feel very dated very quickly, so I hope Red Hat puts out some php55 or php56 packages in future releases for those whom want to take advantage of the latest features.


Other Resources

  1. If you haven’t already, check out Red Hat’s release notes,they detail heaps of new features and additions to the platform.
  2. To learn more about the changes from previous releases, check out Red Hat’s Migration Guide as a starter.
  3. My guide to running EL 7 on EL 5 as a Xen guest for those of you running older Xen hypervisors.