Tag Archives: linux

Great server crash of 2012

In a twist of irony, shortly after boarding my flight in Sydney for my trip back to Wellington to escape the heat of the AU summer, my home NZ server crashed due to the massive 30 degree heatwave experienced in Wellington on Christmas day. :-/

I have two NZ servers, my public facing colocation host, and my “home” server which now lives at my parent’s house following my move. The colocation box is nice and comfy in it’s aircon controlled climate, but the home server fluctuates quite significantly thanks to the Wellington climate and it’s geolocation of being in a house rather than a more temperature consistent apartment/office.

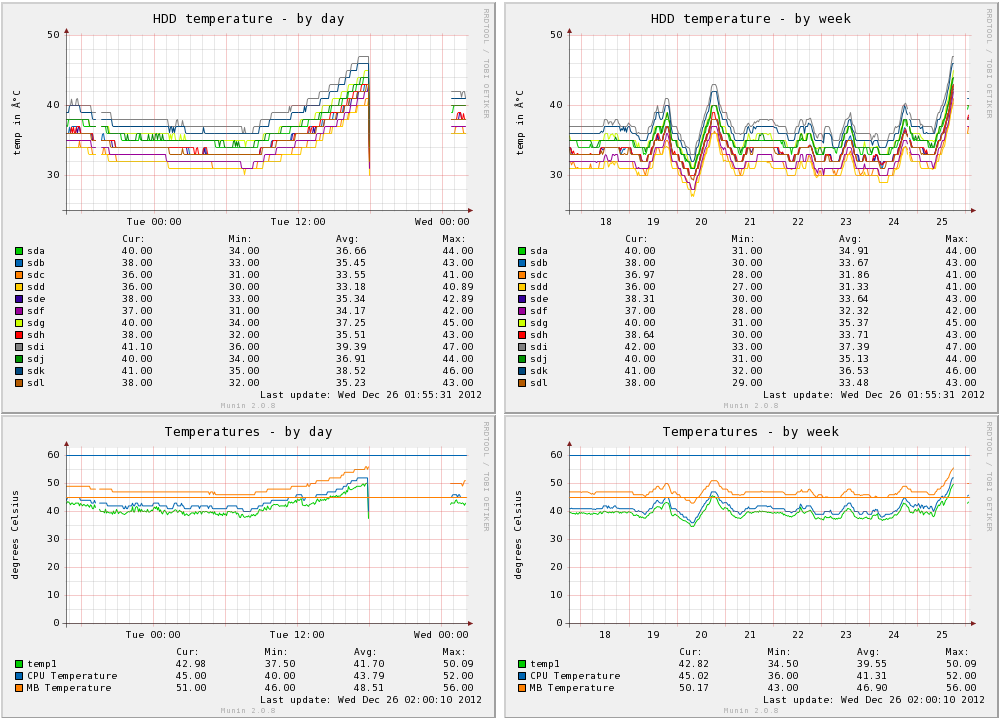
After bringing the host back online, Munin showed some pretty scary looking graphs:

localhost flew too close to the sun and plummeted to it's doom

localhost flew too close to the sun and plummeted to his doom

I’ve had problems with the stability of this system in the past. Whilst I mostly resolved this with the upgrades in cooling, there are still the odd occasions of crashing, which appears to be linked with summer months.

The above graphs are interesting since they show a huge climb in disk temperatures, although I still suspect it’s the CPU that lead to the actual system crash occurring – the CPU temperature graphs show a climb up towards 60 degrees, which is the level where I’ve seen many system crashes in the past.

What’s particularly annoying is that all these crashes cause the RAID 6 to trigger a rebuild – I’m unsure as to why exactly this is, I suspect that maybe the CPU hangs in the middle of a disk operation that has written to some disks, but not all.

Having the RAID rebuild after reboot is particularly nasty since it places even more load and effort onto an already overheated system and subjects the array to increased failure risk due to the loss of redundancy. I’d personally consider this a kernel bug, if a disk operation failed, the array should still have a known good state and be able to recover from that – fail only the blocks that are borked.

Other than buying less iffy hardware and finding a cooler spot in the house, there’s not a lot else I can do for this box…. I’m pondering using CPU frequency scaling to help reduce the temperature, by dropping the clock speed of the CPU if it gets too hot, but that has it’s own set of risks and issues associated with it.

In past experiments with temperature scaling on this host, it hasn’t worked too well with the high virtualised workload causing it to swap frequently between high and low performance, leading to an increase in latency and general sluggishness on the host. There’s also a risk that clocking down the CPU may just result in the same work taking longer on the CPU potentially still generating a lot of heat.

I could attack the workload somewhat, the VMs on the host are named based on their role, eg (prod-, devel-, dr-) so there’s the option to make use of KVM to suspend all but key production VMs when the temperature gets too high. Further VM type tagging would help target this a bit more, for example my minecraft VM is a production host, but it’s less important than my file server VM and could be suspended on that basis.

Fundamentally the host  staying online outweighs the importance of any of the workloads, on the simple basis that if the host is still online, it can restart services when needed. If the host is down, then all services are broken until human intervention can be provided.

Debian Testing with Cinnamon

I’ve been running Debian Stable on my laptop for about 10 months for a number of reasons, but in particular as a way of staying away from GNOME 3 for a while longer.

GNOME 3 is one of those divisive topics in the Linux community, people tend to either love it or hate it – for me personally I find the changes it’s introduced impact my workflow negatively, however if I was less of a power user or running Linux on a tablet, I can see the appeal of the way GNOME 3 is designed.

Since GNOME 3 was released, there have been a few new options that have arisen for users craving the more traditional desktop environment offered – two of the popular options are Cinnamon and MATE.

MATE is a fork of GNOME 2, so duplicates all the old libraries and applications, where as Cinnamon is an alternative GNOME Shell, which means that it uses the GNOME 3 libraries and applications.

I’m actually a fan of a lot of the software made by the GNOME project, so I decided to go down the Cinnamon path as it would give me useful features from GNOME 3 such as the latest widgets for bluetooth, audio, power management and lock screens, whilst still providing the traditional window management and menus that I like.

As I was currently on Debian Stable, I upgraded to Debian Testing which provided the required GNOME 3 packages, and then installed Cinnamon from source – pretty easy since there’s only two packages and as they’ve already packaged for Debian, just a dpkg-buildpackage to get installable packages for my laptop.

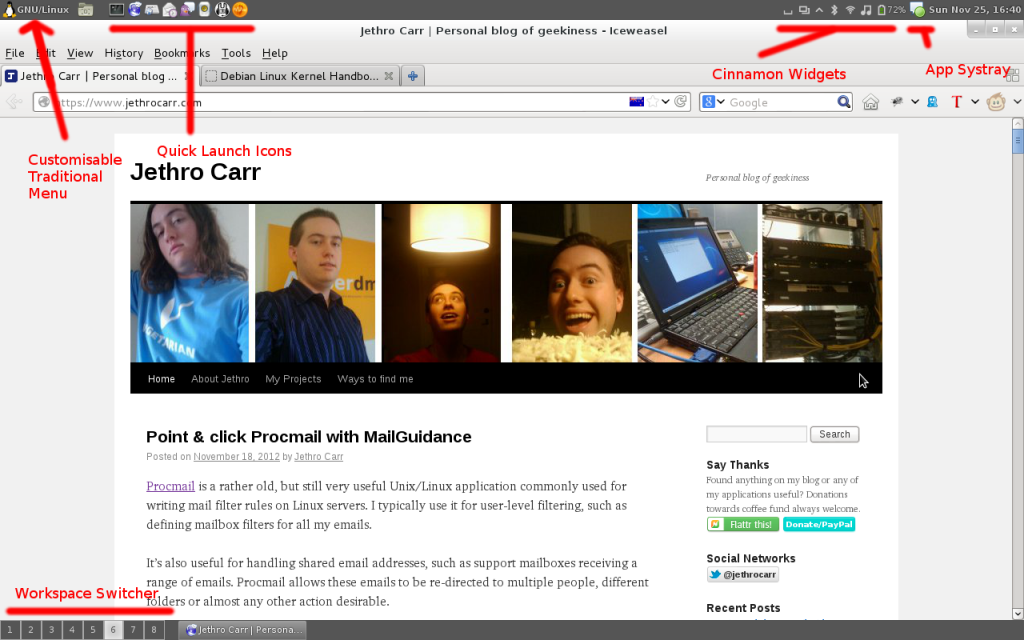
So far I’m pretty happy with it, I’m able to retain my top & bottom menu bar setup and all my favorite GNOME applets and tray features, but also take advantages of a few nice UI enhancements that Cinnamon has added.

All the traditional features we know and love.

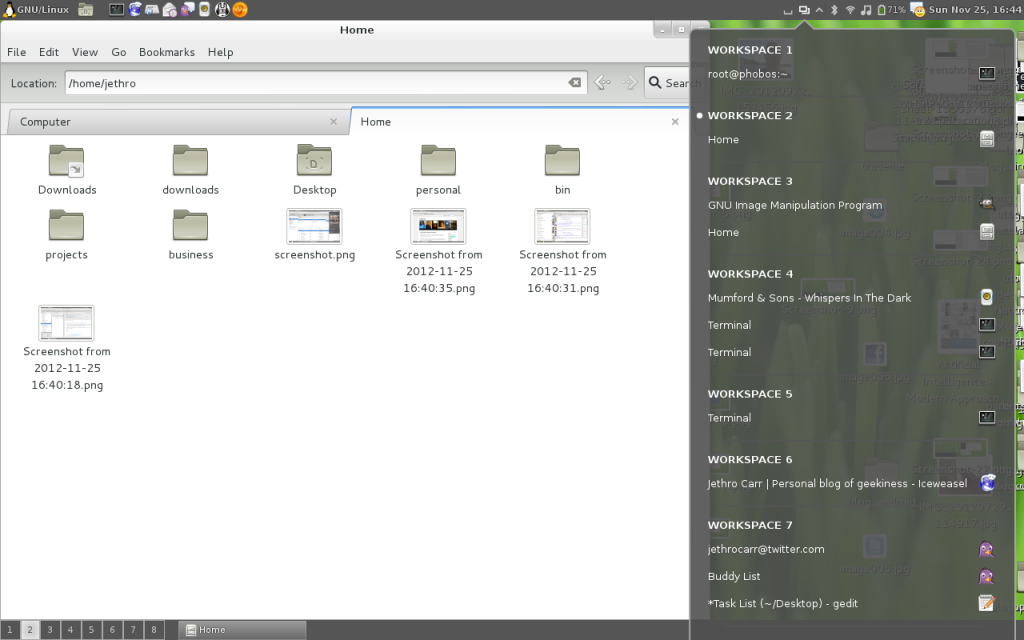
One of the most important features for me was a functional workspace system that allows me to setup my 8 different workspaces that I use for each task. Cinnamon *mostly* delivers on this – it correctly handles CTL+ALT+LEFT/RIGHT to switch between workspaces, it provides a taskbar workspace switcher applet and it lets me set whatever number of workspaces I want to have.

Unfortunately it does seem to have a bug/limitation where the workspace switcher doesn’t display mini icons showing what windows are open on which workspace, something I often use for going “which workspace did I open project blah on?”. I also found that I had to first add the 8 workspaces I wanted by using CTL+ALT+UP and clicking the + icon, otherwise it defaulted to the annoying dynamic “create more workspaces as you need them” behavior.

On the plus side, it does offer up a few shinier features such as the graphical workspace switcher that can be opened with CTL+ALT+UP and the window browser which can be opened with CTL+ATL+DOWN.

You can never have too many workspaces! If you’re similarly anal-retentive as me you can go and name each workspace as well.

There’s also a few handy new applets that may appeal to some, such as the multi-workspace window list, allowing you to select any open window across any workspace.

Window applet dropdown, with Nautilus file manager off to the left.

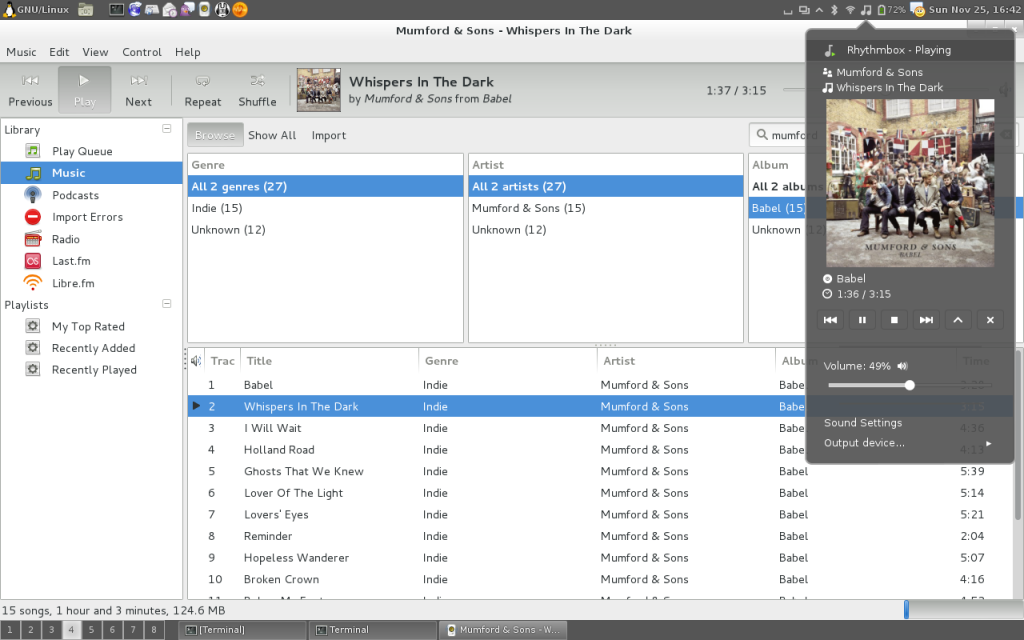
I use Rhythmbox for music playback – I’m not a huge fan of the application, mostly since it doesn’t cope well with playing content off network shares over WAN links, but it does have a nice simple UI and good integration into Cinnamon:

Break out the tweed jackets and moleskins, you can play your folk rock in glorious GTK-3 graphics.

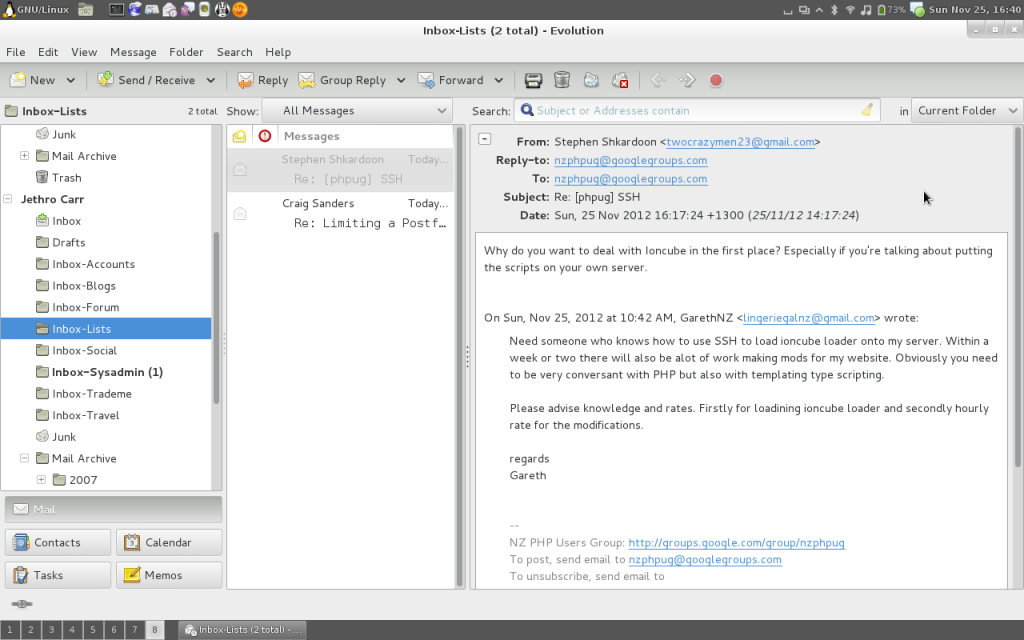
The standard Cinnamon theme is pretty decent, but I do find it has an overabundance of gray, something that is quite noticeable when using a window heavy application such as Evolution.

Didn’t you get the memo? Gray is in this year!

Of course there are a lot of other themes available so if the grayness gets to you, there are other options. You also have the usual options to change the window border styles, it’s something I might do personally since I’m finding that the chunky window headings are wasting a bit of my laptop’s very limited screen real estate.

Overall I’m pretty happy with Cinnamon and plan to keep using it for the foreseeable future on this laptop – if you’re unhappy with GNOME 3 and preferred the older environment, I recommend taking a look at it.

I’ve been using it on a laptop with a pretty basic Intel GPU (using i810 driver) and had no issue with any of the accelerated graphics, everything feels pretty snappy –  there is also a 2D Cinnamon option at login if your system won’t do 3D under any circumstance.

gdisk, oh glorious gdisk

My file server virtual machine passed the 2TB limit a couple months ago, which forced me to get around to upgrading it to RHEL 6 and moving from MSDOS to GPT based partitions, as the MSDOS partitioning table doesn’t support more than 2TB partitions.

I recently had to boost it up by another 1 TB to counter growing disk usage and got stuck trying to resize the physical volume – the trusty old fdisk command doesn’t support GPT partitions, with most documentation resources directing you to use parted instead.

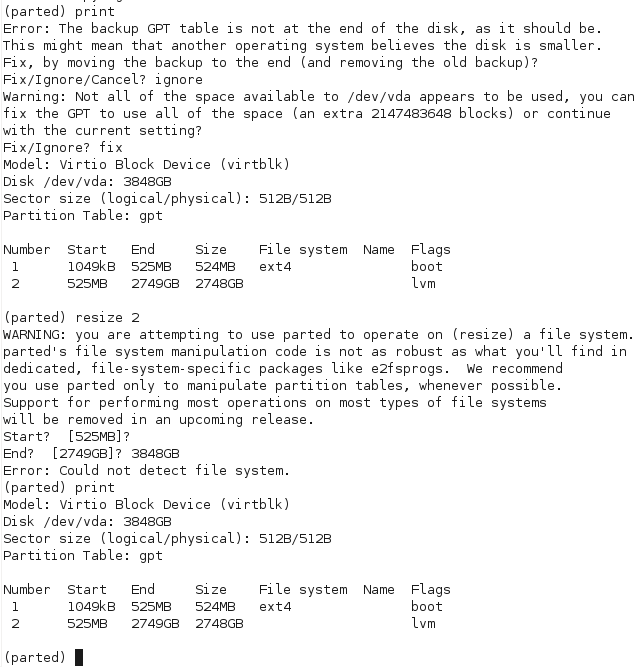
The problem with parted, is that the developers have tried to be clever and made parted filesystem aware, so it will perform filesystem operations as well as block partition operations. Secondly, parted writes changes whilst you’re making them rather than letting you discard or write the final results of your changes to the partition table.

This breaks really badly for my LVM physical volume partitions – as you can see below, parted has a resize command, but when used against an LVM volume it is unable to recognize it as a known type and fails with the very helpful “Error: Could not detect file system“.

Naturally this didn’t put parted into my good books for the evening – doing a search of the documentation didn’t really clarify whether doing the old fdisk way or deleting and re-creating partitions at the same start and end positions was safe or not, but the documentation suggested that this is a destructive process. Seeing as I really didn’t feel like have to pull 2TB of data off backup, I chose caution and decided not to test that poorly documented behavior.

The other suggested option is to just add an additional partition and add it to LVM – whilst there’s no technical reason against this method, it really offended my OCD and the desire to keep my server’s partitioning table simple and logical – I don’t want lots of weirdly sized partitions littering the server from every time I’ve had to upsize the virtual machine!

Whilst cursing parted, I wondered whether there was a tool just like fdisk, but for GPT partition tables. Linux geeks do like to poke fun at fdisk for having a somewhat obscure user interface and basic feature set, but once you learn it, it’s a powerful tool with excellent documentation and it’s simplicity leads it to being able to perform a number of very tricky tasks, as long as the admin knows what they’re doing.

Doing some research lead me to gdisk, which as the name suggests, is a GPT capable clone of fdisk, providing a very similar user interface and functionality.

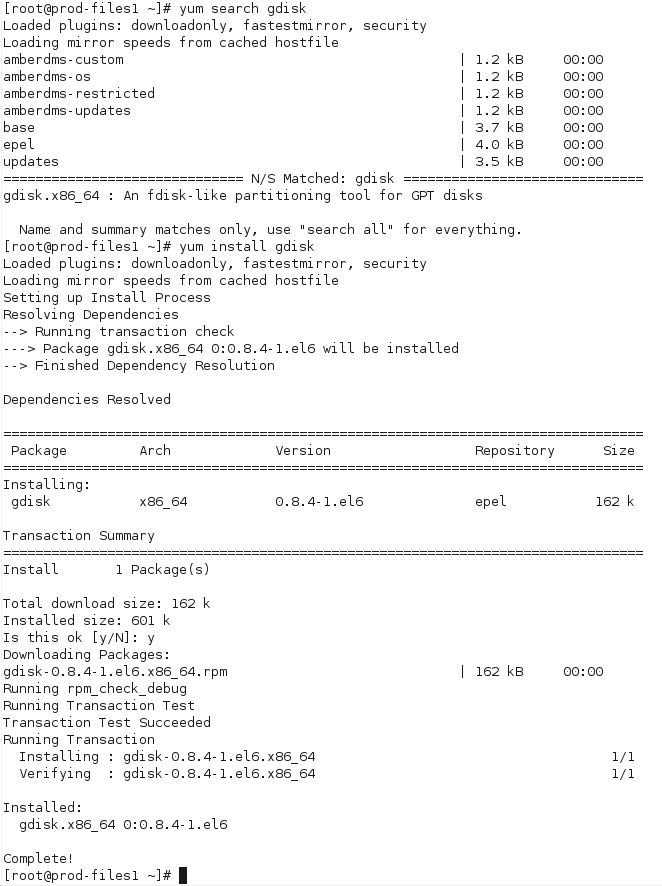
Whilst it’s not part of RHEL’s core package set, it is available in the EPEL repositories, hopefully these are acceptable to your environment:

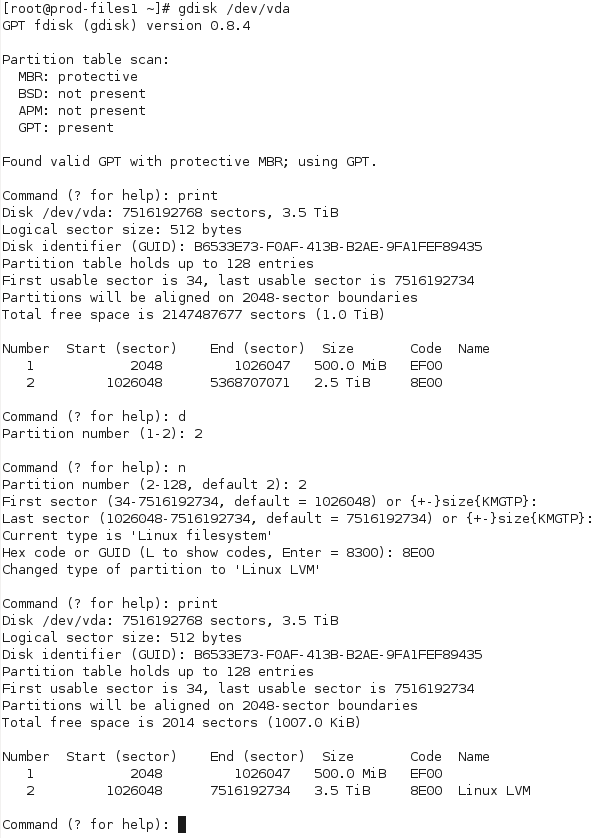
Once installed, it was a pretty simple process of loading gdisk and deleting the partition before expanding to the new size:

Most important is to verify that the start sector hasn’t changed between deleting the old partition and adding the new one – as long as these are the same and the partition is the same size or larger than the old one, everything will be OK.

Save and apply the changes:

On my RHEL 6 KVM virtio VM, I wasn’t able to get the OS to recognize the new partition size, even after running partprobe, so I had to reboot the VM.

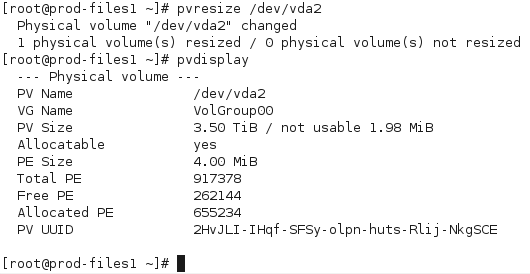
Once rebooted, it was  a simple case of issuing pvresize and pvdisplay to confirm the new physical volume size – from there, I can then expand LVM logical volumes as desired.


Note that pvresize is a bit annoying in that it won’t show any unallocated space – what is means by free PE, is free physical extents, disk that the LVM physical volume already occupies but which isn’t allocated to logical volumes yet. Until you run pvresize, you won’t see any change to the size of the volume.

So far gdisk looks pretty good, I suspect it will become a standard on my own Linux servers, but not being in the base RHEL repositories will limit usage a bit on commercial and client systems, which often have very locked down and limited package sets.

The fact that I need a partition table at all with my virtual machines is a bit of a pain, it would be much nicer if I could just turn the whole /dev/vda drive into a LVM physical volume and then boot the VM from an LVM partition inside the volume.

As things currently stand, it’s necessary to have a non-LVM /boot partition, so I have to create one small conventional partition for boot and a second partition consuming all remaining disk for actual data.

nagios check_disk trap

Let’s play spot the difference:

[root@localhost ~]# /usr/lib64/nagios/plugins/check_disk -w 20 -c 10 -p /home
DISK OK – free space: /home 111715 MB (4% inode=99%);| /home=2498209MB;2609905;2609915;0;2609925

[root@localhost ~]# /usr/lib64/nagios/plugins/check_disk -w 20% -c 10% -p /home
DISK CRITICAL – free space: /home 111715 MB (4% inode=99%);| /home=2498209MB;2087940;2348932;0;2609925

Make sure you that you define your units of disk or add % to your Nagios checks otherwise you might suddenly find yourself running to add more disk….

virt-viewer remote access tricks

Sometimes I need to connect directly to the console of my virtual machines, typically this is usually when working with development or experimental VMs where SSH/RDP/VNC isn’t working for whatever reason, or when I’m installing a new OS entirely.

To view virtual machines using libvirt (by both KVM or Xen), you use the virt-viewer command, this launches a window and establishes a VNC or SPICE connection into the virtual machine.

Historically I’ve just run this by SSHing into the virtual machine host and then using X11 forwarding to display the virtual machine window on my laptop. However this performs really badly on slow connections, particularly 3G where it’s almost unusable due to the design of X11 forwarding not being particularly efficient.

However virt-viewer has the capability to run locally and connect to a remote server, either directly to the libvirt daemon, or via an SSH tunnel. To do the latter, the following command will work for KVM (qemu) based hypervisors:

virt-viewer --connect qemu+ssh://user@host.example.com/system vmnamehere

With the above, you’ll have to enter your SSH password twice – first to establish the connection to the hypervisor and secondly to establish a tunnel to the VM’s VNC/SPICE session – you’ll probably quickly decide to get some SSH keys/certs setup to prevent annoyance. ;-)

This performs way faster than X11 forwarding, plus the UI of virt-manager stays much more responsive, including grabbing/ungrabbing of the local keyboard/mouse, even if the connection or server is lagging badly.

If you’re using Xen with libvirt, the following should work (I haven’t tested this, but based on the man page and some common sense):

virt-viewer --connect xen+ssh://user@host.example.com/ vmnamehere

If you wanted to open up the right ports on your server’s firewall and are sending all traffic via a secure connection (eg VPN), you can drop the +ssh and use –direct to connect directly to the hypervisor and VM without port forwarding via SSH.

How Jethro Geeks – IRL

A number of friends are always quite interested in how my personal IT infrastructure is put together, so I’m going to try and do one post a week ranging from physical environments, desktop, applications, server environments, monitoring and architecture.

Hopefully this is of interest to some readers – I’ll be upfront and advise that not everything is perfect in this setup, like any large environment there’s always ongoing upgrade projects, considering my environment is larger than some small ISPs it’s not surprising that there’s areas of poor design or legacy components, however I’ll try to be honest about these deficiencies and where I’m working to make improvements.

If you have questions or things you’d like to know my solution for, feel free to comment on any of the posts in this series. :-)


Today I’m examining my physical infrastructure, including my workstation and my servers.

After my move to Auckland, it’s changed a lot since last year and is now based around my laptop and gaming desktop primarily.

All the geekery, all the time

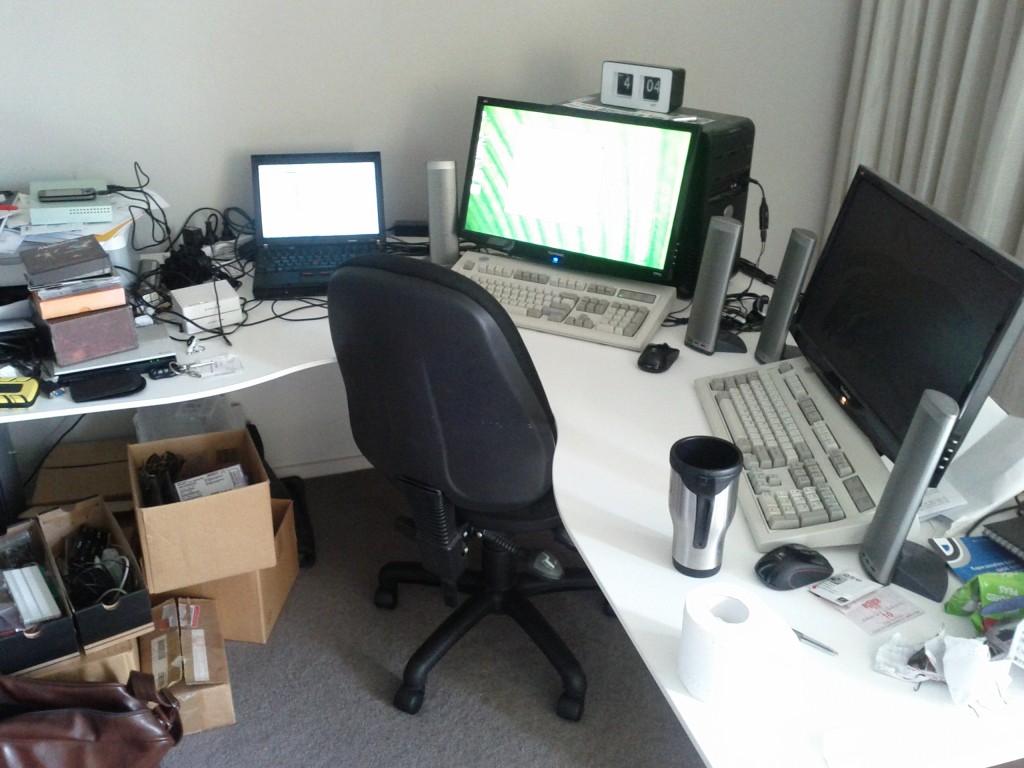
This is probably my most effective setup yet, the table was an excellent investment at about $100 off Trademe, with enough space for 2 workstations plus accessories in a really comfortable and accessible form factor.


My laptop is a Lenovo Thinkpad X201i, with an Intel Core i5 CPU, 8GB RAM, 120GB SSD and a 9-cell battery for long run time. It was running Fedora, but I recently shifted to Debian so I could upskill on the Debian variations some more, particularly around packaging.

I tend to dock it and use the external LCD mostly when at home, but it’s quite comfortable to use directly and I often do when out and about for work – I just find it’s easier to work on projects with the larger keyboard & screen so it usually lives on the dock when I’m coding.

This machine gets utterly hammered, I run this laptop 24×7, typically have to reboot about once every month or so, usually from issues resulting with a system crash from docking or suspend/resume – something I blame the crappy Lenovo BIOS for.


I have an older desktop running Windows XP for gaming, it’s a bit dated now with only a Core 2 Duo and 3GB RAM – kind of due for a replacement, but it still runs the games I want quite acceptably, so there’s been little pressure to replace – plus since I only really use it about once a week, it’s not high on my investment list compared to my laptop and servers.

Naturally, there are the IBM Model M keyboards for both systems, I love these keyboards more than anything (yes Lisa, more than anything <3 ) and I’m really going to be sad when I have to work in an office with other people again whom don’t share my love for loud clicky keyboards.

The desk is a bit messy ATM with several phones and routers lying about for some projects I’ve been working on, I’ll go through stages of extreme OCD tidiness to surrendering to the chaos… fundamentally I just have too much junk to go on it, so trying to downsize the amount of stuff I have. ;-)


Of course this is just my workstations – there’s a whole lot going on in the background with my two physical servers where the real stuff happens.

A couple years back, I had a lab with 2x 42U racks which I really miss. These days I’m running everything on two physical machines running Xen and KVM virtualisation for all services – it was just so expensive and difficult having the racks, I’d consider doing it again if I brought a house, but when renting it’s far better to be as mobile as possible.

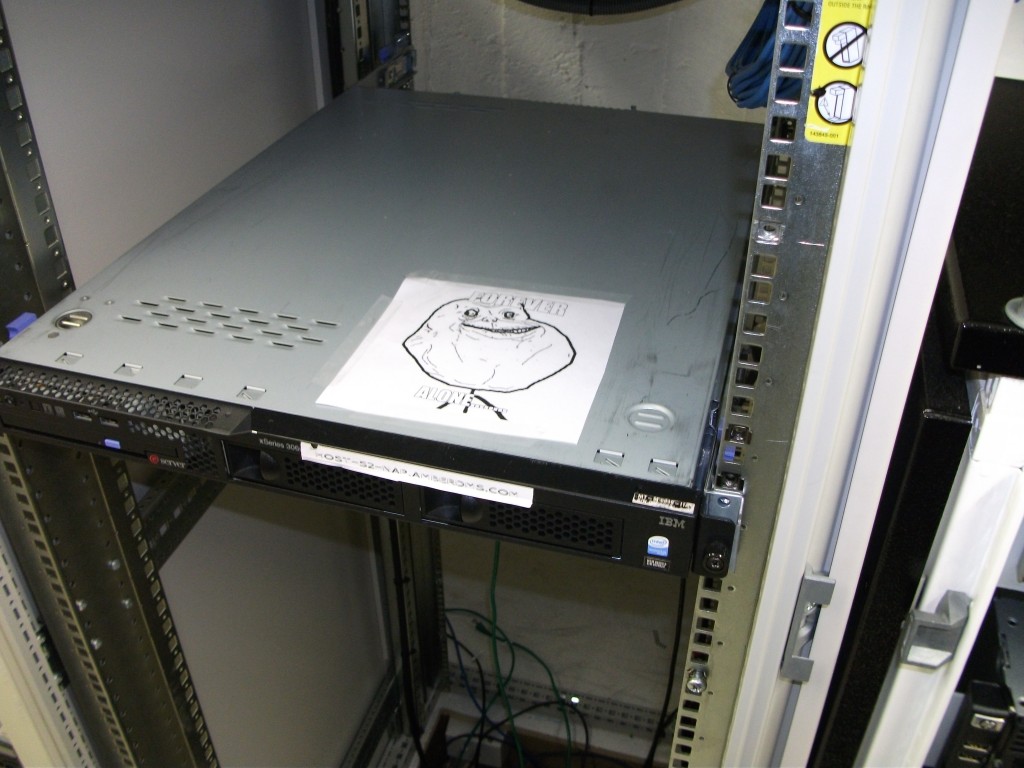
The primary server is my colocation box which runs in a New Zealand data center owned by my current employer:

Forever Alone :'( [thanks to my colleagues for that]

It’s an IBM xseries 306m, with 3.0Ghz P4 CPU, 8GB of RAM and 2x 1TB enterprise grade SATA drives, running CentOS (RHEL clone). It’s not the fastest machine, but it’s more than speedy enough for running all my public-facing production facing services.

It’s a vendor box as it enabled me to have 3 yrs onsite NBD repair support for it, these days I have a complete hardware spare onsite since it’s too old to be supported by IBM any longer.

To provide security isolation and easier management, services are spread across a number of Xen virtual machines based on type and risk of attack, this machine runs around 8 virtual machines performing different publicly facing services including running my mail servers, web servers, VoIP, IM and more.


For anything not public-facing or critical production, there’s my secondary server, which is a “whitebox” custom build running a RHEL/CentOS/JethroHybrid with KVM for virtualisation, running from home.

Whilst I run this server 24×7, it’s not critical for daily life, so I’m able to shut it down for a day or so when moving house or internet providers and not lose my ability to function – having said that, an outage for more than a couple days does get annoying fast….

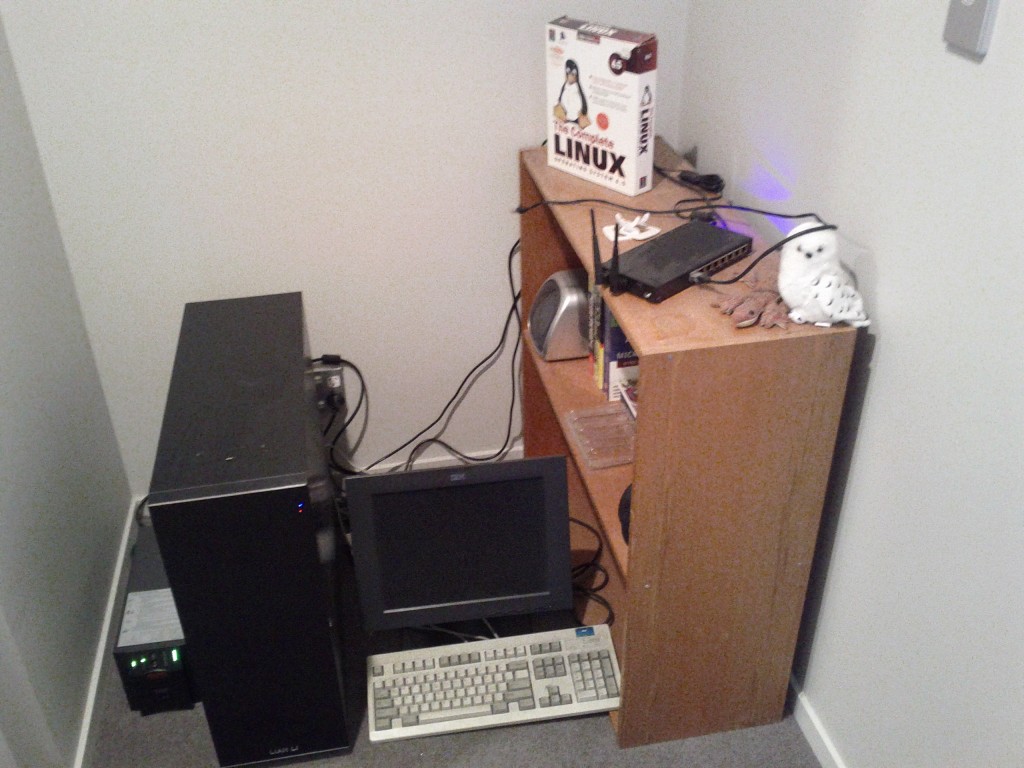
Mmmmmm my beautiful monolith

This attractive black monolith packs a quad core Phenom II CPU, custom cooler, 2x SATA controllers, 16GB RAM, 12x 1TB hard drives in full tower Lian Li case. (slightly out-of-date spec list)

I’m running RHEL with KVM on this server which allows me to run not just my internal production Linux servers, but also other platforms including Windows for development and testing purposes.

It exists to run a number of internal production services, file shares and all my development environment, including virtual Linux and Windows servers, virtual network appliances and other test systems.

These days it’s getting a bit loaded, I’m using about 1 CPU core for RAID and disk encryption and usually 2 cores for the regular VM operation, leaving about 1 core free for load fluctuations. At some point I’ll have to upgrade, in which case I’ll replace the M/B with a new one to take 32GB RAM and a hex-core processor (or maybe octo-core by then?).


To avoid nasty sudden poweroff issues, there’s an APC UPS keeping things running and a cheap LCD and ancient crappy PS/2 keyboard attached as a local console when needed.

It’s a pretty large full tower machine, so I except to be leaving it in NZ when I move overseas for a while as it’s just too hard to ship and try and move around with it – if I end up staying overseas for longer than originally planned, I may need to consider replacing both physical servers with a single colocated rackmount box to drop running costs and to solve the EOL status of the IBM xseries.


The little black box on the bookshelf with antennas is my Mikrotik Routerboard 493G, which provides wifi and wired networking for my flat, with a GigE connection into the server which does all the internet firewalling and routing.

Other than the Mikrotik, I don’t have much in the way of production networking equipment – all my other kit is purely development only and not always connected and a lot of the development kit I now run as VMs anyway.


Hopefully this is of some interest, I’ll aim to do one post a week about my infrastructure in different areas, so add to your RSS reader for future updates. :-)

LDAP & RADIUS centralised authentication

I recently did a presentation at the June AuckLUG meeting on configuring LDAP and RADIUS centralised authentication solutions.

It’s a little rough (first time I’ve done a presentation on the topic), but hopefully is of use to anyone interested in setting up an LDAP server. In my case I’m using an OpenLDAP server with my self-developed open source LDAPAuthManager tool.

You can watch the presentation (about 2 hours) on YouTube, it includes a lot of verbal and visual demonstrations, so conveys a lot more detail than the slides alone.

You can download a copy of the slides here if wanted (pdf).

Lenovo & tp-fan fun

I quite like my Lenovo X201i laptop, I’ve been using it for a couple years now and it’s turned out to be the ideal combination of size and usability – the 12″ form factor means I can carry it around easily enough, it has plenty of performance (particularly since I upgraded it to an SSD and 8GB of RAM) and I can see myself using it for the foreseeable future.

Unfortunately it does have a few issues… the crappy “Thinkpad Wireless” default card that comes in it caused me no end of headaches and the BIOS has always been a

Thankfully most of the major BIOS flaws have been resolved in part due to subsequent updates, but also thanks to the efforts of the Linux kernel developers to work around weird bits of the BIOS’s behavior.

Sadly not all issues have been resolved, in particular, the thermal management is still flawed and fails to adequately handle the maximum heat output of the laptop. I recently discovered that when you’re unfortunate enough to run some very CPU intensive single-threaded processes, by keeping 1/4 cores at 100% for an extended period of time the Lenovo laptop will overheat and issue an emergency thermal shutdown to the OS.

During this time the fan increases in speed, but still has quite a low noise level and airflow volume, which is very hot to the touch, it appears the issue is due to the Lenovo BIOS not ramping the fan speed up high enough to meet the heat being produced.

Thanks to the excellent Thinkwiki site, there’s detailed information on how you can force specific fan speeds using the thinkpad_acpi kernel module, as well as details on various scripts and fan control solutions people have written.

What’s interesting is that when running the fan on level 7 (the maximum speed), the fan still doesn’t spin particularly fast or loudly, no more than when the overheating occurs. But reading the wiki shows that there is a “disengaged” mode, where the fan will run at the true maximum system speed.

It appears to me that the BIOS has the 100% speed setting for the fan set at too low a threshold, the smart fix would be to correct the BIOS so that 100% is actually the true maximum speed of the fan and to scale up slowly to keep the CPU at a reasonable temperature.

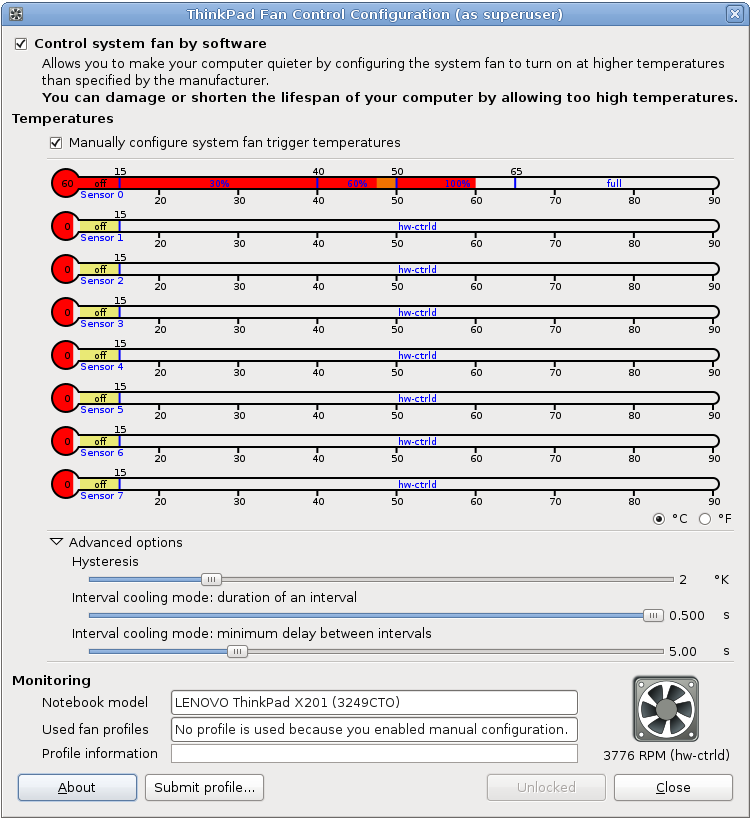
In order to fix it for myself, I obtained the tp-fan program, which runs a python daemon to monitor and adjust the fan speeds in the system based on the configured options. Sadly it’s not able to scale between “100%” and “disengaged” speeds, meaning I have the choice of quiet running or loud running but no middle ground.

Thanks to tpfan’s UI, I was able to tweak the speed positions until I obtained the right balance, the fans will now run at up to 100% for all normal tasks, often sitting just under 50 degrees at 60% fan speed.

When running a highly CPU intensive task, the fan will jump up to the max speed and run at that until the temperature drops sufficiently.  In practice it’s worked pretty well, I don’t get too much jumping up and down of the fan speed and my system hasn’t had any thermal shutdowns since I started using it.

Whilst it’s clearly a fault with the Lenovo BIOS not handling the fans properly, it raised a few other questions for me:

  • Why does the OS lack logic to move CPU intensive tasks between cores? Shuffling high intensive loads between idle cores would reduce the heat and require less active cooling by the system fans – even on a working system that won’t overheat, this would be a good way to reduce power consumption.
  • Why doesn’t the OS have a feature to throttle the CPU clock speed down as the CPU temperature rises? It would be better than having the all or nothing approach that it currently enforces, better to have a slower computer than a fried computer.

Clearly I need some more free time to start writing kernel patches for my laptop, although I fear what new dangerous geeky paths this might lead me into. :-/

cifs, ipv6 and rhel 5

Unfortunately with my recent project enabling IPv6 across my entire personal server environment, I’ve bumped into a number of annoying issues – nothing that isn’t fixable, but things that are generally frustrating and which just shouldn’t be an issue.

Particular thanks goes to my many RHEL/CentOS 5 virtual machines, which lack some pretty key stuff such as:

  • IPv6 connection tracking preventing the ESTABLISHED,RELATED ip6tables rules from working.
  • Unexpected behavior of certain bootscript configuration options.
  • Lack of IPv6 support with CIFS (Samba/SMB) share mounting.
  • Some weirdness with Dovecot I still need to resolve.

(Personally, based on the number of headaches I’ve found with RHEL 5, my recommendation is accelerate any plans to upgrade to RHEL 6 – or some other distribution – before deploying IPv6 in production.)

At the moment, CIFS IPv6 support on RHEL 5 & 6 has been causing me the most pain. My internal file server is dual stacked and has both A and AAAA DNS records – it’s a stock-standard CentOS 6 box running distribution-shipped Samba packages and works perfectly from the server side and modern IPv6 hosts have no issue mounting the shares via IPv6.

Very typical dual stack configuration:

# host fileserver.example.com 
fileserver.example.com has address 192.168.0.10
fileserver.example.com has IPv6 address 2001:0DB8::10

However, when I run the following legitimate and syntactically correct command to mount the CIFS share provided by the Samba server on other RHEL 5 hosts, it breaks with a error message that is typical of incorrect syntax with the mount options:

# mount -t cifs //fileserver.example.com/tmp /mnt/tmpshare -o user=nobody
mount: wrong fs type, bad option, bad superblock on //fileserver.example.com/tmp,
       missing codepage or other error
       In some cases useful info is found in syslog - try
       dmesg | tail  or so

Taking a look a the kernel log, it shows a non-descriptive error explanation:

kernel:  CIFS VFS: cifs_mount failed w/return code = -22

This isn’t particularly helpful, made more infuriating by the fact that I know the command syntax is correct and should be working perfectly fine.

Seeing as a number of things broke after switching on IPv6 across the entire network, I’ve become even more of a cynical bastard and ran some tests using specifically stated IPv6 and IPv4 addresses in the mount command.

I found that by passing the IPv6 address instead of the DNS name, you can produce the additional error message which offers some additional insight:

kernel: CIFS: ip address too long

Huh. Looks like a text book IPv6 support bug to me. (Even I have made this mistake in some older generation web apps that didn’t foresee long 128-bit addresses).

In testing, I found that the following commands are all acceptable on a dual-stack network with a RHEL 5 host:

# mount -t cifs //192.168.0.10/tmp /mnt/tmpshare -o user=nobody
# mount -t cifs //fileserver.example.com/tmp /mnt/tmpshare -o user=nobody,ip=192.168.0.10

However all ways of specifying IPv6 will fail, as well as pure DNS resolution:

# mount -t cifs //2001:0DB8::10/tmp /mnt/tmpshare -o user=nobody
# mount -t cifs //fileserver.example.com/tmp /mnt/tmpshare -o user=nobody,ip=2001:0DB8::10
# mount -t cifs //fileserver.example.com/tmp /mnt/tmpshare -o user=nobody

No method of connecting via IPv6 would work, leaving stock RHEL 5 hosts only being able to work with CIFS shares via IPv4. :-(

Unfortunately this error is due to a known kernel bug in 2.6.18, which was fixed in 2.6.31, but sadly not backported to RHEL 5’s kernel (as of version 2.6.18-308.8.1.el5 anyway), leaving RHEL 5 users in a position where the stock OS is unable to mount CIFS shares on an IPv6 or dual-stacked network. :-(

The ideal solution would be to patch the kernel to resolve the issue – and in fact if you are running on a native IPv6-only (not dual stacked), it would be the only option to get a working solution.

However, typically if you’re using RHEL, custom kernels aren’t that popular due to the impact they make to supportability/guarantee of the platform by vendor and added headaches of security update tracking and application, so another approach is needed.

The following methods will all work for stock RHEL/Centos 5:

  • Use the ip=X mount option to overule DNS.
  • Add an entry to /etc/hosts.
  • Have a separate DNS entry that only has an A record for your file servers (ie //fileserverv4only.example.com/)
  • Disable IPv6 entirely (and suffer the scorn of your cooler IPv6 enabled friends).

These solutions all suck – having manually fixed IPs isn’t great for long term supportability, additional DNS records is an additional pain for management, and let’s not even begin to cover why disabling IPv6 entirely is wrong.

Of course RHEL 5 is a little outdated now, so I took a look at how RHEL 6 fared. On the plus side, it *can* mount IPv6 shares, all of the following mount commands are accepted without fault:

# mount -t cifs //192.168.0.10/tmp /mnt/tmpshare -o user=nobody
# mount -t cifs //2001:0DB8::10/tmp /mnt/tmpshare -o user=nobody
# mount -t cifs //fileserver.example.com/tmp /mnt/tmpshare -o user=nobody,ip=192.168.0.10
# mount -t cifs //fileserver.example.com/tmp /mnt/tmpshare -o user=nobody,ip=2001:0DB8::10

However, any mount of a IPv6 server using the DNS name will still fail, just like how they did with RHEL 5:

# mount -t cifs //fileserver.example.com/tmp /mnt/tmpshare -o user=nobody

The solution is that you need to install the “cifs-utils” package which provides the /sbin/mount.cifs binary offering smarter handling of shares – once installed, all mount command options will work OK on RHEL 6, including the standard DNS-based command we all know and love. :-D

I had always assumed that all Linux systems that could mount CIFS shares had the /sbin/mount.cifs binary installed, but it seems that’s not the case, rather the standard /bin/mount command can handle mounting CIFS using just the standard kernel mount() function

However when /bin/mount detects a /sbin/mount.FILESYSTEM binary, it will call that process instead of calling the kernel mount() directly, these binaries can offer additional logic and handling off the mount command before passing it through to the Linux kernel.

For example, the following strace from a RHEL 5 host shows that /sbin/mount checks for the existence of /sbin/mount.cifs, before then going on to call the Linux kernel mount() directly with the provided arguments:

stat64("/sbin/mount.cifs", 0xbfc9dd20)  = -1 ENOENT (No such file or directory)
...
mount("//fileserver.example.com/tmp", "/mnt", "cifs", MS_MGC_VAL, "user=nobody,password=nobody") = -1 EINVAL (Invalid argument)

But a RHEL 6 host with cifs-utils installed provides /sbin/mount.cifs, which appears to do it’s own name resolution, then establishes a connection to both the IPv4 and IPv6 sockets, before deciding which to use and instructs the kernel using the ip=X parameter.

stat64("/sbin/mount.cifs", {st_mode=S_IFREG|0755, st_size=29376, ...}) = 0
clone(Process 1666 attached
...
[pid  1666] mount("//fileserver.example.com/tmp/", ".", "cifs", 0, "ip=2001:0DB8::10",user=nobody,password=nobody) = 0

So I had an idea….. what if I could easily modify a version of cifs-utils to run on RHEL 5 dual-stack servers, yet only ever resolve DNS queries to IPv4 addresses to work around the kernel issue? :-D

Turns out you can – effectively I just made the nastiest hack ever by just tearing out the IPv6 name resolver. :-/
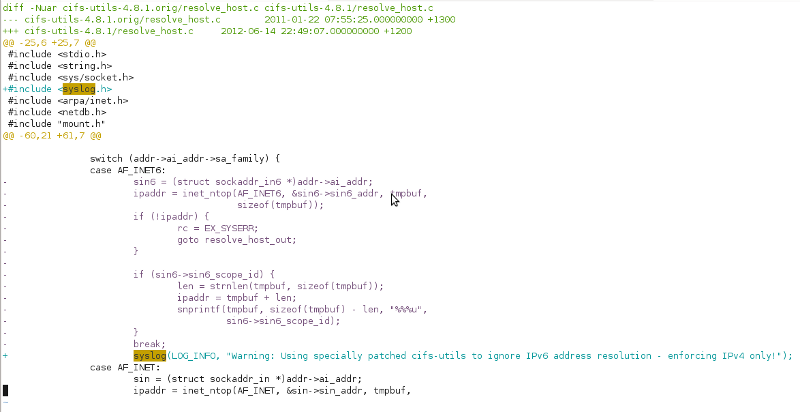
I’m going to hell for this, but damn, feels good man. ;-)

I wasn’t totally evil, I added an info level syslog notice about the IPv4 enforcement incase any poor admin is ever getting puzzled by someone’s customized RHEL 5 box refusing to connect to CIFS shares IPv6 – that would be a bit too cruel. ;-)

The hack is pretty crude, it actually just breaks the IPv6 socket connection attempt and so it then falls back to IPv4, so it throws up a couple errors in the logs, but doesn’t actually impact the mounting at all.

mount.cifs: Warning: Using specially patched cifs-utils to ignore IPv6 address resolution - enforcing IPv4 only!
kernel:  CIFS VFS: Error connecting to socket. Aborting operation
kernel:  CIFS VFS: cifs_mount failed w/return code = -111

But wait, there’s more! I have shiny cifs-util i386/x86_64/SRPM packages with this evil hack available for download from amberdms-os repository (or directly from the server here).

Naturally this is a bit of a kludge, don’t trust it for mission critical stuff, you ONLY need it for RHEL 5, not RHEL 6 and I can’t guarantee it won’t eat all your data and bring upon the end times, etc, etc.

I’ve tested it on my devel systems and it seems like the nicest fix – sure it won’t work for any hosts needing to run on native IPv6, but by the time I come to drop IPv4 addressing entirely I certainly will have moved on my last hosts from RHEL 5 to something a bit newer. :-)
Largefiles strike again!

With modern Linux systems – hell, even systems from 5+ years ago – there’s usually very little issue with handling large files (> 2GB), in fact files considered large a decade ago are now tiny in comparison.

However sometimes poor sysadmins like myself have to support much older machines, in my case, a legacy accounting platform which is tied to the RHEL 2.1 host it was installed on and you suddenly get to re-discover the headaches that plagued sysadmins before us.

In my case, the backup scripts for this application suddenly stopped working recently with the error of:

cpio: standard input is closed: Value too large for defined data type

Turns out that their data had finally crept over the 2GB limit, which left cpio able to write the backup, but unable to read it for verification or restore purposes.

Thankfully cpio does support largefiles, but it’s a case of adding -D_FILE_OFFSET_BITS=64 to the gcc options at build time, so I built which fixes the problem (or at least till we hit the 16GB filesystem limits) ;-)

The version of cpio on the server is ancient, dating back to 2001 (with RHEL 2.1 being first released in 2002), so it’s over a decade old now, and I found it quite difficult to obtain the source for the specific installed version of cpio on the server, Red Hat seemed to be missing the exact release (they have -23 and -28, but not -25) so I pulled the Red Hat 8 source which comes from around the same time period – one of the advantages of having RHN is being able to quickly pull old packages, both binary and source. :-)

If you have this exact issue with a legacy system using cpio, feel free to grab my binary or source package from my repos and save yourself some build time. :-)