Tag Archives: open source

All posts relating to Open Source software, mostly but not exclusively UNIX focused.

Finding & purging Puppet exported resources

Puppet exported resources is a pretty awesome feature – essentially it allows information from one node to be used on another to affect the resulting configuration. We use this for clever things like having nodes tell an Icinga/Nagios server what monitoring configuration should be added for them.

Of course like everything in the Puppet universe, it’s not without some catch – the biggest issue I’ve run into is that if you have a mistake and generate bad exported resources it can be extremely hard to find which node is responsible and take action.

For example, recently my Puppet runs started failing on the monitoring server with the following error:

Error: Could not retrieve catalog from remote server: Error 400 on SERVER: A duplicate resource was found while collecting exported resources, with the type and title Icinga2::Object::Service[Durp Service Health Check] on node failpet1.nagios.example.com

The error is my fault, I forgot that exported resources must have globally unique names across the entire fleet, so I ended up with 2x “Durp Service Health Check” resources.

The problem is that it’s a big fleet and I’m not sure which of the many durp hosts is responsible. To make it more difficult, I suspect they’ve been deleted which is why the duplication clash isn’t clearing by itself after I fixed it.

Thankfully we can use the Puppet DB command line tools on the Puppet master to search the DB for the specific resource and find which hosts it is:

# puppet query nodes \
--puppetdb_host puppetdb.infrastructure.example.com \
"(@@Icinga2::Object::Service['Durp Service Health Check'])"

durphost1312.example.com
durphost3436.example.com

I can then purge all their data with:

# puppet node deactivate durphost1312.example.com
Submitted 'deactivate node' for durphost1312.example.com with UUID xxx-xxx-xxx-xx

In theory deleted hosts shouldn’t have old data in PuppetDB, but hey, sometimes our decommissioning tool has bugs… :-/

Puppet modules

I’m in the middle of doing a migration of my personal server infrastructure from a 2006-era colocation server onto modern cloud hosting providers.

As part of this migration, I’m rebuilding everything properly using Puppet (use it heavily at work so it’s a good fit here) with the intention of being able to complete server builds without requiring any manual effort.

Along the way I’m finding gaps where the available modules don’t quite cut it or nobody seems to have done it before, so I’ve been writing a few modules and putting them up on GitHub for others to benefit/suffer from.


puppet-hostname

https://github.com/jethrocarr/puppet-hostname

Trying to do anything consistently with host naming is always fun, since every organisation or individual has their own special naming scheme and approach to dealing with the issue of naming things.

I decided to take a different approach. Essentially every cloud provider will give you a source of information that could be used to name your instance whether it’s the AWS Instance ID, or a VPS provider passing through the name you gave the machine at creation. Given I want to treat my instances like cattle, an automatic soulless generated name is perfect!

Where they fall down, is that they don’t tend to setup the FQDN properly. I’ve seen a number of solution to this including user data setup scripts, but I’m trying to avoid putting anything in user data that isn’t 100% critical and sticking to my Pupistry bootstrap so I wanted to set my FQDN via Puppet itself.

(It’s even possible to set the hostname itself if desired, you can use logic such as tags or other values passed in as facts to define what role a machine has and then generate/set a hostname entirely within Puppet).

Hence puppet-hostname provides a handy way to easily set FQDN (optionally including the hostname itself) and then trigger reloads on name-dependent services such as syslog.

None of this is revolutionary, but it’s nice getting it into a proper structure instead of relying on yet-another-bunch-of-userdata that’s specific to my systems. The next step is to look into having it execute functions to do DNS changes on providers like Route53 so there’s no longer any need for user data scripts being run to set DNS records at startup.


puppet-rirs

https://github.com/jethrocarr/puppet-rirs

There are various parts of my website that I want to be publicly reachable, such as the WordPress login/admin sections, but at the same time I also don’t want them accessible by any muppet with a bot to try and break their way in.

I could put up a portal of some kind, but this then breaks stuff like apps that want to talk with those endpoints since they can’t handle the authentication steps. What I can do, is setup a GeoIP rule that restricts access to the sections to the countries I’m actually in, which is generally just NZ or AU, to dramatically reduce the amount of noise and attempts people send my way, especially given most of the attacks come from more questionable countries or service providers.

I started doing this with mod_geoip2, but it’s honestly a buggy POS and it really doesn’t work properly if you have both IPv4 and IPv6 connections (one or another is OK). Plus it doesn’t help me for applications that support IP ACLs, but don’t offer a specific GeoIP plugin.

So instead of using GeoIP, I’ve written a custom Puppet function that pulls down the IP assignment lists from the various Regional Internet Registries and generate IP/CIDR lists for both IPv4 and IPv6 on a per-country basis.

I then use those lists to populate configurations like Apache, but it’s also quite possible to use it for other purposes such as iptables firewalling since the generated lists can be turned into Puppet resources. To keep performance sane, I cache the processed output for 24 hours and merge any continuous assignment blocks.

Basically, it’s GeoIP for Puppet with support for anything Puppet can configure. :-)


puppet-digitalocean

https://github.com/jethrocarr/puppet-digitalocean

Provides a fact which exposes details from the Digital Ocean instance API about the instance – similar to how you get values automatically about Amazon EC2 systems.


puppet-initfact

https://github.com/jethrocarr/puppet-initfact

The great thing about the open source world is how we can never agree so we end up with a proliferation of tools doing the same job. Even init systems are not immune, with anything tha intends to run on the major Linux distributions needing to support systemd, Upstart and SysVinit at least for the next few years.

Unfortunately the way that I see most Puppet module authors “deal” with this is that they simply write an init config/file that suits their distribution of choice and conveniently forget the other distributions. The number of times I’ve come across Puppet modules that claim support for Red Hat and Amazon Linux but only ship an Upstart file…. >:-(

Part of the issue is that it’s a pain to even figure out what distribution should be using what type of init configuration. So to solve this, I’ve written a custom Fact called “initsystem” which exposes the primary/best init system on the specific system it’s running on.

It operates in two modes – there is a curated list for specific known systems and then fallback to automatic detection where we don’t have a specific curated result handy.

It supports (or should) all major Linux distributions & derivatives plus FreeBSD and MacOS. Pull requests for others welcome, could do with more BSD support plus maybe even support for Windows if you’re feeling brave.


puppet-yas3fs

https://github.com/pcfens/puppet-yas3fs/commit/27af462f1ce2fe0610012a508236062e65017b5f

Not my module, but I recently submitted a PR to it (subsequently merged) which introduces support for a number of different distributions via use of my initfact module so it should now run on most distributions rather than just Ubuntu.

If you’re not familiar with yas3fs, it’s a FUSE driver that turns S3+SNS+SQS into a shared filesystem between multiple servers. Ideal for dealing with legacy applications that demand state on disk, but don’t require high I/O performance, I’m in the process of doing a proof-of-concept with it and it looks like it should work OK for low activity sites such as WordPress, although with no locking I’d advise against putting MySQL on it anytime soon :-)


These modules can all be found on GitHub, as well as the Puppet Forge. Hopefully someone other than myself finds them useful. :-)

Baking images with Packer & Pupistry

One of the common issues when building modern infrastructure-as-code style systems is that whilst automation is great, it also has a habit of failing at the worst possible time. There’s nothing quite like the fun of trying to autoscale only to find that a newer version of a package breaks compatibility or the repository mirror or Puppet master has gone offline breaking the whole carefully tuned process.

Naturally this is an issue. And whilst I’ve seen some organisations simply ignore the issue and place trust in their repos and configuration management servers, I’m also too pessimistic about technology to trust numerous components for any mission critical applications.

Fortunately there is a solution – we can bake a machine image that has all the applications and configuration pre-applied, so that autoscaling has no third party dependencies (or as close to no dependencies as we can get).

Baking has negative connotations of the bad old days when engineers would assemble custom machine images by hand and then copy them to build new systems, but it doesn’t have to be that way. We can still respect infrastructure-as-code principals and use modern tools like Puppet and Packer to reliably build consistent images as needed.

These images could be as simple as a base AMI image for Amazon AWS which includes the stock OS image plus your Puppet setup. Or they could be as complex as a fully configured and provisioned application server ready-to-go at the first boot.

To make baking images easier, I’ve added support for generating Packer templates pre-loaded with bootstrap data into Pupistry, making it quick and easy to get started. Here’s how you can use it:

Assumptions/prerequisites:

  • You’ve already got Pupistry setup and functional (No? Read the tutorial here)
  • You’ve installed the third party Packer utility.
  • You have an Amazon AWS account for doing the AMI build. Note that Packer isn’t exclusive to Amazon, so you can also use the same technique with other providers including Digital Ocean and OpenStack – but you’ll have to write your own template.

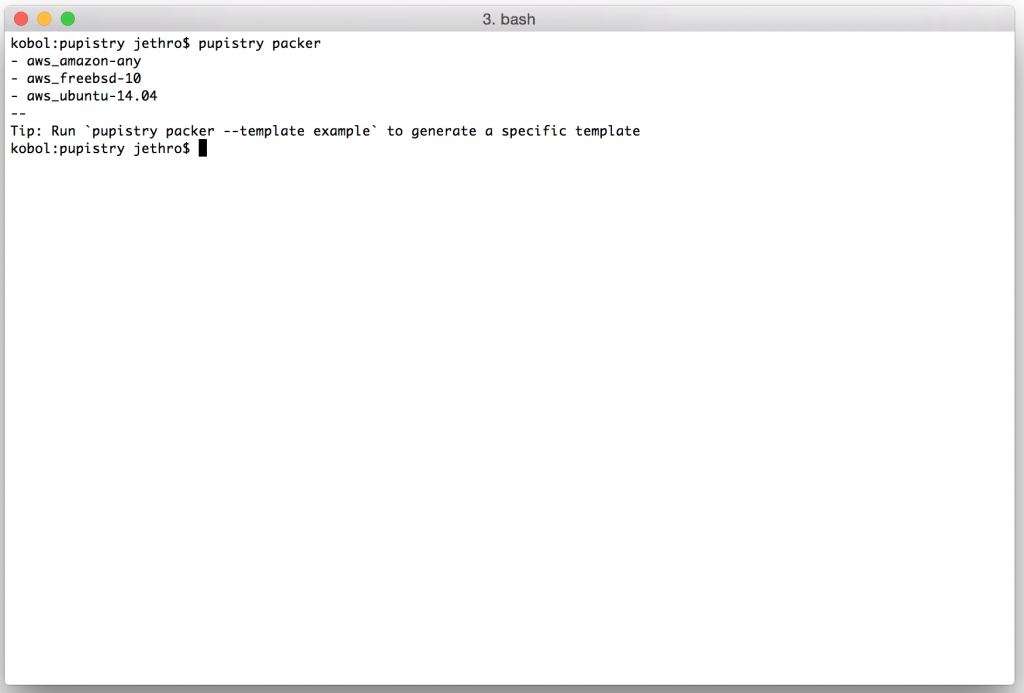
First we can list what Packer templates are available with Pupistry. If the OS/platform of your choice isn’t included, it’s not particularly hard to add it – these are mostly intended to provide a good starting point for customising your own.

pupistry packer

Screen Shot 2015-05-31 at 23.57.20

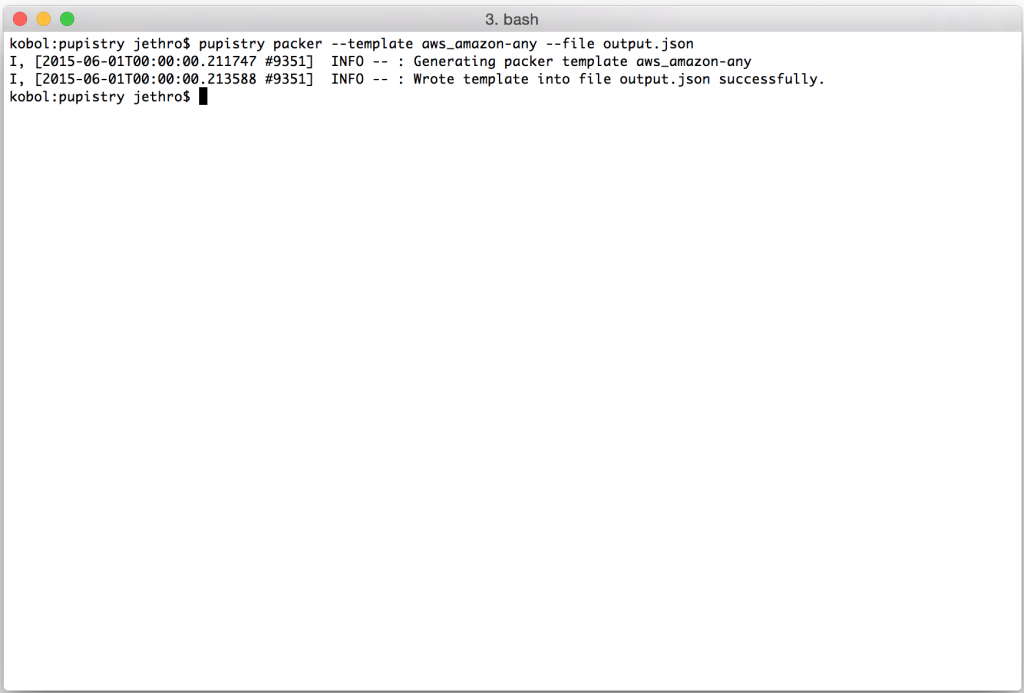
We can select a template with –template NAME and also pass the resulting output to a file with –file NAME.  The following will build an Amazon Linux template pre-loaded with Pupistry and the default manifest applied:

pupistry packer --template aws_amazon-any --file output.json

Screen Shot 2015-06-01 at 00.00.01

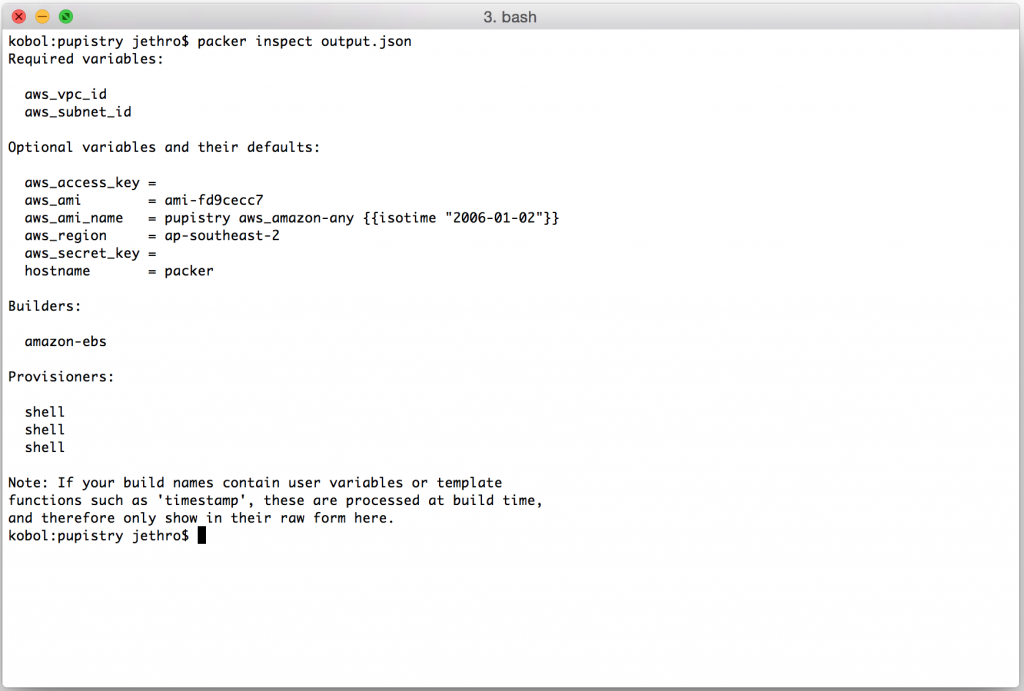
The generated template is a JSON file that includes various instructions to Packer on how to build the image, as well as the bootstrap data that can also be generated independently with pupistry bootstrap. Various variables can be tweaked, we can export out the variables available and see their default settings with:

packer inspect output.json

Screen Shot 2015-06-01 at 00.02.00

You can see here that we must set a VPC ID and Subnet ID – this is because they differ per AWS account and need to be provided. (Side note: technically you can do EC2 classic with Packer and avoid this, but the VPC instance types like t2 are cheaper to run… and we like cheap :-).

The AWS Region and AWS AMI values are interlinked. If you choose to build for a different region, eg us-west-1, you will need to lookup the appropriate AMI ID for that region and change both the aws_ami and aws_region variables when you bake your image. For some reason Amazon chose to make their AMI IDs specific to a particular region which really does make life a bit more difficult than it really needs to be. :-(

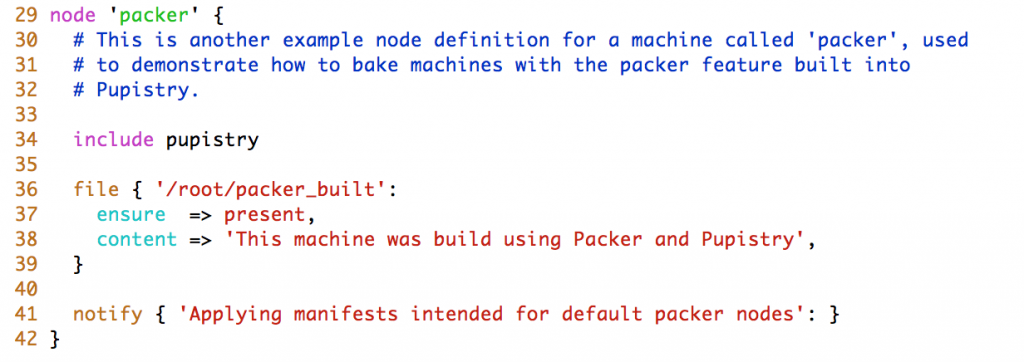
The hostname is worth noting. By default we set it to “packer” so you can target your manifests to handle it specifically, but you could make this anything you wanted such as a particular machine or application type. When using the sample puppet repo that ships by default with Pupistry, we have defined specific configuration to run on the Packer built images:

Screen Shot 2015-06-01 at 00.09.08

Assuming we are happy with the defaults, we just have to set the VPC and Subnet IDs to launch the current image in ap-southeast-2.

packer build \
 -var 'aws_vpc_id=vpc-example' \
 -var 'aws_subnet_id=subnet-example' \
 output.json

As soon as we kick off, we can see that Packer has built a machine in our AWS account to use for the image generation process.

Screen Shot 2015-06-01 at 00.13.53


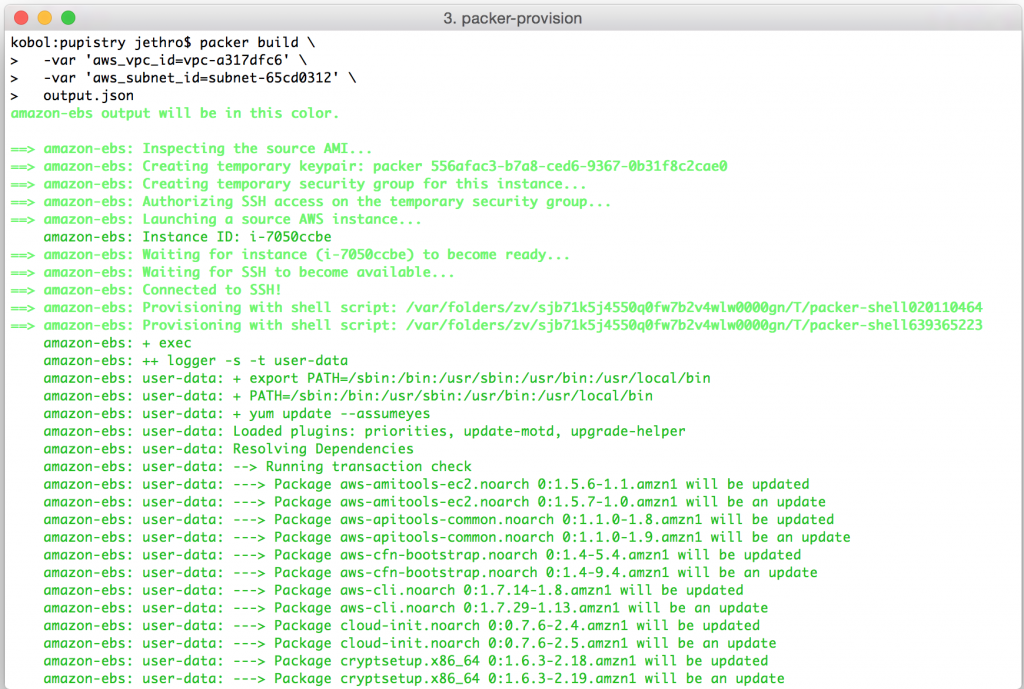
It can take up to a minute for the machine to become available via SSH. Once this happens, Packer opens a connection and starts to feed in the bootstrap commands that have been added into the template by Pupistry.

Screen Shot 2015-06-01 at 00.14.23

This process can take a number of minutes – remember you’re having to install all the various OS updates and then packages and dependencies needed to run Puppet and of course Pupistry itself.

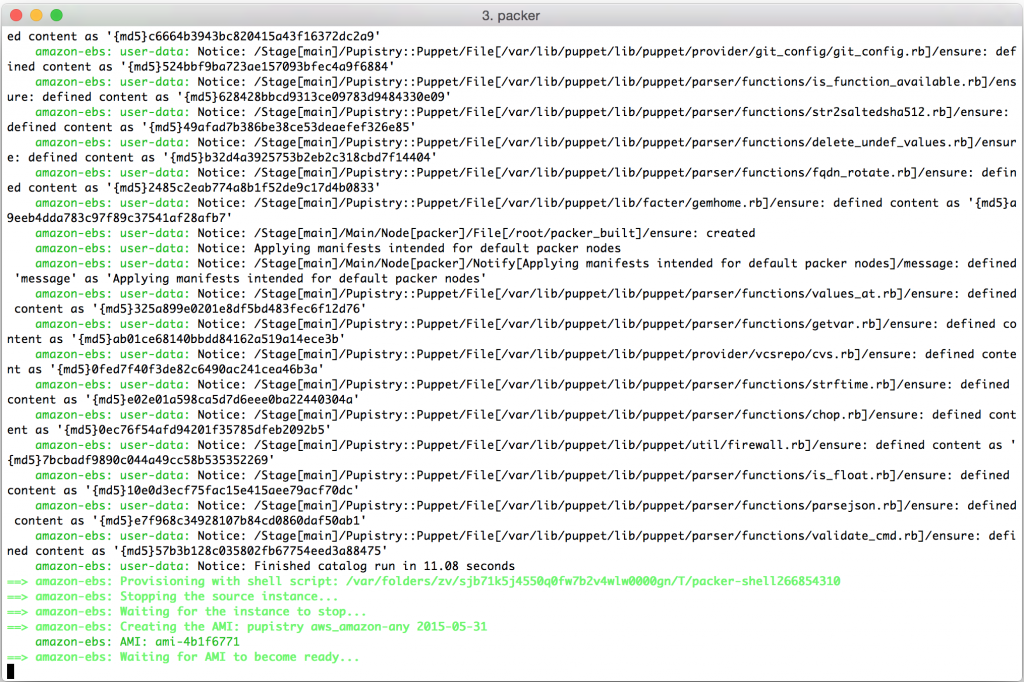
Once all the dependencies are done, Pupistry will run and provision the machine with your Puppet manifests and then return the ID of the AMI that has been generated:

Screen Shot 2015-06-01 at 00.31.57


We can see that Packer has now terminated our temporary machine:

Screen Shot 2015-06-01 at 00.22.28

And given us a shiny new AMI in return:

Screen Shot 2015-06-01 at 00.34.14


We can now use that AMI to launch a new machine and check out what Pupistry did. For convenience, there is a launch button on the AMI page that will build a new machine for the selected AMI, however you can also take the AMI ID and use it in CloudFormation, from the API or from the usual instance creation screen.

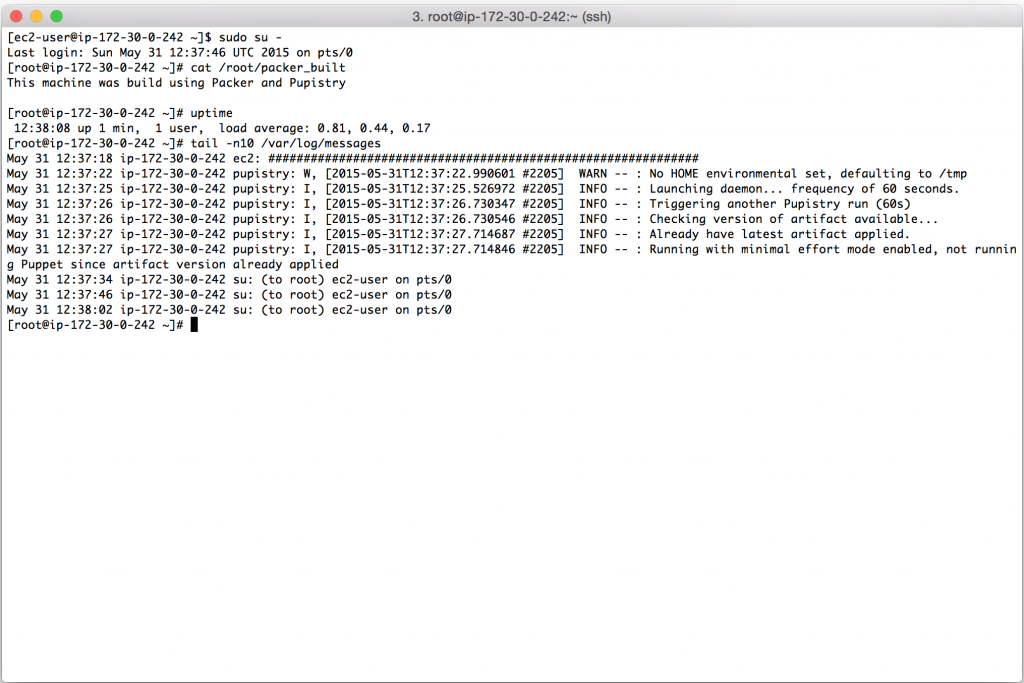
Connecting to the newly spun up instance using our fresh AMI, we can see that it has had the Pupistry rules for the packer node applied and we can also set that the daemon is configured and running in the background.

Except that it took less than 1 minute, rather than needing 5+ minutes to do all the usual updates and dependency installation. And there was no risk of a broken repository or package preventing the launch of our machine. If it was an application server, we could have preloaded it and thrown it right into an ELB within 1 minute after it starting up – that’s ideal for autoscaling!

Screen Shot 2015-06-01 at 00.38.28

Packer supports a number of different options and different providers, so don’t be afraid to pull it down and experiment. You can even write your own custom providers if needed.

Sure you could always just write a script that does all the same things as Packer for your cloud provider of choice, but Packer provides a solid framework for doing this stuff in a reliable and reproducible way saving you time and keeping complexity down.

Setting up and using Pupistry

As mentioned in my previous post, I’ve been working on an application called Pupistry to help make masterless Puppet deployments a lot easier.

If you’re new to Pupistry, AWS, Git and Puppet, I’ve put together this short walk through on how to set up the S3 bucket (and IAM users), the Pupistry application, the Git repo for your Puppet code and building your first server using Pupistry’s bootstrap feature.

If you’re already an established power user of AWS, Git and Puppet, this might still be useful to flick through to see how Pupistry fits into the ecosystem, but a lot of this will be standard stuff for you. More technical details can be found on the application README.

Note that this guide is for Linux or MacOS users. I have no idea how you do this stuff on a Windows machine that lacks a standard unix shell.


1. Installation

Firstly we  need to install Pupistry on your computer. As a Ruby application, Pupistry is packaged as a handy Ruby gem and can be installed in the usual fashion.

sudo gem install pupistry
pupistry setup

01-installThe gem installs the application and any dependencies. We run `pupistry setup` in order to generate a template configuration file, but we will still need to edit it with specific settings. We’ll come back to that.

You’ll also need Puppet available on your computer to build the Pupistry artifacts. Install via the OS package manager, or with:

sudo gem install puppet


2. Setting up AWS S3 bucket & IAM accounts

We need to use an S3 bucket and IAM accounts with Pupistry. The S3 bucket is essentially a cloud-based object store/file server and the IAM accounts are logins that have tight permissions controls.

It’s a common mistake for new AWS users to use the root IAM account details for everything they do, but given that the IAM details will be present on all your servers, you probably want to have specialised accounts purely for Pupistry.

Firstly, make sure you have a functional installation of  the AWS CLI (the modern python one, not the outdated Java one). Amazon have detailed documentation on how to set it up for various platforms, refer to that for information.

Now you need to create:

  1. An S3 bucket. S3 buckets are like domain names -they have a global namespace across *all* AWS accounts. That means someone might already have a bucket name that you want to use, so you’ll need to choose something unique… and hope.
  2. An IAM account for read-only access which will be used by the servers running Pupistry.
  3. An IAM account for read-write access for your workstation to make changes.

To save you doing this all manually, Pupistry includes a CloudFormation template, which is basically a defined set of instructions for AWS to execute to build infrastructure, in our case, it will do all the above steps for you. :-)

Because of the need for a globally unique name, please replace “unique” with something unique to you.

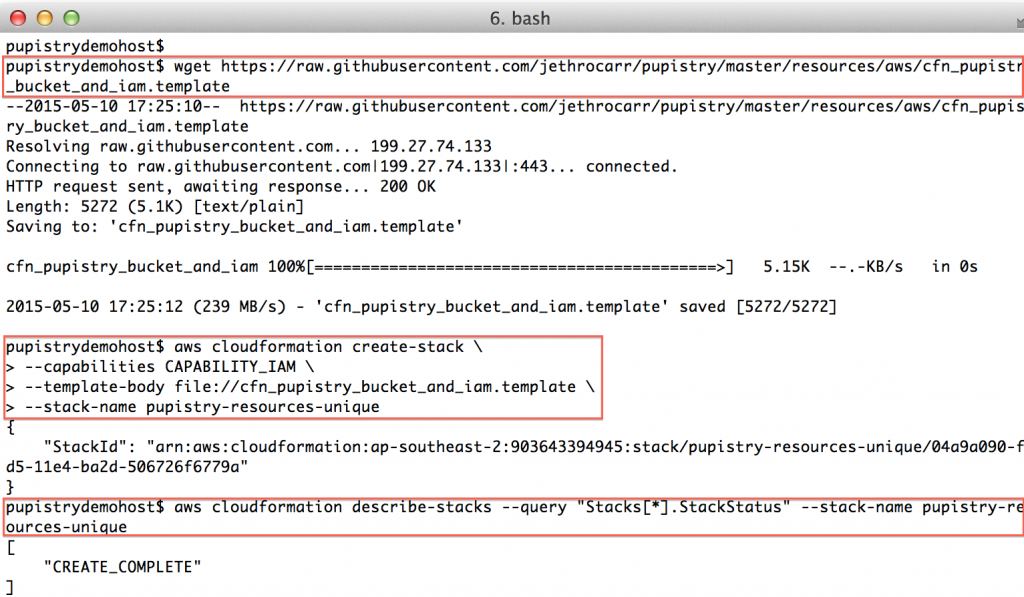
wget https://raw.githubusercontent.com/jethrocarr/pupistry/master/resources/aws/cfn_pupistry_bucket_and_iam.template

aws cloudformation create-stack \
--capabilities CAPABILITY_IAM \
--template-body file://cfn_pupistry_bucket_and_iam.template \
--stack-name pupistry-resources-unique

Once the create-stack command is issued, you can poll the status of the stack, you need it to be in “CREATE_COMPLETE” state before you can continue.

aws cloudformation describe-stacks --query "Stacks[*].StackStatus" --stack-name pupistry-resources-unique
02-s3-setup-init


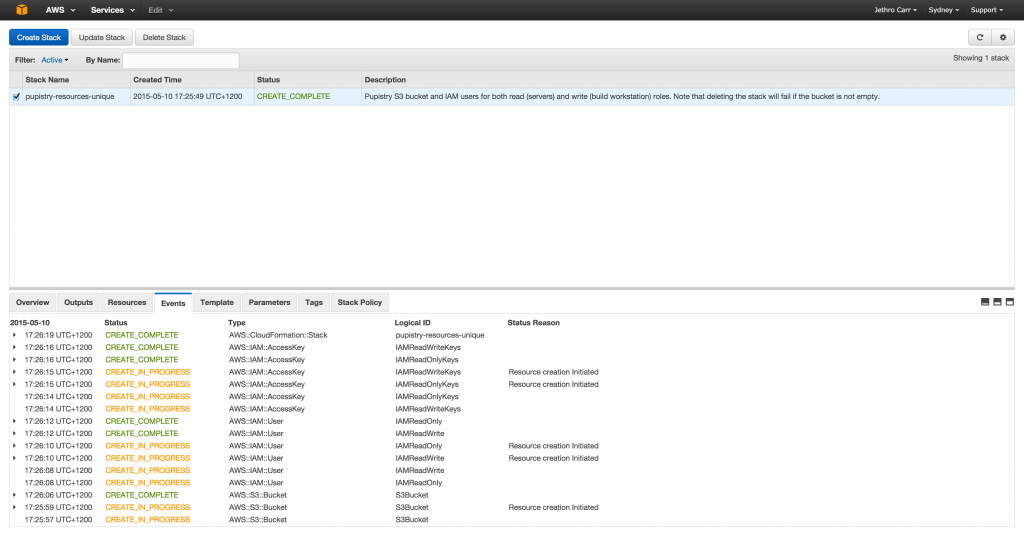
If something goes wrong and your stack status is an error eg “ROLLBACK”, the most likely cause is that you chose a non-unique bucket name. If you want easy debugging, login to the AWS web console and look at the event details of your stack. Once you determine and address the problem, you’ll need to delete & re-create the stack again.
04-s3-aws-cfn-gui

AWS’s web UI can make debugging CFN a bit easier to read than the CLI tools thanks to colour coding and it not all being in horrible JSON.


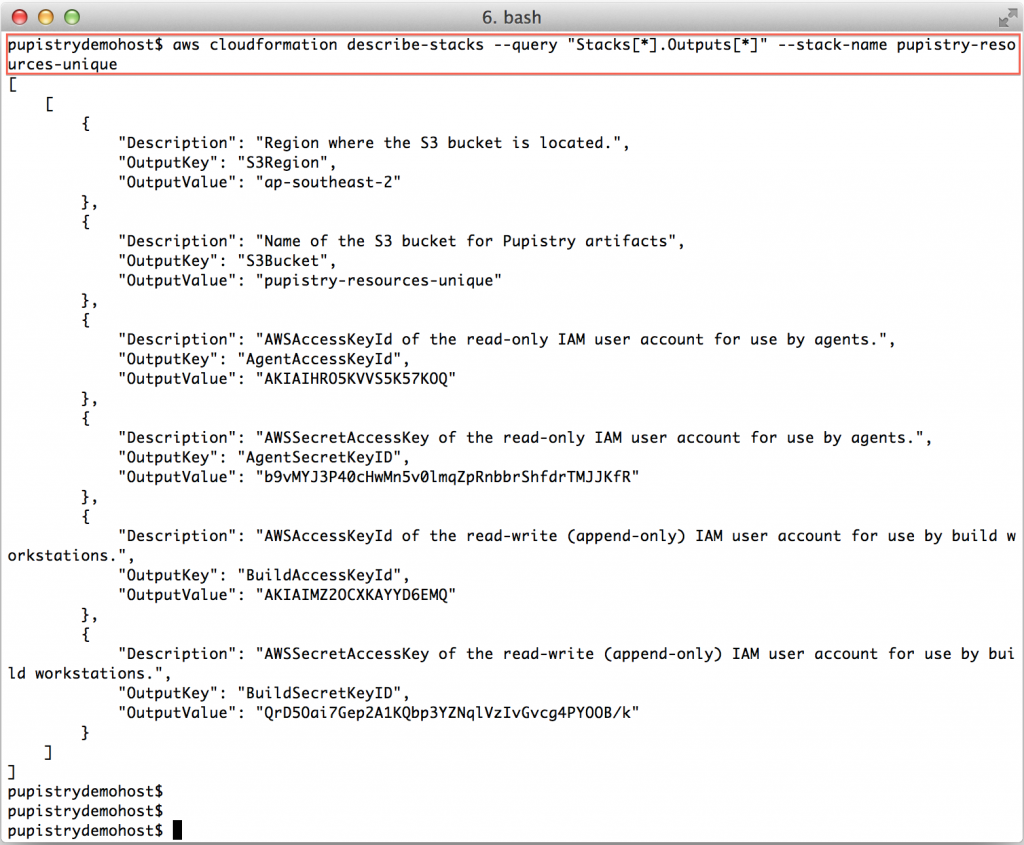
Once you have a CREATE_COMPLETE stack, you can then get the stack outputs, which tell you what has been built. These outputs we then pretty much copy & paste into pupistry’s configuration file.

aws cloudformation describe-stacks --query "Stacks[*].Outputs[*]" --stack-name pupistry-resources-unique
03-s3-setup-explain

Incase you’re wondering – yes, I have changed the above keys & secrets since doing this demo!! Never share your access and secret keys and it’s best to avoid committing them to any repo, even if private.

Save the output, you’ll need the details shortly when we configure Pupistry.


3. Setup your Puppetcode git repository

Optional: You can skip this step if you simply want to try Pupistry using the sample repo, but you’ll have to come back and do this step if you want to make changes to the example manifests.

We use the r10k workflow with Pupistry, which means you’ll need at least one Git repository called the Control Repo.

You’ll probably end up adding many more Git repositories as you grow your Puppet manifests, more information about how the r10rk workflow functions can be found here.

To make life easy, there is a sample repo to go with Pupistry that is a ready-to-go Control Repo for r10k, complete with Puppetfile defining what additional modules to pull in, a manifests/site.pp defining a basic example system and base Hiera configuration.

You can use any Git service, however for this walkthrough, we’ll use Bitbucket since it’s free to setup any number of private repos as their pricing model is on the number of people in a team and is free for under 5 people.

Github’s model of charging per-repo makes the r10k puppet workflow prohibitively expensive, since we need heaps of tiny repos, rather than a few large repos. Which is a shame, since Github has some nice features.

Head to https://bitbucket.org/ and create an account if you don’t already have one. We can use their handy import feature to make a copy of the sample public repo.

Select “Create Repository” and then click the “Import” in the top right corner of the window.

05-bitbucket-create

Now you just need to select “GitHub” as a source with the URL of https://github.com/jethrocarr/pupistry-samplepuppet.git and select a name for your new repo:
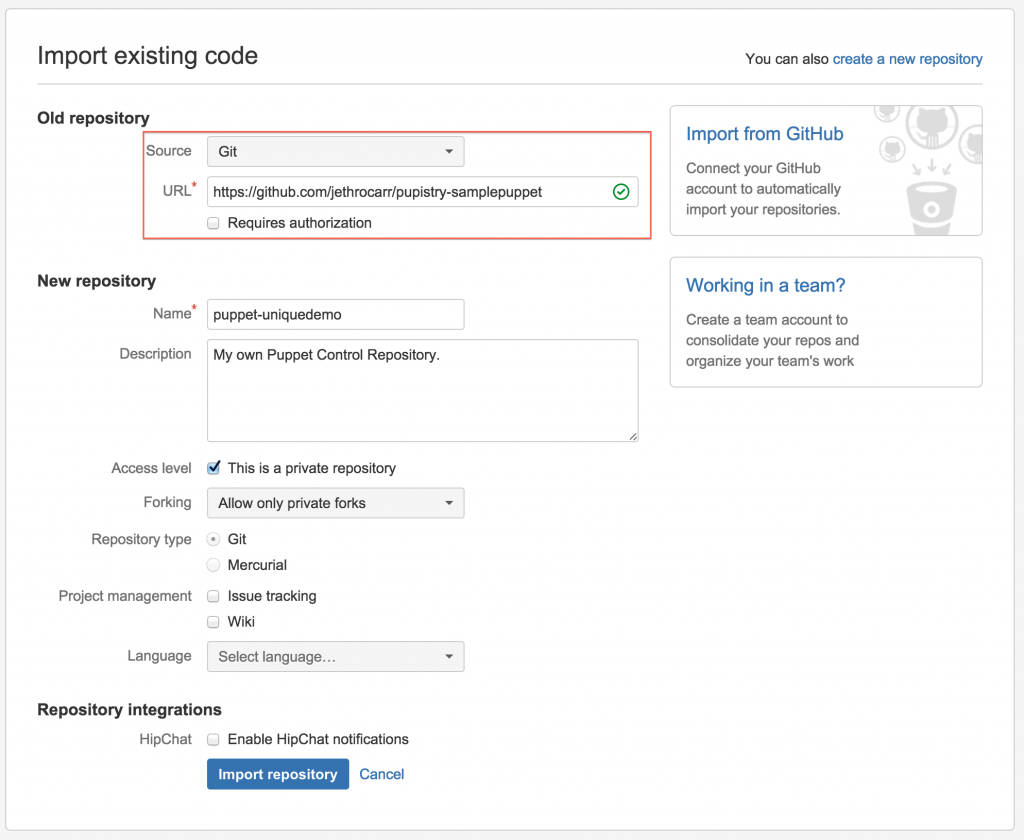
06-bitbucket-import

Once the import completes, it will look a bit like this:

07-bitbucket-done

The only computers that need to be able to access this repository is your workstation. The servers themselves never use any of the Git repos, since Pupistry packages up everything it needs into the artifact files.

Finally, if you’re new to Bitbucket, you probably want to import their key into your known hosts file, so Pupistry doesn’t throw errors trying to check out the repo:

ssh-keyscan bitbucket.org >> ~/.ssh/known_hosts


4. Configuring Pupistry

At this point we have the AWS S3 bucket, IAM accounts and the Git repo for our control repo in Bitbucket. We can now write the Pupistry configuration file and get started with the tool!

Open ~/.pupistry/settings.yaml with your preferred text editor:

vim ~/.pupistry/settings.yaml

09-config-edit

There are three main sections to configure in the file:

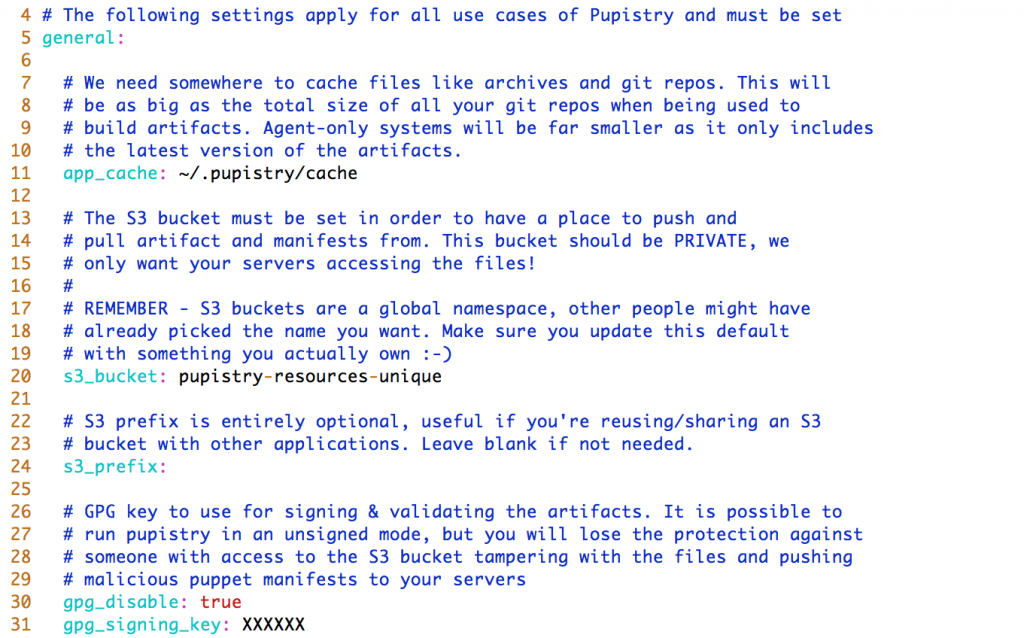
  1. General – We need to define the S3 bucket here. (For our walk though, we are leaving GPG signing disabled, it’s not mandatory and GPG is beyond the scope for this walkthrough):10-config-general
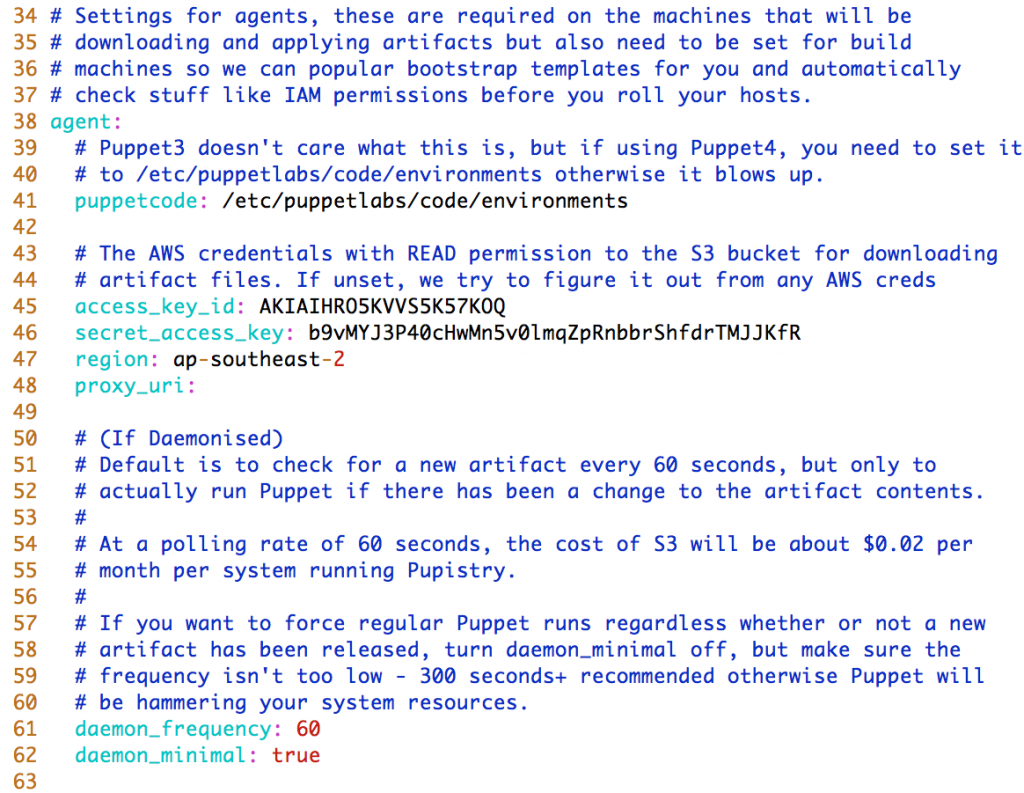
  2. Agent – These settings impact the servers that will be running Pupistry, but you need to set them on your workstation since Pupistry will test them for you and pre-seed the bootstrap data with the settings:11-config-agent
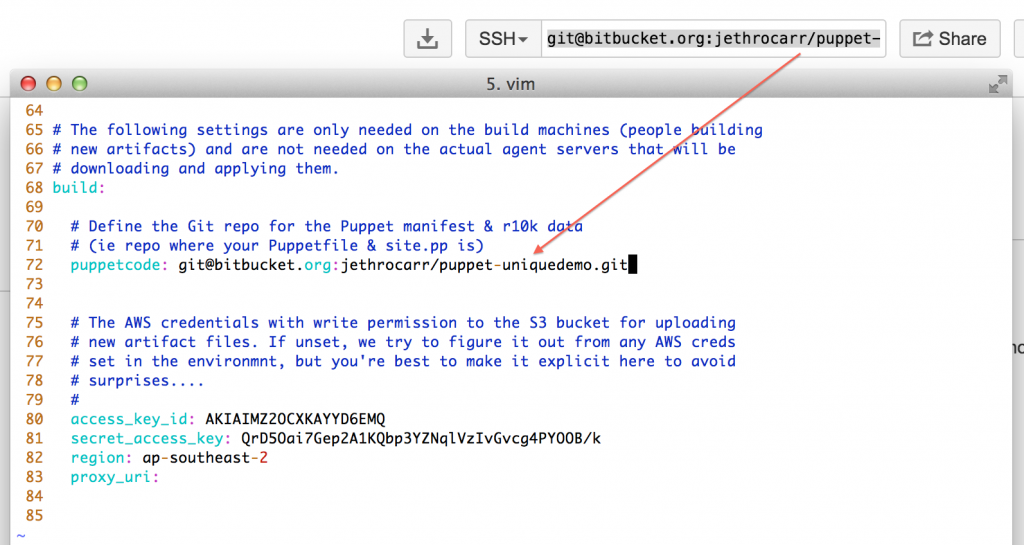
  3. Build – The settings that are used on your workstation to generate artifacts. If you create your own repository in Bitbucket, you need to change the puppetcode variable to the location of your data. If you skipped that step, just leave it on the default sample repo for testing purposes.12-config-use-bitbucket

Make sure you set BOTH the agent and the build section access_key_id and secret_access_key using the output from the CloudFormation build in step 2.


5. Building an artifact with Pupistry

Now we have our AWS resources, our control repository and our configuration – we can finally use Pupistry and build some servers!

pupistry build
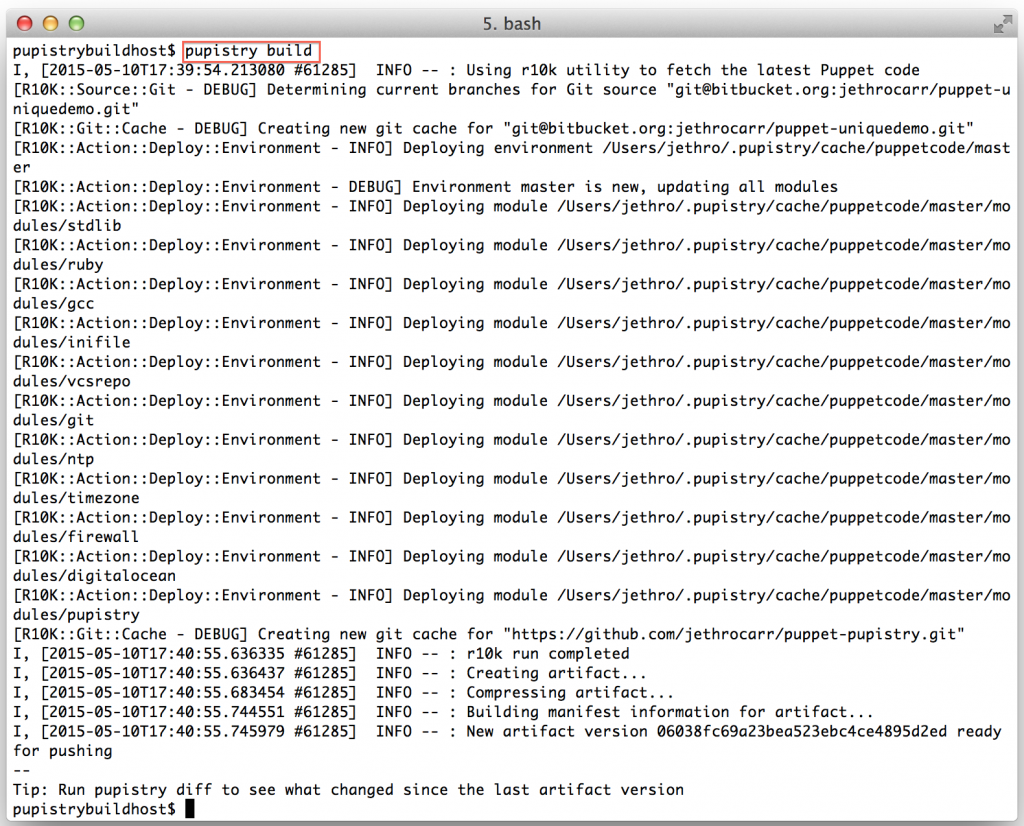
13-pupistry-build

Since this our first artifact, there won’t be much use to running diff, however as part of diff Pupistry will verify your agent AWS credentials are correct, so it’s worth doing.

pupistry diff

14-pupistry-diff

We can now push our newly built artifact to S3 with:

pupistry push

15-pupistry-push

In regards to the GPG warning – Pupistry interacts with AWS via secure transport and the S3 bucket can only be accessed via authorised accounts, however the weakness is that if someone does manage to break into your account (because you stuck your AWS IAM credentials all over a blog post like a muppet), an attacker could replace the artifacts with malicious ones and exploit your servers.

If you do enable GPG, this becomes impossible, since only signed artifacts will be downloaded and executed by your servers – an invalid artifact will be refused. So it’s a good added security benefit and doesn’t require any special setup other than getting GPG onto your workstation and setting the ID of the private key in the Pupistry configuration file.

We’ve now got a valid artifact. The next step is building our first server with Pupistry!


6. Building a server with Pupistry

Because having to install Pupistry and configure it on every server you ever want to build wouldn’t be a lot of fun manually, Pupistry automates this for you and can generate bootstrap scripts for most popular platforms.

These scripts can be run as part of user data on most cloud providers including AWS and Digital Ocean, as well as cut & paste into the root shell of any running server, whether physical, virtual or cloud-based.

The bootstrap process works by:

  1. Using the default OS tools to download and install Pupistry
  2. Write Pupistry’s configuration file and optionally install the GPG public key to verify against.
  3. Runs Pupistry.
  4. Pupistry then pulls down the latest artifact and executes the Puppetcode.
  5. In the case of the sample repo, the Puppetcode includes the puppet-pupistry module. This modules does some clever stuff like setting up a pluginsync equalivent for master-less Puppet and installs a system service for the Pupistry daemon to keep it running in the background – just like the normal Puppet agent! This companion module is strongly recommended for all users.

You can get a list of supported platforms for bootstrap mode with:

pupistry bootstrap

Once you decide which one you’d like to install, you can do:

pupistry bootstrap --template NAME
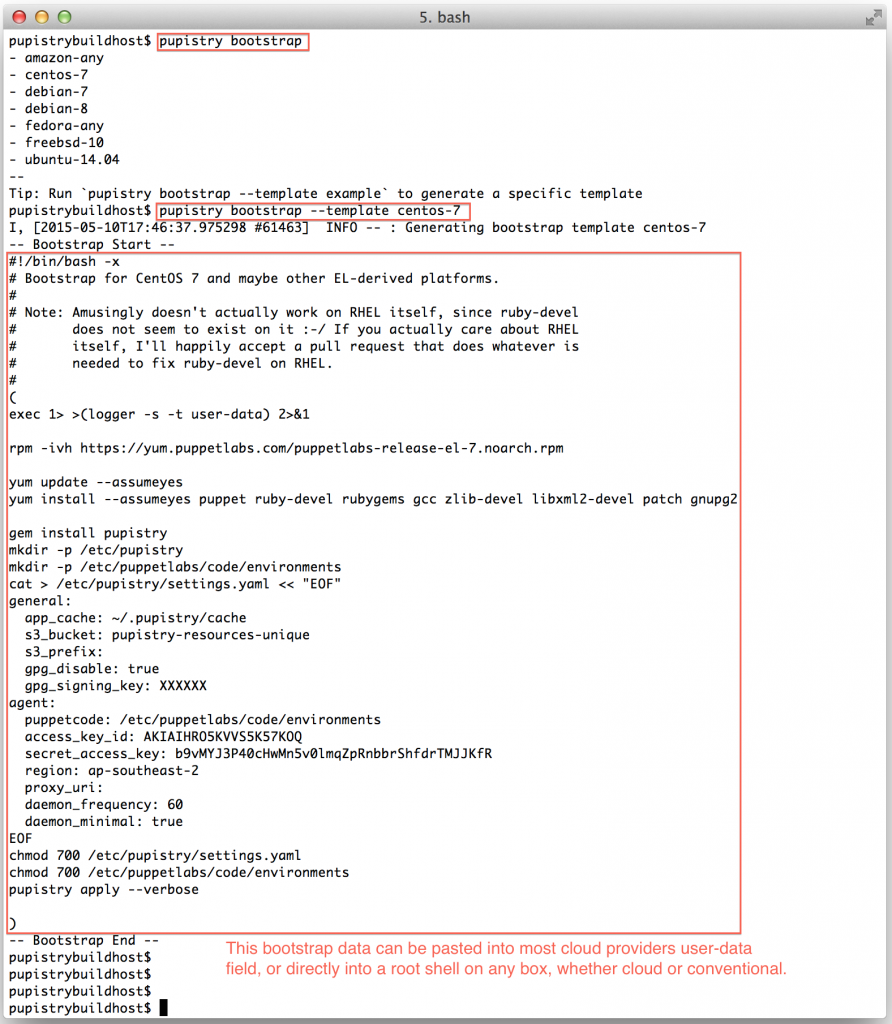
16-pupistry-bootstrap

Pupistry cleverly fills in all the IAM account details and seeds the configuration file based on the settings defined on your workstation. If you want to change behaviours like disabling the daemon, change it in your build host config file and it will be reflected in the bootstrap file.


To test Pupistry you can use any server you want, but this walkthrough shows an example using Digital Ocean which is a very low cost cloud compute provider with a slick interface and much easier learning curve than AWS. You can sign up and use them here, shamelessly clicking on my referrer link so my hosting bill gets paid – but also get yourself $10 credit in the process. Sweetas bru!

Once you have setup/logged into your DigitalOcean account, you need to create a new droplet (their terminology for a VM – AWS uses “EC2 Instance”). It can be named anything you want and any size you want, although this walkthrough is tight and suggests the cheapest example :-)
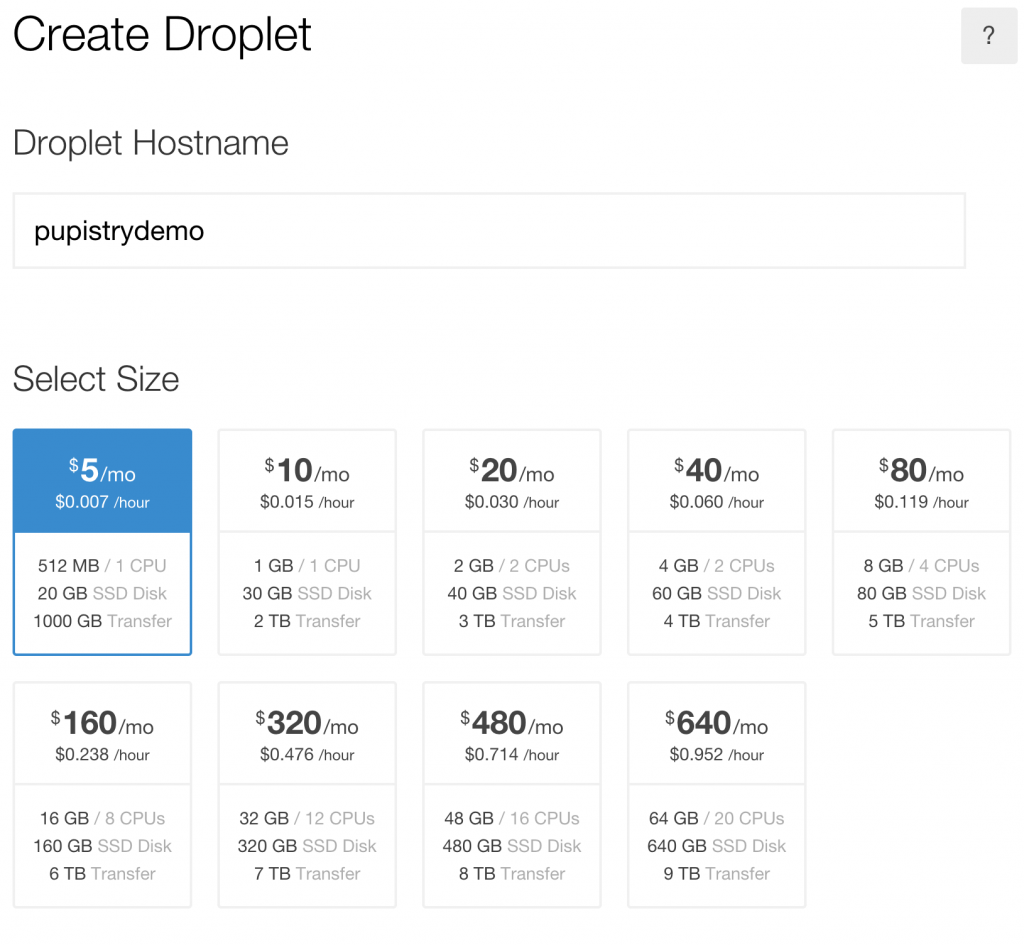
18-digitalocean-create-droplet-1


Now it is possible to just boot the Digital Ocean droplet and then cut & paste the bootstrap script into the running machine, but like most cloud providers Digital Ocean supports a feature called User Data, where a script can be pasted to have it execute when the machine starts up.
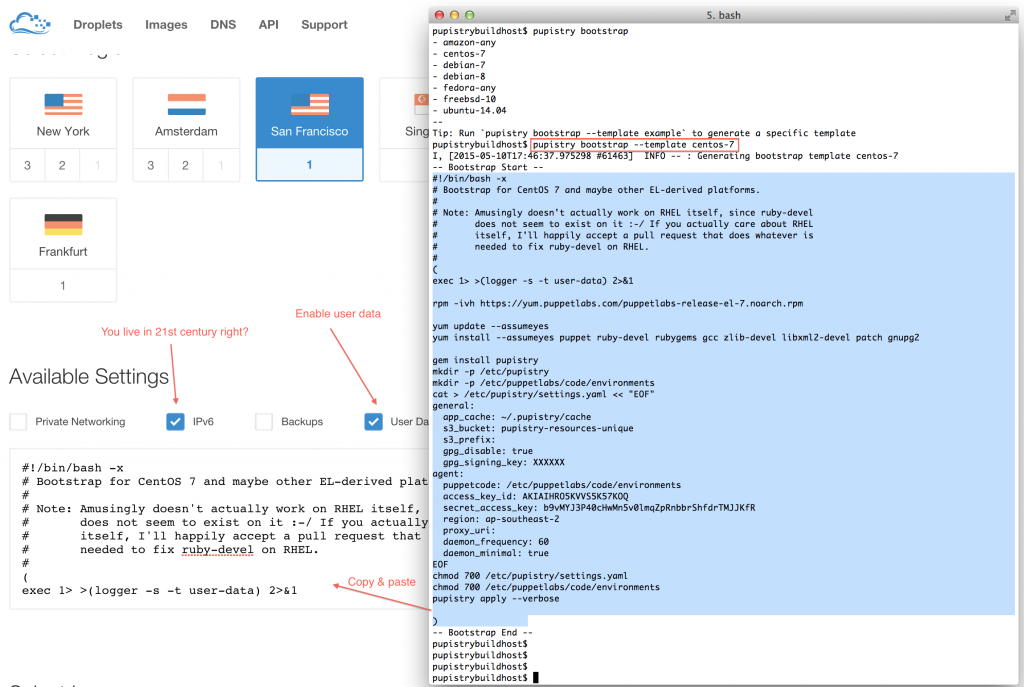
19-digitalocean-create-droplet-2

AWS users can get their user data in base64 version as well by calling pupistry bootstrap with the –base64 parameter – handy if you want to copy & paste the user data into other files like CloudFormation stacks. Digital Ocean just takes it in plain text like above.

Make sure you use the right bootstrap data for the right distribution. There are variations between distributions and sometime even between versions, hence various different bootstrap scripts are provided for the major distributions. If you’re using something else/fringe, you might have to do some of your own debugging, so recommend testing with a major distribution first.
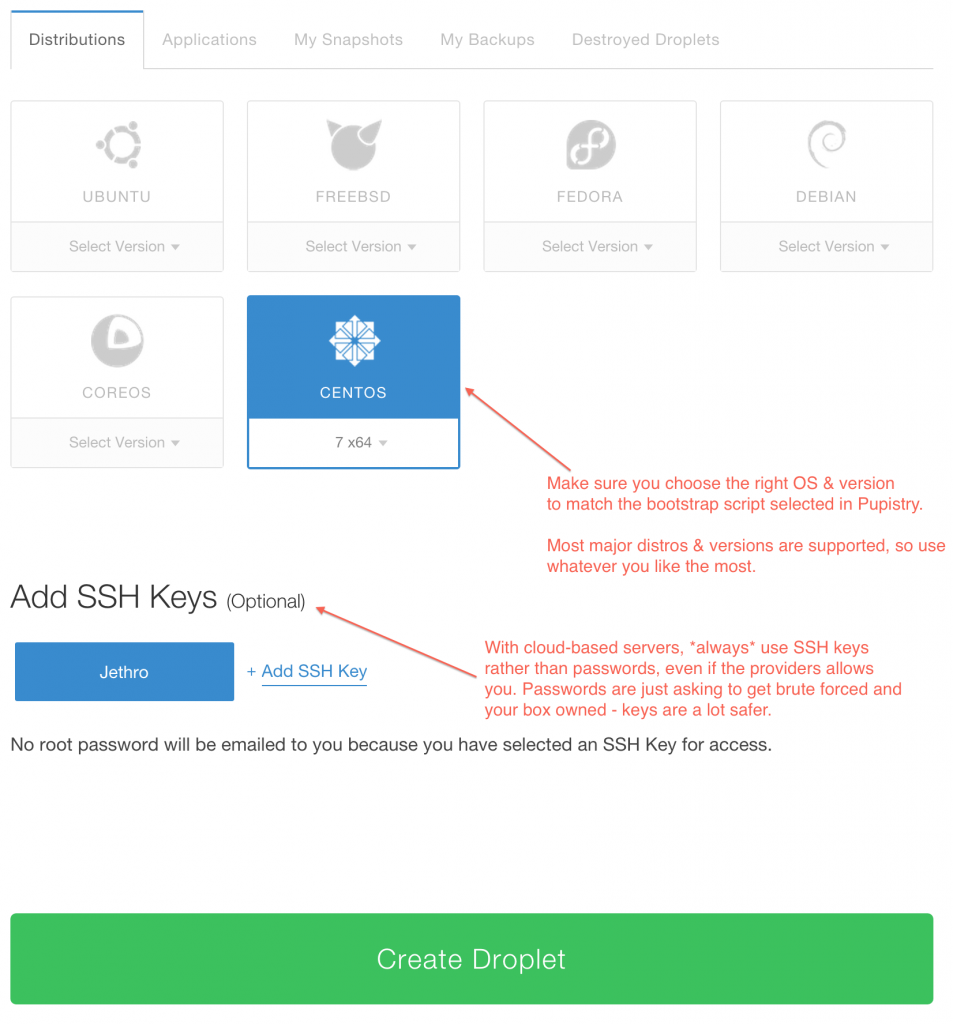
20-digitalocean-create-droplet-3

Once you create your droplet, Digital Ocean will go away for 30-60 seconds and build and launch the machine. Once you SSH into it, tail the system log to see the user data executing in the background as the system completes it’s inaugural startup. The bootstrap script echos all commands it’s running and output into syslog for debugging purposes.
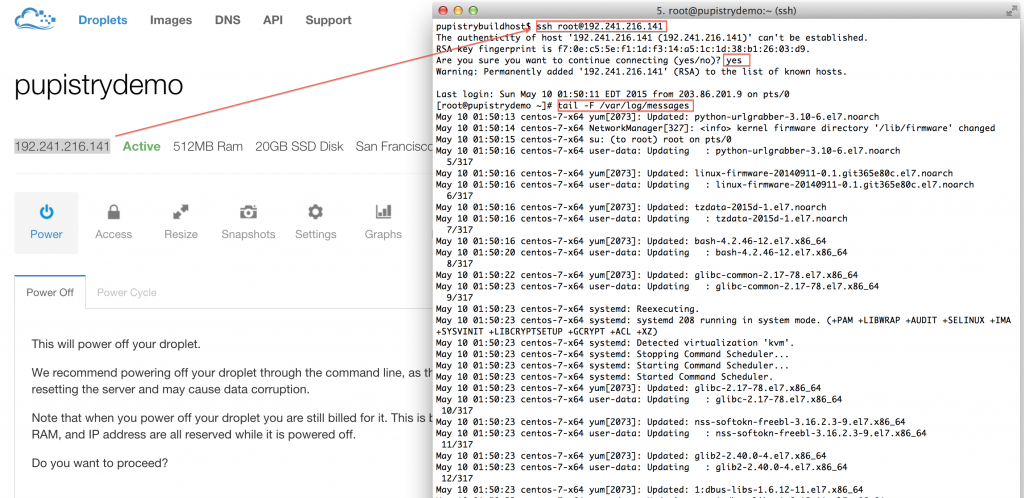
21-digitalocean-connect-to-server


Watch the log file until you see the initial Puppet run take place. You’ll see Puppet output followed by Notice: Finished catalog run at some stage of the process. You’ll also see the Pupistry daemon has launched and is now running in the background checking for updates every minute.
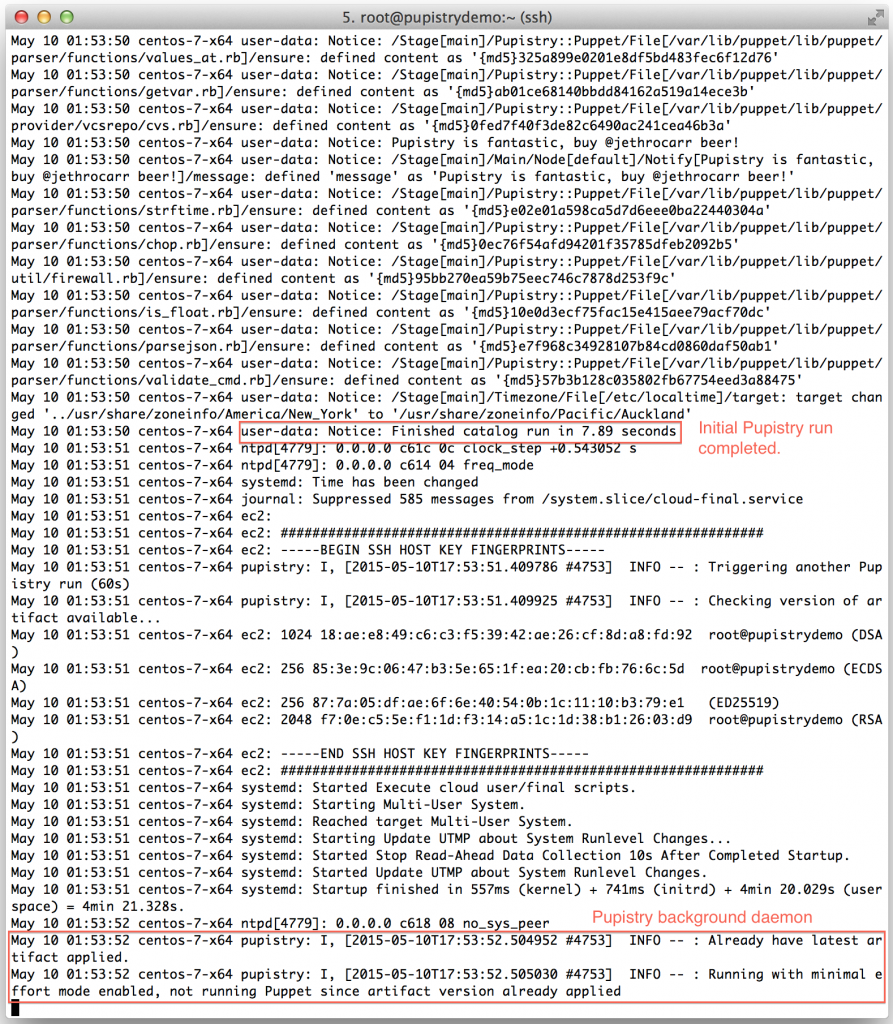
21-initial-pupistry-run

If you got this far, you’ve just done a complete build and proven that Pupistry can run on your server without interruption – because of the user data feature, you can easily automate machine creation & pupistry run to complete build servers without ever needing to login – we only logged in here to see what was going on!


7. Using Pupistry regularly

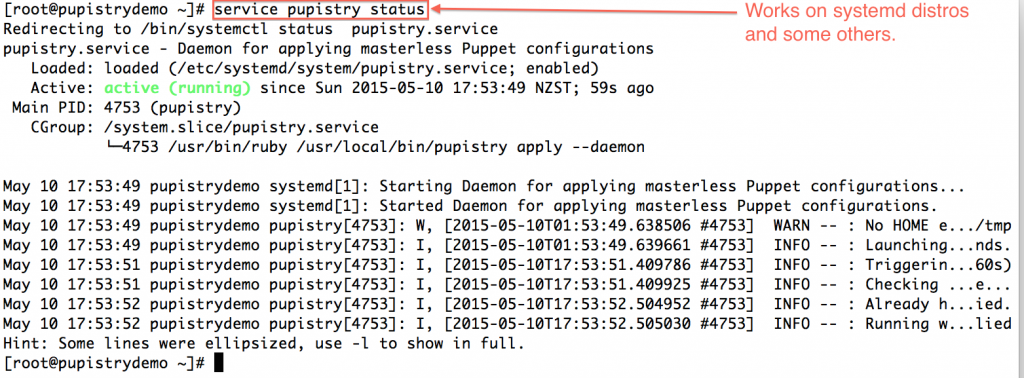
To make rolling out Puppet changes quick and simply, Pupistry sets up a background daemon job via the puppet-pupistry companion module which installs init config for most distributions for systemd, upstart and sysvinit. You can check the daemon status and log output on systemd-era distributions with:

service pupistry status
21-pupistry-daemon-details

If you want to test changes, then you probably may want to stop the daemon whilst you do your testing. Or you can be *clever* and use branches in your control repo – Pupistry daemon defaults to the master branch.

When testing or not using the daemon, you can run Pupistry manually in the same way that you can run the Puppet agent manually:

pupistry apply

22-pupistry-manual

Play around with some of the commands you can do, for example:

Run and only show what would have been done:

pupistry apply --noop

Apply a specific branch (this will work with the sample repo):

pupistry apply --environment exampleofbranch

To learn more about what commands can be run in apply mode, run:

pupistry help apply


8. Making a change to your control repo

At this point, you have a fully working Pupistry setup that you can experiment with and try new things out. You will want to check out the repo from bitbucket with:

git clone <repo>

Screen Shot 2015-05-10 at 23.31.02


Your first change you might want to make is experimenting with changing some of the examples in your repository and pushing a new artifact:

23-custom-puppetcode-1


When Puppet runs, it reads the manifests/site.pp file first for any node configuration. We have a simple default node setup that takes some actions like using some notify resources to display messages to the user. Try changing one of these:
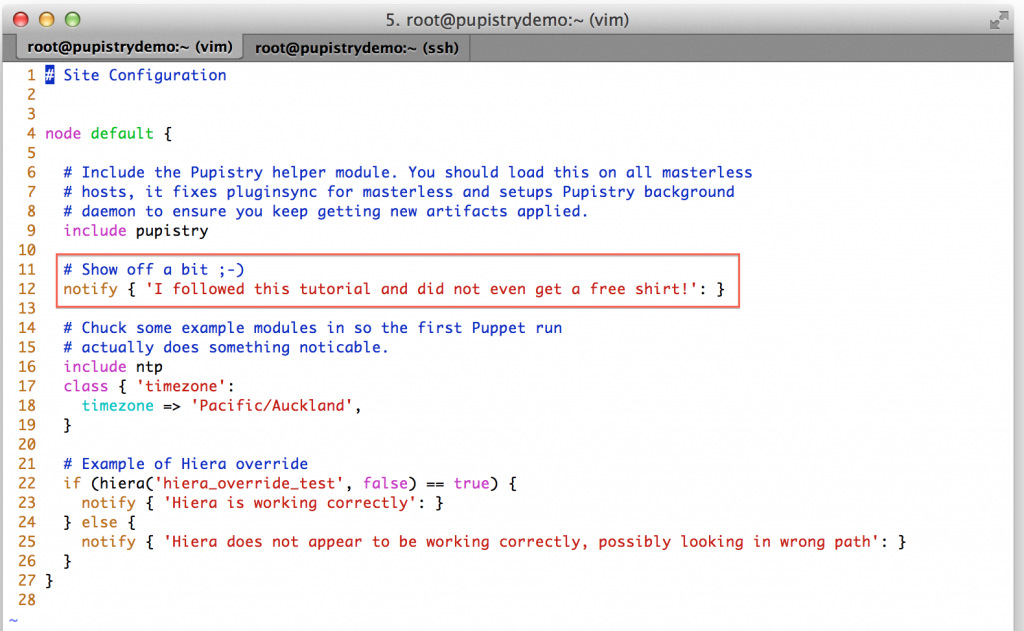
24-custom-puppetcode-2

Make a commit & push the change to Bitbucket, then build a new artifact:
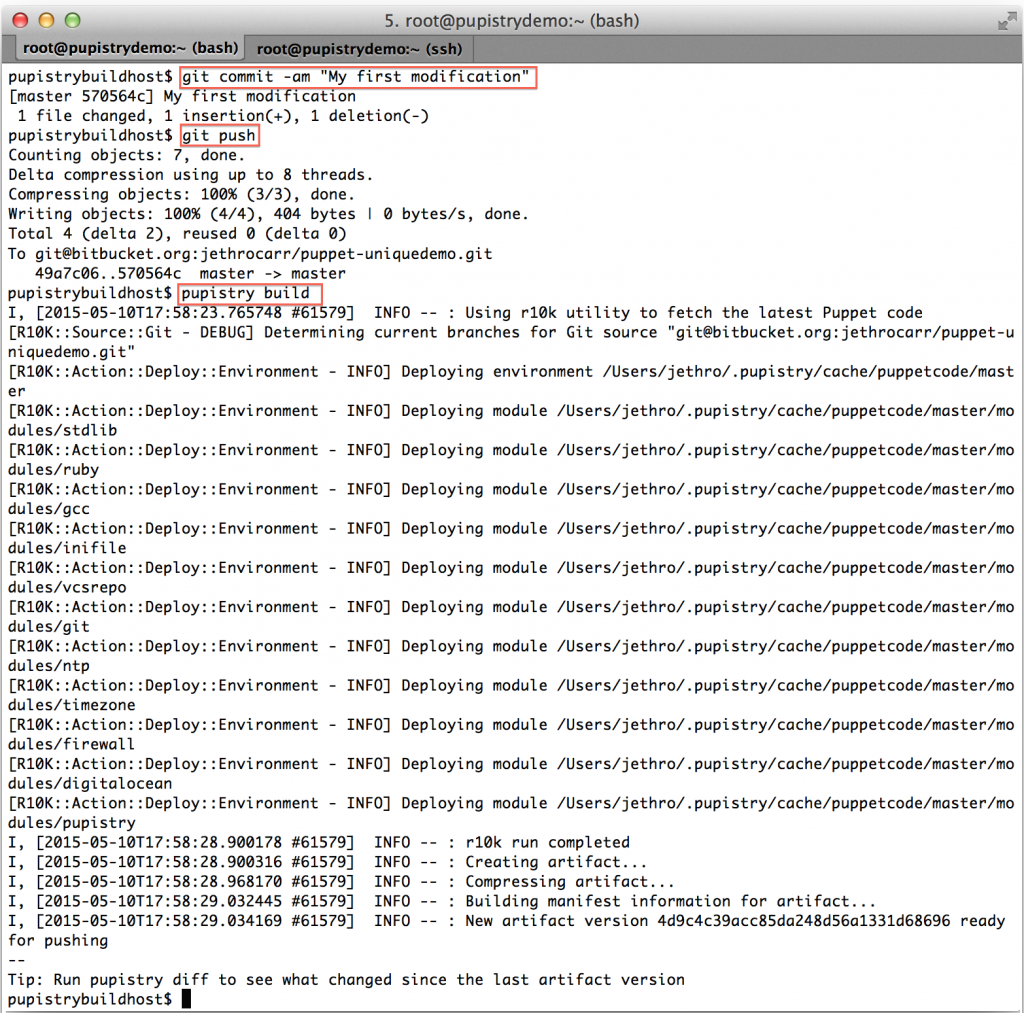
25-custom-puppetcode-3


We can now see the diff command in action:
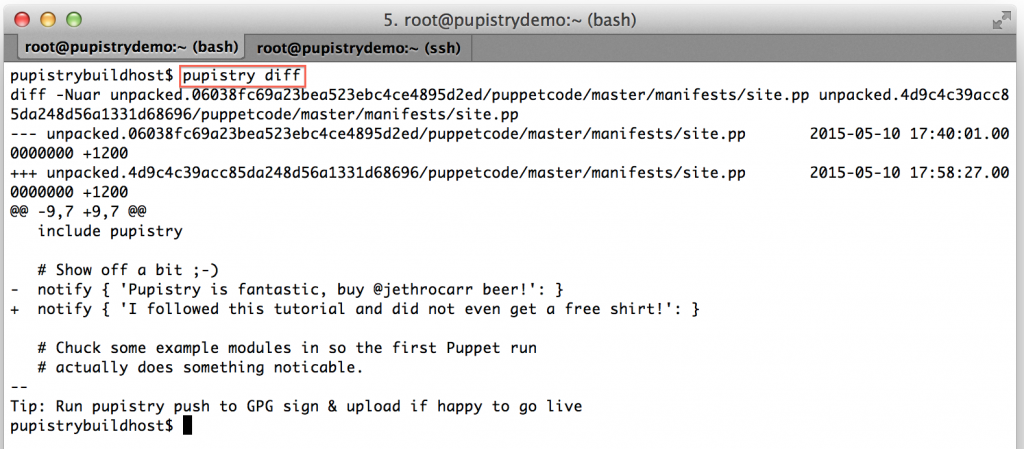
26-custom-puppetcode-4


If you’re happy with the changes, you can then push your new artifact to S3 and it will quickly deploy to your servers within the next minute if running the daemon.

27-custom-puppetcode-5

You can also run the Pupistry apply manually on your target server to see the new change:
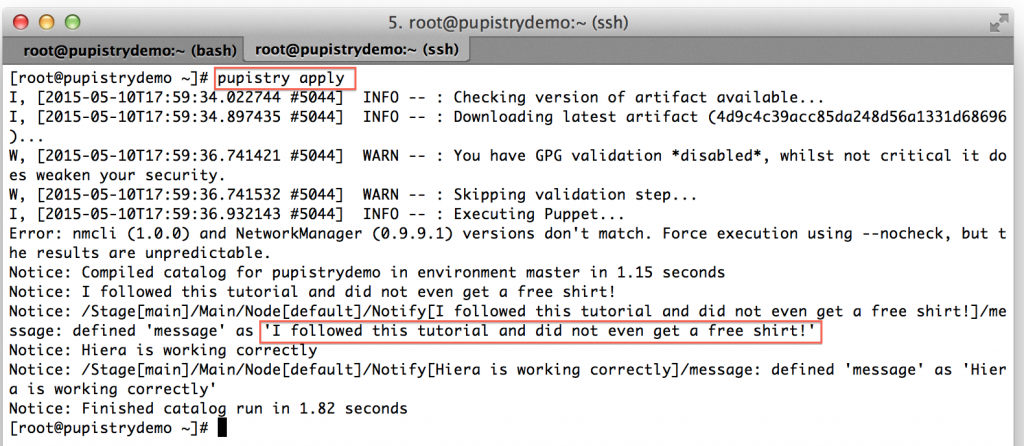
28-custom-puppetcode-6

At this point you’ve been able to setup AWS, setup Git, setup Pupistry, build a server and push new Puppet manifests to it! You’re ready to begin your exciting adventure into master-less Puppet and automate all the things!


9. Cleanup

Hopefully you like Pupistry and are now hooked, but even if you do, you might want to cleanup everything you’ve just created as part of this walkthrough.

First you probably want to destroy your Digital Ocean Droplet so it doesn’t cost you any further money:
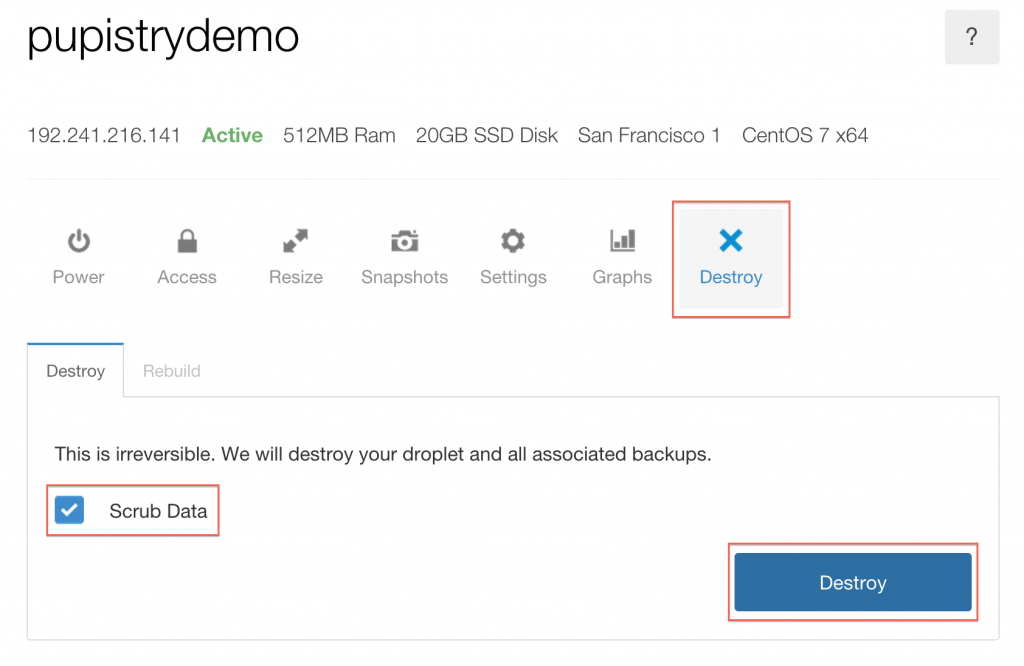
29-cleanup-digitialocean

If you want to keep continuing with Pupistry with your new Pupistry Bitbucket control repo and your AWS account you can, but if you want to purge them to clean up and start again:

Delete the BitBucket repo:
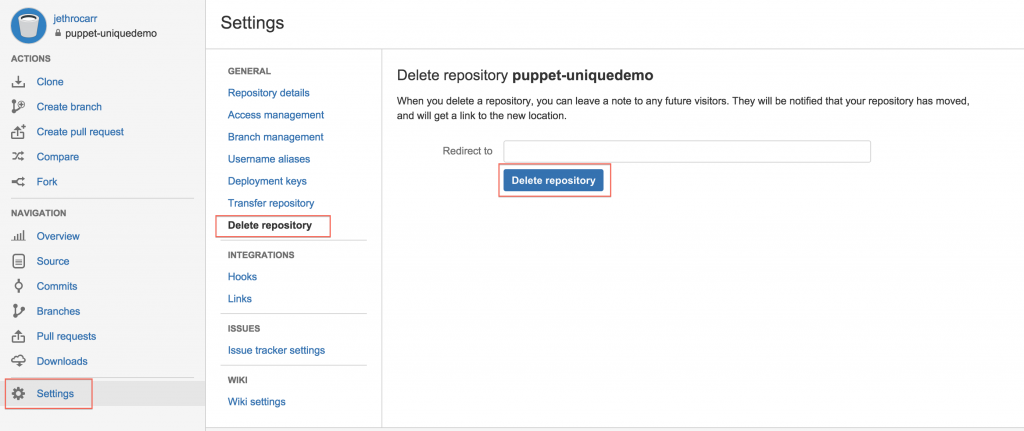
30-cleanup-bitbucket

Delete the AWS S3 bucket contents, then tear down the CloudFormation stack to delete the bucket and the users:

31-cleanup-aws

All done – you can re-run this tutorial from clean, or use your newfound knowledge to setup your proper production configuration.


Further Information

Hopefully you’ve found this walkthrough (and Pupistry) useful! Before getting started properly on your Pupistry adventure, please do read the full README.md and also my introducing Pupistry blog post.


Pupistry is a very new application, so if you find bugs please file an issue in the tracker, it’s also worth checking the tracker for any other known issues with Pupistry before getting started with it in production.

Pull requests for improved documentation, bug fixes or new features are always welcome.

If you are stuck and need support, please file it via an issue in the tracker. If your issue relates *directly* to a step in this tutorial, then you are welcome to post a comment below. I get too many emails, so please don’t email me asking for support on an issue as I’ll probably just discard it.

You may also find the following useful if you’re new to Puppet:

Remember that Pupistry advocates the use of masterless Puppet techniques which isn’t really properly supported by Puppetlabs, however generally Puppet modules will work just fine in master-less as well as master-full environments.

Puppet master is pretty standard, whereas Puppet masterless implementations differ all over the place since there’s no “proper” way of doing it. Pupistry hopefully fills this gap and will become a defacto standard for masterless over time.


Introducing Pupistry

I’ve recently been working to migrate my personal infrastructure from a very conventional and ageing 8 year old colocation server to a new cloud-based approach.

As part of this migration I’m simplifying what I have down to the fewest possible services and offloading a number of them to best-of-breed cloud SaaS providers.

Of course I’m still going to have a few servers for running various applications where it makes the most sense, but ideally it will only be a handful of small virtual machines and a bunch of development machines that I can spin up on demand using cloud providers like AWS or Digital Ocean, only paying for what I use.


The Puppet Master Problem

To make this manageable I needed to use a configuration management system such as Puppet to allow the whole build process of new servers to be automated (and fast!). But running Puppet goes against my plan of as-simple-as-possible as it means running another server (the Puppet master). I could have gone for something like Ansible, but I dislike the agent-less approach and prefer to have a proper agent and being able to build boxes automatically such as when using autoscaling.

So I decided to use Puppet masterless. It’s completely possible to run Puppet against local manifest files and have it apply them, but there’s the annoying issue of how to get Puppet manifests to servers in the first place…. That tends to be left as an exercise to the reader and there’s various collections of hacks floating around on the web and major organisations seem to grow their own homespun tooling to address it.

Just getting a well functioning Puppet masterless setup took far longer than desired and it seems silly given that everyone doing Puppet masterless is going to have to do the same steps over and over again.

User-data is another case of stupidity with every organisation writing their own variation of what is basically the same thing – some lines of bash to get a newly launched Linux instance from nothingness to running Puppet and applying the manifests for that organisation. There’s got to be a better way.


The blessing and challenges of r10k

It gets even more complex when you take the use of r10k into account. r10k is a Puppet workflow solution that makes it easy to include various upstream Puppet modules and pin them to specific versions. It supports branches, so you can do clever things like tell one server to apply a specific new branch to test a change you’ve made before rolling it out to all your servers. In short, it’s fantastic and if you’re not using it with Puppet… you should be.

However using r10k does mean you need access to all the git repositories that are being included in your Puppetfile. This is generally dealt with by having the Puppet master run r10k and download all the git repos using a deployer key that grants it access to the repositories.

But this doesn’t work so well when you have to setup deployer access keys for every machine to be able to read every one of your git repositories. And if a machine is ever compromised, it needs to be changed for every repo and every server again which is hardly ideal.

r10k’s approach of allowing you to assemble various third party Puppet modules into a (hopefully) coherent collection of manifests is very powerful – grab modules from the Puppet forge, from Github or from some other third party, r10k doesn’t care it makes it all work.

But this has the major failing of essentially limiting your security to the trustworthyness of all the third parties you select.

In some cases the author is relatively unknown and could suddenly decide to start including malicious content, or in other cases the security of the platform providing the modules is at risk (eg Puppetforge doesn’t require any two-factor auth for module authors) and a malicious attacker could attack the platform in order to compromise thousands of machines.

Some organisations fix this by still using r10k but always forking any third party modules before using them, but this has the downside of increased manual overhead to regularly check for new updates to the forked repos and pulling them down. It’s worth it for a big enterprise, but not worth the hassle for my few personal systems.

The other issue aside from security is that if any one of these third party repos ever fails to download (eg repo was deleted), your server would fail to build. Nobody wants to find that someone chose to delete the GitHub repo you rely on just minutes before your production host autoscaled and failed to startup. :-(


Pupistry – the solution?

I wanted to fix the lack of a consistent robust approach to doing masterless Puppet and provide a good way to allow r10k to be used with masterless Puppet and so in my limited spare time over the past month I’ve been working on Pupistry. (Pupistry? puppet + artistry == Pupistry! Hopefully my solution is better than my naming “genius”…)

Pupistry is a solution for implementing reliable and secure masterless puppet deployments by taking Puppet modules assembled by r10k and generating compressed and signed archives for distribution to the masterless servers.

Pupistry builds on the functionality offered by the r10k workflow but rather than requiring the implementing of site-specific custom bootstrap and custom workflow mechanisms, Pupistry executes r10k, assembles the combined modules and then generates a compressed artifact file. It then optionally signs the artifact with GPG and finally uploads it into an Amazon S3 bucket along with a manifest file.

The masterless Puppet machines then runs Pupistry which checks for a new version of the manifest file. If there is, it downloads the new artifact and does an optional GPG validation before applying it and running Puppet. Pupistry ships with a daemon which means you can get the same convenience of  a standard Puppet master & agent setup and don’t need dodgy cronjobs everywhere.

To make life even easier, Pupistry will even spit out bootstrap files for your platform which sets up each server from scratch to install, configure and run Pupistry, so you don’t need to write line after line of poorly tested bash code to get your machines online.

It’s also FAST. It can check for a new manifest in under a second, much faster than Puppet master or r10k being run directly on the masterless server.

Because Pupistry is artifact based, you can be sure your servers will always build since all the Puppetcode is packaged up which is great for autoscaling – although you still want to use a tool like Packer to create an OS image with Pupistry pre-loaded to remove dependency and risk of Rubygems or a newer version of Pupistry failing.


Try it!

https://github.com/jethrocarr/pupistry

If this sounds up your street, please take a look at the documentation on the Github page above and also the introduction tutorial I’ve written on this blog to see what Pupistry can do and how to get started with it.

Pupistry is naturally brand new and at MVP stage, so if you find bugs please file an issue in the tracker. It’s also worth checking the tracker for any other known issues with Pupistry before getting started with it in production (because you’re racing to put this brand new unproven app into production right?).

Pull requests for improved documentation, bug fixes or new features are always welcome, as is beer. :-)

I intend to keep developing this for myself as it solves my masterless Puppet needs really nicely, but I’d love to see it become a more popular solution that others are using instead of spinning some home grown weirdness again and again.

I’ve put some time into making it easy to use (I hope) and also written bootstrap scripts for most popular Linux distributions and FreeBSD, but I’d love feedback good & bad. If you’re using Pupistry and love it, let me know! If you tried Pupistry but it had some limitation/issue that prevented you from adopting it, let me know what it was, I might be able to help. Better yet, if you find a blocker to using it, fix it and send me a pull request. :-)

Puppet 3 & 4 on FreeBSD

I’ve been playing with FreeBSD recently and wanted to run Puppet on it to provide my machines with configuration.

Unfortunately I faced the following error when I first ran Puppet with a simple Puppet manifest that tries to install NTP via usage of the puppetlabs/ntp module:

Warning: Found multiple default providers for package: pip, gem; using pip
Error: Could not set 'present' on ensure: Could not locate the pip command. at modules/ntp/manifests/install.pp

Error: /Stage[main]/Ntp::Install/Package[net/ntp]/ensure: change from absent to present failed: Could not set 'present' on ensure: Could not locate the pip command. at modules/ntp/manifests/install.pp

This collection of errors is pretty interesting – we can see that Puppet seems to understand that it’s running on FreeBSD and that the package is called “net/ntp” but it’s trying to install it with pip, which is the Python package manager :-/

Turns out that Puppet versions older than and including 4.0.0 [1] lack support for PkgNg package manager which is used in FreeBSD 10.x and since it doesn’t know how to use it, defaults to trying one of the only two providers left over – pip & gem. Not really the smartest approach…

There’s two ways to fix right now:

  1. An independently packaged provider for PkgNg was written and is available at xaque208/puppet-pkgng. This can be included into any existing Puppet 3/4 deployment and you can define it as the default for all packages globally.
  2. Pull the commit from Puppet that provides PkgNg support (thanks to author of the above project). The downside is that you then have to build your own Gem and install it.

Longer term you can either:

  1. Wait for Puppet to release a stable version that actually works. I’m guessing it will be in 4.0.0 +1 (so 4.0.1?) but I’m not familiar with their approach to releasing new feature additions. See [1] for more information.
  2. Hope that the FreeBSD developers can backport the commit that adds PkgNg support to Puppet4. I’ve actually started chatting with one of the FreeBSD developers who’s been kind enough to have a look at upgrading their package from Puppet3 to Puppet4, but it’s not as simple as it should be thanks to the terrible way Puppetlabs has packaged Puppet4 (lots of hard coded /opt paths everywhere) so it may take some time.


Additionally there is an issue if you choose to install Puppet 4 via RubyGems and when you attempt to run it, you will get the following error:

Error: Cannot create /opt/puppetlabs/puppet/cache; parent directory /opt/puppetlabs/puppet does not exist
Error: /File[/var/log/puppetlabs/puppet]/ensure: change from absent to directory failed: Cannot create /var/log/puppetlabs/puppet; parent directory /var/log/puppetlabs does not exist

This is because the Gem is not properly packaged and doesn’t run nicely with FreeBSD’s filesystem structure. You can hack in a “fix” with:

mkdir -p /opt/puppetlabs/puppet/cache
mkdir -p /var/log/puppetlabs/puppet

It’s far from the right way of properly fixing this, the best solution if you value OS purity right now is to stick with the FreeBSD packaged Puppet 3 version and add the xaque208/puppet-pkgng module.


[1] So at time of writing, *no* stable Puppet version supports PkgNg yet, but given that it’s been merged into the master git branch for Puppet, I have to *presume* that it’s going into 4.0.1… I hope :-/

FreeBSD in the cloud

This weekend I was playing around with FreeBSD in order to add support to Pupistry. Although I generally use Linux exclusively, it’s fun to play around with other platforms now and then, bit like going on vacation. Plus building support for other platforms ensures that I’m writing code that’s more portable.

FreeBSD is probably the most popular BSD in use and it’s the only one available for download from the Amazon Web Services (AWS) Marketplace and as a supported platform from Digital Ocean alongside their Linux offerings.

However as popular as FreeBSD is, it pales in comparison to Linux, which means that it doesn’t get as much love and things don’t work quite as seamlessly with these cloud providers. In my process of testing FreeBSD with both providers I ran into some interesting feature differences and annoyances.


FreeBSD on Digital Ocean

I started with Digital Ocean first, love them since they’re a nice simple, cheap cloud provider for personal stuff – not much need for the AWS enterprise feature set when I’m building personal machines and paying the price of a coffee for a month of compute sure is nice.

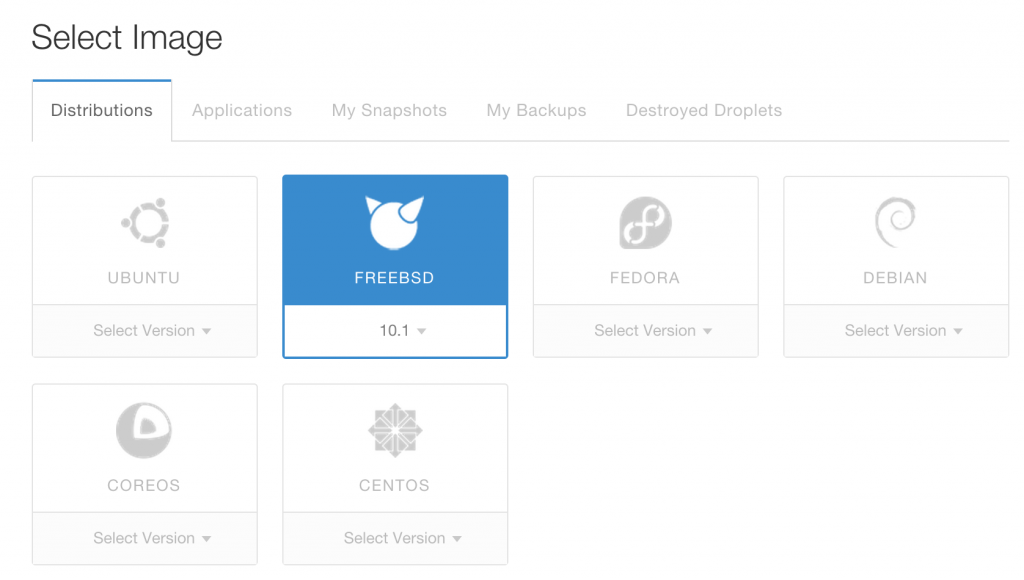
They provide a FreeBSD 10.1 image via the usual droplet creation screen, I have to give Digital Ocean credit for such a nice clean simple interface – limiting user selection does make it much more approachable for people, something Apple always understood with their products.

Screen Shot 2015-04-18 at 23.30.50

As always Digital Ocean is pretty speedy, bringing up a machine within a minute or so. Once ready, login as the freebsd user and you can just sudo to root.

Digital Ocean provides a pretty recent image with pkg already installed and ready to go, although you’ll want to run the update process to get the latest patches. You need to login initially as the freebsd user and then can sudo to acquire root powers.

Over all it’s great – so naturally there is a catch. Digital Ocean doesn’t yet support user data with their droplets. So whilst you can fill in the user data field, it won’t actually get executed.

This is pretty annoying for anyone wanting to automate large number of machines, since it now means you have to SSH to each of them to get them provisioned. I’ve raised a question on their community forum around this issue, but I wouldn’t expect a quick fix since the upstream bsd-cloudinit project they use hasn’t implemented support yet either.

It’s not going to be an end-of-the-world for most people, but it could be barrier if you’re wanting to roll out a fleet of BSD boxen.

The best feature from Digital Ocean is actually their documentation – with the launch of FreeBSD on their platform, they’ve produced some excellent tutorials and guides to their platform which can be found here and are useful to both Linux gurus and noobs alike.

Finally their native IPv6 support extends to FreeBSD, so your machines can join the internet of the 21st century from day one.


FreeBSD on Amazon Web Services (AWS)

Next I spun up an instance in Amazon Web Services (AWS) which is the granddaddy of cloud providers and provides an impressive array of functionality, although this comes at a cost premium over Digital Ocean’s tight pricing.

It’s actually been the first time in a long time that I’ve built a machine via the AWS web console, normally for work we just build all of our systems via Cloud Formation and it was an interesting experience to see the usability difference of AWS’s setup page vs that of Digital Ocean’s.

The fact that the launch wizard has 7 different screens says a lot and I suspect AWS is at risk of having it’s consumer user base eaten by the likes of Linode and Digital Ocean – but when a consumer user is paying $5.00 a month and an enterprise customer pays $300,000 a month, I suspect AWS isn’t going to be too worried.

Launching a FreeBSD instance is not really any different to that of a Linux one, you just need to search for “freebsd” in the AWS Market Place to find the AMI and launch as normal.

Screen Shot 2015-04-18 at 23.43.18


Once launched, things get more interesting. Digital Ocean’s FreeBSD instance came up in around 1 minute which is standard for their systems – but AWS took a whopping 8-10mins to launch the AMI to the level where I could login via SSH!

Digging into the startup log reveals why – it seems the AWS AMI (Amazon’s machine images/templates) for FreeBSD launches the instance, then runs a prolonged upgrade task (freebsd-update fetch install), before doing a subsequent reboot and finally starting SSH.

Whilst I appreciate the good default security posture this provides, there’s a few issues with it:

  1. It differs from most other AWS images which deal with patching by having new images built semi-frequently and leaving the patching in-between up to the admin’s choice.
  2. During the whole process, the admin can’t login which causes some confusion. I initially assumed the AMI images were broken after reviewing my security groups and seeing no reason why I shouldn’t be able to login immediately.
  3. You can’t trust the AMI images to be a solid unchanging base, which means you need to be vary wary if doing autoscaling. Not only is 10mins a bit too slow for autoscaling, having the potential risk of it not coming up due to app changes in the latest update is always something to watch out for. If doing autoscaling with these images, you’ll need to consider
  4. It caused me no end of frustration when trying to test user data since I had to wait 10mins each time to get a confirmation of my test!

The last point brings me to user data – the good news is that Amazon correctly supports user data for FreeBSD machines, so you can paste in your tcsh script (not bash remember!) and it will get invoked at launch time.

The downside is that the user data handling of FreeBSD is a lot more fragile than Linux images. Generally with Linux, the OS boots (including SSH) and then runs the user data. If the user data breaks or hangs or does anything other than expected, you can still login and debug. Whereas since FreeBSD runs the user data before starting up SSH, if something goes wrong you have no way to easily login and debug. And given the differences between tcsh and bash plus annoying commands that default to expecting user input on non-interactive ptys, changes are you’ll have more than one attempt that results in a machine getting stuck at launch.

The ultimate fix is that you’ll probably have to use Packer if using FreeBSD in any serious way on AWS to get the startup performance to an acceptable level.

Finally remember that on AWS, you need to login as the ec2-user and then su –  to become root.


Which one?

If you’re interested in FreeBSD and want to pick a provider to play around with, the choice seems pretty simple to me – Digital Ocean. They’re got the better pricing (~ $5/month vs $15/month) and their ridiculously simple dashboard coupled with the excellent documentation they’ve assembled makes it really attractive for anyone new to the *.nix or cloud space. Plus they’ve bothered to invest in IPv6 which I appreciate.

However if you’re doing business/enterprise systems and want user data, autoscaling or the benefit of automating entire stacks with Cloud Formation, then you will probably find AWS the more attractive offering purely due to the additional functionality offered by that platform. Just be prepared to spend a bit of time baking your own AMI to allow you to skip the overhead of having to wait for updates to apply for each instance you bring up.

Neither provider has got their FreeBSD experience to be quite as slick as that of their Linux offerings, however hopefully they improve on these deficiencies over time –  there’s not much needed to get the experience up to the same level as Linux distributions and it’s nice having a different type of unix to play with for a change.

Puppet facts, json and max nesting

I use Puppet for both business and pleasure and my work often involves writing custom Puppet facts to expose various bits of information.

Recently a fact I had written that worked on the development machines started throwing errors when run on our production machines:

Could not retrieve jethros_awesome_fact: nesting of 20 is too deep

 After digging around it turns out this relates to how many nested levels are inside JSON responses. By default Ruby enforces a maximum level of nesting, I guess to avoid parsing bad JSON or JSON deliberately structured to cause infinite looping.

My fact involved pulling JSON from a local application API and then providing various bits of data from the feed. In the development environments this worked without an issue, but the production systems returned a lot more information via the API feed and broke it.

The fix is pretty easy, just need to add the :max_nesting => false parameter when parsing the JSON – or set it to a different number of levels if you prefer that approach.

json         = JSON.parse(response.body, :max_nesting => false)

First thoughts and tips on EL 7

Generally one RHEL/CentOS/Scientific Linux (aka EL) release isn’t radically different to another, however the introduction of EL 7 is a bit of a shake up, introducing systemd, which means new init system, new ways of reading logs plus dropping some older utilities you may rely on and introducing new defaults.

I’m going through and upgrading some of my machines currently so I’ve prepared a few tips for anyone familiar with EL 4/5/6 and getting started with the move to EL 7.


systemd

The big/scary change introduced by RHEL 7 is systemd – love it or hate it, either way it’s here to stay. The good news is that an existing RHEL admin can keep doing most of their old tricks and existing commands.

Red Hat’s “service” command still works and now hooks into either legacy init scripts or new systemd processes. And rather than forcing everyone to use the new binary logging format, RHEL 7 logs messages to both the traditional syslog plain text files, as well as the new binary log format that you can access via journalctl – so your existing scripts or grep recipes will work as expected.

Rather than write up a whole bunch about systemd, I recommend you check out this blog post by CertDepot which details some of the commands you’ll want to get familiar with. The Fedora wiki is also useful and details stuff like enabling/disabling services at startup time.

I found the transition pretty easy and some of the new tricks like better integration between output logs and init are nice changes that should make Linux easier to work with for new users longer term thanks to better visibility into what’s going on.


Packages to Install

The EL minimum install lacks a few packages that I’d consider key, you may also want to install them as part of your base installs:

  • vim-enhanced – No idea why this doesn’t ship as part of minimum install so as a vim user, it’s very, very frustrating not having it.
  • net-tools – this provides the traditional ifconfig/route/netstat family of network tools. Whilst EL has taken the path of trying to force people onto the newer iproute tools there are still times you may want the older tools, such as for running older shell scripts that haven’t been updated yet.
  • bind-utils – Like tools like host or nslookup? You’ll want this package.
  • mailx – Provides the handy mail command for when you’re debugging your outbound mail.


Networking

Firstly be aware that your devices might no longer be simple named ethX, as devices are now named based on their type and role. Generally this is an improvement, since the names should line up more with the hardware on big systems for easier identification, and you can still change the device names if you prefer something else.

Changing the hostname will cause some confusion for long time RHEL users, rather than a line in /etc/sysconfig/network, the hostname is now configured in /etc/hostname like other distributions.

The EL 7 minimum installation now includes NetworkManager as standard. Whilst I think NetworkManager is a fantastic application, it doesn’t really have any place on my servers where I tend to have statically configured addresses and sometimes a few static routes or other trickiness like bridges and tunnels.

You can disable network manager (and instead use the static “network” service) by running the following commands:

systemctl stop NetworkManager
systemctl disable NetworkManager
systemctl restart network

Red Hat have documentation on doing static network configuration, although it is unfortunately weak on the IPv6 front.

Most stuff is the same as older versions, but the approach of configuring static routes bit me. On EL 5 you configured a /etc/sysconfig/network-scripts/route-ethX file to define IPv4 and IPv6 routes that should be created when that interface comes up. With EL7 you now need to split the IPv4 and IPv6 routes apart, otherwise you just get a weird error when you bring the interface up.

For example, previously on an EL 5 system I would have had something like:

# cat /etc/sysconfig/network-scripts/route-eth1
10.8.0.0/16 via 10.8.5.2 dev eth1
2001:db8:1::/48 via 2001:db8:5::2 dev eth1
#

Whereas you now need something like this:

# cat /etc/sysconfig/network-scripts/route-eth1
10.8.0.0/16 via 10.8.5.2 dev eth1
#

# cat /etc/sysconfig/network-scripts/route6-eth1
2001:db8:1::/48 via 2001:db8:5::2 dev eth1
#

Hopefully your environment is not creative enough to need static routes around the place, but hey, someone out there might always be as crazy as me.


Firewalls

EL 7 introduces FirewallD as the default firewall application – it offers some interesting sounding features for systems that frequently change networks such as mobile users, however I’m personally quite happy and familiar with iptables rulesets for my server systems which don’t ever change networks.

Fortunately the traditional raw iptables approach is still available, Red Hat dragged their existing iptables/ip6tables service scripts over into systemd, so you can still save your firewall rules into /etc/sysconfig/iptables and /etc/sysconfig/iptables respectively.

# Disable firewalld:
systemctl disable firewalld
systemctl stop firewalld

# Install iptables
yum install iptables-service
systemctl enable iptables
systemctl enable ip6tables
systemctl start iptables
systemctl start ip6tables


LAMP Stack

  • Apache has been upgraded from 2.2 to 2.4. Generally things are mostly the same, but some modules have been removed which might break some of your configuration if you take a lift+shift approach.
  • MySQL has been replaced by MariaDB (community developed fork) which means the package names and service have changed, however all the mysql command line tools still exist and work fine.
  • PHP has been upgraded to 5.4.16 which a little bit dated already – over the lifespan of EL 7 it’s going to feel very dated very quickly, so I hope Red Hat puts out some php55 or php56 packages in future releases for those whom want to take advantage of the latest features.


Other Resources

  1. If you haven’t already, check out Red Hat’s release notes,they detail heaps of new features and additions to the platform.
  2. To learn more about the changes from previous releases, check out Red Hat’s Migration Guide as a starter.
  3. My guide to running EL 7 on EL 5 as a Xen guest for those of you running older Xen hypervisors.

Installing EL7 onto EL5 Xen hosts

With RedHat recently releasing RHEL 7 (and CentOS promptly getting their rebuild out the door shortly after), I decided to take the opportunity to start upgrading some of my ageing RHEL/CentOS (EL) systems.

My personal co-location server is a trusty P4 3.0Ghz box running EL 5 for both host and Xen guests. Xen has lost some popularity in favour of HVM solutions like KVM, however it’s still a great hypervisor and can run Linux guests really nicely on even hardware as old as mine that lacks HVM CPU extensions.

Considering that EL 5, 6 and 7 are all still supported by RedHat, I would expect that installing EL 7 as a guest on EL 5 should be easy – and to be fair to RedHat it mostly is, the installation was pretty standard.

Like EL 5 guests, EL 7 guests can be installed entirely from the command line using the standard virt-install command – for example:

$ virt-install --paravirt \
 --name MyCentOS7Guest \
 --ram 1024 \
 --vcpus 1 \
 --location http://mirror.centos.org/centos/7/os/x86_64/ \
 --file /dev/lv_group/MyCentOS7Guest \
 --network bridge=xenbr0

One issue I had is that the installer no longer prompts for network information to use to download the rest of the installer and instead assumes you have a DHCP server, an assumption that isn’t always correct. If you want to force it to use a static address, append the following parameters to the virt-install command.

 -x 'ip=192.168.1.20 netmask=255.255.255.0 dns=8.8.8.8 gateway=192.168.1.1'

The installer will proceed and give you an option to either use VNC to get a graphical installer, or to accept the more basic/limited text mode installer. In my case I went with the text mode installer, generally this is fine for average installations, except that it doesn’t give you a lot of control over partitioning.

Installation completed successfully, but I was not able to subsequently boot the new guest, with an error being thrown about pygrub being unable to find the boot partition.

# xm create -c vmguest
Using config file "./vmguest".
Traceback (most recent call last):
  File "/usr/bin/pygrub", line 774, in ?
    raise RuntimeError, "Unable to find partition containing kernel"
RuntimeError: Unable to find partition containing kernel
No handlers could be found for logger "xend"
Error: Boot loader didn't return any data!
Usage: xm create <ConfigFile> [options] [vars]


Xen works a little differently than VMWare/KVM/VirtualBox in that it doesn’t try to emulate hardware unnecessarily in paravirtualised mode, so there’s no BIOS. Instead Xen ships with a tool called pygrub, that is essentially an application that implements grub and goes through the process of reading the guest’s /boot filesystem, displaying a grub interface using the config in /boot, then when a kernel is selected grabs the kernel and associated information and launches the guest with it.

Generally this works well, certainly you can boot any of your EL 5 guests with it as well as other Linux distributions with Xen paravirtulised compatible kernels (it’s merged into upstream these days).

However RHEL has moved on a bit since 2007 adding a few new tricks, such as replacing Grub with Grub2 and moving from the typical ext3 boot partition to an xfs boot partition. These changes confuse the much older utilities written for Xen, leaving it unable to read the boot loader data and launch the guest.

The two main problems come down to:

  1. EL 5 can’t read the xfs boot partition created by default by EL 7 hosts. Even if you install optional xfs packages provided by centosplus/centosextras, you still can’t read the filesystem due to the version of xfs being too new for it to comprehend.
  2. The version of pygrub shipped with EL 5 doesn’t have support for Grub2. Well, technically it’s supposed to according to RedHat, but I suspect they forgot to merge in fixes needed to make EL 7 boot.

I hope that RedHat fix this deficiency soon, presumably there will be RedHat customers wanting to do exactly what I’m doing who will apply some pressure for a fix, however until then if you want to get your shiny new EL 7 guests installed, I have a bunch of workarounds for those whom are not faint of heart.


For these instructions, I’m assuming that your guest is installed to /dev/lv_group/vmguest, however these instructions should work equally for image files or block devices.

Firstly, we need to check what the state of the /boot partition is – we need to make sure it is an ext3 volume, or convert it if not. If you installed via the limited text mode installer, it will be an xfs partition, however if you installed via VNC, you might be able to change the type to ext3 and avoid the next few steps entirely.

We use kpartx -a and -d respectively to expose the partitions inside the block device so we can manipulate the contents. We then use the good ol’ file command to check what type of filesystem is on the first partition (which is presumably boot).

# kpartx -a /dev/lv_group/vmguest
# file -sL /dev/mapper/vmguestp1
/dev/mapper/vmguestp1: SGI XFS filesystem data (blksz 4096, inosz 256, v2 dirs)
# kpartx -d /dev/lv_group/vmguest

Being xfs, we’re probably unable to do much – if we install xfsprogs (from centos extras), we can verify it’s unreadable by the host OS:

# yum install xfsprogs
# xfs_check /dev/mapper/vmguestp1
bad sb version # 0xb4b4 in ag 0
bad sb version # 0xb4a4 in ag 1
bad sb version # 0xb4a4 in ag 2
bad sb version # 0xb4a4 in ag 3
WARNING: this may be a newer XFS filesystem.
#

Technically you could fix this by upgrading the kernel, but EL 5’s kernel is a weird monster that includes all manor of patches for Xen that were never included into upstream, so it’s not a simple (or even feasible) operation.

We can convert the filesystem from xfs to ext3 by using another newer Linux system. First we need to export the boot volume into an image file:

# dd if=/dev/mapper/vmguestp1  | bzip2 > /tmp/boot.img.bz2

Then copy the file to another host, where we will unpack it and recreate the image file with ext3 and the same contents.

$ bunzip2 boot.img.bz2
$ mkdir tmp1 tmp2
$ sudo mount -t xfs -o loop boot.img tmp1/
$ sudo cp -avr tmp1/* tmp2/
$ sudo umount tmp1/
$ mkfs.ext3 boot.img
$ sudo mount -t ext3 -o loop boot.img tmp1/
$ sudo cp -avr tmp2/* tmp1/
$ sudo umount tmp1
$ rm -rf tmp1 tmp2
$ mv boot.img boot-new.img
$ bzip2 boot-new.img

Copy the new file (boot-new.img) back to the Xen host server and replace the guest’s/boot volume with it.

# kpartx -a /dev/lv_group/vmguest
# bzcat boot-new.img.bz2 > /dev/mapper/vmguestp1
# kpartx -d /dev/lv_group/vmguest


Having fixed the filesystem, Xen’s pygrub will be able to read it, however your guest still won’t boot. :-( On the plus side, it throws a more useful error showing that it could access the filesystem, but couldn’t parse some data inside it.

# xm create -c vmguest
Using config file "./vmguest".
Using <class 'grub.GrubConf.Grub2ConfigFile'> to parse /grub2/grub.cfg
Traceback (most recent call last):
  File "/usr/bin/pygrub", line 758, in ?
    chosencfg = run_grub(file, entry, fs)
  File "/usr/bin/pygrub", line 581, in run_grub
    g = Grub(file, fs)
  File "/usr/bin/pygrub", line 223, in __init__
    self.read_config(file, fs)
  File "/usr/bin/pygrub", line 443, in read_config
    self.cf.parse(buf)
  File "/usr/lib64/python2.4/site-packages/grub/GrubConf.py", line 430, in parse
    setattr(self, self.commands[com], arg.strip())
  File "/usr/lib64/python2.4/site-packages/grub/GrubConf.py", line 233, in _set_default
    self._default = int(val)
ValueError: invalid literal for int(): ${next_entry}
No handlers could be found for logger "xend"
Error: Boot loader didn't return any data!

At a glance, it looks like pygrub can’t handle the special variables/functions used in the EL 7 grub configuration file, however even if you remove them and simplify the configuration down to the core basics, it will still blow up.

# xm create -c vmguest
Using config file "./vmguest".
Using <class 'grub.GrubConf.Grub2ConfigFile'> to parse /grub2/grub.cfg
WARNING:root:Unknown image directive load_video
WARNING:root:Unknown image directive if
WARNING:root:Unknown image directive else
WARNING:root:Unknown image directive fi
WARNING:root:Unknown image directive linux16
WARNING:root:Unknown image directive initrd16
WARNING:root:Unknown image directive load_video
WARNING:root:Unknown image directive if
WARNING:root:Unknown image directive else
WARNING:root:Unknown image directive fi
WARNING:root:Unknown image directive linux16
WARNING:root:Unknown image directive initrd16
WARNING:root:Unknown directive source
WARNING:root:Unknown directive elif
WARNING:root:Unknown directive source
Traceback (most recent call last):
  File "/usr/bin/pygrub", line 758, in ?
    chosencfg = run_grub(file, entry, fs)
  File "/usr/bin/pygrub", line 604, in run_grub
    grubcfg["kernel"] = img.kernel[1]
TypeError: unsubscriptable object
No handlers could be found for logger "xend"
Error: Boot loader didn't return any data!
Usage: xm create <ConfigFile> [options] [vars]

Create a domain based on <ConfigFile>

At this point it’s pretty clear that pygrub won’t be able to parse the configuration file, so you’re left with two options:

  1. Copy the kernel and initrd file from the guest to somewhere on the host and set Xen to boot directly using those host-located files. However then kernel updating the guest is a pain.
  2. Backport a working pygrub to the old Xen host and use that to boot the guest. This requires no changes to the Grub2 configuration and means your guest will seamlessly handle kernel updates.

Because option 2 is harder and more painful, I naturally chose to go down that path, backporting the latest upstream Xen pygrub source code to EL 5. It’s not quite vanilla, I had to make some tweaks to rip out a couple newer features that were breaking it on EL 5, so I’ve packaged up my version of pygrub and made it available in both source and binary formats.

Download Jethro’s pygrub backport here

Installing this *will* replace the version installed by the Xen package – this means an update to the package on the host will undo these changes – I thought about installing it to another path or making an RPM, but my hope is that Red Hat get their Xen package fixed and make this whole blog post redundant in the first place so I haven’t invested that level of effort.

Copy to your server and unpack with:

# tar -xkzvf xen-pygrub-6f96a67-JCbackport.tar.gz
# cd xen-pygrub-6f96a67-JCbackport

Then you can build the source into a python module and install with:

# yum install xen-devel gcc python-devel
# python setup.py build
running build
running build_py
creating build
creating build/lib.linux-x86_64-2.4
creating build/lib.linux-x86_64-2.4/grub
copying src/GrubConf.py -> build/lib.linux-x86_64-2.4/grub
copying src/LiloConf.py -> build/lib.linux-x86_64-2.4/grub
copying src/ExtLinuxConf.py -> build/lib.linux-x86_64-2.4/grub
copying src/__init__.py -> build/lib.linux-x86_64-2.4/grub
running build_ext
building 'fsimage' extension
creating build/temp.linux-x86_64-2.4
creating build/temp.linux-x86_64-2.4/src
creating build/temp.linux-x86_64-2.4/src/fsimage
gcc -pthread -fno-strict-aliasing -DNDEBUG -O2 -g -pipe -Wall -Wp,-D_FORTIFY_SOURCE=2 -fexceptions -fstack-protector --param=ssp-buffer-size=4 -m64 -mtune=generic -D_GNU_SOURCE -fPIC -fPIC -I../../tools/libfsimage/common/ -I/usr/include/python2.4 -c src/fsimage/fsimage.c -o build/temp.linux-x86_64-2.4/src/fsimage/fsimage.o -fno-strict-aliasing -Werror
gcc -pthread -shared build/temp.linux-x86_64-2.4/src/fsimage/fsimage.o -L../../tools/libfsimage/common/ -lfsimage -o build/lib.linux-x86_64-2.4/fsimage.so
running build_scripts
creating build/scripts-2.4
copying and adjusting src/pygrub -> build/scripts-2.4
changing mode of build/scripts-2.4/pygrub from 644 to 755

# python setup.py install

Naturally I recommend reviewing the source code and making sure it’s legit (you do trust random blogs right?) but if you can’t get it to build/lack build tools/like gambling, I’ve included pre-built binaries in the archive and you can just do

# python setup.py install

Then do a quick check to make sure pygrub throws it’s help message, rather than any nasty errors indicating something went wrong.

# /usr/bin/pygrub


We’re almost ready to try booting again! First create a directory that the new pygrub expects:

# mkdir /var/run/xend/boot/

Then launch the machine creation – this time, it should actually boot and run through the usual systemd startup process. If you installed with /boot set to ext3 via the installer, everything should just work and you’ll be up and running!

If you had to do the xfs to ext3 conversion trick, the bootup process will explode with scary errors like the following:

.......
[ TIME ] Timed out waiting for device dev-disk-by\x2duuid-245...95b2c23.device.
[DEPEND] Dependency failed for /boot.
[DEPEND] Dependency failed for Local File Systems.
[DEPEND] Dependency failed for Relabel all filesystems, if necessary.
[DEPEND] Dependency failed for Mark the need to relabel after reboot.
[  101.134423] systemd-journald[414]: Received request to flush runtime journal from PID 1
[  101.658465] type=1305 audit(1405735466.679:4): audit_pid=476 old=0 auid=4294967295 ses=4294967295 subj=system_u:system_r:auditd_t:s0 res=1
Welcome to emergency mode! After logging in, type "journalctl -xb" to view
system logs, "systemctl reboot" to reboot, "systemctl default" to try again
to boot into default mode.
Give root password for maintenance
(or type Control-D to continue):

The issue is that the conversion of the filesystem changed it’s UUID, plus the filesystem type in /etc/fstab no longer matches.

We can fix this easily by dropping to the recovery shell by entering the root password above and executing the following commands:

guest# sed -i -e '/boot/ s/UUID=[0-9\-]*/\/dev\/xvda1/' /etc/fstab
guest# sed -i -e '/boot/ s/xfs/ext3/' /etc/fstab
guest# cat /etc/fstab | grep '/boot'

Make sure the cat returns a valid /boot line, it should be using /dev/xvda1 as the device and ext3 as the filesystem now.

Finally, stop and start the instance (reboots seem to hang for me):

guest# shutdown -h now
xm create -c vmguest1

It should now boot correctly! Go forth and enjoy your new VM!

CentOS Linux 7 (Core)
Kernel 3.10.0-123.el7.x86_64 on an x86_64

This is certainly a hack – doing this backport of pygrub solved my personal issue, but it’s entirely possible it may break other things, so do your own testing and determine whether it’s suitable for you and your environment or not.