Tag Archives: open source

All posts relating to Open Source software, mostly but not exclusively UNIX focused.

Rescuing a corrupt tarfile

Having upgraded OS recently, I was using a poor quality sneakernet of free USB sticks to transfer some data from my previous installation. This dodgy process strangely enough managed to result in some data corruption of my .tar.bz2 file, leaving me in the position of having to go to other backups to recover my data. :-(

$ tar -xkjvf corrupt_archive.tar.bz2
....
jcarr/Pictures/fluffy_cats.jpg
jcarr/Documents/favourite_java_exceptions.txt

bzip2: Data integrity error when decompressing.
    Input file = (stdin), output file = (stdout)

It is possible that the compressed file(s) have become corrupted.
You can use the -tvv option to test integrity of such files.

You can use the `bzip2recover' program to attempt to recover
data from undamaged sections of corrupted files.

tar: Unexpected EOF in archive
tar: Error is not recoverable: exiting now

This is the first time I’ve ever experienced a corruption like this with .tar.bz2. The file was the expected size, so it wasn’t a case of a truncated file, the data was there but something part way through the file was corrupted and causing bzip2 to fail with decompression.

Bzip2 comes with a recovery utility, which works by rescuing each block into an individual file. We then run -t over them to identify any blocks which are clearly corrupt, and delete them accordingly.

$ bzip2recover corrupt_archive.tar.bz2
$ bzip2 -t rec*.tar.bz2

Then we can put the blocks back together in an uncompressed form of the original file (in this case tar);

$ bzip2 -dc rec*.tar.bz2 > recovered_data.tar

Finally we want to extract the actual tar file itself to get the data. However, tar might not be too happy about having lost some blocks inside it, or having other forms of corruption.

# tar -xvf recovered_data.tar
...
jcarr/Pictures/fluffy_cats.jpg
jcarr/Documents/favourite_java_exceptions.txt
tar: Skipping to next header
tar: Archive contains ‘\223%\322TGG!XہI.’ where numeric off_t value expected
tar: Exiting with failure status due to previous errors

I couldn’t figure out a way to get tar to skip over, or repair the file, however I did find a few posts online suggesting the use of the much older cpio utility that still exists on most unixes today.

$ cpio -ivd -H tar < recovered_data.tar

This worked perfectly! cpio complained about some files it couldn’t recover, but it recovered the vast majority of the damaged contents. Of course I can’t trust any files completely that I’ve restored, always possible there is some small corruption after such a restore, however if you lack backups, or your backups themselves are corrupted, this could be the way to go to get back some of your precious data.

In this case I was lucky that the header of the file was still intact  – if bzip2 or tar can’t read the file header to identify it as a tar.bz2 to being with, other measures may need to be taken. There’s heaps of suggestions online, just make a copy of the corrupted file first then try the different suggested methods till you find an approach that (hopefully) works for you.

Funny tasting Squid Resolver

squid_logoSquid is a very popular (and time tested) proxy server, it’s generally the go-to solution for a  proxy server in a *nix environment and is capable of providing general caching proxy services (including transparent) as well as more sophisticated reverse proxy solutions.

I recently ran into an issue where Squid was refusing to resolve some DNS addresses on our network – not an uncommon problem if using a public DNS server instead of an internal-only DNS server by mistake.

The first step was to check the nameservers listed in /etc/resolv.conf and make sure they were correct and returning valid results. In this case they were, all the name servers correctly resolved the address without any issue.

Next step was to check for specific configuration in Squid – some applications like Squid and Nginx allow you to specifically set their nameservers to something other than the contents of /etc/resolv.conf. In this case, there was no such configuration, in fact there was no configuration relating to DNS at all, meaning it would have to fall back to the operating system resolver.

Or does it? Generally Linux applications use the OS resolver which follows a set order to discover hosts defined explicitly in /etc/hosts, or tries the nameservers in /etc/resolv.conf. When either file is changed, the changes are reflected immediately on the next query for those addresses.

However Squid has it’s own approach. Unless it’s using DNS name servers specifically defined in it’s configuration file, instead of using the OS resolver it reads the configuration in /etc/resolv.conf as a once-off startup action, then continues to use the name servers that were defined for the lifetime of the process.

You can see this in the logs – at startup time Squid logs the servers it’s using in cache.log:

# grep nameserver /var/log/squid/cache.log
2014/07/02 11:57:37| Adding nameserver 192.168.1.10 from /etc/resolv.conf

From this, the sequence of events is simple to figure out:

  1. A server was brought online, using a public DNS server that lacked some of our internal records.
  2. Squid was started up, reading in that DNS server from /etc/resolv.conf.
  3. The DNS server addresses were corrected and immediately resolved all other applications – but Squid stuck with the old address still, so continued to refuse the queries.

Resolving the immediate issue is as simple as restarting the Squid process to force it to pickup the new resolver settings. But what if your DNS server values could change at any future stage without warning?

If you’re using Puppet, you could use a custom fact (like this one) that exposes the current name servers on the system, then writes them into the Squid configuration file using the dns_nameservers configuration parameter and notifies the Squid service to reload on any change of the configuration file.

Or if your squid server is always going to be using a particular DNS server, regardless of what the host is using, you can simply set the dns_nameservers parameter in Squid to point to the desired servers.

Thunderbolt and other Macbook hardware issues with Linux

Having semi-recently switched to a Macbook Pro Retina 15″ at work, I decided to give MacOS a go. It’s been interesting, it’s not too bad an operating system and whilst it is something I could use on an ongoing basis, I quickly longed for the happy embrace of GNU/Linux where I have a bit more power and control over the system.

Generally the Linux kernel supports most of the Macbook hardware out-of-the-box (As of 3.15 anyway), but with a couple exceptions:

  • I believe support for the dual GPU mode switching is now fixed, however the model I’m using now is Intel only, so I can’t test this unfortunately.
  • The Apple Webcam does not yet have a driver. The older iSight driver doesn’t work, since the new gen of hardware is a PCIe connected device, not USB.
  • The WiFi requires a third party driver to be built for your kernel. You’ll want the latest Broadcom 802.11 STA driver in order for it to built with new kernel versions. Ubuntu users, get this version, or more recent.
  • If you’re having weird hangs where the Macbook just halts frequently waiting on on I/O, add “libata.force=noncq” kernel parameter. It seems that there is some bug with this SSD and some kernel versions that leads to weird I/O halts, which is fixed by this option.
  • Thunderbolt support is limited to only working on devices connected at boot up, no hotplug. Additionally, when using Thunderbolt, Suspend/Resume is disabled (although it works otherwise if there’s no Thunderbolt involved).

Of all these issues, the lack of Thunderbolt support was the one that was really frustrating me, since I need to use a Thunderbolt based Ethernet adaptor currently on a daily basis and I always rely on Suspend and Resume heavily.

Thankfully two kernel developers, Andreas Noever and Matthew J Garrett have been working on a series of kernel patches that introduce support for Thunderbolt hotplug and thus allow it to work on suspend and resume.

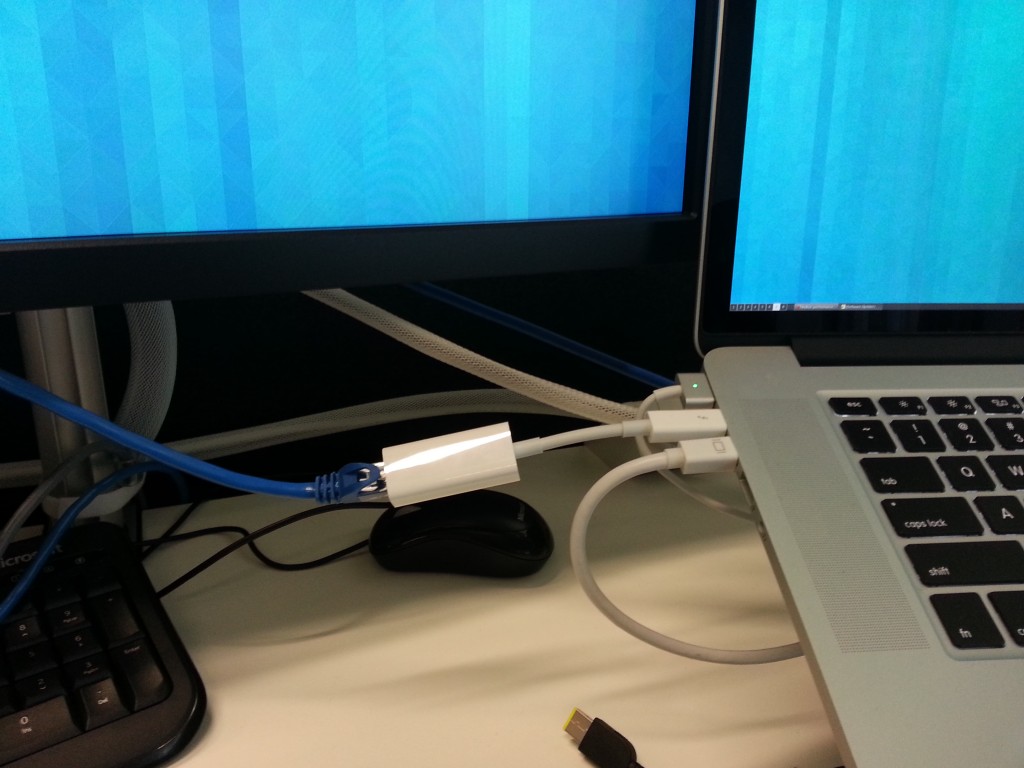
Sadly whilst this patch is awesome, it doesn't yet do wireless Thunderbolt for when the ethernet cable you want is too bloody short.

You too can now enjoy the shackles of a wired LAN connection like it’s 1990 all over again!

It doesn’t sound like it has been easy based on the posts on MJG’s blog which are well worth a read – essentially the Apple firmware does weird things with the Thunderbolt hardware when the OS doesn’t identify itself as Darwin (MacOS’s kernel) and likes to power stuff down after suspend/resume, so it’s taken some effort to debug and put in hardware-specific workarounds.
It will surely only be a matter of time before these awesome patches are merged, but if you need them right now and are happy to run rather beta kernel patches (who isn’t??) then the easiest way is to checkout their Git repo of 3.15 with all the patches applied. This repository should build cleanly via the usual means, and provide you with a new kernel module called “thunderbolt”.I’ve been testing it for a few days and it looks really good. I’ve had no kernel panics, freezes, devices failing to work or any issues with suspend/resume with these patches – the features that they claim to work, just work.  The only catches are:

  • If you boot the Macbook with the Thunderbolt device attached, it will be treated like a PCIe hotplug device… except that when you remove it, that Thunderbolt port won’t work again until the next restart. I recommend booting the Macbook with no devices attached, then hotplug once started to avoid this issue. I always remove before suspend and re-connect after resume as well (mostly because it’s a laptop and it’s easy to do so and avoid any issues).
  • The developers advise that Thunderbolt Displays don’t work at this time (however Mini DisplayPort connected screens work fine, even though they share the same socket).
  • The developers advise that chaining Thunderbolt devices is not yet supported. So stick to one device per port for now.

If you’re using Linux on a Macbook, I recommend grabbing the patched source and doing a build. Hopefully all these patches make their way into 3.16 or 3.17 and make this post irrelevant soon.

If you’re extra lazy and trust a random blogger’s binary packages, I’ve built deb packages for Ubuntu 13.10 (and should work just fine on 14.04 as well) for both the Thunderbolt enabled kernel as well as the Broadcom WiFi. You can download these packages here.

There are no seasons in the datacenter

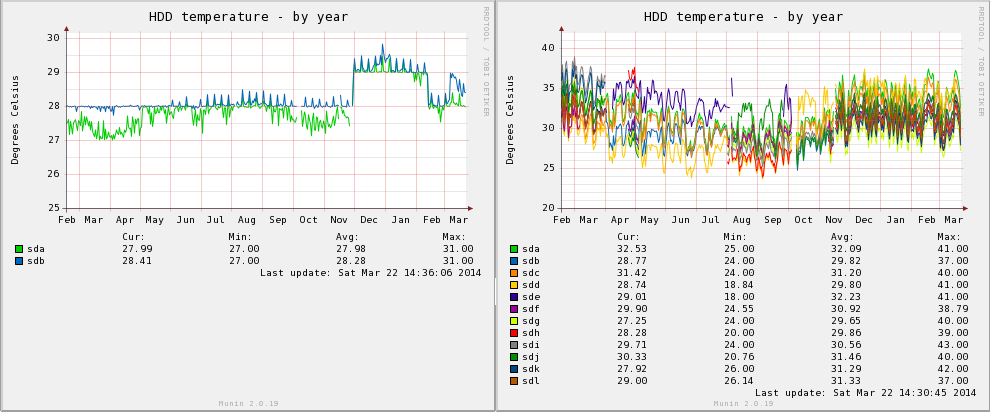
I always like reviewing the Munin temperature graphs between my co-located server and my home server, the temperature range fluctuations in non-air conditioned rooms is always quite interesting – as much as 25 degrees Celsius over the course of the year, inline with the seasons.

Tmp

Co-location machine (left), home machine (right).

t,p

Co-location machine (left), home machine (right).

Fedora x86_64 installer hanging on KVM hosts

Had an annoying problem today where a Fedora x86_64 guest wouldn’t install on my CentOS KVM server. Weirdly the i386 version had installed perfectly, but the x86_64 version would repeatedly crash and chew up heaps of CPU at the software package selection screen.

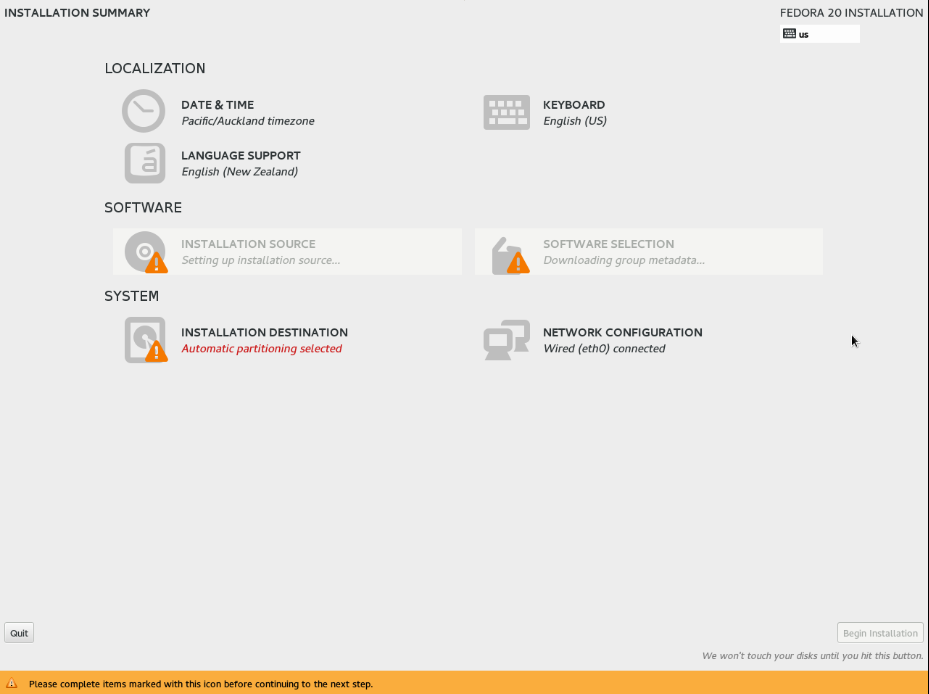
I hate being stuck here...

Stuck here, unresponsive console, no mouse, etc?

Turns out that 512MB of RAM isn’t enough to install Fedora x86_64, but is enough to get away with installing Fedora i386 on. Simply boost the RAM allocation of the VM up to 1GB, and the installation will proceed OK. You can drop the RAM allocation down again afterwards.

Unsure why the installer dies in such a strange fashion, I would have expected Linux’s OOM to terminate the installer and leave me with a clear message, but maybe Anaconda is doing something weird like OOM protection and just ends up with the system running out of memory and hanging.

linux.conf.au 2014

I’ve just returned from my annual pilgrimage to linux.conf.au, which was held in Perth this year. It’s the first time I’ve been over to West Australia, it’s a whole 5 hour flight from Sydney –  longer than it takes to fly to New Zealand.

Perth’s climate is a very dry heat compared to Sydney, so although it was actually hotter than Sydney for most of the week, it didn’t feel quite as unpleasant – other than the final day which hit 45 degrees and was baking hot…

It’s also a very clean/tidy city, the well maintained nature was very noticeable with the city and gardens being immaculately trimmed – not sure if it’s always been like this, or if it’s a side effect of the mining wealth in the economy allowing the local government to afford it more effectively.

The towering metropolis of mining wealth.

The towering metropolis of mining wealth.

As usual, the conference ran for 5 full days and featured 4-5 concurrent streams of talks during the week. The quality was generally high as always, although I feel that content selection has shifted away from a lot of deep dive technical talks to more high level talks, and that OpenStack (whilst awesome) is taking up far too much of the conference and really deserves it’s own dedicated conference now.

I’ve prepared my personal shortlist of the talks I enjoyed most of all for anyone who wants to spend a bit of time watching some of the recorded sessions.


Interesting New(ish) Software

  1. RatticDB – A web-based password storage system written in Python written by friends in Melbourne. I’ve been trialling it and since then it’s growing in popularity and awareness, as well as getting security audits (and fixes) [video] [project homepage].
  2. MARS Light – This is an insanely awesome replacement for DRBD designed to address the issues of DRBD when replicating over slower long WAN links. Like DRBD, MARS Light is a block-level replication, so ideal for entire datacenter and VM replication. [video] [project homepage].
  3. Pettycoin – Proposal/design for an adjacent network to Bitcoin designed for microtransactions. It’s currently under development, but is an interesting idea. [video] [project homepage].
  4. Lua code in Mediawiki – the Mediawiki developers have added the ability for Wikipedia editors to write Lua code that is executed server side which is pretty insanely awesome when you think about how normally nobody wants to allow untrusted public the ability to remote execute code on systems. The developers have taken Lua and created a “safe” version that runs inside PHP with restrictions to make this possible. [video] [project homepage].
  5. OpenShift – RedHat did a demonstration on their hosted (and open source) PAAS platform, OpenShift. It’s a solution I’ve been looking at before, if you’re a developer whom doesn’t care about infrastructure management, it looks very attractive. [video] [project homepage].


Evolution of Linux

  1. D-Bus in the Kernel – Lennart Pottering (of Pulseaudio and SystemD fame) presented the efforts he’s been involved in to fix D-Bus’s shortcomings and move it into the kernel itself and have D-Bus as a proper high speed IPC solution for the Linux kernel. [video]
  2. The Six Stages of SystemD – Presentation by an engineer who has been moving systems to SystemD and the process he went through and his thoughts/experience with SystemD. Really showcases the value that moving to SystemD will bring to GNU/Linux distributions. [video]
  3. Development Tools & The UNIX Philosophy – Excellent talk by a Python developer on how we should stop accepting command-line only tools as being the “right” or “proper” UNIX-style tools. Some tools (eg debuggers) are just better suited for graphical interfaces, and that it still meets the UNIX philosophy of having one tool doing one thing well. I really like the argument he makes and have to agree, in some cases GUIs are just more suitable for some tasks. [video]


Walkthroughs and Warstories

  1. TCP Tuning for the Web – presented by one of the co-founders of Fastly showing the various techniques they use to improve the performance of TCP connections and handle issues such as DDOS attacks. Excellent talk by a very smart networking engineer. [video]
  2. Massive Scaling of Graphite – very interesting talk on the massive scaling issues involved to collect statistics with Graphite and some impressive and scary stats on the lifespans and abuse that SSDs will tolerate (which is nowhere near as much as they should!). [video]
  3. Maintaining Internal Forks – One of the FreeBSD developers spoke on how his company maintains an internal fork of FreeBSD (with various modifications for their storage product) and the challenges of keeping it synced with the current releases. Lots of common problems, such as pain of handling new upstream releases and re-merging changes. [video]
  4. Reverse engineering firmware – Mathew Garrett dug deep into vendor firmware configuration tools and explained how to reverse engineer their calls with various tools such as strace, IO and memory mapping tools. Well worth a watch purely for the fact that Matthew Garrett is an amazing speaker. [video]
  5. Android, The positronic brain – Interesting session on how to build native applications for Android devices, such as cross compiling daemons and how the internal structure of Android is laid out. [video]
  6. Rapid OpenStack Deployment – Double-length Tutorial/presentation on how to build OpenStack clusters. Very useful if you’re looking at building one. [video]
  7. Debian on AWS – Interesting talk on how the Debian project is using Amazon AWS for various serving projects and how they’re handling AMI builds. [video]
  8. A Web Page in Seven Syscalls – Excellent walk through on Varnish by one of the developers. Nothing too new for anyone who’s been using it, but a good explanation of how it works and what it’s used for. [video]


Other Cool Stuff

  1. Deploying software updates to ArduSat in orbit by Jonathan Oxer – Launching Arduino powered satelittes into orbit and updating them remotely to allow them to be used for educational and research purposes. What could possibly be more awesome than this? [video].
  2. HTTP/2.0 and you – Discussion of the emerging HTTP/2.0 standard. Interesting and important stuff for anyone working in the online space. [video]
  3. OpenStreetMap – Very interesting talk from the director of OpenStreetMap Team about how OpenStreetMap is used around disaster prone areas and getting the local community to assist with generating maps, which are being used by humanitarian teams to help with the disaster relief efforts. [video]
  4. Linux File Systems, Where did they come from? – A great look at the history and development cycles of the different filesytems in the Linux kernel – comparing ext1/2/3/4, XFS, ReiserFS, Btrfs and others. [video]
  5. A pseudo-random talk on entropy – Good explanation of the importance of entropy on Linux systems, but much more low level and about what tools there are for helping with it. Some cross-over with my own previous writings on this topic. [video]

Naturally there have been many other excellent talks – the above is just a selection of the ones that I got the most out from during the conference. Take a look at the full schedule to find other talks that might interest, almost all sessions got recorded during the conference.

Encrypting disk on Android 4

Traditional computer operating systems have been around for a while, long enough that concerns around physical security have been well addressed. We understand the value and power that the information on our computers can provide to an attacker, so we have locked them down with features such as disk encryption, passphrase protected lock screens and techniques to prevent unwanted DMA attacks via high speed buses.

Yet despite the massive development of mobile devices technology in the past several years, a number of these features didn’t manage to make their way into the mobile operating systems as defaults. Whilst we take the time to setup disk encryption on our laptops and maybe desktops, we tend not to bother securing our mobile devices, possibly due to the perception of them being less risky to have exposed, or that they are less attractive targets.

Even a relatively paranoid IT geek like myself with an encrypted laptop, secure passphrases, and VPNs, still had a mobile phone that was protected with nothing more than it’s physical proximity to myself. Anyone gaining physical access to my phone could unlock it, whether it be by guessing a trivial unlock pattern, or by attaching it to another computer and reading the unencrypted filesystem.

And as these mobile devices have increased in functionality, so has the risk of an attacker getting hold of the device. When a mobile phone did nothing but phone calls and txts, having someone gain access would be more of a annoyance when they rack up a bill or prank call your contacts, than a serious risk.

But rather than leave it there, we started adding other productivity features – email, so we could keep in touch on the go. Instant messaging. Fully featured web browers that sync account details, bookmarks and history with your desktop. Banking applications. Access to shared storage solutions like Dropbox. Suddenly a mobile device is a much more attractive target.

And even if we decide that the mobile apps are too limited in scope, there’s  the risk of an attacker using the information such as credentials stored on the device to gain full access to the desktop version of these services. Having an email application that limits the phone to the inbox can reduce risk by protecting your archives, but not if the attacker can obtain your full username/passphrase from the device and then use it to gain full access with some alternative software.

Remember that obtaining credentials from a device isn’t hard – the credentials  have to be kept in some decrypted format somewhere on disk, so even if they’re hashed/obfuscated in some form, they’ll still have the key that enables them to be exposed somewhere on disk.

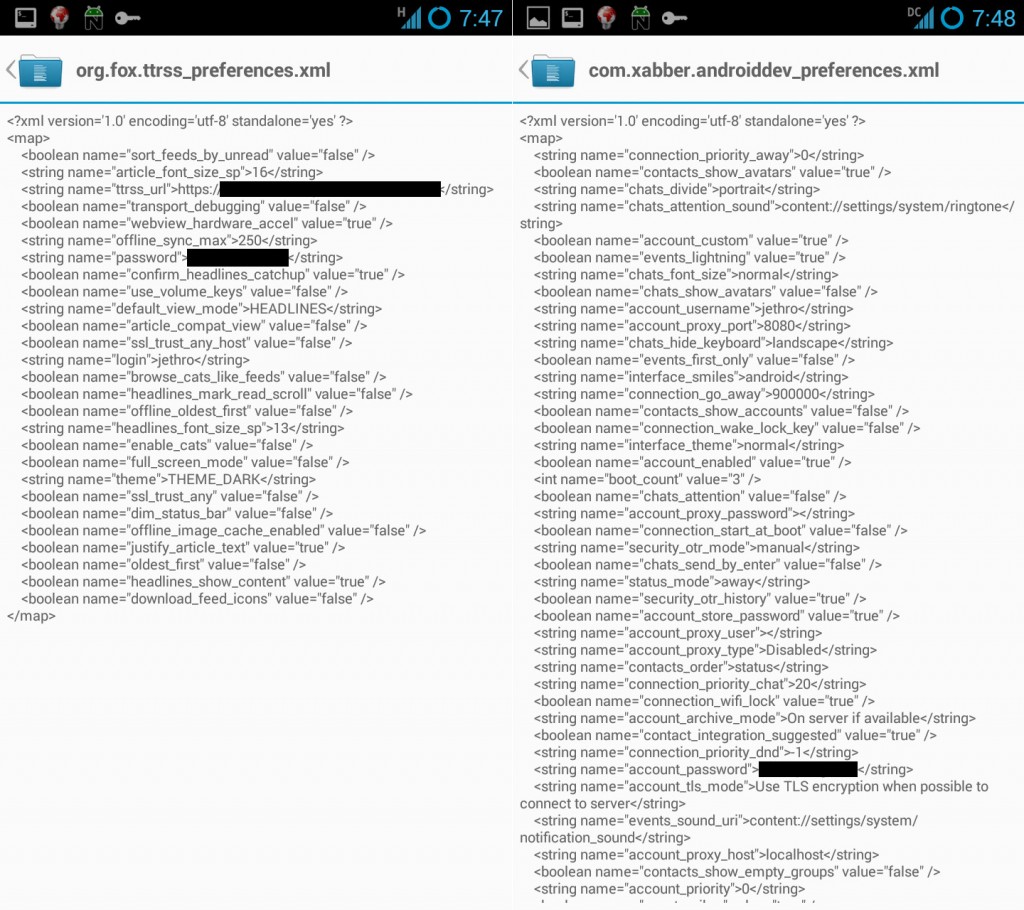
A quick grep through the /data/ volume on my phone revealed numerous applications that had my passphrases in plain text, extremely easy pickings for an attacker.

Mmmm plain text passwords. :-)

Mmmm plain text passwords. :-)

I was getting increasingly concerned with this hole in my security, so recently having replaced my Galaxy Nexus with a Samsung Galaxy Note II, I decided to set it up in a more secure fashion.

Android added disk encryption in Android 3, but it’s suffered two main issues that limits it’s usefulness:

  1. The disk encryption only covers the data volumes (/data, /sdcard) which is good in that it protects the data, but it still leaves the application volumes open to be exploited by anyone wanting to install malware such as key loggers.
  2. Turning on Android disk encryption then forces the user to use either a PIN or a passphrase to unlock their device as swipe or pattern unlock is disabled. For a frequent phone user this is too much of an usability issue, it makes frequent locks/unlocks much more difficult, so users may chose not to use encryption altogether, or choose a very easy/weak passphrase.

The first point I can’t do much about without digging into the low guts of Android, however the second is fixable. My personal acceptable trade-off is a weaker lock screen using a pattern, but being able to have a secure disk encryption passphrase. This ensures that if powered off, an attacker can’t exploit my data and the passphrase is long and secure, but if the phone is running, I take a compromise of security for convenience and ease of use.

There’s still the risk of an attacker installing malware on the non-encrypted OS portion of the mobile device, however if I lose physical access of my phone in an untrusted environment (eg border security confiscation) I can reload the OS from backup.

To setup disk encryption on Android 4 without losing pattern unlock, instead of adjusting via the settings interface, you need to enable it via the shell -easiest way is via the ADB shell in root mode.

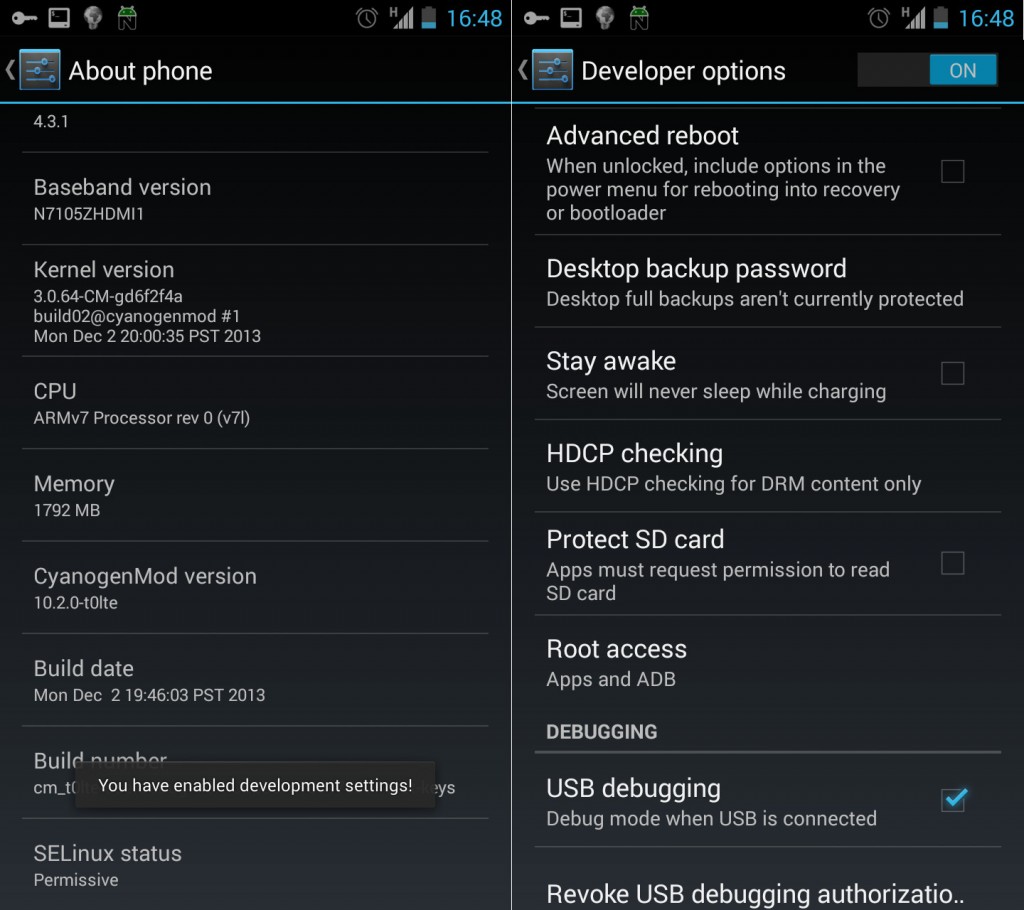
Firstly you need to enable developer mode in Settings -> About Phone by tapping the build number multiple times, until it tells you that the developer mode has been unlocked. Then inside Settings -> Developer options, change the “Root Access” option to “Apps and ADB”.

Enable ADB root for all the fun stuff!

Enable ADB root for all the fun stuff!

Secondly, you need a workstation running the latest version of ADB (ships with the Android ADK under platform-tools) and to connect your phone via USB. Once done, you can enable disk encryption with the following commands (where PASSWORD is the desired encryption passphrase).

user@laptop # adb root
user@laptop # adb shell
root@phone:/ #
root@phone:/ # /system/bin/vdc cryptfs enablecrypto inplace PASSWORD

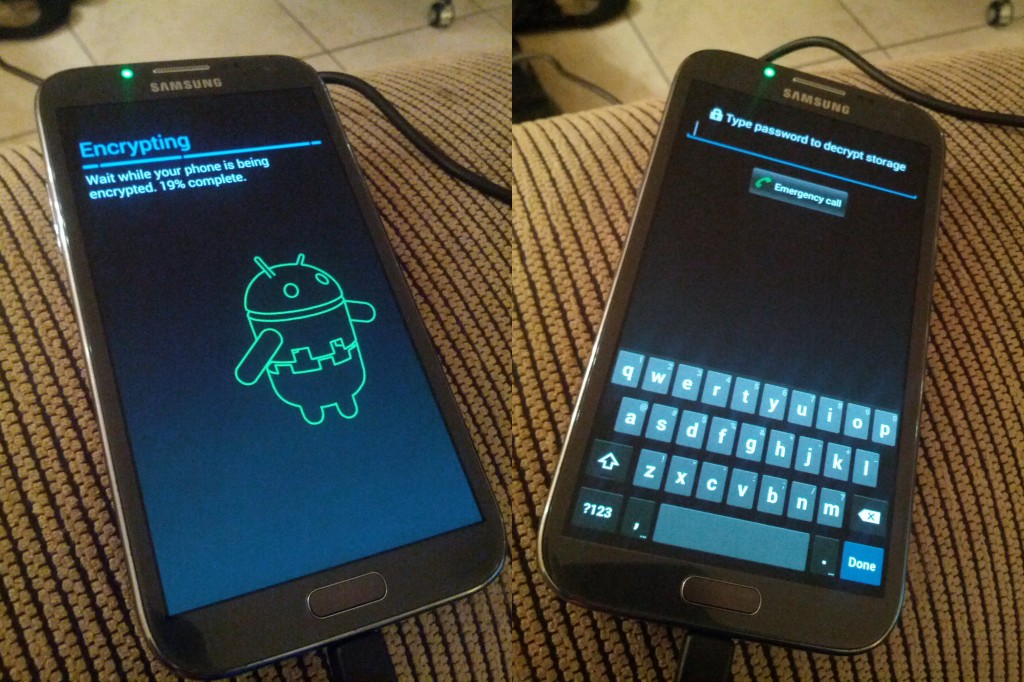
Your Android device will then restart and encrypt itself. This process takes time, factor up to an hour for it to complete it’s work.

Android phone undergoing encryption; and subsequent boot with encryption enabled.

Android phone undergoing encryption; and subsequent boot with encryption enabled.

Once rebooted, your existing pattern based unlock continues to work fine and all your private data and credentials are now secured.

Recovering SW RAID with Ubuntu on Amazon AWS

Amazon’s AWS cloud service is a very popular and generally mature offering, but it does have it’s issues at times – in particular it’s storage options and limited debug facilities.

When using AWS, you have three main storage options for your instances (virtual machine servers):

  1. Ephemeral disk , storage attached locally to your instance which is lost at shutdown or if the instance terminates unexpectedly. A fixed amount is included with your instance, the size set depending on your instance size.
  2. Elastic Block Storage (EBS) which is a network-attached block storage exposed to your Linux instance as if it was a traditional local disk.
  3. EBS with provisioned IOPs – the same as the above, but with guarantees around performance – for a price of course. ;-)

With EBS, there’s no need to use RAID from a disk reliability perspective- the EBS volume itself has it’s own underlying redundancy (although one should still perform snapshots and backups to handle end user failure or systematic EBS failure), which is the common reason for using RAID with conventional physical hosts.

So with RAID being pointless for redundancy in an Amazon world, why write about recovering hosts in AWS using software RAID? Because there are still situations where you may end up using it for purposes other than redundancy:

  1. Poor man’s performance gains – EBS provisioned IOPs are the proper way of getting performance from EBS to meet your particular requirements. But it comes with a cost attached – you pay increasingly more for faster disk, but also need proportionally larger disks minimum sizes to go with the higher speeds (10:1 ratio IOPs:size) which can quickly make a small fast volume prohibitively expensive. A software RAID array can allow you to get more performance by combining numerous small volumes together at low cost.
  2. Merging multiple EBS volumes – EBS volumes have an Amazon-imposed limit of 1TB per volume. If a single filesystem of more than 1TB is required, either LVM or software RAID is needed to merge them.
  3. Merging multiple ephemeral volumes – software RAID can be used to also merge the multiple EBS volumes that Amazon provides on some larger instances. However being ephemeral, if your RAID gets degraded, there’s no need to repair it – just destroy the instance and build a nice new one.

So whilst using software RAID with your AWS Instances can be a legitimate exercise, it can also introduce it’s own share of issues.

Firstly you can no longer use EBS snapshotting to do backups of the EBS volumes, unless you first halt the entire RAID array/freeze the filesystem writes for the duration of all the snapshots to be created – which depending on your application may or may not be feasible.

Secondly you now have the issue of increased complexity of your I/O configuration. If using automation to build your instances, you need to do additional work to handle the setup of the array which is a one-time investment, but the use of RAID also adds complexity to the maintenance (such as resizes) and increases the risk of a fault occurring.

I recently had the excitement/misfortune of such an experience. We had a pair of Ubuntu 12.04 LTS instances using GlusterFS to provide a redundant NFS mount to some of our legacy applications running in AWS (AWS unfortunately lacks a hosted NFS filer service). To provide sufficient speed to an otherwise small volume, RAID 0 had been used with a number of small EBS volumes.

The RAID array was nearly full, so a resize/grow operation was required. This is not an uncommon requirement and just involves adding an EBS volume to the instance, growing the RAID array size and expanding the filesystem on top. Unfortunately something nasty happened between Gluster and the Linux kernel, where the RAID resize operation on one of the two hosts suddenly triggered a kernel panic and failed, killing the host. I wasn’t able to get the logs for it, but at this stage it looks like gluster tried to do some operation right when the resize was active and instead of being blocked, triggered a panic.

Upon a subsequent restart, the host didn’t come back online. Connecting to the AWS Instance’s console output (ec2-get-console-output <instanceid>) showed that the RAID array failure was preventing the instance from booting back up, even through it was an auxiliary mount, not the root filesystem or anything required to boot.

The system may have suffered a hardware fault, such as a disk drive
failure.  The root device may depend on the RAID devices being online. One
or more of the following RAID devices are degraded:
Personalities : [linear] [multipath] [raid0] [raid1] [raid6] [raid5] [raid4] [raid10] 
md0 : inactive xvdn[9](S) xvdm[7](S) xvdj[4](S) xvdi[3](S) xvdf[0](S) xvdh[2](S) xvdk[5](S) xvdl[6](S) xvdg[1](S)
      13630912 blocks super 1.2

unused devices: <none>
Attempting to start the RAID in degraded mode...
mdadm: CREATE user root not found
mdadm: CREATE group disk not found
[31761224.516958] bio: create slab <bio-1> at 1
[31761224.516976] md/raid:md0: not clean -- starting background reconstruction
[31761224.516981] md/raid:md0: reshape will continue
[31761224.516996] md/raid:md0: device xvdm operational as raid disk 7
[31761224.517002] md/raid:md0: device xvdj operational as raid disk 4
[31761224.517007] md/raid:md0: device xvdi operational as raid disk 3
[31761224.517013] md/raid:md0: device xvdf operational as raid disk 0
[31761224.517018] md/raid:md0: device xvdh operational as raid disk 2
[31761224.517023] md/raid:md0: device xvdk operational as raid disk 5
[31761224.517029] md/raid:md0: device xvdl operational as raid disk 6
[31761224.517034] md/raid:md0: device xvdg operational as raid disk 1
[31761224.517683] md/raid:md0: allocated 10592kB
[31761224.517771] md/raid:md0: cannot start dirty degraded array.
[31761224.518405] md/raid:md0: failed to run raid set.
[31761224.518412] md: pers->run() failed ...
mdadm: failed to start array /dev/md0: Input/output error
mdadm: CREATE user root not found
mdadm: CREATE group disk not found
Could not start the RAID in degraded mode.
Dropping to a shell.

BusyBox v1.18.5 (Ubuntu 1:1.18.5-1ubuntu4.1) built-in shell (ash)
Enter 'help' for a list of built-in commands.

Dropping to a shell during bootup problems is an approach that has differing perspectives – personally I want my hosts to boot regardless of how messed up things are so I can get SSH, but others differ and prefer the safety of halting and dropping to a recovery shell for the sysadmin to resolve. Ubuntu is configured to do the latter by default.

But regardless of your views on this subject, dropping to a shell leaves you stuck when running AWS instances, since there is no way to interact with this console – Amazon doesn’t have a proper console for interacting with instances like a traditional VPS provider, you’re limited to only seeing the console log.

Ubuntu’s documentation actually advises that in the event of a failed RAID array, you can still force a boot by setting a kernel option bootdegraded=true. This helps if the array was degraded, but in this case the array had entirely failed, rather than being degraded, and Ubuntu treats that differently.

Thankfully it is possible to recover the failed instance, by attaching it’s volume to another instance, adjusting the initramfs to allow booting even whilst the RAID is failed and then once booted, you can do a repair on the host itself.

To do this repair you require an additional Linux instance to use as a recovery host and the Amazon CLI tools to be installed on your workstation.

# Set some variables with your instance IDs (eg i-abcd3)
export FAILED=setme
export RECOVERY=setme

# Fetch the root filesystem EBS volume ID and set a var with it:
export VOLUME=vol-setme

# Now stop the failed instance, so we can detach it's root volume.
# (Note: wait till status goes from "stopping" to "stopped")
ec2-stop-instances --force $FAILED
ec2-describe-instances $FAILED | grep INSTANCE | awk '{ print $5 }'

# Attach the root volume to the recovery host as /dev/sdo
ec2-detach-volume $VOLUME -i $FAILED
ec2-attach-volume $VOLUME -i $RECOVERY -d /dev/sdo

# Mount the root volume on the recovery host
ssh recoveryhost.example.com
mkdir /mnt/recovery
mount /dev/sdo /mnt/recovery

# Disable raid startup scripts for initramfs/initrd. We need to
# unpack the old file and modify the startup scripts inside it.
cp /mnt/recovery/boot/initrd.img-LATESTHERE-virtual /tmp/initrd-old.img
cd /tmp/
mkdir initrd-test
cd initrd-test
cpio --extract < ../initrd-old.img
vim scripts/local-premount/mdadm
- degraded_arrays || exit 0
- mountroot_fail || panic "Dropping to a shell."
+ #degraded_arrays || exit 0
+ #mountroot_fail || panic "Dropping to a shell."
find . | cpio -o -H newc > ../initrd-new.img
cd ..
gzip initrd-new.img
cp initrd-new.img.gz /mnt/recovery/boot/initrd.img-LATESTHERE-virtual

# Disable mounting of filesystem at boot (otherwise startup process
# will fail despite the array being skipped).
vim /mnt/recovery/etc/fstab
- /dev/md0    /mnt/myraidarray    xfs    defaults    1    2
+ #/dev/md0    /mnt/myraidarray    xfs    defaults    1    2

# Work done, umount volume.
umount /mnt/recovery

# Re-attach the root volume back to the failed instance
ec2-detach-volume $VOLUME -i $RECOVERY
ec2-attach-volume $VOLUME -i $FAILED -d /dev/sda1

# Startup the failed instance.
# (Note: Wait for status to go from pending to running)
ec2-start-instances $FAILED
ec2-describe-instances $FAILED | grep INSTANCE | awk '{ print $5 }'

# Watch the startup console. Note: java.lang.NullPointerException
# means that there is no output from the console yet.
ec2-get-console-output $FAILED

# Host should startup, you can get access via SSH and repair RAID
# array via usual means.

The above is very Ubuntu-specific, but the techniques shown are transferable to other platforms as well – just note that the scripts inside the initramfs/initrd will vary per distribution, it’s one of the components of a GNU/Linux system that is completely specific to the distribution vendor.

Route53 with NamedManager 1.8.0

Just released NamedManager 1.8.0, my open source web-based DNS management tool. This release fixes some bugs with MySQL 5.6 and internationalized domain names, but also includes support for using Amazon AWS Route53 alongside the existing Bind9 support.

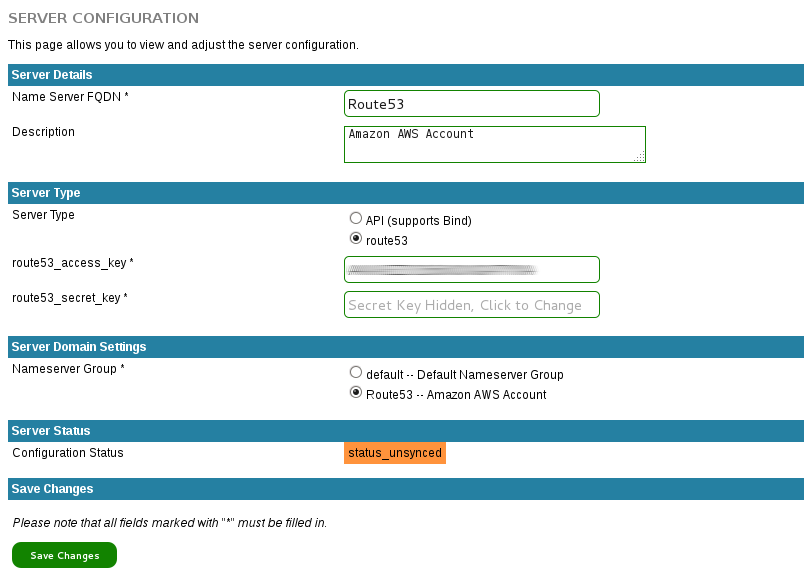
Just add a name server entry with the type of Route53 and your Amazon credentials and a background process will sync all DNS changes to Route53. You can mix and match thanks to the groups feature, so if you want some zones going to both Bind9 and Route53 and others going to just Route53 or Bind9, you can do so.

NamedManager, now with cloudy goodness.

NamedManager, now with cloudy goodness.

As always, the easiest installation is from the provided RPMs, however you can also install from tarball or from Git – just refer to the installation documentation.

This feature is considered stable, however it is new, so be wary for bugs and issues – and report any issues you encounter back to me via email or the project manager issue tracker.

Jconsole to remote servers, easily

At work I support a number of different Java applications. Sadly they’re not all well behaved and it’s sometimes necessary to have to connect to the JMX port with Jconsole and take a look at what’s going on.

Jconsole isn't as pretty as newer services like Newrelic, but it's always there for you.

Jconsole isn’t as pretty as newer services like Newrelic, but it’s always there for you and information isn’t delayed.

This is usually easy enough when dealing with a local application, or an application on a LAN with very lax firewall policies, however in a hardened hosting environment with tight policies, it can be more difficult.

Even if the JMX port is permitted by your firewall policies, there’s another challange due to Jconsole needing to also connect to the RMI port, which can vary and is unlikely to be included in your firewall policies. This also makes it hard to do SSH port forwarding, since you have to find out what port is in use each time, and it just gets messy.

Thankfully there is an easier way using good old SSH – this will work with GNU/Linux and MacOS (Windows users will need to figure out the equivalent Putty configuration).

Firstly, open an SSH SOCKS proxy connection with:

ssh -D 1234 myjavapp.example.com

Secondly in a different shell, launch Jconsole, passing parameters to use the SOCKS proxy for all connections. Assuming that the JMX is listening on 7199, you’d end up with:

jconsole -J-DsocksProxyHost=localhost -J-DsocksProxyPort=1234 \
          service:jmx:rmi:///jndi/rmi://localhost:7199/jmxrmi

And you’re in, through any firewalls and SSH ensures your connection is properly encrypted.  If opening multiple Jconsole connections, you just need to establish a different SOCKS proxy port connection each time.

If your application isn’t currently providing a JMX listening port, the following configuration will setup the JMX port. Note that this configuration has no authentication, so anyone with an account on the server could connect to the JMX, or if the server lacks a firewall, from other network locations.

-Dcom.sun.management.jmxremote \
-Dcom.sun.management.jmxremote.port=7199 \
-Dcom.sun.management.jmxremote.ssl=false \
-Dcom.sun.management.jmxremote.authenticate=false

These parameters need to get added to the Java startup parameters for your application… this varies a lot by application/platform, but look for JAVA_OPTS or a startup script of some kind and trace through form there.