Tag Archives: open source

All posts relating to Open Source software, mostly but not exclusively UNIX focused.

Radius Rapid Rotate (R3)

I’ve been spending a bit of time lately going through my private source code repositories and tidying up things for public release.

A while ago I had a customer who required their FreeRadius traffic accounting logs to be collected from a few servers and saved onto a mounted network drive. It’s a simple enough problem, however there’s a few requirements that make it slightly trickier than it sounds:

  • Extremely important that log files weren’t lost or corrupted in any circumstance.
  • The archive location was a mounted network drive, this means no guarantee that the filesystem would always be mounted and writable.
  • The rotated files need to be named with the server hostname so that files from multiple servers could be collated in a single location without clashing.
  • Regular frequent execution period, eg every 5 or 10 minutes.

The solution I wrote was “Radius Rapid Rotate” (or R3 since I’m a lazy typist). This utility rotates FreeRadius log files in a manner which meets all the above requirements.

It would have been possible to write this all into an existing application, such as logrotate, however logrotate isn’t intended for such frequent execution and won’t do log rotation onto a network mount in a manner that will handle a dodgy network mount gracefully.

Whilst this application is FreeRadius focused, it would be easy to port to use for other purposes if suitable.

You can read more about R3 and download it’s source code here.

Introducing FlatTraffic

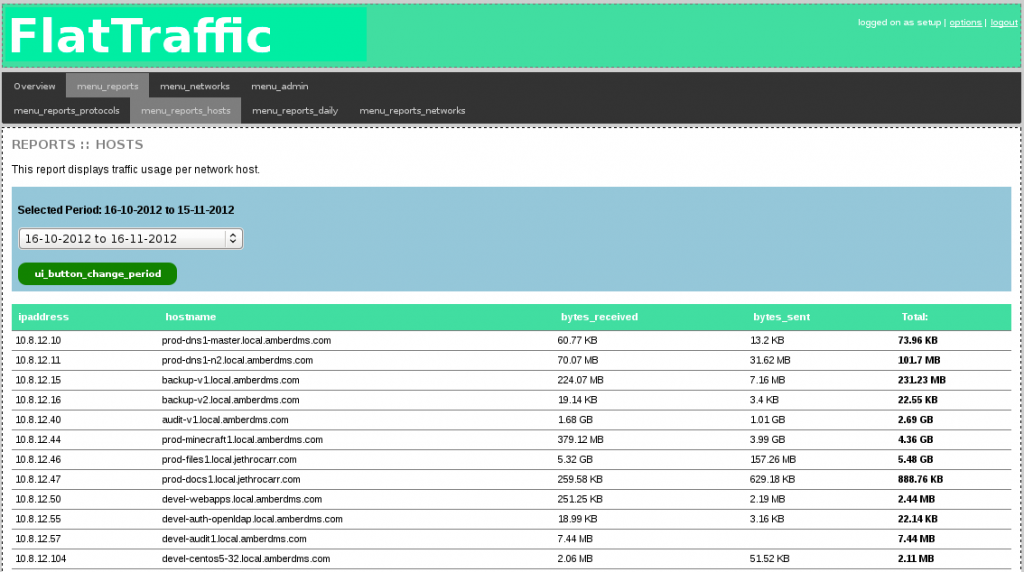
FlatTraffic is an AGPL web interface for analyzing NetFlow records and showing statistics designed to make it clear and easy to determine which hosts of the network are consuming data.

It’s still in beta stage, the application is functional and is documented, but may have bugs and need a few tweaks here and there to bring it up to a stable grade… I’m releasing now so that people can start using and breaking it to get a well tested piece of code to enable a 1.0.0 release.

I’d be lying if I said this was a complete list of my computers….

As you are probably aware, New Zealand (and Australia to a lesser degree) are victims of the much hated internet data cap, an unfortunate response to the economic pressures of providing internet services in our markets.

This is a particular issue when you have situations such as flatmates sharing a connection or a a collection of servers behind an internet link which are hungrily consuming the data cap every second.

To help keep the peace with flatmates I started writing this application when I was back in Wellington to report on traffic usage, using a SQL DB of NetFlow records collected by the gateway. It got put on hold somewhat after moving to Auckland and getting a fat DSL plan from Snap NZ, however it recently got resurrected so that I could track down which host on my home server was chewing through the much smaller data cap at it’s new home at my parents place (sadly my full tower beauty wouldn’t fit into my plane luggage).


FlatTraffic is focused at being a geek home/small server environment tool rather than a general purpose NetFlow analyzer – there are more powerful tools already available for that, my design focus with FlatTraffic is simplicity and doing one job really well.

FlatTraffic assumes you’re using it in a conventional ISP customer situation and allows you to configure the monthly date that your service renews on, so that it will show data usage periods that match your billing period. You can also configure other key options such as 1000 vs 1024 bytes and what automatic DB truncating options should be turned on.

Graphical configuration options, eat your heart out Microsoft developers.

There are currently four reports defined in FlatTraffic:

  1. Traffic consumed by protocol.
  2. Traffic consumed by host (with reverse DNS lookup resolution of host IPs)
  3. Traffic consumed per day.
  4. Traffic consumed by configured network range.

Helpful daily totals, aligned with your ISP’s billing period.

FlatTraffic doesn’t replace a NetFlow collector, you still need to understand the principles of setting up NetFlow traffic accounting and configuring a collector that stores records into a SQL database.

I’ve included some sample scripts for use with flowd (from the flow-tools collection) however I’m going to work on adding support for some better collectors. There’s also work needed for IPv6, since whilst the app UI is IPv6 compatible, the NetFlow reporting is strictly IPv4 only currently.

(Unfortunately I also have issues in that the iptables module I’m using to generate NetFlow records don’t seem to have an ip6tables version, so I’m a bit stuck for generating IPv6 records currently without adding a device between my server and the WAN connection :-(  ).

In my own environment I hand out static DHCP leases to all my systems along with having configured reverse DNS so when doing a host report I can clearly see which host is responsible for what usage – if you have dynamically addressed hosts doing lots of traffic, things won’t be too helpful until you fix the leases for at least the high users.

To keep performance reasonable when working with huge NetFlow databases, FlatTraffic queries summary data for the selected date period and then caches into MySQL MEMORY tables to make subsequent reports quick and non resource intensive.

Please sir, can I have some more flow records?

I’m currently using it with NetFlow DBs with several months worth of data without issue, but it needs further and wider testing to determine how scalable it really is. I’ve worked to avoid putting much memory hungry logic in PHP, instead FlatTraffic tries to do as much as possible inside MySQL itself and uses some easily indexable queries.

To get started with FlatTraffic, visit the project page and install from either RPM, Source Tarball or direct from SVN – and send me feedback, good or bad. If you’re using another type of NetFlow collector other than flowd and would like support take a look at this page. Also note that there’s no reason why FlatTraffic couldn’t end up using other sources of data, it’s not architecturally limited to just NetFlow if you can get similar traffic details in some other form that would do fine.

If you end up using this application, please let me know how you find, always good to know what is/isn’t useful for people.

Munin 2.0.x on EL 5/6 with IPv6

I’ve been looking forwards to Munin 2 for a while – whilst Munin has historically been a great monitoring resource, it’s always been a little bit too fragile for my liking and the 2.x series sounds like it will correct a number of limitations.

Munin 2.0.6 packages recently became available in the EPEL repository, making it easy to add Munin to your RHEL/CentOS/OracleEL 5/6 servers.

Unfortunately the upgrade managed to break value collection for all my hosts, thanks to the fact that I run a dual-stack IPv4/IPv6 network. :-(

Essentially there were two problems encountered:

  1. Firstly, the Munin 2.x master attempts to talk to the nodes via IPv6 by default, as it typical of applications when running in a dual stack environment. However when it isn’t able to establish an IPv6 connection, instead of falling back to IPv4, Munin just fails to connect.
  2. Secondly, the Munin nodes weren’t listing on IPv6 as they should have been – which is the cause of the first problem.

The first problem is an application bug, or possibly a bug in one of the underlying libraries that Munin-node is using. I haven’t gone to the effort of tracing and debugging it at this stage, but if I get some time it would be good to fix properly.

The second is a packaging issue – there are two dependency issues on EL 5 & 6 that need to be resolved before munin-node will support IPv6 properly.

  1. perl-IO-Socket-INET6 must be installed – whilst it may not be a package dependency (at time of writing anyway) it is a functional dependency for IPv6 to work.
  2. perl-Net-Server as provided by EPEL is too old to support listening on IPv6 and needs to be upgraded to version 2.x.

Once the above two issues are corrected, make sure that the munin configuration is correctly configured:

host *
allow ^127\.0\.0\.1$
allow ^192\.168\.1$
allow ^fdd5:\S*$

I configure my Munin nodes to listen to all interfaces (host *) and to allow access from localhost, my IPv4 LAN and my IPv6 LAN. Note that the allow lines are just regex rather than CIDR notation.

If you prefer to allow all connections and control access by some other means (such as ip6tables firewall rules), you can use just the following as your only allow line:

allow ^\S*$

Once done, you can verify that munin-node is listening on an IPv6 interface. :-)

ipv4host$ netstat -na | grep 4949
tcp 0 0 0.0.0.0:4949 0.0.0.0:* LISTEN
ipv6host$  netstat -na | grep 4949
tcp 0 0 :::4949 :::* LISTEN

I’ve created packages that solve these issues for EL 5 & EL 6 which are now available in my repos – essentially an upgraded perl-Net-Server package and an adjusted EPEL Munin package that includes the perl-IO-Socket-Net package as a dependency.

Twitter Auto Delete

Despite me making a clean break from Twitter earlier this year, I’ve ended up back on it on a casual basis, mostly due to the number of my friends on there who only chat or are only reachable via it. :-(

I decided that this time I’d like to treat Twitter more like an IRC chat room, ie a place to chat casually with friends, but not as a formal permanent record – so I made some tweaks to how I was using it:

  1. Primary interaction with Twitter is via PrplTwtr, a plugin for Pidgin, which makes Twitter act like any other chat room, to avoid the habit of having Twitter open in my browser being an invasive distraction. If friends @reply me or DM me, I get a new IM message notification, but otherwise I can ignore it happily.
  2. I wrote a small script that automatically goes and deletes all my Twitter messages after 24 hours – this is enough time for me to chat comfortably with friends, but makes it hard for outsiders to go and data mine my feed and it’s less of a permanent recordable cached record, or link to my tweets long term.

It’s not a perfect setup, whilst it prevents someone from casually going back and seeing my history and engagements with others, it doesn’t stop someone recording my tweets over an extended period to build up their own data pool about me, and of course I have no way of knowing if when I delete a tweet, if it really disappears from the pool of information that Twitter sells to data miners to use.

But it’s good enough that I can chat with friends and keep up-to-date with their lives without leaving a huge digital footprint for any randoms to trawl through.

There are some auto-deleter services around, but I didn’t trust any of them to not do malicious things with my account (eg spamming their presence), plus I wanted it to delete all my tweets *except* my blog post feed.

I found that there’s a pretty decent Twitter module for Python and decided to use this as an exercise to finally learn some proper Python, something I’ve somewhat avoided for lack of a good learning exercise.

The result is a simple Twitter auto-deleter script that is called by Cron every 4 hours and runs a check and deletes any tweets older than 24 hours – the basics is pretty simple really:

39    # query my user status list
40    mytimeline = api.GetUserTimeline(screen_name=user_name,count=query_quantity,include_rts=True)
41    
42    for status in mytimeline:
43    
44        if re.match("^New Blog Post", status.text):
45            #print "Blog post! No delete wanted"
46            continue
47    
48        if status.created_at_in_seconds < cond_time_before:
49            api.DestroyStatus(status.id)
50       
51            print "Deleting Tweet:"
52            print "- Created At: " + status.created_at
53            print "- Content: " + status.text

Note that with GetUserTimeline, you need to specify include_rts=True as an explicit option, so that it includes anything you’ve retweeted in the timeline returned.

Favorites are special wee critters and require a separate GetFavorites call, I don’t use Favorites, so wanted this delete to remove any favorites created by accidental miss-clicks.

You can check out my source here – if you want to run it on your own server, you’ll need to use your account to setup a dev API key and access tokens etc. And you may want to adjust things like the deletion of favorites or retention of blog posts.

I’ve pondered turning this into a simple web-hosted service for people to use, so if you’re the sort of person who can’t use this script yourself but would like the ability to auto-delete your tweets, let me know and I’ll ponder doing it if there’s interest.

I’m sure Twitter will probably kill off more and more of these API calls in future, but at the moment they’re exposing just enough logic to enable me to do this. :-)

Do note that if you run this on a big account, you will hit the maximum API call limit VERY quickly, hence a configured query quantity limit to restrict how many tweets are loaded per execution – you could get away with several hundred every 60mins if you wanted to delete all your twitter history as fast as possible without actually blowing away the account.

Android alarm UI WTF

I like Android, but there are a few times the UX (User Experience) is a bit messed up compared with the way the user thinks. For example, take the newly introduced alarm clock time selection interface added in ICS:

So the alarm time selection gives me the ability to drag the time up/down, simple enough, most users understand dragging on touch screen devices. However if one decides to tap the up/down buttons instead…

I guess the developer decided that the up button should increase the time and the down should decrease which would make sense if it wasn’t for the fact that the user can see the preceding and following numbers which changes their perspective from the arrows being for numerical incrementing to the arrows being for sliding/rotating the displayed numbers on screen.

It’s even more annoying since it worked logically on pre-ICS devices only to be changed and broken in this confusing manner. :-(

gdisk, oh glorious gdisk

My file server virtual machine passed the 2TB limit a couple months ago, which forced me to get around to upgrading it to RHEL 6 and moving from MSDOS to GPT based partitions, as the MSDOS partitioning table doesn’t support more than 2TB partitions.

I recently had to boost it up by another 1 TB to counter growing disk usage and got stuck trying to resize the physical volume – the trusty old fdisk command doesn’t support GPT partitions, with most documentation resources directing you to use parted instead.

The problem with parted, is that the developers have tried to be clever and made parted filesystem aware, so it will perform filesystem operations as well as block partition operations. Secondly, parted writes changes whilst you’re making them rather than letting you discard or write the final results of your changes to the partition table.

This breaks really badly for my LVM physical volume partitions – as you can see below, parted has a resize command, but when used against an LVM volume it is unable to recognize it as a known type and fails with the very helpful “Error: Could not detect file system“.
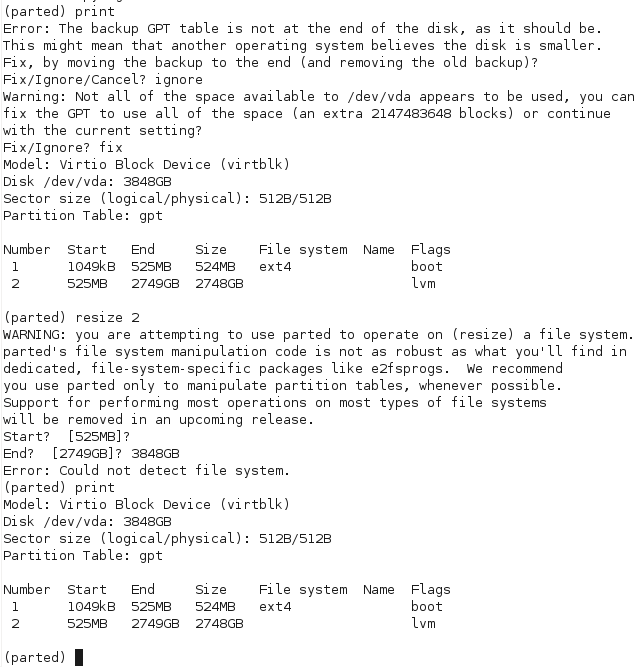
Naturally this didn’t put parted into my good books for the evening – doing a search of the documentation didn’t really clarify whether doing the old fdisk way or deleting and re-creating partitions at the same start and end positions was safe or not, but the documentation suggested that this is a destructive process. Seeing as I really didn’t feel like have to pull 2TB of data off backup, I chose caution and decided not to test that poorly documented behavior.

The other suggested option is to just add an additional partition and add it to LVM – whilst there’s no technical reason against this method, it really offended my OCD and the desire to keep my server’s partitioning table simple and logical – I don’t want lots of weirdly sized partitions littering the server from every time I’ve had to upsize the virtual machine!

Whilst cursing parted, I wondered whether there was a tool just like fdisk, but for GPT partition tables. Linux geeks do like to poke fun at fdisk for having a somewhat obscure user interface and basic feature set, but once you learn it, it’s a powerful tool with excellent documentation and it’s simplicity leads it to being able to perform a number of very tricky tasks, as long as the admin knows what they’re doing.

Doing some research lead me to gdisk, which as the name suggests, is a GPT capable clone of fdisk, providing a very similar user interface and functionality.

Whilst it’s not part of RHEL’s core package set, it is available in the EPEL repositories, hopefully these are acceptable to your environment:
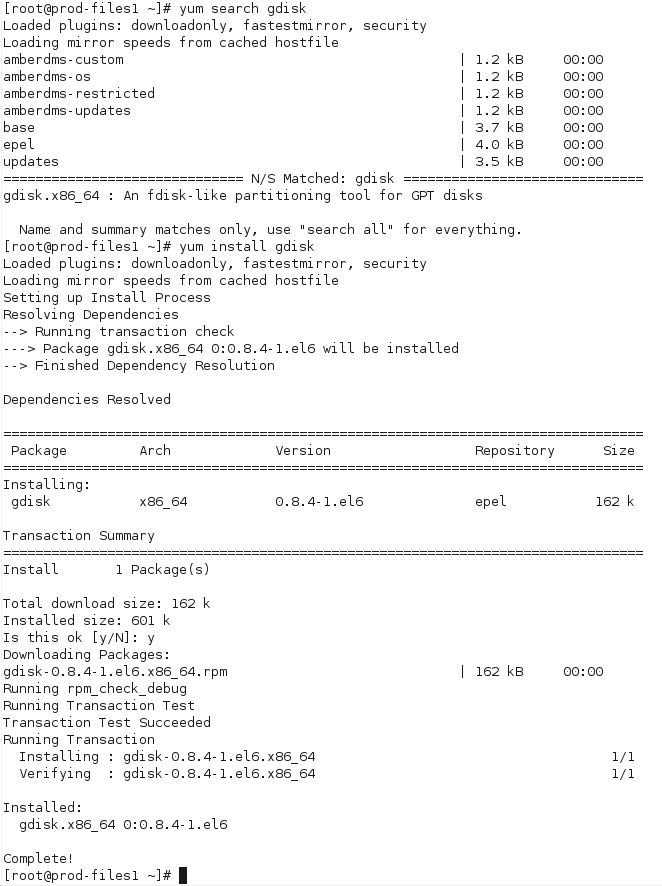
Once installed, it was a pretty simple process of loading gdisk and deleting the partition before expanding to the new size:
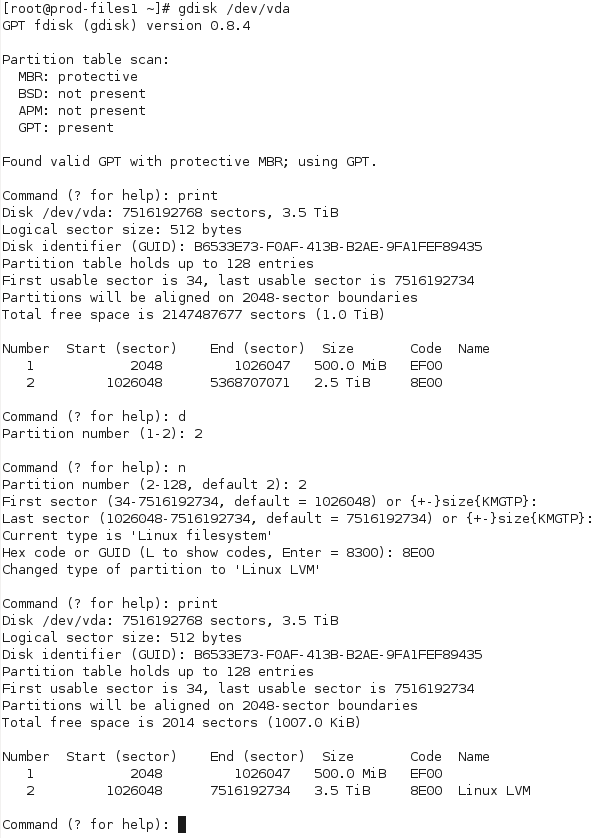
Most important is to verify that the start sector hasn’t changed between deleting the old partition and adding the new one – as long as these are the same and the partition is the same size or larger than the old one, everything will be OK.

Save and apply the changes:

On my RHEL 6 KVM virtio VM, I wasn’t able to get the OS to recognize the new partition size, even after running partprobe, so I had to reboot the VM.

Once rebooted, it was  a simple case of issuing pvresize and pvdisplay to confirm the new physical volume size – from there, I can then expand LVM logical volumes as desired.
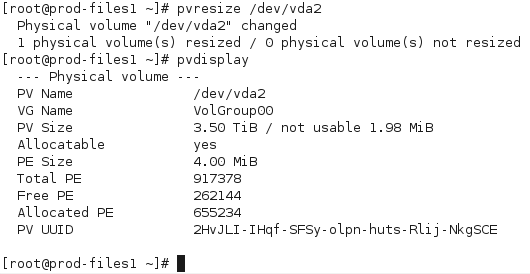


Note that pvresize is a bit annoying in that it won’t show any unallocated space – what is means by free PE, is free physical extents, disk that the LVM physical volume already occupies but which isn’t allocated to logical volumes yet. Until you run pvresize, you won’t see any change to the size of the volume.

So far gdisk looks pretty good, I suspect it will become a standard on my own Linux servers, but not being in the base RHEL repositories will limit usage a bit on commercial and client systems, which often have very locked down and limited package sets.

The fact that I need a partition table at all with my virtual machines is a bit of a pain, it would be much nicer if I could just turn the whole /dev/vda drive into a LVM physical volume and then boot the VM from an LVM partition inside the volume.

As things currently stand, it’s necessary to have a non-LVM /boot partition, so I have to create one small conventional partition for boot and a second partition consuming all remaining disk for actual data.

nagios check_disk trap

Let’s play spot the difference:

[root@localhost ~]# /usr/lib64/nagios/plugins/check_disk -w 20 -c 10 -p /home
DISK OK – free space: /home 111715 MB (4% inode=99%);| /home=2498209MB;2609905;2609915;0;2609925

[root@localhost ~]# /usr/lib64/nagios/plugins/check_disk -w 20% -c 10% -p /home
DISK CRITICAL – free space: /home 111715 MB (4% inode=99%);| /home=2498209MB;2087940;2348932;0;2609925

Make sure you that you define your units of disk or add % to your Nagios checks otherwise you might suddenly find yourself running to add more disk….

virt-viewer remote access tricks

Sometimes I need to connect directly to the console of my virtual machines, typically this is usually when working with development or experimental VMs where SSH/RDP/VNC isn’t working for whatever reason, or when I’m installing a new OS entirely.

To view virtual machines using libvirt (by both KVM or Xen), you use the virt-viewer command, this launches a window and establishes a VNC or SPICE connection into the virtual machine.

Historically I’ve just run this by SSHing into the virtual machine host and then using X11 forwarding to display the virtual machine window on my laptop. However this performs really badly on slow connections, particularly 3G where it’s almost unusable due to the design of X11 forwarding not being particularly efficient.

However virt-viewer has the capability to run locally and connect to a remote server, either directly to the libvirt daemon, or via an SSH tunnel. To do the latter, the following command will work for KVM (qemu) based hypervisors:

virt-viewer --connect qemu+ssh://user@host.example.com/system vmnamehere

With the above, you’ll have to enter your SSH password twice – first to establish the connection to the hypervisor and secondly to establish a tunnel to the VM’s VNC/SPICE session – you’ll probably quickly decide to get some SSH keys/certs setup to prevent annoyance. ;-)

This performs way faster than X11 forwarding, plus the UI of virt-manager stays much more responsive, including grabbing/ungrabbing of the local keyboard/mouse, even if the connection or server is lagging badly.

If you’re using Xen with libvirt, the following should work (I haven’t tested this, but based on the man page and some common sense):

virt-viewer --connect xen+ssh://user@host.example.com/ vmnamehere

If you wanted to open up the right ports on your server’s firewall and are sending all traffic via a secure connection (eg VPN), you can drop the +ssh and use –direct to connect directly to the hypervisor and VM without port forwarding via SSH.

LDAP & RADIUS centralised authentication

I recently did a presentation at the June AuckLUG meeting on configuring LDAP and RADIUS centralised authentication solutions.

It’s a little rough (first time I’ve done a presentation on the topic), but hopefully is of use to anyone interested in setting up an LDAP server. In my case I’m using an OpenLDAP server with my self-developed open source LDAPAuthManager tool.

You can watch the presentation (about 2 hours) on YouTube, it includes a lot of verbal and visual demonstrations, so conveys a lot more detail than the slides alone.

You can download a copy of the slides here if wanted (pdf).

Lenovo & tp-fan fun

I quite like my Lenovo X201i laptop, I’ve been using it for a couple years now and it’s turned out to be the ideal combination of size and usability – the 12″ form factor means I can carry it around easily enough, it has plenty of performance (particularly since I upgraded it to an SSD and 8GB of RAM) and I can see myself using it for the foreseeable future.

Unfortunately it does have a few issues… the crappy “Thinkpad Wireless” default card that comes in it caused me no end of headaches and the BIOS has always been a

Thankfully most of the major BIOS flaws have been resolved in part due to subsequent updates, but also thanks to the efforts of the Linux kernel developers to work around weird bits of the BIOS’s behavior.

Sadly not all issues have been resolved, in particular, the thermal management is still flawed and fails to adequately handle the maximum heat output of the laptop. I recently discovered that when you’re unfortunate enough to run some very CPU intensive single-threaded processes, by keeping 1/4 cores at 100% for an extended period of time the Lenovo laptop will overheat and issue an emergency thermal shutdown to the OS.

During this time the fan increases in speed, but still has quite a low noise level and airflow volume, which is very hot to the touch, it appears the issue is due to the Lenovo BIOS not ramping the fan speed up high enough to meet the heat being produced.

Thanks to the excellent Thinkwiki site, there’s detailed information on how you can force specific fan speeds using the thinkpad_acpi kernel module, as well as details on various scripts and fan control solutions people have written.

What’s interesting is that when running the fan on level 7 (the maximum speed), the fan still doesn’t spin particularly fast or loudly, no more than when the overheating occurs. But reading the wiki shows that there is a “disengaged” mode, where the fan will run at the true maximum system speed.

It appears to me that the BIOS has the 100% speed setting for the fan set at too low a threshold, the smart fix would be to correct the BIOS so that 100% is actually the true maximum speed of the fan and to scale up slowly to keep the CPU at a reasonable temperature.

In order to fix it for myself, I obtained the tp-fan program, which runs a python daemon to monitor and adjust the fan speeds in the system based on the configured options. Sadly it’s not able to scale between “100%” and “disengaged” speeds, meaning I have the choice of quiet running or loud running but no middle ground.

Thanks to tpfan’s UI, I was able to tweak the speed positions until I obtained the right balance, the fans will now run at up to 100% for all normal tasks, often sitting just under 50 degrees at 60% fan speed.

When running a highly CPU intensive task, the fan will jump up to the max speed and run at that until the temperature drops sufficiently.  In practice it’s worked pretty well, I don’t get too much jumping up and down of the fan speed and my system hasn’t had any thermal shutdowns since I started using it.

Whilst it’s clearly a fault with the Lenovo BIOS not handling the fans properly, it raised a few other questions for me:

  • Why does the OS lack logic to move CPU intensive tasks between cores? Shuffling high intensive loads between idle cores would reduce the heat and require less active cooling by the system fans – even on a working system that won’t overheat, this would be a good way to reduce power consumption.
  • Why doesn’t the OS have a feature to throttle the CPU clock speed down as the CPU temperature rises? It would be better than having the all or nothing approach that it currently enforces, better to have a slower computer than a fried computer.

Clearly I need some more free time to start writing kernel patches for my laptop, although I fear what new dangerous geeky paths this might lead me into. :-/