Tag Archives: puppet

Puppet Autosigning & Cloud Recommendations

I was over in Sydney this week attending linux.conf.au 2018 and made a short presentation at the Sysadmin miniconf regarding deploying Puppet in cloud environments.

The majority of this talk covers the Puppet autosigning process which is a big potential security headache if misconfigured. If you’re deploying Puppet (or even some other config management system) into the cloud, I recommend checking this one out (~15mins) and making sure your own setup doesn’t have any issues.


Puppet Training

I recently ran a training session for our development team at Fairfax introducing them to the fundamentals of Puppet.

To assist with this training, I’ve developed a bunch of scripts and learning modules which I’ve now open sourced at https://github.com/jethrocarr/puppet-training

Using these modules you can:

  • Provision a pre-configured Puppet master + Puppet client to use for exercises.
  • Learn the basics of an r10k/git workflow for Puppet modules.
  • Create a module and get used to Puppet resources like package, file and service.
  • Learn the basics of ordering and dependencies.
  • Use Hiera to set params.

It’s not as complete a course as I’d like. I did about half a day using these modules and another half the day adhoc. Ideally I’d like to finish off writing modules at some point, but it takes a reasonably long period to write anything like this and there’s only so many hours in a week :-)

Putting up here as they might be of interest to people. PRs are always welcome as well.

Building a mail server with Puppet

A few months back I rebuilt my personal server infrastructure and fully Puppetised everything, even the mail server. Because I keep having people ask me how to setup a mail server, I’ve gone and adjusted my Puppet modules to make them suitable for a wider audience and open sourced them.

Hence announcing – https://github.com/jethrocarr/puppet-mail

This module has been designed for hobbyists or small organisation mail server operators whom want an easy solution to build and manage a mail server that doesn’t try to be too complex. If you’re running an ISP with 30,000 mailboxes, this probably isn’t the module for you. But 5 users? Yourself only? Keep on reading!

Mail servers can be difficult to configure, particularly when figuring out the linking between MTA (eg Postfix) and LDA (eg Dovecot) and authentication (SASL? Cyrus? Wut?), plus there’s the added headaches of dealing with spam and making sure your configuration is properly locked down to prevent open relays.

By using this Puppet module, you’ll end up with a mail server that:

  • Uses Postfix as the MTA.
  • Uses Dovecot for providing IMAP.
  • Enforces SSL/TLS and generates a legitimate cert automatically with LetsEncrypt.
  • Filters spam using SpamAssassin.
  • Provides Sieve for server-side email filtering rules.
  • Simple authentication against PAM for easy management of users.
  • Supports virtual email aliases and multiple domains.
  • Supports CentOS (7) and Ubuntu (16.04).

To get started with this module, you’ll need a functional Puppet setup. If you’re new to Puppet, I recommend reading Setting up and using Pupistry for a master-less Puppet setup.

Then it’s just a case of adding the following to r10k to include all the modules and dependencies:

mod 'puppetlabs/stdlib'

# EPEL & Jethro Repo modules only required for CentOS/RHEL systems
mod 'stahnma/epel'
mod 'jethrocarr/repo_jethro'

# Note that the letsencrypt module needs to be the upstream Github version,
# the version on PuppetForge is too old.
mod 'letsencrypt',
  :git    => 'https://github.com/danzilio/puppet-letsencrypt.git',
  :branch => 'master'

# This postfix module is a fork of thias/puppet-postfix with some fixes
# to make it more suitable for the needs of this module. Longer-term,
# expect to merge it into this one and drop unnecessary functionality.
mod 'postfix',
  :git    => 'https://github.com/jethrocarr/puppet-postfix.git',
  :branch => 'master'

And the following your Puppet manifests (eg site.pp):

class { '::mail': }

And in Hiera, define the specific configuration for your server:

mail::server_hostname: 'setme.example.com'
mail::server_label: 'My awesome mail server'
mail::enable_antispam: true
mail::enable_graylisting: false
mail::virtual_domains:
 - example.com
mail::virtual_addresses:
  'nickname@example.com': 'user'
  'user@example.com': 'user'

That’s all the Puppet config done! Before you apply it to the server, you also need to make sure both your forward and reverse DNS is correct in order to be able to get the SSL/TLS cert and also to ensure major email providers will accept your messages.

$ host mail.example.com
mail.example.com has address 10.0.0.1

$ host 10.0.0.1
1.0.0.10.in-addr.arpa domain name pointer mail.example.com.

For each domain being served, you need to setup MX records and also a TXT record for SPF:

$ host -t MX example.com
example.com mail is handled by 10 mail.example.com.

$ host -t TXT example.com
example.com descriptive text "v=spf1 mx -all"

Note that SPF used to have it’s own DNS type, but that was replaced in favour of just using TXT.

The example above tells other mail servers that whatever system is mentioned in the MX record is a legitmate mail server for that domain. For details about what SPF records and what their values mean, please refer to the OpenSPF website.

Finally, you should read the section on firewalling in the README, there are a number of ports that you’ll probably want to restrict to trusted IP ranges to prevent attackers trying to force their way into your system with password guess attempts.

Hopefully this ends up being useful to some people. I’ve replaced my own internal-only module for my mail server with this one, so I’ll continue to dogfood it to make sure it’s solid.

That being said, this module is new and deals with a complex configuration so I’m sure there will be some issues people run into – please raise any problems you have on the Github issues page and I’ll do my best to assist where possible.

Faking a Time Capsule with a GNU/Linux server

Apple MacOS’s Time Machine feature is a great backup solution for general desktop use, but has some annoying limitations such as only working with either locally attached storage devices or with Apple’s Time Capsule devices.

Whilst the Time Capsules aren’t bad devices, they offer a whole bunch of stuff I already have and don’t need – WiFi access point, ethernet router, and network attached storage and they’re not exactly cheap either. They also don’t help anyone wanting to backup to an off-site cloud server/VPS via a VPN.

So instead of a Time Capsule, I’m using a project called netatalk to allow a GNU/Linux server to provide an AFP file share to MacOS which acts as a Time Machine suitable target.

There’s an annoyance with Time Machine where it only officially works with AFP shares specially flagged as “Time Machine” shares. So whilst Apple has embraced SMB2 as the file sharing protocol of future use, you can’t use SMB2 for Time Machine backups (Well technically you can by enabling unsupported volumes in MacOS, but then you lack the ability to restore from backup via the MacOS recovery tools).

To make life easy, I’ve written a Puppet module that install netatalk and configures a Debian GNI/Linux server to act as a Time Capsule for all local users.

After installing the Puppet module (r10k or puppet module tools), you can simply define the directory and how much space to report to each client:

class { 'timemachine':
  location     => '/mnt/backup/timemachine',
  volsizelimit => '1000000', # 1TB per user backing up
}

To setup each MacOS machine, you will need to first connect to the share using Finder. You can do this with Finder -> Go -> Connect to Server and then entering afp://SERVERNAME and authenticating with your PAM credentials for the server.

After connecting, the share should now appear under Time Machine preferences. If you experience any issues connecting, check the /var/log/afpd.log file for debug information on the server – common issues include not having created the directories for the shares or having incorrect permissions on them.

Easy IKEv2 VPN for mobile devices (inc iOS)

I recently obtained an iPhone and needed to connect it to my VPN. However my existing VPN server was an OpenVPN installation which works lovely on traditional desktop operating systems and Android, but the iOS client is a bit more questionable having last been updated in September 2014 (pre iOS 9).

I decided to look into what the “proper” VPN option would be for iOS in order to get something that should be supported by the OS as smoothly as possible. Last time I looked this was full of wonderful horrors like PPTP (not actually encrypted!!) and L2TP/IPSec (configuration hell), so I had always avoided like the plague.

However as of iOS 9+, Apple has implemented support for IKEv2 VPNs which offers an interesting new option. What particularly made this option attractive for me, is that I can support every device I have with the one VPN standard:

  • IKEv2 is built into iOS 9 and MacOS El Capitan.
  • IKEv2 is built into Windows 10.
  • Works on Android with a third party client (hopeful for native integration soonish?).
  • Naturally works on GNU/Linux.

Whilst I love OpenVPN, being able to use the stock OS features instead of a third party client is always nice, particularly on mobile where power management and background tasks behaviour can be interesting.

IKEv2 on mobile also has some other nice features, such as MOBIKE, which makes it very seamless when switching between different networks (like the cellular to WiFi dance we do constantly with phones/tablets). This is something that OpenVPN can’t do – whilst it’s generally fast and reliable at establishing a connection, a change in the network means issuing a reconnect, it doesn’t just move the current connection across.


Given that I run GNU/Linux servers, I went for one of the popular IPSec solutions available on most distributions – StrongSwan.

Unfortunately whilst it’s technical capabilities are excellent, it’s documentation isn’t great. Best way to describe it is that every option is documented, but what options and why you’d want to use them? Not so much. The “left” vs “right” style documentation is also a right pain to work with, it’s not a configuration format that reads nicely and clearly.

Trying to find clear instructions and working examples of configurations for doing IKEv2 with iOS devices was also difficult and there’s some real traps for young players such as generating SHA1 certs instead of SHA2 when using the tools with defaults.

The other fun is that I also wanted my iOS device setup properly to:

  1. Use certificate based authentication, rather than PSK.
  2. Only connect to the VPN when outside of my house.
  3. Remain connected to the VPN even when moving between networks, etc.

I found the best way to make it work, was to use Apple Configurator to generate a .mobileconfig file for my iOS devices that includes all my VPN settings and certificates in an easy-to-import package, but also (critically) allows me to define options that are not selectable to end users, such as on-demand VPN establishment.


After a few nights of messing around and cursing the fact that all the major OS vendors haven’t just implemented OpenVPN, I managed to get a working connection. To avoid others the same pain, I considered writing a guide – but it’s actually a really complex setup, so instead I decided to write a Puppet module (clone from github / or install from puppetforge) which does the following heavy lifting for you:

  • Installs StrongSwan (on a Debian/derived GNU/Linux system).
  • Configures StrongSwan for IKEv2 roadwarrior style VPNs.
  • Generates all the CA, cert and key files for the VPN server.
  • Generates each client’s certs for you.
  • Generates a .mobileconfig file for iOS devices so you can have a single import of all the configuration, certs and ondemand rules and don’t have to have a Mac to use Apple Configurator.

This means you can save yourself all the heavy lifting and setup a VPN with as little as the following Puppet code:

class { 'roadwarrior':
   manage_firewall_v4 => true,
   manage_firewall_v6 => true,
   vpn_name           => 'vpn.example.com',
   vpn_range_v4       => '10.10.10.0/24',
   vpn_route_v4       => '192.168.0.0/16',
 }

roadwarrior::client { 'myiphone':
  ondemand_connect       => true,
  ondemand_ssid_excludes => ['wifihouse'],
}

roadwarrior::client { 'android': }

The above example sets up a routed VPN using 10.10.10.0/24 as the VPN client range and routes the 192.168.0.0/16 network behind the VPN server back through. (Note that I haven’t added masquerading options yet, so your gateway has to know to route the vpn_range back to the VPN server).

It then defines two clients – “myiphone” and “android”. And in the .mobileconfig file generated for the “myiphone” client, it will specifically generate rules that cause the VPN to maintain a constant connection, except when connected to a WiFi network called “wifihouse”.

The certs and .mobileconfig files are helpfully placed in  /etc/ipsec.d/dist/ for your rsync’ing pleasure including a few different formats to help load onto fussy devices.


Hopefully this module is useful to some of you. If you’re new to Puppet but want to take advantage of it, you could always check out my introduction to Puppet with Pupistry guide.

If you’re not sure of my Puppet modules or prefer other config management systems (or *gasp* none at all!) the Puppet module should be fairly readable and easy enough to translate into your own commands to run.

There a few things I still want to do – I haven’t yet done IPv6 configuration (which I’ll fix since I run a dual-stack network everywhere) and I intend to add a masquerade firewall feature for those struggling with routing properly between their VPN and LAN.

I’ve been using this configuration for a few weeks on a couple iOS 9.3.1 devices and it’s been working beautifully, especially with the ondemand configuration which I haven’t been able to do on any other devices (like Android or MacOS) yet unfortunately. The power consumption overhead seems minimal, but of course your mileage may vary.

It would be good to test with Windows 10 and as many other devices as possible. I don’t intend for this module to support non-roadwarrior type configs (eg site-to-site linking) to keep things simple, but happy to merge any PRs that make it easier to connect more mobile devices or branch routers back to a main VPN host. Also happy to merge PRs for more GNU/Linux distribution support- currently only support Debian/Ubuntu, but it shouldn’t be hard to add others.

If you’re on Android, this VPN will work for you, but you may find the OpenVPN client better and more flexible since the Android client doesn’t have the same level of on demand functionality that iOS has built in. You may also find OpenVPN a better option if you’re regularly using restrictive networks that only allow “HTTPS” out, since it can be run on TCP/443, whereas StrongSwan IKEv2 runs on UDP port 500 or 4500.

Secure Hiera data with Masterless Puppet

One of the biggest limitations with masterless Puppet is keeping Hiera data secure. Hiera is a great way for separating site-specific information (like credentials) from your Puppet modules without making a huge mess of your sites.pp. On a traditional Puppet master environment, this works well since the Puppet master controls access to the Hiera data and ensures that client servers only have access to credentials that apply to them.

With masterless puppet this becomes difficult since all clients have access to the full set of Hiera data, which means your webserver might have the ability to query the database server’s admin password – certainly not ideal.

Some solutions like Hiera-eyaml can still be used, but they require setting up different keys for each server (or group of servers) which is a pain with masterless, especially when you have one value you wish to encrypted for several different servers.

To solve this limitation for Pupistry users, I’ve added a feature “HieraCrypt” in Pupistry version 1.3.0 that allows the hieradata directory to be encrypted and filtered to specific hosts.

HieraCrypt works, by generating a cert on each node (server) you use with the pupistry hieracrypt --generate parameter and saving the output into your puppetcode repository at hieracrypt/nodes/HOSTNAME. This output includes a x509 cert made against the host’s SSH RSA host key and a JSON array of all the facter facts on that host that correlate to values inside the hiera.yaml file.

When you run Pupistry on your build workstation, it parses the hiera.yaml file for each environment and generates a match of files per-node. It then encrypts these files and creates an encrypted package for each node that only they can decrypt.

For example, if your hiera.yaml file looks like:

:hierarchy:
  - "environments/%{::environment}"
  - "nodes/%{::hostname}"
  - common

And your hieradata directory looks like:

hieradata/
hieradata/common.yaml
hieradata/environments
hieradata/nodes
hieradata/nodes/testhost.yaml
hieradata/nodes/foobox.yaml

When Pupistry builds the artifact, it will include the common.yaml file for all nodes, however the testhost.yaml file will only be included for node “testhost” and of course foobox.yaml will only be available on node “foobox”.

The selection of matching files is then encrypted against each host’s certificate and bundled into the artifact. The end result is that whilst all nodes have access to the same artifact, nodes can only decrypt the Hiera files relating to them. Provided you setup your Hiera structure properly, you can make sure your webserver can’t access your database server credentials and vice-versa.


More Puppet Stuff

I’ve been continuing to migrate to my new server setup and Puppetising along the way, the outcome is yet more Puppet modules:

  1. The puppetlabs-firewall module performs very poorly with large rulesets, to work around this with my geoip/rirs module, I’ve gone and written puppet-speedychains, which generates iptables chains outside of the one-rule, one-resource Puppet logic. This allows me to do thousands of results in a matter of seconds vs hours using the standard module.
  2. If you’re doing Puppet for any more than a couple of users and systems, at some point you’ll want to write a user module that takes advantage of virtual users to make it easy to select which systems should have a specific user account on it. I’ve open sourced my (very basic) virtual user module as a handy reference point, including examples on how to use Hiera to store the user information.

Additionally, I’ve been working on Pupistry lightly, including building a version that runs on the ancient Ruby 1.8.7 versions found on RHEL/CentOS 5 & 6. You can check out this version in the legacy branch currently.

I’m undecided about whether or not I merge this into the main branch, since although it works fine on newer Ruby versions, I’m not sure if it could limit me significantly in future or not, so it might be best to keep the legacy branch as special thing for ancient versions only.

Finding & purging Puppet exported resources

Puppet exported resources is a pretty awesome feature – essentially it allows information from one node to be used on another to affect the resulting configuration. We use this for clever things like having nodes tell an Icinga/Nagios server what monitoring configuration should be added for them.

Of course like everything in the Puppet universe, it’s not without some catch – the biggest issue I’ve run into is that if you have a mistake and generate bad exported resources it can be extremely hard to find which node is responsible and take action.

For example, recently my Puppet runs started failing on the monitoring server with the following error:

Error: Could not retrieve catalog from remote server: Error 400 on SERVER: A duplicate resource was found while collecting exported resources, with the type and title Icinga2::Object::Service[Durp Service Health Check] on node failpet1.nagios.example.com

The error is my fault, I forgot that exported resources must have globally unique names across the entire fleet, so I ended up with 2x “Durp Service Health Check” resources.

The problem is that it’s a big fleet and I’m not sure which of the many durp hosts is responsible. To make it more difficult, I suspect they’ve been deleted which is why the duplication clash isn’t clearing by itself after I fixed it.

Thankfully we can use the Puppet DB command line tools on the Puppet master to search the DB for the specific resource and find which hosts it is:

# puppet query nodes \
--puppetdb_host puppetdb.infrastructure.example.com \
"(@@Icinga2::Object::Service['Durp Service Health Check'])"

durphost1312.example.com
durphost3436.example.com

I can then purge all their data with:

# puppet node deactivate durphost1312.example.com
Submitted 'deactivate node' for durphost1312.example.com with UUID xxx-xxx-xxx-xx

In theory deleted hosts shouldn’t have old data in PuppetDB, but hey, sometimes our decommissioning tool has bugs… :-/

Puppet modules

I’m in the middle of doing a migration of my personal server infrastructure from a 2006-era colocation server onto modern cloud hosting providers.

As part of this migration, I’m rebuilding everything properly using Puppet (use it heavily at work so it’s a good fit here) with the intention of being able to complete server builds without requiring any manual effort.

Along the way I’m finding gaps where the available modules don’t quite cut it or nobody seems to have done it before, so I’ve been writing a few modules and putting them up on GitHub for others to benefit/suffer from.


puppet-hostname

https://github.com/jethrocarr/puppet-hostname

Trying to do anything consistently with host naming is always fun, since every organisation or individual has their own special naming scheme and approach to dealing with the issue of naming things.

I decided to take a different approach. Essentially every cloud provider will give you a source of information that could be used to name your instance whether it’s the AWS Instance ID, or a VPS provider passing through the name you gave the machine at creation. Given I want to treat my instances like cattle, an automatic soulless generated name is perfect!

Where they fall down, is that they don’t tend to setup the FQDN properly. I’ve seen a number of solution to this including user data setup scripts, but I’m trying to avoid putting anything in user data that isn’t 100% critical and sticking to my Pupistry bootstrap so I wanted to set my FQDN via Puppet itself.

(It’s even possible to set the hostname itself if desired, you can use logic such as tags or other values passed in as facts to define what role a machine has and then generate/set a hostname entirely within Puppet).

Hence puppet-hostname provides a handy way to easily set FQDN (optionally including the hostname itself) and then trigger reloads on name-dependent services such as syslog.

None of this is revolutionary, but it’s nice getting it into a proper structure instead of relying on yet-another-bunch-of-userdata that’s specific to my systems. The next step is to look into having it execute functions to do DNS changes on providers like Route53 so there’s no longer any need for user data scripts being run to set DNS records at startup.


puppet-rirs

https://github.com/jethrocarr/puppet-rirs

There are various parts of my website that I want to be publicly reachable, such as the WordPress login/admin sections, but at the same time I also don’t want them accessible by any muppet with a bot to try and break their way in.

I could put up a portal of some kind, but this then breaks stuff like apps that want to talk with those endpoints since they can’t handle the authentication steps. What I can do, is setup a GeoIP rule that restricts access to the sections to the countries I’m actually in, which is generally just NZ or AU, to dramatically reduce the amount of noise and attempts people send my way, especially given most of the attacks come from more questionable countries or service providers.

I started doing this with mod_geoip2, but it’s honestly a buggy POS and it really doesn’t work properly if you have both IPv4 and IPv6 connections (one or another is OK). Plus it doesn’t help me for applications that support IP ACLs, but don’t offer a specific GeoIP plugin.

So instead of using GeoIP, I’ve written a custom Puppet function that pulls down the IP assignment lists from the various Regional Internet Registries and generate IP/CIDR lists for both IPv4 and IPv6 on a per-country basis.

I then use those lists to populate configurations like Apache, but it’s also quite possible to use it for other purposes such as iptables firewalling since the generated lists can be turned into Puppet resources. To keep performance sane, I cache the processed output for 24 hours and merge any continuous assignment blocks.

Basically, it’s GeoIP for Puppet with support for anything Puppet can configure. :-)


puppet-digitalocean

https://github.com/jethrocarr/puppet-digitalocean

Provides a fact which exposes details from the Digital Ocean instance API about the instance – similar to how you get values automatically about Amazon EC2 systems.


puppet-initfact

https://github.com/jethrocarr/puppet-initfact

The great thing about the open source world is how we can never agree so we end up with a proliferation of tools doing the same job. Even init systems are not immune, with anything tha intends to run on the major Linux distributions needing to support systemd, Upstart and SysVinit at least for the next few years.

Unfortunately the way that I see most Puppet module authors “deal” with this is that they simply write an init config/file that suits their distribution of choice and conveniently forget the other distributions. The number of times I’ve come across Puppet modules that claim support for Red Hat and Amazon Linux but only ship an Upstart file…. >:-(

Part of the issue is that it’s a pain to even figure out what distribution should be using what type of init configuration. So to solve this, I’ve written a custom Fact called “initsystem” which exposes the primary/best init system on the specific system it’s running on.

It operates in two modes – there is a curated list for specific known systems and then fallback to automatic detection where we don’t have a specific curated result handy.

It supports (or should) all major Linux distributions & derivatives plus FreeBSD and MacOS. Pull requests for others welcome, could do with more BSD support plus maybe even support for Windows if you’re feeling brave.


puppet-yas3fs

https://github.com/pcfens/puppet-yas3fs/commit/27af462f1ce2fe0610012a508236062e65017b5f

Not my module, but I recently submitted a PR to it (subsequently merged) which introduces support for a number of different distributions via use of my initfact module so it should now run on most distributions rather than just Ubuntu.

If you’re not familiar with yas3fs, it’s a FUSE driver that turns S3+SNS+SQS into a shared filesystem between multiple servers. Ideal for dealing with legacy applications that demand state on disk, but don’t require high I/O performance, I’m in the process of doing a proof-of-concept with it and it looks like it should work OK for low activity sites such as WordPress, although with no locking I’d advise against putting MySQL on it anytime soon :-)


These modules can all be found on GitHub, as well as the Puppet Forge. Hopefully someone other than myself finds them useful. :-)
Baking images with Packer & Pupistry

One of the common issues when building modern infrastructure-as-code style systems is that whilst automation is great, it also has a habit of failing at the worst possible time. There’s nothing quite like the fun of trying to autoscale only to find that a newer version of a package breaks compatibility or the repository mirror or Puppet master has gone offline breaking the whole carefully tuned process.

Naturally this is an issue. And whilst I’ve seen some organisations simply ignore the issue and place trust in their repos and configuration management servers, I’m also too pessimistic about technology to trust numerous components for any mission critical applications.

Fortunately there is a solution – we can bake a machine image that has all the applications and configuration pre-applied, so that autoscaling has no third party dependencies (or as close to no dependencies as we can get).

Baking has negative connotations of the bad old days when engineers would assemble custom machine images by hand and then copy them to build new systems, but it doesn’t have to be that way. We can still respect infrastructure-as-code principals and use modern tools like Puppet and Packer to reliably build consistent images as needed.

These images could be as simple as a base AMI image for Amazon AWS which includes the stock OS image plus your Puppet setup. Or they could be as complex as a fully configured and provisioned application server ready-to-go at the first boot.

To make baking images easier, I’ve added support for generating Packer templates pre-loaded with bootstrap data into Pupistry, making it quick and easy to get started. Here’s how you can use it:

Assumptions/prerequisites:

  • You’ve already got Pupistry setup and functional (No? Read the tutorial here)
  • You’ve installed the third party Packer utility.
  • You have an Amazon AWS account for doing the AMI build. Note that Packer isn’t exclusive to Amazon, so you can also use the same technique with other providers including Digital Ocean and OpenStack – but you’ll have to write your own template.

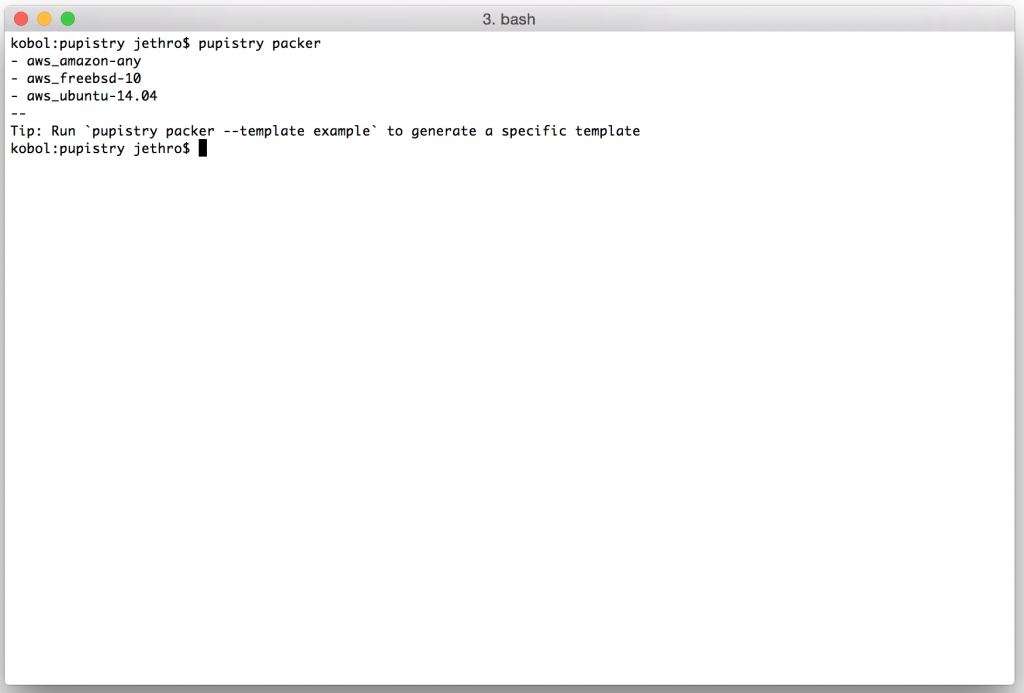
First we can list what Packer templates are available with Pupistry. If the OS/platform of your choice isn’t included, it’s not particularly hard to add it – these are mostly intended to provide a good starting point for customising your own.

pupistry packer

Screen Shot 2015-05-31 at 23.57.20

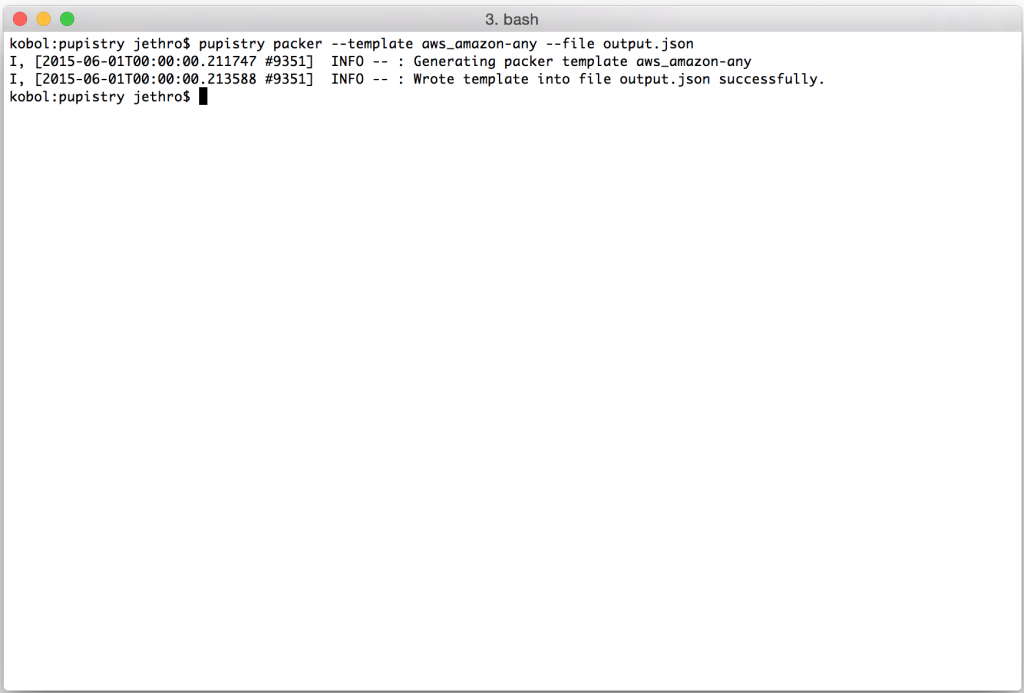
We can select a template with –template NAME and also pass the resulting output to a file with –file NAME.  The following will build an Amazon Linux template pre-loaded with Pupistry and the default manifest applied:

pupistry packer --template aws_amazon-any --file output.json

Screen Shot 2015-06-01 at 00.00.01

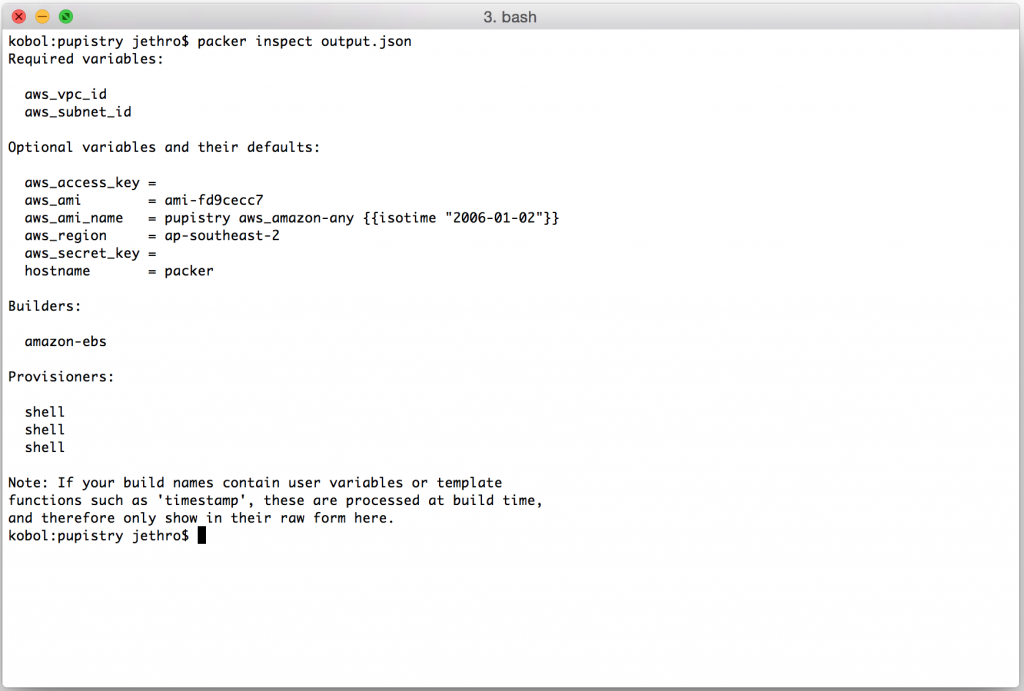
The generated template is a JSON file that includes various instructions to Packer on how to build the image, as well as the bootstrap data that can also be generated independently with pupistry bootstrap. Various variables can be tweaked, we can export out the variables available and see their default settings with:

packer inspect output.json

Screen Shot 2015-06-01 at 00.02.00

You can see here that we must set a VPC ID and Subnet ID – this is because they differ per AWS account and need to be provided. (Side note: technically you can do EC2 classic with Packer and avoid this, but the VPC instance types like t2 are cheaper to run… and we like cheap :-).

The AWS Region and AWS AMI values are interlinked. If you choose to build for a different region, eg us-west-1, you will need to lookup the appropriate AMI ID for that region and change both the aws_ami and aws_region variables when you bake your image. For some reason Amazon chose to make their AMI IDs specific to a particular region which really does make life a bit more difficult than it really needs to be. :-(

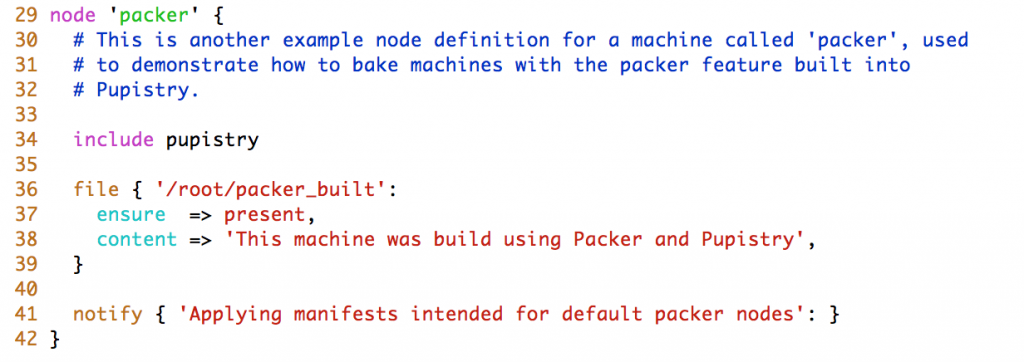
The hostname is worth noting. By default we set it to “packer” so you can target your manifests to handle it specifically, but you could make this anything you wanted such as a particular machine or application type. When using the sample puppet repo that ships by default with Pupistry, we have defined specific configuration to run on the Packer built images:

Screen Shot 2015-06-01 at 00.09.08

Assuming we are happy with the defaults, we just have to set the VPC and Subnet IDs to launch the current image in ap-southeast-2.

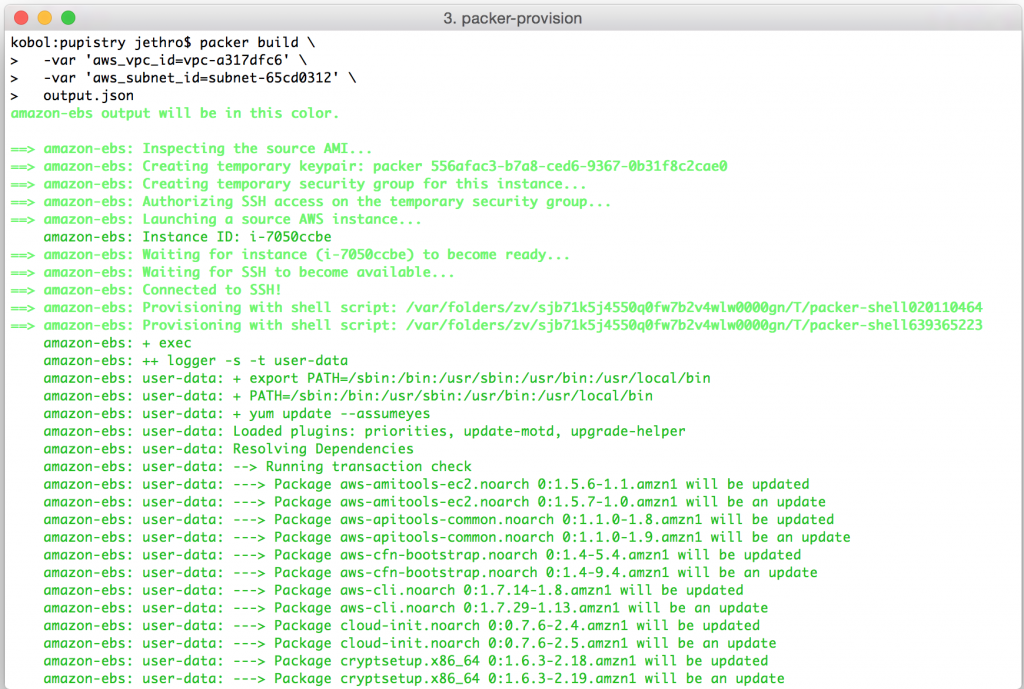
packer build \
 -var 'aws_vpc_id=vpc-example' \
 -var 'aws_subnet_id=subnet-example' \
 output.json

As soon as we kick off, we can see that Packer has built a machine in our AWS account to use for the image generation process.

Screen Shot 2015-06-01 at 00.13.53


It can take up to a minute for the machine to become available via SSH. Once this happens, Packer opens a connection and starts to feed in the bootstrap commands that have been added into the template by Pupistry.

Screen Shot 2015-06-01 at 00.14.23

This process can take a number of minutes – remember you’re having to install all the various OS updates and then packages and dependencies needed to run Puppet and of course Pupistry itself.

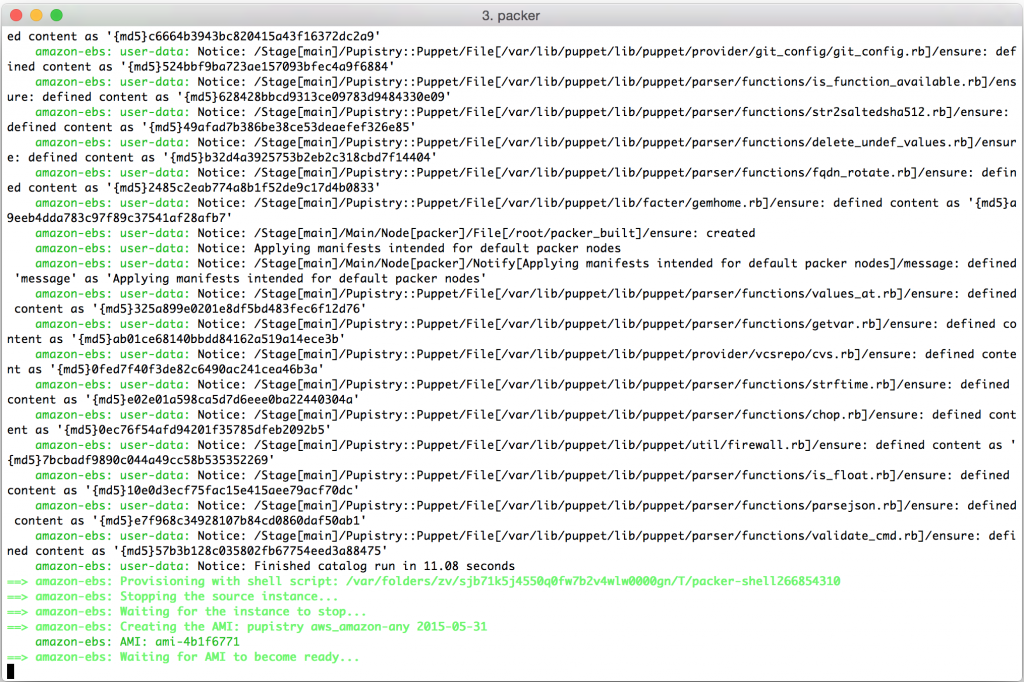
Once all the dependencies are done, Pupistry will run and provision the machine with your Puppet manifests and then return the ID of the AMI that has been generated:

Screen Shot 2015-06-01 at 00.31.57


We can see that Packer has now terminated our temporary machine:

Screen Shot 2015-06-01 at 00.22.28

And given us a shiny new AMI in return:

Screen Shot 2015-06-01 at 00.34.14


We can now use that AMI to launch a new machine and check out what Pupistry did. For convenience, there is a launch button on the AMI page that will build a new machine for the selected AMI, however you can also take the AMI ID and use it in CloudFormation, from the API or from the usual instance creation screen.

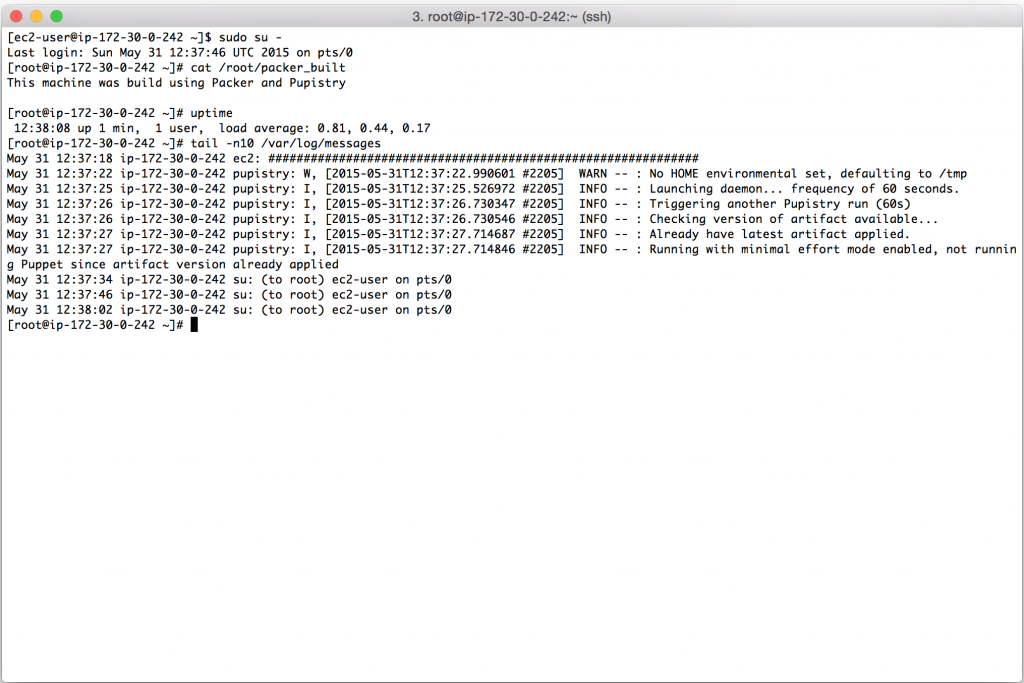
Connecting to the newly spun up instance using our fresh AMI, we can see that it has had the Pupistry rules for the packer node applied and we can also set that the daemon is configured and running in the background.

Except that it took less than 1 minute, rather than needing 5+ minutes to do all the usual updates and dependency installation. And there was no risk of a broken repository or package preventing the launch of our machine. If it was an application server, we could have preloaded it and thrown it right into an ELB within 1 minute after it starting up – that’s ideal for autoscaling!

Screen Shot 2015-06-01 at 00.38.28

Packer supports a number of different options and different providers, so don’t be afraid to pull it down and experiment. You can even write your own custom providers if needed.

Sure you could always just write a script that does all the same things as Packer for your cloud provider of choice, but Packer provides a solid framework for doing this stuff in a reliable and reproducible way saving you time and keeping complexity down.